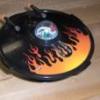
mr moto Posted December 7, 2021 Share Posted December 7, 2021 (edited) What to say? This one's a sort of holy grail (really, any Studebaker Hawk is) and it took me 10 years (not continuous!) and it's been a struggle most of the way but it all feels good now! It's decked out in the most mid 50's color scheme possible and certainly the most poetically named. Sunglow and Yellowstone. These low contrast, subtle two-tones made a big splash in the mid 50's but have disappeared ever since. The car itself was one of the first to use what became the classic muscle car formula of "stick a big engine in a car that was intended for a smaller engine". It has a 352 inch "Sky Power" that was intended for use in Packards. In a 1956 comparison test, Speed Age magazine declared it the fastest American "sports car". It was up against Corvette, Thunderbird and Chrysler 300B. Anyway, here it is and I hope you like. Photos came out kind of fuzzy. I'll have to work on that in the future. See hi-tech photo booth below. Edited December 7, 2021 by mr moto 1 Quote Link to comment Share on other sites More sharing options...
espo Posted December 7, 2021 Share Posted December 7, 2021 Beautiful looking finishes and the trim detailing is outstanding. I got to followed your build and I think you might want to post a link for anyone who didn't so that thay can better appreciate all that you have done here. Quote Link to comment Share on other sites More sharing options...
PappyD340 Posted December 7, 2021 Share Posted December 7, 2021 Outstanding! Quote Link to comment Share on other sites More sharing options...
Mike C Posted December 7, 2021 Share Posted December 7, 2021 Looks really good! Quote Link to comment Share on other sites More sharing options...
charger74 Posted December 8, 2021 Share Posted December 8, 2021 It looks great Quote Link to comment Share on other sites More sharing options...
happy grumpy Posted December 8, 2021 Share Posted December 8, 2021 Not only is the subject rare and interesting, but the rendition is stellar, this is absolutely a show stopper for me. I wish there were more demand for odd ball cars like this but alas we are outnumbered and outgunned (sigh).😢 You did an awesome job. Quote Link to comment Share on other sites More sharing options...
mr moto Posted December 8, 2021 Author Share Posted December 8, 2021 8 hours ago, espo said: I got to followed your build and I think you might want to post a link for anyone who didn't so that thay can better appreciate all that you have done here. Thank you for the suggestion! I'll add that link. And thank you to everyone for the nice words about my work. http://www.modelcarsmag.com/forums/topic/165044-1956-studebaker-golden-hawk-56j/ Quote Link to comment Share on other sites More sharing options...
mr moto Posted December 8, 2021 Author Share Posted December 8, 2021 41 minutes ago, happy grumpy said: I wish there were more demand for odd ball cars like this but alas we are outnumbered and outgunned (sigh).😢 We may be outnumbered but I have some ammo socked away for future use! Quote Link to comment Share on other sites More sharing options...
Kah puts Posted December 8, 2021 Share Posted December 8, 2021 Lifting all them weights payed off, what a great looking Studebaker. Your tint looks like the bottom of an old small Coke bottle, kudos. Quote Link to comment Share on other sites More sharing options...
Zippi Posted December 8, 2021 Share Posted December 8, 2021 I really like this one. Great color and love the dual antenna's. What a super clean build. My first car was my Grandfathers 57 Studebaker. Quote Link to comment Share on other sites More sharing options...
Classicgas Posted December 9, 2021 Share Posted December 9, 2021 Wow! Resin or a conversion of the amt kit? Quote Link to comment Share on other sites More sharing options...
NOBLNG Posted December 9, 2021 Share Posted December 9, 2021 I don’t like it one bit….I love it! Excellent workmanship there to get it looking like the real thing! 👍👍 Quote Link to comment Share on other sites More sharing options...
TransAmMike Posted December 9, 2021 Share Posted December 9, 2021 Oh yeah Manuel, great looking Golden Hawk👍....and, Geaux Tigers😄 Quote Link to comment Share on other sites More sharing options...
Dominik Posted December 10, 2021 Share Posted December 10, 2021 well built Stude! it looks perfect. Quote Link to comment Share on other sites More sharing options...
ChrisR Posted December 10, 2021 Share Posted December 10, 2021 Awesome! Quote Link to comment Share on other sites More sharing options...
Tom99 Posted December 10, 2021 Share Posted December 10, 2021 Beautiful!! Quote Link to comment Share on other sites More sharing options...
ATHU Posted December 10, 2021 Share Posted December 10, 2021 Stunning build, looks fantastic!!👍 Quote Link to comment Share on other sites More sharing options...
mr moto Posted December 10, 2021 Author Share Posted December 10, 2021 On 12/8/2021 at 6:22 PM, Classicgas said: Wow! Resin or a conversion of the amt kit? It's some of each plus a dollop of scratch building. The body is from R&R Resin but I re-mastered the hood and front bumper/grill assembly and did other needed mods also. You can check out the link to the workbench thread in one of the previous threads and get more details. Quote Link to comment Share on other sites More sharing options...
MrObsessive Posted December 10, 2021 Share Posted December 10, 2021 Manuel, this is BEYOND gorgeous! You're the only one I've seen take this kit and make a brilliant gem out of it! Many years ago, I got this kit from Ray, but what stopped me was the Packard engine that was needed among other things. With your suggestions, I've since bought a Cadillac parts pack engine which can now give me the basic "bones" to get it correct. Thanks for finishing this one up..........Studebaker Hawks are among my favorite of vintage '50's/'60's cars out there, and it's too bad that there aren't more kits of these available. Quote Link to comment Share on other sites More sharing options...
dave branson Posted December 10, 2021 Share Posted December 10, 2021 very nice Quote Link to comment Share on other sites More sharing options...
slusher Posted December 13, 2021 Share Posted December 13, 2021 Beautifully Done! Quote Link to comment Share on other sites More sharing options...
ewetwo Posted December 13, 2021 Share Posted December 13, 2021 Stunning car. Quote Link to comment Share on other sites More sharing options...
TonyW Posted December 14, 2021 Share Posted December 14, 2021 A superb model. The chrome work is quite exceptional. Quote Link to comment Share on other sites More sharing options...
peteski Posted December 14, 2021 Share Posted December 14, 2021 (edited) Beautiful model! The photos do look a bit flat, but your photo "booth" looks fine. The photos seem a bit underexposed, and the contrast is weak. I took one photo and punched it up just a bit. Original: And punched up. The shallow depth of field is the reason the rear part of the model to be blurry. You are probably using a cell phone, and can't adjust the lens' aperture, so you can't control the depth of field. If you can control where the focus point is, you might focus on the vent(?) door behind the front wheel. That way the front of the car might still be sharp enough, and the back of the car will be in better focus. I'm also curious what you used for outlining the door and trunk lines, and how you tinted the windows, but those are probably answered in your WIP thread. Edited December 14, 2021 by peteski Quote Link to comment Share on other sites More sharing options...
mr moto Posted December 14, 2021 Author Share Posted December 14, 2021 Thanks for those photo tips, Peter. And huge thanks to everyone who has commented on this build. I think the main thing my photo setup needs is more light. As Pete commented they're underexposed. I going to be looking for some kind of positionable light - maybe something that will clip onto the chair. The one overhead fixture just isn't bright enough for this use. The door lines haven't been highlighted with anything at all. I never have liked the look of putting a wash in the panel lines, etc. Just make sure the lines are deep and sharp enough before painting. The window tint is described in the WIP thread. It's very simple - just a mix of decanted Testors transparent enamels. The recipe is the WIP. But I realize that I left out two things that may be important to the overall result. 1: I give the windows a short soak in Super Clean before painting - maybe 20 minutes - to remove whatever release agent or other gunk might be on there. 2: After they're tinted I dip them in Future. Now you know all my secrets! Pete, what did you use to improve my photo? Quote Link to comment Share on other sites More sharing options...
Recommended Posts
Join the conversation
You can post now and register later. If you have an account, sign in now to post with your account.
Note: Your post will require moderator approval before it will be visible.