charlie libby Posted January 9, 2023 Share Posted January 9, 2023 i am taking a break from my camaro project to start on this 32 ford. it is jaguar powered , will have a quickchange rear and straight axle frontend.i narrowed the roadster body 1.750 inches and removed .375 from the bottom edge so far .rebent and narowwed the frame which is solid .250 brass. got a start on the engine and the webber carbs, just started on them.spent the last few days on a nose for it in brass.i carved a block of plastic to the general shape .hieght and length not finalize yet. i anealed .045 brass several times during the process of shrinking and hammering to fit. can't hammer on the buck very much,its to fragile. i use a lot of dollies, most i have formed myself. please take a look and leave your comments lookin forward again to hearing from you all,charlie 6 Quote Link to comment Share on other sites More sharing options...
Paul Payne Posted January 9, 2023 Share Posted January 9, 2023 Looks like you are working in 1/8 scale? Super work in any scale! Will be following! Quote Link to comment Share on other sites More sharing options...
Joe Nunes Posted January 9, 2023 Share Posted January 9, 2023 This is an outstanding start to your model project. An amazing array of detail work shows within the photos. Thank you for sharing! 👍 Joe Quote Link to comment Share on other sites More sharing options...
cobraman Posted January 9, 2023 Share Posted January 9, 2023 Wow, this is going to be nice. Quote Link to comment Share on other sites More sharing options...
Ace-Garageguy Posted January 9, 2023 Share Posted January 9, 2023 Very fine machine work, brass fab, metal shaping. Reminiscent of Mr. Wingrove. Quote Link to comment Share on other sites More sharing options...
absmiami Posted January 10, 2023 Share Posted January 10, 2023 Nice! Reckon you’ve got bout 5 months of nice weather to tackle this project … Quote Link to comment Share on other sites More sharing options...
charlie libby Posted January 17, 2023 Author Share Posted January 17, 2023 thank you all for you comments. hi andrew. yes paul it is 1/8 scale. finally got the body chopped up and back together again. i took 1.750 out of the body front to rear. i guess thats about 14 inches. cut the bottom off and had to pie cut the cowl 1/8 at the top to 0 on the bottom to get it to look right. narrowed the frame but its not done. i made a hammer form to make the tear drop shaped blisters for the places that protrude out side the body , it seems to work well. i also took time and alot of scrap stuff ,to make a bead roller.it works well also. i am going to make some different dies for it. the only die so far is the bead. got the nose partly mounted. i am going to finish the floor i have started and then the interior aluminum. thanks for looking, charlie 3 Quote Link to comment Share on other sites More sharing options...
Claude Thibodeau Posted January 17, 2023 Share Posted January 17, 2023 Hi Sir! Very impressive, as your work is always, I might add. I assume your body is the Revell Big Deuce? Just curious... CT Quote Link to comment Share on other sites More sharing options...
iBorg Posted January 17, 2023 Share Posted January 17, 2023 VERY IMPRESSIVE. I've also thought about making a bead roller. Yours is interesting especially how your's is designed to let you adapt to different metal thicknesses. Do you have a female die under he metal? Quote Link to comment Share on other sites More sharing options...
charlie libby Posted January 18, 2023 Author Share Posted January 18, 2023 yes claude it is or was. it is a glue bomb i got on ebay. there is a lower die .i will take a picture without the metal so you can see and post it later this week. the bead is .040 wide and the female is .050 wide. same with the depth. i wish i had a little extra money i would build a better and stronger one of aluminum .it does work fine but the throat is not guite deep enough. Quote Link to comment Share on other sites More sharing options...
AmericanMuscleFan Posted January 18, 2023 Share Posted January 18, 2023 You never cease to amaze me Charlie, everything you make is impressive and of great quality, another masterpiece in the making. My current project is not from the same era but I will be back to see your prowess and your custom tools inspire me my friend. I like what I see! 😊 Quote Link to comment Share on other sites More sharing options...
Straightliner59 Posted January 18, 2023 Share Posted January 18, 2023 Excellent job on the sheet work! I did the nose and tail of my Nostalgia Dragster with tin. most of my stuff is aluminum, but, I haven't gotten the hang of soldering it, yet. Your bead roller is great, too! There will have to be one of those in my future. Quote Link to comment Share on other sites More sharing options...
Bugatti Fan Posted January 18, 2023 Share Posted January 18, 2023 Looks like the beaten metalwork is thin copper sheet. Nice to see a model that utilises some kit items and made into something special with engineered parts. It is always interesting to see how different modeller resolve problems when making parts from scratch. Did the Jaguar engine come from the Revellogram kit or as it machined from metal? I will be following this project. Quote Link to comment Share on other sites More sharing options...
charlie libby Posted January 21, 2023 Author Share Posted January 21, 2023 hi noel it is brass that i anealed to soften . the engine is all hand made aluminum and plastic. i frncis your new project is fantastic !!! a couple of pictures for mike Quote Link to comment Share on other sites More sharing options...
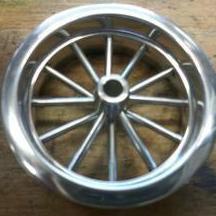
charlie libby Posted January 21, 2023 Author Share Posted January 21, 2023 hi francis nice to hear from you.mike i hit submit without the pictures. what do you think blackwall or white wall ? 4 Quote Link to comment Share on other sites More sharing options...
iBorg Posted January 21, 2023 Share Posted January 21, 2023 Its a race car.....black wall. 3 Quote Link to comment Share on other sites More sharing options...
AmericanMuscleFan Posted January 21, 2023 Share Posted January 21, 2023 Everything is so beautiful and well done Charlie, I love every update and you keep us (me... 😊) fully motivated! I too prefer black wall tires but it is your build so your choice will be the right one. Quote Link to comment Share on other sites More sharing options...
misterNNL Posted January 23, 2023 Share Posted January 23, 2023 Really incredible craftsmanship on display here. Quote Link to comment Share on other sites More sharing options...
charlie libby Posted January 29, 2023 Author Share Posted January 29, 2023 thank you francis. very nice to hear from you tom. i have been moving forward ,coming up with ideas along the way. the beadroller works well.rear suspension is complete except the shocks. made the rollbar fairing in wood to get a final shape and then pored a square block of 2 part urethane and recarved it. got the mid plate engine mount done and the mounts for it soldered on the frame . the front engine mount are next. brake drums and backing plates are done .alot of the parts are things i have made in the past few years and am now putting together in this project. thanks for checking in. 2 Quote Link to comment Share on other sites More sharing options...
absmiami Posted January 30, 2023 Share Posted January 30, 2023 What urethane do you use ? - it looks like it works like Renshape … Quote Link to comment Share on other sites More sharing options...
AmericanMuscleFan Posted February 1, 2023 Share Posted February 1, 2023 It's a feast for the eyes Charlie, everything comes together beautifully and with impeccable quality. 👌 Quote Link to comment Share on other sites More sharing options...
charlie libby Posted February 3, 2023 Author Share Posted February 3, 2023 hi andrew,i use a 2 part casting resin. i cast a in square container or something round ,whatever is big enough for me to machine the part i want to make. the fairing on the back i made from wood just to get the radius the way i wanted and then cast a block in a small rectangular box and recarved it from that. the brand name is SRC but I'm sure there are plenty of quality brands.hi francis wow, your grill is fantastic. your whole project is so nice. Quote Link to comment Share on other sites More sharing options...
charlie libby Posted February 6, 2023 Author Share Posted February 6, 2023 i have started the transmission and scatershield. the shield is modeled after the mcloed shield and the transmission is early muncie 4 speed. alot of filling and sanding time in the front case. i am going to make a multi disc clutch . i havent decided of which manufacturer 2 Quote Link to comment Share on other sites More sharing options...
absmiami Posted February 6, 2023 Share Posted February 6, 2023 Nice - is this milled fr alu stock or - what ? Quote Link to comment Share on other sites More sharing options...
Belugawrx Posted February 7, 2023 Share Posted February 7, 2023 great metal work..Wow! Quote Link to comment Share on other sites More sharing options...
Recommended Posts
Join the conversation
You can post now and register later. If you have an account, sign in now to post with your account.
Note: Your post will require moderator approval before it will be visible.