Romell R Posted March 15, 2012 Share Posted March 15, 2012 Again... Quote Link to comment Share on other sites More sharing options...
vintagedragfan Posted March 16, 2012 Author Share Posted March 16, 2012 Awsome work on those machined parts, cheap lathe depends what you call cheap looks like it works really good to me, you could make parts for a few guys on the forum and cover the cost on that lathe very quickly, once again outstanding. thank you Robert, yea I have had numerous offers to make wheels for others, barely have time for my own stuff,LOL, I met Stacey David from Gearz he thought they were pretty cool, I told him I would make him a set, havent had the time Quote Link to comment Share on other sites More sharing options...
vintagedragfan Posted March 16, 2012 Author Share Posted March 16, 2012 Can you give me the dimensions of the hub? What size bit did you use for the spoke holes? Thanks, Mike Again... Mike I dont know exactly what drill bit I used, they are so small, I use calipers and mike the wire, then use calipers to find a bit, remember I am a redneck machinist, LOL same with the hub Romell you are funny! lol Quote Link to comment Share on other sites More sharing options...
rv1963 Posted March 16, 2012 Share Posted March 16, 2012 Once again outstanding work, just to clear things up i wasn't trying to hint for you to make wheels for me it's way to much work just to do your own machining i know i have a vintage unimat lathe from the 1960's that i like to play with and make my own stuff it's fun but i am not even close to your skill level, can't wait to see what you make next. Quote Link to comment Share on other sites More sharing options...
Romell R Posted March 16, 2012 Share Posted March 16, 2012 Mike I dont know exactly what drill bit I used, they are so small, I use calipers and mike the wire, then use calipers to find a bit, remember I am a redneck machinist, LOL same with the hub I guess you eyeball stuff like I do, I use calipers the same way. And that great work on the rims both front and back. Quote Link to comment Share on other sites More sharing options...
Mooneyzs Posted March 16, 2012 Share Posted March 16, 2012 Thanks for posting your lathe Bill. Hey what size wire did you use for the spokes?? and am I correct for saying it looks like you used push pins or needles for the wire?? Quote Link to comment Share on other sites More sharing options...
vintagedragfan Posted March 16, 2012 Author Share Posted March 16, 2012 Once again outstanding work, just to clear things up i wasn't trying to hint for you to make wheels for me it's way to much work just to do your own machining i know i have a vintage unimat lathe from the 1960's that i like to play with and make my own stuff it's fun but i am not even close to your skill level, can't wait to see what you make next. sure I understand Robert, you need to use that lathe of yours more!! Quote Link to comment Share on other sites More sharing options...
vintagedragfan Posted March 16, 2012 Author Share Posted March 16, 2012 I guess you eyeball stuff like I do, I use calipers the same way. And that great work on the rims both front and back. Thanks for posting your lathe Bill. Hey what size wire did you use for the spokes?? and am I correct for saying it looks like you used push pins or needles for the wire?? you are soooo right Romell! I do alot of eyeballin! n.p. Chris, anything I can do to help, I started out using pins because they were similar to real spokes with the head on them, there just wasn't any way to get them all in, so I ended up using nickel pated wire, it is about .015 thick, they are actually too thick for scale but its the best I could come up with, I think they will be ok <--- see what I mean Rom? everyday! LOL Quote Link to comment Share on other sites More sharing options...
Romell R Posted March 16, 2012 Share Posted March 16, 2012 you are soooo right Romell! I do alot of eyeballin! n.p. Chris, anything I can do to help, I started out using pins because they were similar to real spokes with the head on them, there just wasn't any way to get them all in, so I ended up using nickel pated wire, it is about .015 thick, they are actually too thick for scale but its the best I could come up with, I think they will be ok <--- see what I mean Rom? everyday! LOL this is kool , its when you get like this is when you need to worry LOL!!!! Thats the look on my face most of the time! Quote Link to comment Share on other sites More sharing options...
rv1963 Posted March 16, 2012 Share Posted March 16, 2012 Bill how did you secure those thin wires to the rim ? Quote Link to comment Share on other sites More sharing options...
Romell R Posted March 16, 2012 Share Posted March 16, 2012 Bill how did you secure those thin wires to the rim ? He hires a teeny tiny wheel smith (not to be confused with Will Smith) that does all the work. You should see his teeny tiny mechanics that work in his teeny tiny dino shop, it's just amazing I tell ya! Quote Link to comment Share on other sites More sharing options...
rv1963 Posted March 16, 2012 Share Posted March 16, 2012 Yep Romell i thought it was something like that i wonder if they do freelance work the pay sucks but they get free beer and chips. Quote Link to comment Share on other sites More sharing options...
Jantrix Posted March 16, 2012 Share Posted March 16, 2012 <---------------floored. Quote Link to comment Share on other sites More sharing options...
Scott Colmer Posted March 16, 2012 Share Posted March 16, 2012 Holy Smokes! This is first time I clicked onthis thread. WOW! Excellent, excellent work. Some of the cleanest scratchbuilding around! And it's your first time?!. Even your chassis paint is clean and smooth. It's no wonder you caught the attention of the owner of the real car. Hats off to you, Bill. Scott Quote Link to comment Share on other sites More sharing options...
GoatGuy Posted March 17, 2012 Share Posted March 17, 2012 I found .008 banjo strings at a music store, made by GHS, size L08. I used some of it for antennas. Quote Link to comment Share on other sites More sharing options...
vintagedragfan Posted March 17, 2012 Author Share Posted March 17, 2012 Bill how did you secure those thin wires to the rim ? hey Robert just used CA glue, they are actually pretty strong Quote Link to comment Share on other sites More sharing options...
vintagedragfan Posted March 17, 2012 Author Share Posted March 17, 2012 He hires a teeny tiny wheel smith (not to be confused with Will Smith) that does all the work. You should see his teeny tiny mechanics that work in his teeny tiny dino shop, it's just amazing I tell ya! ROFL ! thats funny $*#+ there ^^^^ Quote Link to comment Share on other sites More sharing options...
vintagedragfan Posted March 17, 2012 Author Share Posted March 17, 2012 <---------------floored. Holy Smokes! This is first time I clicked onthis thread. WOW! Excellent, excellent work. Some of the cleanest scratchbuilding around! And it's your first time?!. Even your chassis paint is clean and smooth. It's no wonder you caught the attention of the owner of the real car. Hats off to you, Bill. Scott thanks fella's appreciate you looking at my progress! Quote Link to comment Share on other sites More sharing options...
vintagedragfan Posted March 17, 2012 Author Share Posted March 17, 2012 I found .008 banjo strings at a music store, made by GHS, size L08. I used some of it for antennas. yea Dave that would work very well because it is plated too Quote Link to comment Share on other sites More sharing options...
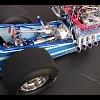
vintagedragfan Posted March 19, 2012 Author Share Posted March 19, 2012 (edited) got a little more work done this week end, had to dissasimble the engine and flatten the areas on the head where the filler necks go on and on the back of the heads where the overflow tubes come out, I didn't realize this until I got some more detailed pics from Jerry, so i figured I had better address it, here is the engine allmost complete, still have to add some fuel lines and touch up a couple things, made the overflow lines from aluminum wire and mde the fittings from hex styrene,, and used pro tech stainless braided line, from what I can see thats the only braided lines on this car, everything else is hard line or rubber I must have been excited, before I knew it I had the headers on and realized I forgot to blue them!! do you think I should try and remove them and blue them or just leave it? Edited March 19, 2012 by vintagedragfan Quote Link to comment Share on other sites More sharing options...
vintagedragfan Posted March 19, 2012 Author Share Posted March 19, 2012 (edited) here are a couple more thanks for looking Edited March 19, 2012 by vintagedragfan Quote Link to comment Share on other sites More sharing options...
Terry Sumner Posted March 19, 2012 Share Posted March 19, 2012 Shore is purty!!!! Is the blower drive tension pulley adjustable so you can take out the slack? Quote Link to comment Share on other sites More sharing options...
vintagedragfan Posted March 19, 2012 Author Share Posted March 19, 2012 Shore is purty!!!! Is the blower drive tension pulley adjustable so you can take out the slack? I wish it was adjustable! the blower belt was a fight all the way! it is a pretty stiff belt, it was a little too wide, had to narrow it about 1/16 Quote Link to comment Share on other sites More sharing options...
ClayK Posted March 19, 2012 Share Posted March 19, 2012 Beautiful work Bill. An absolute work of art! The first pic on your second post from today blows me away. Clay Quote Link to comment Share on other sites More sharing options...
tyrone Posted March 19, 2012 Share Posted March 19, 2012 Speechless Bill.... Super Fantastic.... crisp, clean detailing is an understatement... Quote Link to comment Share on other sites More sharing options...
Recommended Posts
Join the conversation
You can post now and register later. If you have an account, sign in now to post with your account.
Note: Your post will require moderator approval before it will be visible.