jayhkr Posted March 22, 2012 Share Posted March 22, 2012 Well it's a SLOW start, but a start nontheless. So far I've put some of the engine together and taken extreme liberties sanding the body and spraying the metalizer over it. As you can see, the body looks about as perfect as my skill can get it at the point in time! Now to just be patient and wait till the rest of the car is built before I paint it! LOL. Quote Link to comment Share on other sites More sharing options...
LoneWolf15 Posted March 22, 2012 Share Posted March 22, 2012 Shoot it now , let It flash out while you build the rest of the car ! The scratches you see will disappear once your top coat is applied ! Have faith in the method , it will work for you each and every time ! Quote Link to comment Share on other sites More sharing options...
jayhkr Posted March 22, 2012 Author Share Posted March 22, 2012 Well the thing is I'm still debating on the color scheme, thought I would get the "hard" part out of the way first so I can think of how I want it to look. Red would look nice, but so would blue, pearl blue, or burgundy, but I think I'm going to use that color for the '49 Merc that's up next. Thanks Donn, you have been an inspiration to my work. Out of curiosity are you going to any of the conventions in the mid-west anytime soon? I know there is one here in KC in June I think. Quote Link to comment Share on other sites More sharing options...
BOSWELL891 Posted March 22, 2012 Share Posted March 22, 2012 Looks good so far Quote Link to comment Share on other sites More sharing options...
jayhkr Posted March 23, 2012 Author Share Posted March 23, 2012 Well another slow update. For some reason I'm just taking my time and in no hurry with this build. Here is the engine. A little more detail than the last one, but not anywhere near what some of you guys produce (going to get into wires soon). Really took my time on the fan belt. Man, that's a pain to pain just right (and yes I already see a touch up I have to take care of in the morning) Quote Link to comment Share on other sites More sharing options...
my80malibu Posted March 23, 2012 Share Posted March 23, 2012 good luck with getting those fenders to fit in the first picture Quote Link to comment Share on other sites More sharing options...
jayhkr Posted March 23, 2012 Author Share Posted March 23, 2012 Any tips you can add to it? Sounds like you had a devil of a time. I mocked them up and was thinking the same thing. Quote Link to comment Share on other sites More sharing options...
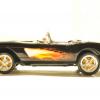
jayhkr Posted March 24, 2012 Author Share Posted March 24, 2012 Just finished putting the white in the whitewalls, but I'm wondering if I should make it semi-gloss? I think that would give it a more natural appearance. Gotta wait till the paint is dried then I'll shoot some pictures and post them. Man, that was a tedious job. Painted each tire with a toothpick and used the capillary method. Anyone have an easier way of doing that for the next time? Quote Link to comment Share on other sites More sharing options...
Agent G Posted March 24, 2012 Share Posted March 24, 2012 Umm, the fenders are backwards................................ G Quote Link to comment Share on other sites More sharing options...
jayhkr Posted March 24, 2012 Author Share Posted March 24, 2012 well that would explain things then........<goes and bangs head on wall> Quote Link to comment Share on other sites More sharing options...
my80malibu Posted March 24, 2012 Share Posted March 24, 2012 Just finished putting the white in the whitewalls, but I'm wondering if I should make it semi-gloss? I think that would give it a more natural appearance. Gotta wait till the paint is dried then I'll shoot some pictures and post them. Man, that was a tedious job. Painted each tire with a toothpick and used the capillary method. Anyone have an easier way of doing that for the next time? Are you doing wide whitewalls? I usually cut circles out with a template the correct size(very important step). Using the green masking tape. I then stick them on to my tires burnish them down with a wooden type of tool that my wife, used to use for her cuticles but is more useful to me, and Airbrush with very light mist coats of Acrylic white followed with acrylic flat clear. Its not hard and looks really good.like these http://public.fotki.com/Gabriel12/green-coupe/5.html Quote Link to comment Share on other sites More sharing options...
jayhkr Posted March 24, 2012 Author Share Posted March 24, 2012 Those did come out nice. They are wide whitewalls. I will try the template thing on my next project ('49 Merc) Quote Link to comment Share on other sites More sharing options...
CEKPETHO BCE Posted April 15, 2012 Share Posted April 15, 2012 I'm building a fendered 3 window in very similar color Quote Link to comment Share on other sites More sharing options...
Recommended Posts
Join the conversation
You can post now and register later. If you have an account, sign in now to post with your account.
Note: Your post will require moderator approval before it will be visible.