Brizio Posted May 5, 2012 Share Posted May 5, 2012 Nice! I like the stripes on the seats, they give a nice touch. Quote Link to comment Share on other sites More sharing options...
cobraman Posted May 5, 2012 Author Share Posted May 5, 2012 Here is another small update. Interior mounted to the chassis and the first coats of paint hit the body. As luck would have it some ###### got into the paint ( don't you hate when that happens ? ). Anyway what you see is the body that has been wet sanded to remove the junk in the paint, Tomorrow maybe will squirt on the final coats before decaling and clear coats. I have to say that this is a pretty nice kit. No, it's not super detailed, no more really than any of the good new 1/25 kits. But it goes together (so far ) very nicely. I wanted to lower it a bit but there is very little room between the top of the tires and the inner wheel wells so I didn't bother. If it sits up high I will be angry I didn't take the time to figure out how to do it. Quote Link to comment Share on other sites More sharing options...
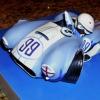
cobraman Posted May 5, 2012 Author Share Posted May 5, 2012 Sorry, forgot the photos. Quote Link to comment Share on other sites More sharing options...
cobraman Posted May 7, 2012 Author Share Posted May 7, 2012 Small progress report. I mocked up the body onto the chassis. Body is ready for the decals and then the clear coats. Sits a bit too high but I can live with it. Quote Link to comment Share on other sites More sharing options...
knyte91 Posted May 8, 2012 Share Posted May 8, 2012 Cobraman, Thats looking sharp. Hope to start on mine next week. Gotta finish my camaro first. Nice shade of yellow. Quote Link to comment Share on other sites More sharing options...
knyte91 Posted May 8, 2012 Share Posted May 8, 2012 Cobraman, Did you airbrush or rattle can the rims? How ever you did them, they look sharp. I still have to use the easyoff on mine when I get started. Also how much BMF did you use? I see some areas that look like they have BMF on them. Sorry about the questions. Quote Link to comment Share on other sites More sharing options...
Kaleb Posted May 8, 2012 Share Posted May 8, 2012 The glass will fit smooth. Just a heads up. Looking great so far keep up the good work. Quote Link to comment Share on other sites More sharing options...
cobraman Posted May 8, 2012 Author Share Posted May 8, 2012 Thanks guys. I did use some BMF in a couple places and used it to make the simulated hose clamps. I do have an airbrush but on larger surfaces I prefer to use a rattle can. I think if you lay down a good even spray that with clearing and polishing you can get good results with spray cans. Laying down the decals today. Quote Link to comment Share on other sites More sharing options...
cobraman Posted May 8, 2012 Author Share Posted May 8, 2012 I just finished putting the decals on the car and noticed something not really correct. The decals and the instructions show the last decal in the rear around the plate going below the body colored section and onto the black area on the bottom of the car. This is not correct in any photos I could find. I trimmed the lower section off my decal. Anyone else notice that ? I also noticed the the SHELBY logo that goes across the rear is a tad to long to go where it is suposed to. Either that or I did something wrong. Lastly, the stripe decals on the front of the car gave me fits even with setting solution. Still, I love this kit but if I ever do another I will paint the stripes on. Quote Link to comment Share on other sites More sharing options...
knyte91 Posted May 8, 2012 Share Posted May 8, 2012 Cant wait to see it with the decals & all finished. I have a metallic color but wondering how it will turn out. Mine will also be done with rattle can. Quote Link to comment Share on other sites More sharing options...
knyte91 Posted May 8, 2012 Share Posted May 8, 2012 I will be painting mine flat black then tape off the stripes & then use either metallic black or gloss black. Trying to do the ghost stripes & I was told to use flat black on the whole car then mask off the stripes then paint it the other shade of black. I noticed I repeated myself. Sorry. Quote Link to comment Share on other sites More sharing options...
Hoosierfarmboy Posted May 8, 2012 Share Posted May 8, 2012 Mercy Snakes (pun intended) , I love the engine compartment detail. Hoping to get one of these b4 2 long. Keep up the good work. Quote Link to comment Share on other sites More sharing options...
cobraman Posted May 8, 2012 Author Share Posted May 8, 2012 I will be painting mine flat black then tape off the stripes & then use either metallic black or gloss black. Trying to do the ghost stripes & I was told to use flat black on the whole car then mask off the stripes then paint it the other shade of black. I noticed I repeated myself. Sorry. Nothing wrong with that plan and I bet you would have a sharp Shelby. I myself would paint the car your main color and then mask and shoot the stripes. I think that would be eaiser but that of course is up to you. Looking forward to your photos. You will love the way this car goes together. Quote Link to comment Share on other sites More sharing options...
eviltwincustoms Posted May 8, 2012 Share Posted May 8, 2012 (edited) I will be painting mine flat black then tape off the stripes & then use either metallic black or gloss black. Trying to do the ghost stripes & I was told to use flat black on the whole car then mask off the stripes then paint it the other shade of black. I noticed I repeated myself. Sorry. Nothing wrong with that plan and I bet you would have a sharp Shelby. I myself would paint the car your main color and then mask and shoot the stripes. I think that would be eaiser but that of course is up to you. Looking forward to your photos. You will love the way this car goes together. It really depends on what the final color would be. By shooting the flat black, one could actually tape off any stripes. Then just shoot a pear and/or clear over the flat for the rest of the car and you would be done. Myself, I am more fond of the Red with white strip or Gun Metal gray with white strip GT500KR's. I guess that is why Ford makes the big bucks because they paint these cars in so many different factory colors. Edited May 8, 2012 by eviltwincustoms Quote Link to comment Share on other sites More sharing options...
cobraman Posted May 8, 2012 Author Share Posted May 8, 2012 By shooting the whole car flat black first you end up putting a couple more extra coats of paint on the car. This can sometimes hide detail. Not really an issue with a body this size I think. Couple coats of primer, a couple coats of flat black, coats of color, coats of clear, you get the idea. Also how will you clear the body color ? if you remove masking you will have to clear the flat black. If you clear with the stripes masked you will end up with a big ridge where the stripes are. If you paint and clear the body and then shoot the flat black stripes I just think it will be much more easy. I may be missing something and I am not trying to tell you how to build your car so please don't take it that way. Just trying to understand why doing the stripe color first is better. It may be, I may have to try that if it works good for you. Also dont forget the trick of spraying the car with some clear after you mask the stripes. It will help keep paint for seeping under the edge of the tape. Looking forward to seeing your build. Sounds like a cool idea. Quote Link to comment Share on other sites More sharing options...
cobraman Posted May 8, 2012 Author Share Posted May 8, 2012 Here is another small update. Car has been decaled and given 5 coats of clear. Now I wait till I can polish it ot and then I will mask the lower sections off and airbrush the satin black that is on the lower portions of the car. Quote Link to comment Share on other sites More sharing options...
knyte91 Posted May 8, 2012 Share Posted May 8, 2012 Looks sharp so far. Quote Link to comment Share on other sites More sharing options...
brodie_83 Posted May 8, 2012 Share Posted May 8, 2012 Looks great! Seeing your car, I think I'll have to do a bit of lowering the car...it sits really high. No offense. Looking very good so far! I kinda like the yellow. Quote Link to comment Share on other sites More sharing options...
cobraman Posted May 8, 2012 Author Share Posted May 8, 2012 I do agree it would look better lowered. As you know there is not a lot of room between the top of the tires and the inner wheel wells. I wonder if when I paint the satin black on the lower body panels if that will make it "look" lower or make it look higher. Quote Link to comment Share on other sites More sharing options...
knyte91 Posted May 9, 2012 Share Posted May 9, 2012 I thought there was someone on the site that had this model & lowered it. I cant recall where I seen it but it was on this forum. It looked sharp. Not sure how it will look when you paint the satin black. Guess you will find out when you paint it. Did you use high gloss clear coat? That car shines. :) Quote Link to comment Share on other sites More sharing options...
knyte91 Posted May 9, 2012 Share Posted May 9, 2012 I found the lowered Mustang. Go under "ON the bench" on page 3. Scroll down until you see 1/12th Mustang. It shows the rear lowered. Not sure if he did the front. Quote Link to comment Share on other sites More sharing options...
knyte91 Posted May 9, 2012 Share Posted May 9, 2012 I meant to say on the workbench. Sorry about that. Quote Link to comment Share on other sites More sharing options...
cobraman Posted May 9, 2012 Author Share Posted May 9, 2012 Thanks. I found the post and I do think it looks better lowered. Just about everything looks better lowered. Too late now. if I do another ( and I may ) it will be lowered for sure. Quote Link to comment Share on other sites More sharing options...
cobraman Posted May 9, 2012 Author Share Posted May 9, 2012 Kirt, I just used Testors clear lacquer. It does shine pretty good but I hope to have it really shine after I polish it out. Quote Link to comment Share on other sites More sharing options...
deja-view Posted May 12, 2012 Share Posted May 12, 2012 That's a great color. Of course, if you were driving it you woudn't get a mile down the road without being stopped. Quote Link to comment Share on other sites More sharing options...
Recommended Posts
Join the conversation
You can post now and register later. If you have an account, sign in now to post with your account.
Note: Your post will require moderator approval before it will be visible.