vintagedragfan Posted March 3, 2013 Author Share Posted March 3, 2013 VERY nice! You make it look so simple! thanks Allen Brilliant solution, Bill. Looks like you've got the creativity dial turned t 11 keep feeding us hey Alyn, what ever it's turned to makes my head hurt! I have done a lot of studying just to get to this point, whew! Looks great in brass! we are about at the same point of work today but yours had to take a lot longer then mine did for sure! thanks Chas, I do have a lot of time in this thing! I have a question on your suspension design. I see you have the lower control arms swapped around in two different pictures. Are the open cups supposed to face down, and the 00-90 bolts screw up into the struts and get capped on the bottom? In the bottom picture the open cups face UP, or reversed. Just trying to clarify which end is up, or down .... Otherwise, carry on with the awesomeness. John, they aren't swapped, in one pic the chassis is upright, the other upside down, the cup opening is on the bottom, and the disk will cover that, hopefully this will give it a nice clean look, thanks for the interest Awesome stuff Bill, Really dig the strut setup. thanks so much bro Quote Link to comment Share on other sites More sharing options...
FASTBACK340 Posted March 3, 2013 Share Posted March 3, 2013 (edited) The bottom two pictures the arms are orinented in the same direction while the chassis is flipped. That was my question. So the 00-90 bolts go up into the struts inside these cups, and the bottom gets capped? Cool.... Edited March 3, 2013 by FASTBACK340 Quote Link to comment Share on other sites More sharing options...
blunc Posted March 3, 2013 Share Posted March 3, 2013 what, no torsion bar suspension? bummer. amazing work anyway, excellent solution for the "ball joints". Quote Link to comment Share on other sites More sharing options...
blunc Posted March 3, 2013 Share Posted March 3, 2013 regarding the your ball joint solution, I was wondering if you have an internal gap between the bevel head screw and the covering cap... it's possible that the head of the screw may knock the cover cap loose during extreme travel if it's a real tight fit, unless you bevel the slotted side of the screw also. Quote Link to comment Share on other sites More sharing options...
vintagedragfan Posted March 4, 2013 Author Share Posted March 4, 2013 what, no torsion bar suspension? bummer. amazing work anyway, excellent solution for the "ball joints". regarding the your ball joint solution, I was wondering if you have an internal gap between the bevel head screw and the covering cap... it's possible that the head of the screw may knock the cover cap loose during extreme travel if it's a real tight fit, unless you bevel the slotted side of the screw also. hi Mike, yes I left plenty of room for it to move freely and not contact the cover, sorry about the torsion bars thanks for the interest Quote Link to comment Share on other sites More sharing options...
John Teresi Posted March 4, 2013 Share Posted March 4, 2013 Bill.......BEAUTIFUL work man........"Top Shelf" nothing less. Quote Link to comment Share on other sites More sharing options...
vintagedragfan Posted March 4, 2013 Author Share Posted March 4, 2013 got a little more done, the struts are finished, they are drilled and tapped on each end and all so for the spindle, there is no adjustment on the front suspension, so I figured the caster and camber as close as I could, here are the lower control arms and struts together here is what I'm doing with the upper strut mounts, I drilled holes in the frame for the mounts to slide into, should be plenty strong for the working suspension, I will add another support from the frame to the top for extra support should have another update tomorrow nite with this all completed and functioning (hopefully) thanks for checking in Quote Link to comment Share on other sites More sharing options...
vintagedragfan Posted March 4, 2013 Author Share Posted March 4, 2013 Bill.......BEAUTIFUL work man........"Top Shelf" nothing less. hi John, thanks brother, you know I appreciate it Quote Link to comment Share on other sites More sharing options...
Mooneyzs Posted March 4, 2013 Share Posted March 4, 2013 Bill.... I am at a loss for words Bud. Your craftsmanship is just awesome and you are a talented person. That front suspension is blowing me away and looks killer. Amazing work and you are doing all this in 1:25th scale. Very impressive. Looking forward to your next update. Quote Link to comment Share on other sites More sharing options...
Rdrunner Posted March 4, 2013 Share Posted March 4, 2013 (edited) thanks so much for the encouraging words Ken, they are truly humbling, you should share some of your builds with us, I know everyone would love to see them, sorry to hear about your Road Runner, that would be heart breaking for sure Hi Bill, sorry for the delayed reply, got tied up....lol. I still have some more to finish on my builds, I am currently in Malaysia and most of my stuff is back in the States. I am trying to finish up my 68 Roadrunner and will eventually post some pics here, nothing compared to you guys builds, I am still a newbie . Yeah, I still have not got over my loss of my 'baby' it's been 8 years now. I am still awed by your work. and yes, there are some awesome builders here and I am learning some great techniques. Awesome front suspension build !!!!!! Best of luck with your build, can't wait for the grand finale Edited March 4, 2013 by Rdrunner Quote Link to comment Share on other sites More sharing options...
vintagedragfan Posted March 4, 2013 Author Share Posted March 4, 2013 Bill.... I am at a loss for words Bud. Your craftsmanship is just awesome and you are a talented person. That front suspension is blowing me away and looks killer. Amazing work and you are doing all this in 1:25th scale. Very impressive. Looking forward to your next update. hi Chris, this is a 1/24 scale, it is HUGE compared to 1/25 well it does help a little, you are to kind bro, thanks so much Hi Bill, sorry for the delayed reply, got tied up....lol. I still have some more to finish on my builds, I am currently in Malaysia and most of my stuff is back in the States. I am trying to finish up my 68 Roadrunner and will eventually post some pics here, nothing compared to you guys builds, I am still a newbie . Yeah, I still have not got over my loss of my 'baby' it's been 8 years now. I am still awed by your work. and yes, there are some awesome builders here and I am learning some great techniques. Awesome front suspension build !!!!!! Best of luck with your build, can't wait for the grand finale ya Ken we are all ready to see some of your work, hopefully you will get back to them soon, thanks for keeping up on the project! Quote Link to comment Share on other sites More sharing options...
Scale-Master Posted March 4, 2013 Share Posted March 4, 2013 this is a 1/24 scale, it is HUGE compared to 1/25 Now that is funny right there! Quote Link to comment Share on other sites More sharing options...
Chas SCR Posted March 4, 2013 Share Posted March 4, 2013 Just asking but why not put the hoop connected to the top of the frame rail to give it more relistic look? or is this need to get the right angle for the strut? Quote Link to comment Share on other sites More sharing options...
Webb Posted March 4, 2013 Share Posted March 4, 2013 Geez Bill! Great stuff. I'm either going to have to get a prescription for anti depressants or quit following this build. Everytime I look at your work it really makes me feel unworthy. Partly because I actually went to school to become a machinist back in the seventies so I know what is involved. I'd be happy with just 10% of your talent! I have a new idol!! Chris Quote Link to comment Share on other sites More sharing options...
vintagedragfan Posted March 4, 2013 Author Share Posted March 4, 2013 Now that is funny right there! lol, thanks for checking in Mark! Just asking but why not put the hoop connected to the top of the frame rail to give it more relistic look? or is this need to get the right angle for the strut? hey Chas, as you can see by this picture, there isn't really enough room to come off the top of the frame with a loop, but I will run another bar or two from the top of the frame where I can, it was just simpler to do a loop this way, one way or the other I was going to have to come from the side of the frame any way thanks for the interest Geez Bill! Great stuff. I'm either going to have to get a prescription for anti depressants or quit following this build. Everytime I look at your work it really makes me feel unworthy. Partly because I actually went to school to become a machinist back in the seventies so I know what is involved. I'd be happy with just 10% of your talent! I have a new idol!! Chris thanks so much Chris, I was planning on coming down there to the Farmers Branch show this week end, I was hoping to meet up with you there, but, I am not going to make it this year, pretty bummed about it, really appreciate it man Quote Link to comment Share on other sites More sharing options...
Randy D Posted March 6, 2013 Share Posted March 6, 2013 Hi Bill, WOW!!!! Great looking progress my friend. You are just knocking this out of the park. Really look forward to your updates Randy Quote Link to comment Share on other sites More sharing options...
GoatGuy Posted March 7, 2013 Share Posted March 7, 2013 Wow. Looks great. Quote Link to comment Share on other sites More sharing options...
FASTBACK340 Posted March 7, 2013 Share Posted March 7, 2013 Nice job Bill! I can't wait to see this puppy up on it's paws. Speaking of brass masterpieces..... Randy, what's up with your project? Quote Link to comment Share on other sites More sharing options...
vintagedragfan Posted March 8, 2013 Author Share Posted March 8, 2013 Hi Bill, WOW!!!! Great looking progress my friend. You are just knocking this out of the park. Really look forward to your updates Randy hi Randy, if it turns out half is nice as your metal work I will be happy, I appreciate it! Wow. Looks great. thanks Dave, I hear Wild Willie calling Nice job Bill! I can't wait to see this puppy up on it's paws. Speaking of brass masterpieces..... Randy, what's up with your project? I'm glad it finally is John! thanks man Quote Link to comment Share on other sites More sharing options...
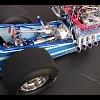
vintagedragfan Posted March 8, 2013 Author Share Posted March 8, 2013 (edited) I did finally manage to get it setting on all 4 wheels, every thing seems to work and there is no interference when when the wheels are turned, the struts are tilted in about 5 deg. and back 6 or 7 deg. about as close as I could get, I added a temporary link between the struts for test purposes, still need to add a couple more tubes from the frame up to the top of the strut hoops, still need to make the rotor for the left side and all of the brakes time to start on the rack and pinion, looks like it going to be a tight fit for that too, thanks for checking on the progress!! Edited March 8, 2013 by vintagedragfan Quote Link to comment Share on other sites More sharing options...
tyrone Posted March 8, 2013 Share Posted March 8, 2013 HELL TO THA NAW....LOL... FLAWLESS Bill... Quote Link to comment Share on other sites More sharing options...
gasser59 Posted March 8, 2013 Share Posted March 8, 2013 I can't say what I really want to say, so I'll just say this...OMFG. Does the weight of the engine hold some of the suspension down? I imagine that thing has got to be heavy. Have you weighed it yet Bill? Quote Link to comment Share on other sites More sharing options...
John Teresi Posted March 8, 2013 Share Posted March 8, 2013 Bill pure Genius.........U have no Idea how talented U are ..........I thought U could not out do your Keeling/Clayton.......but,these up-dates are showing otherwise.......keep on trucking Brother. Quote Link to comment Share on other sites More sharing options...
tyrone Posted March 8, 2013 Share Posted March 8, 2013 Just went back and had to look at these last pics again.... SUPERFANTASTIC WORK!!!!!!.... that engine looks like a beast in there... Quote Link to comment Share on other sites More sharing options...
FASTBACK340 Posted March 8, 2013 Share Posted March 8, 2013 I agree with the above comments. Watching this being created is amazing. The accuracy, realism, skill, and sterile build style make for a master class. Thank you. Quote Link to comment Share on other sites More sharing options...
Recommended Posts
Join the conversation
You can post now and register later. If you have an account, sign in now to post with your account.
Note: Your post will require moderator approval before it will be visible.