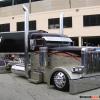
Kenny B Posted December 1, 2012 Share Posted December 1, 2012 (edited) I'm new to this site but not to building. Has anyone ever taken a Peterbilt 359 1/16 scale model and go crazy and chop it up? Watch this. I purchased the truck back in the late eighties and was always wanting to build something wild. It sat on the shelf for years and several moves later I still lugged it with me thinking I'm going to build this one day. Once I started chopping it up and doing a little research to find that this 1/16 scale Pete is going on ebay for around 500 bucks the kit is obsolete. To late!!! Now several hundreds of dollars in plastic,putty and paint and anything else you can find to use as parts it is coming along not to badly.They don't make any aftermarket parts for 1/16 scale so you have to scratch build. I read now that Revell has re-released the kit again. I would get one or two for sure and do it all over again. It's taken me about a year and a bit to get to where I am now. Still have a few more things to build but heres how it all started. First I extended the hood and sleeper to get the length of each that I wanted. I wanted the hood to be longer that the standard 379 X hood. Sleeper is 120 inch and will look like the newer style Unibilt 379 highrise sleepers once done. Made some old style fenders.I cut the doors out as well. Now that I have the length I could figure out the length of the frame. The bigger the better Right? Settled on 25 inches long. I had to get the heat gun out and bend the frame to keep it from sagging so badly with all the weight that will be on it. Going to be a big truck, will need to have big fuel tanks. Time to prime and paint the frame. will post more later... Kenny B Edited February 4, 2018 by Kenny B Repost pictures Quote Link to comment Share on other sites More sharing options...
Murphy's Law Posted December 1, 2012 Share Posted December 1, 2012 Oh, how I'd hate to pay the bill to fill those tanks. Looks really good. Quote Link to comment Share on other sites More sharing options...
signguy2108 Posted December 1, 2012 Share Posted December 1, 2012 Going to look good. Question is, when it's finished, where do you put it!!!! Quote Link to comment Share on other sites More sharing options...
Kenny B Posted December 1, 2012 Author Share Posted December 1, 2012 Well Larry not to sure. I do have room in my display case right now but once the trailer is done then I'm not sure. Kenny B Quote Link to comment Share on other sites More sharing options...
trick my mixer Posted December 1, 2012 Share Posted December 1, 2012 That is going to be a very Large Car. I am sure it is going to have dual breathers, right? Patiently waiting for the finished product. Quote Link to comment Share on other sites More sharing options...
Kenny B Posted December 1, 2012 Author Share Posted December 1, 2012 (edited) I'm trying to down load more picks but it is not working for me. I'll keep trying. Kenny.B Edited December 1, 2012 by Kenny B Quote Link to comment Share on other sites More sharing options...
Kenny B Posted December 1, 2012 Author Share Posted December 1, 2012 (edited) Lets try this again. More pics. Frame and engine was painted to match, air lines, fuel injectors and fuel filters were added. Because of the hood and the front of the frame was extended I needed to set back the engine further in the frame. Edited February 4, 2018 by Kenny B Quote Link to comment Share on other sites More sharing options...
Kenny B Posted December 1, 2012 Author Share Posted December 1, 2012 (edited) The drive shaft needed extended as well. I used alunimum tube on that. Kenny B. Edited February 4, 2018 by Kenny B Quote Link to comment Share on other sites More sharing options...
Kenny B Posted December 1, 2012 Author Share Posted December 1, 2012 (edited) I went to the local craft store and found some small containers to use as air breathers. Bonus I can use the beads as hose fittings. I sanded the lids smooth for the top of the air breathers.(the one on the right is sanded) Then I'm going to need some kind of screening or mesh for them. Went to the hardware store and bought a foot of window screen. The holes are to big, but I found some photo etched screen at the hobby shop. How to fasten this to the containers and look good? Krazy glue containers will be used as outers. Will be chromed . More pics to come. Kenny B. Edited February 4, 2018 by Kenny B Quote Link to comment Share on other sites More sharing options...
williamchevelleman1972 Posted December 2, 2012 Share Posted December 2, 2012 what did you use to do the hinges? very nice model by the way love the detail on the motor Quote Link to comment Share on other sites More sharing options...
Kenny B Posted December 2, 2012 Author Share Posted December 2, 2012 William, Thank you, the hinges I found at a craft store. I also found them on-line look under doll houses and accesories. Also if you have a eye glass case with the hinged case type that works. I also found some 3mm brass nails that will work for all the rivets I will have to put in to the sleeper. I'm thinking about 800 of them should be enough. I haven't ordered them yet still wondering if I want to drill all those holes. If anyone has any ideas or has done this before please let know. Thanks again. Kenny B. Quote Link to comment Share on other sites More sharing options...
Kenny B Posted December 2, 2012 Author Share Posted December 2, 2012 (edited) More pics. Fenders and bumper were scratch built. Edited February 4, 2018 by Kenny B Quote Link to comment Share on other sites More sharing options...
Kenny B Posted December 2, 2012 Author Share Posted December 2, 2012 (edited) I just had to have a workable fifth wheel. Edited February 4, 2018 by Kenny B Quote Link to comment Share on other sites More sharing options...
towman1271 Posted December 2, 2012 Share Posted December 2, 2012 That is one amazing piece... Your imagination to details is great..Cant wait to see this finished.. Would love to see some of your past builds posted since you have been building for a while!! Quote Link to comment Share on other sites More sharing options...
Kenny B Posted December 2, 2012 Author Share Posted December 2, 2012 (edited) Scratch built simulated Air-Ride seats were built. I found an old article written by Ken Smith in Car Modeler that he wrote how to build them. It's a very nice design and works nicely. Of coarse the stock seats were a little plain looking, leather seats will look good. The door panels were lacking detail and needed some help as well. Kenny B Edited February 4, 2018 by Kenny B Quote Link to comment Share on other sites More sharing options...
Kenny B Posted December 2, 2012 Author Share Posted December 2, 2012 (edited) The dash needed some help as well. Wood grain dash inserts were added . Stained and clear coated. That's better. Kenny B. Edited February 4, 2018 by Kenny B Quote Link to comment Share on other sites More sharing options...
Kostas Parchas Posted December 2, 2012 Share Posted December 2, 2012 Way too C O O L ! ! ! Kostas. Quote Link to comment Share on other sites More sharing options...
Mr mopar Posted December 2, 2012 Share Posted December 2, 2012 This is way cool ........................ i like it more Please. Quote Link to comment Share on other sites More sharing options...
ewaskew Posted December 2, 2012 Share Posted December 2, 2012 Very nice build you got going man,I'll be looking in on this one. I like the custom rigs myself because no matter who builds them, there always cool looking and different. And very nice one of kind builds. Quote Link to comment Share on other sites More sharing options...
Kenny B Posted December 2, 2012 Author Share Posted December 2, 2012 (edited) Thanks guys, How about a nice West Coast style hinged lift-up bumper. First mock up. More to come. Kenny B. Edited February 4, 2018 by Kenny B Quote Link to comment Share on other sites More sharing options...
camaro68 Posted December 2, 2012 Share Posted December 2, 2012 Thats Amazing!!!!! Quote Link to comment Share on other sites More sharing options...
skysoldier46 Posted December 2, 2012 Share Posted December 2, 2012 Loving the detail work here!!!!! Quote Link to comment Share on other sites More sharing options...
BigBad Posted December 2, 2012 Share Posted December 2, 2012 Awesome, very nice and clever work using household items, this is a nice build especially considering the lack of available aftermarket stuff. Great work! Quote Link to comment Share on other sites More sharing options...
CDA Posted December 3, 2012 Share Posted December 3, 2012 That is crazy!!! Your dash is amazing!!!!! Quote Link to comment Share on other sites More sharing options...
kilrathy10 Posted December 5, 2012 Share Posted December 5, 2012 Very, very nice work...Especially on the interior...Although there's superb detail throughout, I find the interior to be most pleasing to myself...Very, very, nice work... Quote Link to comment Share on other sites More sharing options...
Recommended Posts
Join the conversation
You can post now and register later. If you have an account, sign in now to post with your account.
Note: Your post will require moderator approval before it will be visible.