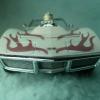
pandamonium2112 Posted December 22, 2012 Share Posted December 22, 2012 I got one of these kits when i was a youth and when they re-issued them, i had to get a pair of them. The second time around was a much funner build because of my increased skills. Although they aren't perfect, i really tried to figure out a way to make the brake cooling ducts more realistic (didn't know about Alex Kustov's trick) I think they turned out pretty good. I used about every trick i had and customized what i could, including alot of scratch building..Enjoy. Quote Link to comment Share on other sites More sharing options...
James2 Posted December 22, 2012 Share Posted December 22, 2012 Very well done, I have always like these cars. Quote Link to comment Share on other sites More sharing options...
JM485 Posted December 22, 2012 Share Posted December 22, 2012 Looks awesome! Everything looks clean and the paint is smooth, nice work. Quote Link to comment Share on other sites More sharing options...
Draggon Posted December 22, 2012 Share Posted December 22, 2012 I'm impressed! Pretty neat idea to have them posed together like that. Quote Link to comment Share on other sites More sharing options...
peter31a Posted December 22, 2012 Share Posted December 22, 2012 Very cool builds. Love the McLaren's. Looks like your tricks worked really well. Quote Link to comment Share on other sites More sharing options...
Gluebomber Posted December 22, 2012 Share Posted December 22, 2012 Wow! Beautiful job, Steve. I'll be saving your pics to use as reference photos. Are these the Accurate Miniatures kits? If so, did you use any special tricks to get the rear body to sit so flush over the engine? I've seen several build-up photos of the AM kit, and in every one of them the builder couldn't seem to get the engine cover to sit correctly over the rear of the car. There is so much stuff packed in there, rear body panel always sits cockeyed. Yours looks great. Congratulations on a great couple of builds. Quote Link to comment Share on other sites More sharing options...
Scuderia Posted December 22, 2012 Share Posted December 22, 2012 Amazing, those look so awesome. Nicely done!! Quote Link to comment Share on other sites More sharing options...
cobraman Posted December 23, 2012 Share Posted December 23, 2012 Very nice looking cars. Wouldn't mind trying my hand at one of these kits. Quote Link to comment Share on other sites More sharing options...
pandamonium2112 Posted December 23, 2012 Author Share Posted December 23, 2012 Wow! Beautiful job, Steve. I'll be saving your pics to use as reference photos. Are these the Accurate Miniatures kits? If so, did you use any special tricks to get the rear body to sit so flush over the engine? I've seen several build-up photos of the AM kit, and in every one of them the builder couldn't seem to get the engine cover to sit correctly over the rear of the car. There is so much stuff packed in there, rear body panel always sits cockeyed. Yours looks great. Congratulations on a great couple of builds. They are the MK8d 1/20 scale AMT (re-release) kits, I bought them because i remember how detailed they were and knew i could get a good project out of them. if your thinking of getting one, don't hesitate (Buy 2 or you'll regret it) The body fits over the engine like a glove, snaking it over the roll bar is a little tricky. The bodies have score lines in them and extra parts should you choose to cut it up and be able to remove sections at a time. I did this on the first one i built and it didn't turn out good, it never sat together very well, i could probably compensate for that now with my building skills but choose to just leave it in 1 piece. Thanks for the comments, i enjoyed sharing them with you. Quote Link to comment Share on other sites More sharing options...
bondo bill Posted December 23, 2012 Share Posted December 23, 2012 very nice Quote Link to comment Share on other sites More sharing options...
DustyMojave Posted December 23, 2012 Share Posted December 23, 2012 These are 1/20 scale. I was involved in Can Am racing back when these cars were racing and the models were pretty good. As he says above, they're not perfect, but not bad. Quote Link to comment Share on other sites More sharing options...
bbowser Posted December 23, 2012 Share Posted December 23, 2012 Outstanding replicas. You have done a fine job of detailing, they look very convincing. Great looking models. Quote Link to comment Share on other sites More sharing options...
Crazy Ed Posted December 23, 2012 Share Posted December 23, 2012 Steve you've done the mechanicals on those Very Well. I do like what you've done not only to the Break Ducts but also how you treated the Radiator and Oil Coolers. But I got a nit that seems to have escaped most builders of these kits. The car as built never had the number 4 or 5 on it. The #4 was McLarens number and he died testing the car, 5 was Humes who won that Can Am season. But the Car with the Hoop on the Roll Bar was driven by #48 Dan Gurney (another addition Gurney gave to Race Cars along with the GT40 Gurney "Bump") and later by #7 Peter Gothin (lookup pics of Peter in the car. The height difference between him and Gurney is quickly noticed! ). Hopefully I'll be able to at least approach the detail and finish you did when I pull my M8D off the shelf. Your car will be among the references I use to build it. Quote Link to comment Share on other sites More sharing options...
Recommended Posts
Join the conversation
You can post now and register later. If you have an account, sign in now to post with your account.
Note: Your post will require moderator approval before it will be visible.