iderek Posted March 14, 2013 Share Posted March 14, 2013 (edited) It's been a while since my last build~ and so, I have finally decided to build another again haha! This one will be a little special for me since I haven't done a full decal model yet. This thread has been completed, here's the link to "UnderGlass": http://www.modelcarsmag.com/forums/index.php?showtopic=73255 Hope nothing bad happens~ hehe Ok, so far I have completed the chassis and part of the interior, check it out! This is will be all OOB, so I will tend to detail it as much as I can with only paint. Hope you guys like this! Edited April 2, 2013 by iderek Quote Link to comment Share on other sites More sharing options...
martinfan5 Posted March 14, 2013 Share Posted March 14, 2013 Going to be watching this one, I have been holding off building mine , not looking forward to the decals Quote Link to comment Share on other sites More sharing options...
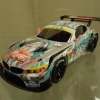
Christopher J Posted March 14, 2013 Share Posted March 14, 2013 FANTASTIC work! It looks like it's off to quite a nice start. Quote Link to comment Share on other sites More sharing options...
lanesteele240 Posted March 14, 2013 Share Posted March 14, 2013 Like martinfan said. Im holding off on both of my miku kits. I have this one and the gt3 Porsche So far it looks great. I am put off building mine because of the Japanese only decal instructions. I even contacted fujimi and they never replied. Quote Link to comment Share on other sites More sharing options...
scalemodelworld Posted March 14, 2013 Share Posted March 14, 2013 AWESOME! All that colour inside makes it look like a video game! Quote Link to comment Share on other sites More sharing options...
niteowl7710 Posted March 14, 2013 Share Posted March 14, 2013 (edited) I am put off building mine because of the Japanese only decal instructions. I even contacted fujimi and they never replied. Fujimi is the least, how shall we say, export friendly of the 4 Japanese companies. Even if non-Japanese instructions existed, they'd be in the same garbled machine-translated "English" that the warnings before the assembly diagrams are featured in, and I'm not sure that'd be any more clear than what you got in the kit. Edited March 14, 2013 by niteowl7710 Quote Link to comment Share on other sites More sharing options...
iderek Posted March 14, 2013 Author Share Posted March 14, 2013 Thanks guys~ I'm going to have a lot of fun when I start decal-ling it lol Like martinfan said. Im holding off on both of my miku kits. I have this one and the gt3 Porsche So far it looks great. I am put off building mine because of the Japanese only decal instructions. I even contacted fujimi and they never replied. Well, I'm not Jjapanese, but I can somewhat understand on what to do with the hood and side panels.. I'll let you know what works best as I go along, or I'll keep posting here as a step by step Quote Link to comment Share on other sites More sharing options...
iderek Posted March 15, 2013 Author Share Posted March 15, 2013 Got the roll cage installed and did some test fitting with the body~ everything according to plan!! mwahahahaha Quote Link to comment Share on other sites More sharing options...
iderek Posted March 17, 2013 Author Share Posted March 17, 2013 Okay, I guess I'll do a little step by step with the body~ So, first.. I glued on the 6 separated pieces of the body (front vents, side panels and rear intake) I then primed the whole thing using Tamiya Surface Primer (FINE). After drying for a whole night, I laid down the base coat of Tamiya Acrylic X-2 using my airbrush. My camera sucks lol! and MORE TO COME~ Quote Link to comment Share on other sites More sharing options...
Nacho Z Posted March 17, 2013 Share Posted March 17, 2013 I'll be watching this one too. I've got this one in the stash. I'm on one hand digging the decals and on the other hand thinking they are the goofiest things I've ever seen. I am really looking forward to seeing what your experience with the decals is. It is looking good so far! Quote Link to comment Share on other sites More sharing options...
iderek Posted March 21, 2013 Author Share Posted March 21, 2013 I'll be watching this one too. I've got this one in the stash. I'm on one hand digging the decals and on the other hand thinking they are the goofiest things I've ever seen. I am really looking forward to seeing what your experience with the decals is. It is looking good so far! Thanks Z~ its quite a handful once you get to the body.. And after waiting for about 3 days for the white to dry, I finally started the decal-ing process!! Here's my step by step~ First, following the number sequence on the bottom of the picture and applying the required decal in that position. Here's the progress. Some tips I can give you is that; -decal softener (if you have some) <- will become handy when you have to apply to some curved and angle body panels -clear paint <- i used Tamiya Acrylic X22 as a decal glue on some tight spots where the decal wouldn't stick -needle <- to get rid of any air pockets after you applied the decal -q-tips <- for smoothing out the decal (not really required) -patience <- you'll definitely need a lot of this! lol Quote Link to comment Share on other sites More sharing options...
iderek Posted March 22, 2013 Author Share Posted March 22, 2013 Alright, next segment!! This one is pretty much self explanatory, use the required decal in the following positions. I started off from the roof and then worked my way to the trunk (boot). Take your time on the roof!! For the holes on the side of the trunk (boot) you'll need to punch it through. And I did the panel line of the trunk (boot) just so it looks more realistic. Quote Link to comment Share on other sites More sharing options...
lanesteele240 Posted March 22, 2013 Share Posted March 22, 2013 Keep it up she looks awesome. I bet you just cant wait to jump on that hood (bonnet). Quote Link to comment Share on other sites More sharing options...
iderek Posted March 23, 2013 Author Share Posted March 23, 2013 Keep it up she looks awesome. I bet you just cant wait to jump on that hood (bonnet). Yea man!! that's going to be next~ I just hope I won't screw it up last minute.. haha Here's the rear bumper section Same thing with the front, follow the number sequence with the corresponding decal. And here is what it will look like after. Quote Link to comment Share on other sites More sharing options...
Bennyg Posted March 23, 2013 Share Posted March 23, 2013 That is nice. Quote Link to comment Share on other sites More sharing options...
Nacho Z Posted March 23, 2013 Share Posted March 23, 2013 I really like and appreciate you doing the step-by-step shots on this. Looks like you are doing a fantastic job on the decals. Have you thought about clearing them or not? Does the carrier film show very much? I don't really see any in your pics. Keep up the good work Derek! Quote Link to comment Share on other sites More sharing options...
iderek Posted March 25, 2013 Author Share Posted March 25, 2013 I really like and appreciate you doing the step-by-step shots on this. Looks like you are doing a fantastic job on the decals. Have you thought about clearing them or not? Does the carrier film show very much? I don't really see any in your pics. Keep up the good work Derek! no problem Z, and there is a texture to the decal, but it's very little. When you shine a light to it, it shows up like gloss. I was thinking about if I should clear coat this or not, but I think I will. I'm going to shoot a few layers of Tamiya Acylic X-22 clear, if it comes out pretty smooth, I might just leave it, since I don't want to ruin it lol Quote Link to comment Share on other sites More sharing options...
Davewilly Posted March 25, 2013 Share Posted March 25, 2013 Very cool! I really like the Z3 and Z4 anyway....I didnt know they had a kit of the Z4....I have to get me one now! This is what I did with my Z3 after seeing a real on on the street with a weather beaten rag top..and decided there needed to be a better top for this killer little car. I built mine about 9 years ago before they even made the Z4 Quote Link to comment Share on other sites More sharing options...
GoatGuy Posted March 25, 2013 Share Posted March 25, 2013 Looks great.........and very challenging. Quote Link to comment Share on other sites More sharing options...
iderek Posted March 26, 2013 Author Share Posted March 26, 2013 Very cool! I really like the Z3 and Z4 anyway....I didnt know they had a kit of the Z4....I have to get me one now! This is what I did with my Z3 after seeing a real on on the street with a weather beaten rag top..and decided there needed to be a better top for this killer little car. I built mine about 9 years ago before they even made the Z4 that looks amazing!! Looks great.........and very challenging. It is really challenging once you get to the decal part. AND HERE'S AN UPDATE ON THE HOOD!!! For this part, time is your friend.. take as much time as you need!! On the instructions, follow the number sequence like the rear bumper, and apply the following decal. Cut along the line that is dotted on the main hood decal, use the instructions as reference. For the hood vents, you'll need to cut the clear part of the decal out (you can cut it before applying or cut as you go) For the hood pin holes, just punch it through like the rear trunk (boot) Here is what the final product should look like. Hope you guys like it!! Quote Link to comment Share on other sites More sharing options...
Nacho Z Posted March 26, 2013 Share Posted March 26, 2013 You are doing a GREAT job on this so far! It is really looking good. Quote Link to comment Share on other sites More sharing options...
lanesteele240 Posted March 26, 2013 Share Posted March 26, 2013 Ahhhhh Miku <3 She is so hot. I just whish she were real Quote Link to comment Share on other sites More sharing options...
Davewilly Posted March 26, 2013 Share Posted March 26, 2013 Great job on the hood...that looks killer! Did you pick up the kit in a hobby shop or get it online? Quote Link to comment Share on other sites More sharing options...
Kennyboy Posted March 26, 2013 Share Posted March 26, 2013 Derek this is a masterpiece, it will no doubt bring a smile to your face every time you walk past it. Great job my friend. Quote Link to comment Share on other sites More sharing options...
iderek Posted March 27, 2013 Author Share Posted March 27, 2013 You are doing a GREAT job on this so far! It is really looking good. Thanks Z, appreciate the compliments!! Ahhhhh Miku <3 She is so hot. I just whish she were real The first version of this car has a hotter picture of her.http://i546.photobucket.com/albums/hh419/dtshyk/04a749277f.jpg Great job on the hood...that looks killer! Did you pick up the kit in a hobby shop or get it online? I picked up this kit in a hobby store, I had my eyes on it for the longest time! Just didn't have the money to get it back then. Derek this is a masterpiece, it will no doubt bring a smile to your face every time you walk past it. Great job my friend. Thanks!! really appreciate it~ Everytime I look, I wish I have a real one sitting on my driveway lol Quote Link to comment Share on other sites More sharing options...
Recommended Posts
Join the conversation
You can post now and register later. If you have an account, sign in now to post with your account.
Note: Your post will require moderator approval before it will be visible.