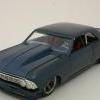
ScrappyJ Posted June 27, 2006 Share Posted June 27, 2006 This is another redo. This one had some separationg and etching as a result of the chopped topped and the sectioning to achieve the chopp (over years, it just appeared). So, I decided to redo it and put a very thin sheet of styrene at the top. There might be some etching again over years. Blown Rat. Valve covers and scoop machined by Bob Dudek. Blower and pulleys machined by me: Front suspension parts along with both front and rear air bags: Fuel tank: Opened doors, chopped and channelled. Needless to say that the chop and opening was a little challenging: Hope you guys enjoy. Quote Link to comment Share on other sites More sharing options...
MrObsessive Posted June 27, 2006 Share Posted June 27, 2006 Excellent job so far Dirk! Opening the doors on that Chevy pickup had to be a challenge because of the thinness of the windshield posts...............Not to mention building up the doglegs because of the wraparound glass. I wanted to try that with my kit............but haven't had the guts yet! I also LOVE the airbag suspension! 8) Quote Link to comment Share on other sites More sharing options...
BIGTRUCK Posted June 27, 2006 Share Posted June 27, 2006 Huge undertaking on that one , Bill is so right that door opening area is a scary cut , super work.. Quote Link to comment Share on other sites More sharing options...
ScrappyJ Posted June 28, 2006 Author Share Posted June 28, 2006 Excellent job so far Dirk! Opening the doors on that Chevy pickup had to be a challenge because of the thinness of the windshield posts...............Not to mention building up the doglegs because of the wraparound glass. I wanted to try that with my kit............but haven't had the guts yet! I also LOVE the airbag suspension! 8) Thanks, Bill! Opening the doors was trully a challenge, particularly since I chopped the top too. I finally figured out how to get it where it was sturdy enough. I frist attempted to drill small holed on either end, where I chopped the top and then insert small brass rod into each end. This worked until I sat on the caba and crushed it. I was still able to re-pin it, but then as I was testing the strenght of the post, the brass snapped (go figure, I guess brass is a little brittle). What I finally ended-up doing, was to make small channels on the outside of the post and then took straight pins (which I beleive are steel) and inserted it. Working around the curve for the dog leg, I channelled with the slitting saw first and then I took a very small engraving tool to whittle out around that corner of the dog-leg. I use a slitting saw that is metal, because if you use a cut off tool, the plastic will get too hot and start to melt. It still gets a little hot with the slitting saw, but not so much that it totally starts melting. Once the channel is made, I simply cut the pin to size, insert, and then fill with CA glue and a little activator. It seems to work okay. as now when I test it, it seems really strong. I also did this on the doors. Again thanks for the compliment and I've always admired your work! DBJ Quote Link to comment Share on other sites More sharing options...
ScrappyJ Posted June 28, 2006 Author Share Posted June 28, 2006 Huge undertaking on that one , Bill is so right that door opening area is a scary cut , super work.. Thanks, Ken! Quote Link to comment Share on other sites More sharing options...
Recommended Posts
Join the conversation
You can post now and register later. If you have an account, sign in now to post with your account.
Note: Your post will require moderator approval before it will be visible.