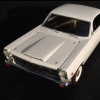
Automatic 250 Posted April 10, 2013 Share Posted April 10, 2013 (edited) Here it is, the first kit I've started in more than 20 years! I picked up this beautiful AMT Fairlane 427 over 10 years ago; finally I decided to do something about it... Stage One, research. I went online and found the exact car at www.mustangandfords.com Stage Two, more research. What new tricks are out there for building plastic models in the 21st Century, anyway? Found this little gem at my local hobby shop; Stage Three, quite dragging things out and actually commit. So, step by step, I actually got on with it. Put a lot of time and effort into finishing the engine block and components. Since this was the first subassembly I had tackled in a very long time, I luxuriated over it; sanding, filling and primering. Of course, as the weeks wore on, other aspects of the finishing received somewhat less attention... The quality of the kit moulding pleasantly surprised me. The parts fit so well that I used almost no putty. The joins bonded nicely with Ambro Safe Weld and disappeared with light sanding and filing. The transmission was a separate component from the engine block. This allowed me to finish and paint each element separately, unlike the old days when the whole thing came in two halves. Shift linkages were also included, which is I found a nice detail element. Given this was a "back in the saddle" exercise, i decided to build the kit OTB, with the exception of the spark plug wires, which seem to add so much realism. I used yellow fine-guage model railroad electrical wire. The prototype wires are black, but given the simple black and white colour scheme of the original car, I made the creative decision to emphasize small hits of bright colour as realistically as possible. I was initially apprehensive about detailing the tires. I love the red sidewall detail but dreaded how to achieve it. Fortunately, there is a very slight groove in the vinyl. With patience, reading glasses, a 000 brush and diluted flat red Tamiya acrylics, I got on with it. I allowed the diluted paint to flow into the groove and wiped away the excess, giving quite passable results. I think I may have had a whiskey as well after completing this stage. I'll post more pics later today and tomorrow. As promised; Here are some of the detail components. The dashboard was dismal, but the streering wheel turned out nicely. I sprayed the base colour using Testors semi-gloss black and painted on the chrome trims. Again, using a 000 brush and a lot of patience. No whiskey required this time. Completed engine compartment. Hose clamps are made from strips of aluminum tape. The completed sub-components ready for final assembly The first disappointment. In a misguided attempt to save money, I used commercial spray enamel instead of a better quality hobby enamel for the body colour. The result was an orange peel finish. Using super-fine grit sandpaper and polishing compound, I corrected most of the defects. I then finished the window trims and windshield wipers using Testors Krome Foil. Unfortunately, the foil picked up some of the residual orange peel finish. Lesson: get the finish right first! Completed undercarriage and detail. The selective hits of colour are all reasonably accurate to the original car. And...the final result. Edited April 15, 2013 by Automatic 250 Quote Link to comment Share on other sites More sharing options...
o-man Posted April 11, 2013 Share Posted April 11, 2013 I would need several shots from attempting those tires. Can't wait to see how the rest turns out Quote Link to comment Share on other sites More sharing options...
Custom Mike Posted April 11, 2013 Share Posted April 11, 2013 (edited) I think I may have had a whiskey as well after completing this stage. Peter, I'd say you earned that whiskey, those tires look great! Amazing how much more patience we have for this stuff as we age, isn't it? Your work looks great so far, nice and clean, keep it up! Edited April 11, 2013 by Custom Mike Quote Link to comment Share on other sites More sharing options...
Automatic 250 Posted April 11, 2013 Author Share Posted April 11, 2013 Thanks Mike. More patience yes, but a lot less free time! Quote Link to comment Share on other sites More sharing options...
cobramike Posted April 14, 2013 Share Posted April 14, 2013 That '66 is coming together nicely. I like the idea of some Scotch prior to starting, during, after, along with a nice fat cigar. I work in my work shed whenever I am working on models. Quote Link to comment Share on other sites More sharing options...
rmvw guy Posted April 14, 2013 Share Posted April 14, 2013 Nice job I like it a lot. Thanks for doing a lot of the the research for when I start mine! It's been on the shelf for at least 10 years. Quote Link to comment Share on other sites More sharing options...
Automatic 250 Posted April 15, 2013 Author Share Posted April 15, 2013 Thanks rmvw guy. After 10 years aged on plywood, I find the kit matures nicely. If I inspired you to make a start on it, great! Quote Link to comment Share on other sites More sharing options...
Automatic 250 Posted April 15, 2013 Author Share Posted April 15, 2013 I like the idea of some Scotch prior to starting, during, after, along with a nice fat cigar. I work in my work shed whenever I am working on models. Proof that model building is a manly past time. I bet Hemingway would've built plastic kits if they'd been around then. Quote Link to comment Share on other sites More sharing options...
Recommended Posts
Join the conversation
You can post now and register later. If you have an account, sign in now to post with your account.
Note: Your post will require moderator approval before it will be visible.