pandamonium2112 Posted April 12, 2013 Share Posted April 12, 2013 (edited) You can check out all the photos of this build on my Photo bucket page http://s1214.photobucket.com/ After building the MPC Street Charger back in the 90's it made it to one model contest and took a ribbon only to suffer demise at the hands of a teenager. It has lived in a box till now. I decided to give it a major overhaul. My skills have improved enough to do it justice. The kit was pretty cool and fun to build but there was some things I never really liked. The width of the rear axle for one was going to change so I could lower it with the wheels tucked up in the wells. This is what i'm starting with. Here's the progress so far. After stripping all the paint from the under body, I cut the frame away to allow dropping the body height. Then I cut out the wheel wells. Edited May 29, 2013 by pandamonium2112 Quote Link to comment Share on other sites More sharing options...
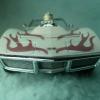
pandamonium2112 Posted April 12, 2013 Author Share Posted April 12, 2013 This is the rear height i'm shooting for. The front end will fall in later. There's a lot of work ahead on this one. I'll post more photos as progress continues.. Quote Link to comment Share on other sites More sharing options...
cobraman Posted April 12, 2013 Share Posted April 12, 2013 Looks much better with the wheels tucked and lowered. Quote Link to comment Share on other sites More sharing options...
BKcustoms Posted April 12, 2013 Share Posted April 12, 2013 This is cool! I can't wait to see how it turns out. Quote Link to comment Share on other sites More sharing options...
Custom Hearse Posted April 12, 2013 Share Posted April 12, 2013 This is gonna be a cool build! Quote Link to comment Share on other sites More sharing options...
Quick GMC Posted April 12, 2013 Share Posted April 12, 2013 So much better with the wheels tucked in Quote Link to comment Share on other sites More sharing options...
pandamonium2112 Posted April 12, 2013 Author Share Posted April 12, 2013 Thanks for the comments so far. Yes that rear stance bothered me from the day I built It, just didn't care to do anything about it at the time, it was just a box, stock build. That and scratch building a new front suspension will be the only extreme modifications. The plans from here is to add more detail (wiring, linkage, fluid lines, disc brakes and some interior work) bringing it to a more realistic level. I need some honest feedback on the paint job though. It's a beautiful color Purple gold flake. I polished the hood and it came out beautiful. During the re-build I won't have to cut into the body at all. But do you think I should. Leave it alone? Add some graphics? Complete re-paint? Quote Link to comment Share on other sites More sharing options...
Quick GMC Posted April 12, 2013 Share Posted April 12, 2013 Thanks for the comments so far. Yes that rear stance bothered me from the day I built It, just didn't care to do anything about it at the time, it was just a box, stock build. That and scratch building a new front suspension will be the only extreme modifications. The plans from here is to add more detail (wiring, linkage, fluid lines, disc brakes and some interior work) bringing it to a more realistic level. I need some honest feedback on the paint job though. It's a beautiful color Purple gold flake. I polished the hood and it came out beautiful. During the re-build I won't have to cut into the body at all. But do you think I should. Leave it alone? Add some graphics? Complete re-paint? Normally I really don't like flake paints on models, but because it's a bigger scale the flake looks good and even though I hate purple, it suits the car well. If anything, maybe sand it ultra smooth and clear coat it to give it more depth? I would stick with the paint, it fits. Quote Link to comment Share on other sites More sharing options...
BKcustoms Posted April 12, 2013 Share Posted April 12, 2013 If you can polish the paint to a point where you're happy with it, then I think you should leave it. The color is perfect for this car IMO. Quote Link to comment Share on other sites More sharing options...
Austin T Posted April 13, 2013 Share Posted April 13, 2013 So whats the story on how it got destroyed? Some guy couldn't handle losing to it? Quote Link to comment Share on other sites More sharing options...
pandamonium2112 Posted April 13, 2013 Author Share Posted April 13, 2013 Thanks for the input on the paint job. It's what I had felt all along. It's gorgeous when polished and a definite "Street Sleeper" look. It's why I left it that way when I built it. Final answer is: Keep the paint. Austin. The story on the destruction: I had 2 teenage daughters at the time of the build,and it seemed like the boys who dropped by to visit had just as hard a time keeping there hands off my displayed models (this is only 1 of 6 that were destroyed) as the 2 daughters. Still to this day I can't say which one suffered the most. The models can be rebuilt but the innocents of a couple of girls is lost forever. Does that answer your question? So. I got some time on the car after the "Honey Do" list was handled. First task was to shorten the rear axle. Then see if it was going to work out. I am trying to keep the old school approach on this car by moving the leaf springs inward and building another set of coil overs then re-fit the shackles rather than building a pro stock set up to replace the suspension. I cut the old tubs out and am making a mold out of wood to bend some new styrene tubs (only wider) to replace the stock ones but keep the same depth. Here's some photos. Stock rear hardware. Looks like it's all going work out. Quote Link to comment Share on other sites More sharing options...
Bonekrosha Posted April 13, 2013 Share Posted April 13, 2013 I do the same thing on mine as far as tucking the tires under. Love the color and I'm looking forward to seeing more of this one! Quote Link to comment Share on other sites More sharing options...
pandamonium2112 Posted April 14, 2013 Author Share Posted April 14, 2013 Lots of progress today. I started by using the old wheel tubs to make a jig out of wood for the new tubs. Then cut some styrene, layed them out on the block and carefully heated them with a torch till they bent. A test fit proved they would work nicely. Then I cut 2 more strips to fill the gap. They came out quite well. I'll be using the old tubs to scribe the angle on the new tubs so they form tightly to the body on the inside of the trunk since the lid is hinged and i'll be putting some detail in it also, probably the battery and a nitrous bottle also be able to see the top of the fuel cell in there too. I also started working on the new leaf spring mounts. A little bit of cutting and sanding should get them ready. That's all the progress for now, won't be able to get more bench time in till Monday. 16 hour shift tomorrow Quote Link to comment Share on other sites More sharing options...
crazyrichard Posted April 14, 2013 Share Posted April 14, 2013 nice work , love where this is heading !! Quote Link to comment Share on other sites More sharing options...
TheRX7Project Posted April 14, 2013 Share Posted April 14, 2013 This should be an awesome build. I'd leave the color alone- it fits the car nicely and looks like it's in good shape. The one and only thing I want to point out is that having worked on and been around many "tubbed" pro-street cars, I've never once seen a square tub. They are always round. I only point this out because the trunk is hinged, and if you want it to be "correct" the tubs should be round. Not that yours look bad at all, you did a great job building them. Quote Link to comment Share on other sites More sharing options...
Greg Myers Posted April 14, 2013 Share Posted April 14, 2013 You're gonna need some movement in those rear springs as well. With both ends solidly mounted there will be no room for the springs to move as they flex. You need some shackles. Quote Link to comment Share on other sites More sharing options...
Greg Myers Posted April 14, 2013 Share Posted April 14, 2013 for reals Quote Link to comment Share on other sites More sharing options...
pandamonium2112 Posted April 15, 2013 Author Share Posted April 15, 2013 Thanks for the feed back. James: I'm trying not to go Pro Street with this build as I stated earlier in my post. Trying to land somewhere around "Garage Modified" with the work coming out nicely. You know. "That one guy in your city that no one will tangle with because of that Purple Charger he cruises in on Sat night" The next project is going to be a lot more "Pro Streetable" A 1/16 57 Chevy 2 door Rag Top with a blown Alcohol and Nitrous fed funny car engine in it. Should be pretty wild. Gregory: Yes I haven't forgotten about the shackles. I thought that they would fit differently than they do so i'm going to re-do 2 of the leaf spring mounts. Thanks for those reference photos though. That first one is a sweet build. What are you putting it under? Quote Link to comment Share on other sites More sharing options...
pandamonium2112 Posted April 19, 2013 Author Share Posted April 19, 2013 So....not a ton of progress but I was able to get a little bench time in. It's funny that as soon as I decide to do another build that the honey-do list appears. I was able to cut down the new tubs and contour them to fit inside the body. I ran a bead of glue around the inside now that I am sure of the fit. Next will be some primer and bondo to fill in the gaps (which I anticipate will be few) I started to sand and form the leaf spring mounts and soaked the chrome off of the shackels. Been wondering about the coil overs though (Sorry for the lack of photos). The original kit had a pair on each side (total of 4 on the rear and 4 on the front) I want to keep the same design but not so sure of my confidence in scratch building them. If any one has some photos I would appreciate them for reference. The issue is that they will be shorter than the originals. While waiting for glue to dry I started on the battery and nitrous tanks that will go in the trunk also.. Hopefully I will have the whole weekend to play around...Weather man says "SNOW" tomorrow...Sounds like a basement day to me All traced and ready to cut Cut and ready for a trial fit. I guess it'll work? This is what i'm shooting for.. Pretty wicked view of the what second place would see. Minus 200 hundred pounds of chrome... Leaf spring mounts roughed in.. Starting on the nitrous bottles.. Soaked the chrome off the shackels. Not sure if I can use them or have to build new ones. They are pretty thick for a realism.. More to come.. Quote Link to comment Share on other sites More sharing options...
Bonekrosha Posted April 19, 2013 Share Posted April 19, 2013 NICE, NICE!!! Looking forward to more.... Quote Link to comment Share on other sites More sharing options...
Greg Myers Posted April 19, 2013 Share Posted April 19, 2013 The "coil overs" are actually shock absorbers, 2 per side. Early NASCAR suspensions. Quote Link to comment Share on other sites More sharing options...
pandamonium2112 Posted April 19, 2013 Author Share Posted April 19, 2013 Thanks for the photo Greg. Yes shock absorbers, sometimes I can type faster than I can think. The old shocks from the kit won't be re used (they don't look real enough and 2 got broken anyway) I would like to build some with coil overs on them, more just for looks. In the photo, that's just a single post sticking up with the shocks bolted on. I wonder what the other end that brace at the top is bolted to? Thanks again for the photo.. Quote Link to comment Share on other sites More sharing options...
Wonderbread Kustomz Posted April 19, 2013 Share Posted April 19, 2013 Very cool! Quote Link to comment Share on other sites More sharing options...
Rob Hall Posted April 19, 2013 Share Posted April 19, 2013 Neat..looks like it's coming along well. I have an unbuilt '80s issue of that kit (the molded in red version), and one thing I don't like about it is how the rear tires stick out so far...narrowing the axle and widening the rear wheel wells seems to be the way to go.. Quote Link to comment Share on other sites More sharing options...
pandamonium2112 Posted April 20, 2013 Author Share Posted April 20, 2013 Well I got most of the rear suspension done today. Forward leaf spring mounts are all formed. Shackels got modified. Worked over the leaf springs for the final time then put it together with pins to see the fit. I started gathering tubing and springs for the 4 coil over shocks on the rear but have to wait on construction till the rear end is solid so I can get the length correct. Here's the leafs layed over the axle. I think this is going to work. Quote Link to comment Share on other sites More sharing options...
Recommended Posts
Join the conversation
You can post now and register later. If you have an account, sign in now to post with your account.
Note: Your post will require moderator approval before it will be visible.