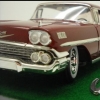
ImpalaBoy Posted May 30, 2013 Share Posted May 30, 2013 (edited) This is my '58 Impala, mostly by AMT, with a few bits from the Revell kit because I thought they were more cleanly molded. The color is Testors 1 coat lacquer Mythical Maroon over Tamiya white spray primer, no clear coat. Photoetch set from Model Car Garage, pre-wired distributor from Preston's Car Parts. Not the best distributor I've seen, but this was the first engine I've wired (but yes, they are in the correct firing order!) If any of you have a favorite brand of scale distributors, let me know, so I can get one for my next build. I started this car at the beginning of September 2012 and finished it at the end of March. It took so long mostly because a college dorm room isn't exactly the best place for model building. Still, I was able to clean up almost all the pieces and get them ready for paint so I could do all the painting over Christmas break. The pieces I took from the Revell kit are as follows: headlight assemblies, fender spears, tail light bezels and lenses, metal exhaust tips, tires (mainly because of the convenience of the white wall inserts), door handles, driver's side mirror, steering wheel, rocker covers, generator, and fuel pump. The air cleaner is from a '66 Mustang GT350. I also added a dip stick and a couple other little bits of plumbing. The springs were replaced with real springs from a retractable pen. They aren't perfect, but I think they look a lot better than the molded atrocities it came with! I cut out the trunk, too, but I guess that doesn't really matter since I didn't end up putting anything in it. The dash board gauge decals are also from the Revell kit. (Interesting side note: the chrome 'Chevrolet' script on the display case base is from the dashboard of a 1949 or '50 Chevrolet Deluxe I found in the woods. The rest of the car was pretty much a big pile of rust, but that little piece of chrome was in almost perfect condition!) Overall, I think it came out really well. Tell me what you think and please share any tips or constructive criticism that I can draw upon for future builds! Edited May 31, 2013 by ImpalaBoy Quote Link to comment Share on other sites More sharing options...
Connor01 Posted May 30, 2013 Share Posted May 30, 2013 Nice impala ,love the red and what a shine Quote Link to comment Share on other sites More sharing options...
58 Impala Posted May 30, 2013 Share Posted May 30, 2013 Very nice build. If you are looking for a good aftermarket distributor, Replicas and Miniatures of Maryland make some nice ones. Quote Link to comment Share on other sites More sharing options...
cobraman Posted May 30, 2013 Share Posted May 30, 2013 Very sharp ! Quote Link to comment Share on other sites More sharing options...
CrazyGirl Posted May 30, 2013 Share Posted May 30, 2013 Very Apple Pie !!! love it !! Quote Link to comment Share on other sites More sharing options...
lazlow Posted May 30, 2013 Share Posted May 30, 2013 Sweet, so much chrome, love the seats. Laz Quote Link to comment Share on other sites More sharing options...
John Teresi Posted May 31, 2013 Share Posted May 31, 2013 Andrew........cool build........love that outside photo. Quote Link to comment Share on other sites More sharing options...
ImpalaBoy Posted May 31, 2013 Author Share Posted May 31, 2013 Nice impala ,love the red and what a shine Thank you! This is actually the second '58 Impala I've painted this color. It's so rich. Very nice build. If you are looking for a good aftermarket distributor, Replicas and Miniatures of Maryland make some nice ones. Thanks for the recommendation, I'll have to check them out! Quote Link to comment Share on other sites More sharing options...
ImpalaBoy Posted May 31, 2013 Author Share Posted May 31, 2013 Very Apple Pie !!! love it !! Thank you! Hope to see more updates of your '67 Corvette soon, btw Quote Link to comment Share on other sites More sharing options...
ImpalaBoy Posted May 31, 2013 Author Share Posted May 31, 2013 Sweet, so much chrome, love the seats. Laz Thank you! Those were the two hardest parts in my opinion. I did all the BMF one day while watching all three Toy Story movies in a row. I think that helped me retain my sanity xD The seats were also a real pain, but all of the masking was definitely worth it in the end Quote Link to comment Share on other sites More sharing options...
ImpalaBoy Posted May 31, 2013 Author Share Posted May 31, 2013 Andrew........cool build........love that outside photo. Thanks! I like the outside shots best myself. I should go out and take more some time when it's sunny. It was actually quite surprised by how much brighter the paint looked in direct sunlight. Quote Link to comment Share on other sites More sharing options...
ImpalaBoy Posted May 31, 2013 Author Share Posted May 31, 2013 Very nice build. Thank you! And I love the Red Green Show, btw Quote Link to comment Share on other sites More sharing options...
Sixties Sam Posted May 31, 2013 Share Posted May 31, 2013 Really nice build! Great engine and interior detailing. That color really looks different in the outside photo. Great work! Sam Quote Link to comment Share on other sites More sharing options...
Porscheman Posted May 31, 2013 Share Posted May 31, 2013 Very nice build. Love the paint Quote Link to comment Share on other sites More sharing options...
Harry P. Posted May 31, 2013 Share Posted May 31, 2013 The rear springs don't work... too thin and too loosely coiled, and your foiling is a bit ragged in a few spots, but overall I'd give it a solid B+. Maybe even an A-. Quote Link to comment Share on other sites More sharing options...
ImpalaBoy Posted May 31, 2013 Author Share Posted May 31, 2013 Really nice build! Great engine and interior detailing. That color really looks different in the outside photo. Great work! Sam Thank you! I think this is my best looking engine so far. If you're looking to do a '58 Impala next, I highly recommend getting both the AMT and Revell kits and combining them Quote Link to comment Share on other sites More sharing options...
ImpalaBoy Posted May 31, 2013 Author Share Posted May 31, 2013 The rear springs don't work... too thin and too loosely coiled, and your foiling is a bit ragged in a few spots, but overall I'd give it a solid B+. Maybe even an A-. I completely agree about the springs, but I think if you saw the ones in the kit, you'd see how much of an improvement they are. As for the foiling, yes there are a couple ragged spots, but I will display no humility when I say that I honestly believe it looks better than 85% of all the '58 Impala models I've seen so far. (But then, that might just be ego and six hours of tedious X-acto work talking) Thanks for your honest evaluation Quote Link to comment Share on other sites More sharing options...
Sixties Sam Posted May 31, 2013 Share Posted May 31, 2013 Andrew, I've made coil springs by winding soft craft wire around a piece of music wire or a wooden dowel rod. The wire is dead soft and springs back only a tiny bit. I wind a coil about 2 inches long, then slide it off the rod and cut it into shorter pieces with wire cutters. Michael's Craft Stores have the wire in many gauges. Sam Quote Link to comment Share on other sites More sharing options...
Harry P. Posted May 31, 2013 Share Posted May 31, 2013 I completely agree about the springs, but I think if you saw the ones in the kit, you'd see how much of an improvement they are. I did see the ones in the kit. I've built that kit. Sorry, but yours are not an improvement. No offense intended, just being straight with you. The model overall does look good, so don't take this as a slam. Overall you did a very good job, among the better ones of this kit that I've seen. Quote Link to comment Share on other sites More sharing options...
ImpalaBoy Posted May 31, 2013 Author Share Posted May 31, 2013 I did see the ones in the kit. I've built that kit. Sorry, but yours are not an improvement. No offense intended, just being straight with you. The model overall does look good, so don't take this as a slam. Overall you did a very good job, among the better ones of this kit that I've seen. Did you use the kit springs when you built yours? If you have a picture handy I'd like see how they look. Maybe the ones in my kit were just particularly badly molded. I'm not trying to defend mine anymore; I looked back at my reference pics, and yeah, they really are way too loosely coiled. If I can get it apart, I'll try to redo them using Sam's suggestion. In general, how would you rate the kit you built in terms of mold quality? I don't think there was a single piece in mine that I didn't have to sand, file, or scrape to get it to fit, or even look good. I guess the mold was just wearing out. Quote Link to comment Share on other sites More sharing options...
Harry P. Posted May 31, 2013 Share Posted May 31, 2013 Did you use the kit springs when you built yours? If you have a picture handy I'd like see how they look. Maybe the ones in my kit were just particularly badly molded. I'm not trying to defend mine anymore; I looked back at my reference pics, and yeah, they really are way too loosely coiled. If I can get it apart, I'll try to redo them using Sam's suggestion. In general, how would you rate the kit you built in terms of mold quality? I don't think there was a single piece in mine that I didn't have to sand, file, or scrape to get it to fit, or even look good. I guess the mold was just wearing out. You're exactly right. It's an old kit, so most likely there would be some flash or even a mismatch between halves on some parts due to upper/lower mold misalignment due to wear and tear. I have photos of mine, but none showing the underside. Actually I built mine years ago and don't remember anything specific about the springs other than they would have needed the usual cleanup with a file and/or sandpaper. Maybe even a lot of cleanup! But I know I did use the kit springs. Llike I said, springs aside, you did a very nice job with yours. Definitely a model you should be proud of. Quote Link to comment Share on other sites More sharing options...
Harry P. Posted May 31, 2013 Share Posted May 31, 2013 Here's mine. As you can see, I blew it on the "fork" side trim. The two inner "tines" should not be foiled. The way you did yours is correct. I see that my foil also looks ragged in these photos. Not sure why... it's pretty clean and straight in real life. Quote Link to comment Share on other sites More sharing options...
ImpalaBoy Posted May 31, 2013 Author Share Posted May 31, 2013 Here's mine. As you can see, I blew it on the "fork" side trim. The two inner "tines" should not be foiled. The way you did yours is correct. Wow. That is a thing of beauty right there. Great color combo! I can't judge you too harshly for the fork trim; unfortunately it's a very common mistake. I really am honored that you think mine so good, though, because yours is gorgeous Quote Link to comment Share on other sites More sharing options...
Harry P. Posted May 31, 2013 Share Posted May 31, 2013 I think they're both pretty darn good... Quote Link to comment Share on other sites More sharing options...
slusher Posted May 31, 2013 Share Posted May 31, 2013 Beautiful model.. Quote Link to comment Share on other sites More sharing options...
Recommended Posts
Join the conversation
You can post now and register later. If you have an account, sign in now to post with your account.
Note: Your post will require moderator approval before it will be visible.