ImpalaBoy Posted July 30, 2013 Share Posted July 30, 2013 (edited) This is the Pro Shop version of the AMT '57 Chevy that was released in 1998. I know some of you will probably agree with me when I say it's such a good kit it's almost hard to believe it was made by AMT. It has over 160 parts and includes a photoetch set, ignition wire, a small sheet of BMF (which doesn't look like it would be enough to do the whole body, but it doesn't matter because I used the Bare Metal Foil brand Ultra Bright Chrome, which I found surprisingly different from the regular chrome), and a sprue of hoses, which also containes the bumper bullets, molded in soft vinyl, which I think is awesome! I think that's about it for extra goodies. I know a lot of people complain that it doesn't have any custom parts, but I really don't care since I think they looked too good out of the factory to customize. I actually started this about 3 weeks ago, but just now decided to put it up here. Edited September 18, 2013 by ImpalaBoy Quote Link to comment Share on other sites More sharing options...
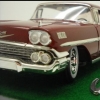
ImpalaBoy Posted July 30, 2013 Author Share Posted July 30, 2013 The paint is Tamiya bright red lacquer and Tamiya pearl white lacquer on the roof. Wet sanded and polished but no clear coat. It's pretty shiny, but not a perfect mirror finish, which is how I want it because I think that's how it would have looked right out of the factory. Quote Link to comment Share on other sites More sharing options...
ImpalaBoy Posted July 30, 2013 Author Share Posted July 30, 2013 (edited) Engine is complete, except for the batwing air cleaner. I added a couple extra bits of plumbing using wire from a bread tie, the dipstick tube, also bread tie wire, and the belt is masking tape. I'd have to say this is the most detailed engine I've seen out of box. I also have to note the presence of accurate motor mounts, which I've never seen done that well. Can anybody tell me what that black hose/tube/pipe(?) coming off the back of the engine is? The instructions are pretty vague as to what the other end goes to, but as far as I can tell, it doesn't go to anything. Yes, I know there is supposed to be a fuel bowl between that carb and the fuel line, but I didn't know how to go about scratch building it and I'm pretty sure it wouldn't be noticeable once the batwing air cleaner is in place anyway. If anybody has tips on scratching a fuel bowl, though, I would do my best to put one in if possible. Edited July 30, 2013 by ImpalaBoy Quote Link to comment Share on other sites More sharing options...
Chris White Posted July 30, 2013 Share Posted July 30, 2013 Really nice start Quote Link to comment Share on other sites More sharing options...
cobraman Posted July 30, 2013 Share Posted July 30, 2013 Looks like a nice kit. Quote Link to comment Share on other sites More sharing options...
hemi Posted July 30, 2013 Share Posted July 30, 2013 Very nice lookin so far,as far as the bowl goes look at radio shack for electronic diodes. lots of people use them just find the one that matches what you want to replicate. Quote Link to comment Share on other sites More sharing options...
ImpalaBoy Posted July 30, 2013 Author Share Posted July 30, 2013 I'm sure a lot of people are probably thinking "good grief, ANOTHER '57 Chevy??" But thanks for your positive input so far Anyway, never mind about the fuel bowl, there's no room for it behind the air cleaner. I actually had to modify that fuel line a little bit to get the air cleaner on there. Quote Link to comment Share on other sites More sharing options...
PappyD340 Posted July 31, 2013 Share Posted July 31, 2013 Extremely NICE start so far Andrew, really nice detail, like the color scheme too!! Quote Link to comment Share on other sites More sharing options...
Swifster Posted July 31, 2013 Share Posted July 31, 2013 The tube at the back of the engine is probably a road draft tube. Quote Link to comment Share on other sites More sharing options...
ImpalaBoy Posted July 31, 2013 Author Share Posted July 31, 2013 The tube at the back of the engine is probably a road draft tube. Yes! I Googled the term and eventually found a diagram of this engine where it was labeled. I had never heard of such a thing before. Thank you! Quote Link to comment Share on other sites More sharing options...
slusher Posted July 31, 2013 Share Posted July 31, 2013 Sharp paint and foil. Nice color choices.. Quote Link to comment Share on other sites More sharing options...
codie27 Posted July 31, 2013 Share Posted July 31, 2013 Nice work so far. Looks like a very interesting kit by the way. Quote Link to comment Share on other sites More sharing options...
Monty Posted July 31, 2013 Share Posted July 31, 2013 Andrew, what's the secret to lettering the valve covers? I'll be wanting to do this in black on mine, bit the "how" part eludes me. Quote Link to comment Share on other sites More sharing options...
ImpalaBoy Posted July 31, 2013 Author Share Posted July 31, 2013 Andrew, what's the secret to lettering the valve covers? I'll be wanting to do this in black on mine, bit the "how" part eludes me. I use the smallest brush I have, dip it in the lid of the paint after shaking the bottle, brush some of it off on a paper towel, and do one letter at a time, very carefully. I guess this is what they call 'dry brushing' because there's hardly any paint on the brush. You want there to be barely enough on the brush to come off on the letters. It takes a few minutes, but it's worth it. I suppose you could also try a silver (in your case, black) Sharpie. I've never tried it, but I guess as long as you just barely touch the letter with the tip of the marker so that not too much ink comes out, it should work. Quote Link to comment Share on other sites More sharing options...
blunc Posted July 31, 2013 Share Posted July 31, 2013 Yes! I Googled the term and eventually found a diagram of this engine where it was labeled. I had never heard of such a thing before. Thank you! the "road draft tube" predates the addition of the PCV (pressurized crankcase ventilation) valve which is designed to capture and burn the internal engine vapors (oil/gas/other). the road draft tube vented all these engine vapors to the atmosphere...as long as the draft tube was not clogged... Quote Link to comment Share on other sites More sharing options...
ImpalaBoy Posted August 5, 2013 Author Share Posted August 5, 2013 I sort of get the basic idea that the batwing air filter is like an oil bath kind of thing, but can anybody tell me exactly what it does? Quote Link to comment Share on other sites More sharing options...
blunc Posted August 5, 2013 Share Posted August 5, 2013 I sort of get the basic idea that the batwing air filter is like an oil bath kind of thing, but can anybody tell me exactly what it does? In my experience with oil bath air cleaner assemblies ( and I welcome Bill to correct or enlighten what I relate here ), the air filter cannister is fitted in such a way as to force air to be sucked through the oil in the bottom of the cannister thereby trapping foreign objects like dust/debris in the oil rather than going direct into the carb. THis was relatively safe (assuming the car never tilted very much or crashed) because oil has to be rather hot before it will burn or be contaminated with fluids that are flammable. Fiber type air filter elements came along to reduce the messy issues with oil bath air filter assemblies which were much easier to service/replace. Quote Link to comment Share on other sites More sharing options...
ImpalaBoy Posted August 5, 2013 Author Share Posted August 5, 2013 In my experience with oil bath air cleaner assemblies ( and I welcome Bill to correct or enlighten what I relate here ), the air filter cannister is fitted in such a way as to force air to be sucked through the oil in the bottom of the cannister thereby trapping foreign objects like dust/debris in the oil rather than going direct into the carb. THis was relatively safe (assuming the car never tilted very much or crashed) because oil has to be rather hot before it will burn or be contaminated with fluids that are flammable. Fiber type air filter elements came along to reduce the messy issues with oil bath air filter assemblies which were much easier to service/replace. Thanks for the info! I had a friend looking at my photos on Facebook wondering what in the world it is, so that helped him, too Quote Link to comment Share on other sites More sharing options...
ImpalaBoy Posted August 5, 2013 Author Share Posted August 5, 2013 Very very nice work so far. Thank you! How's your non-proshop version coming? Is there a thread for it yet that I've missed? Quote Link to comment Share on other sites More sharing options...
ImpalaBoy Posted August 6, 2013 Author Share Posted August 6, 2013 Exhaust system is assembled and painted. It went together very well; you can't even tell each pipe was three pieces! I love noticing little details that are done really well in this kit and in this case, it's the muffler clamps. I knew the front seat would probably be tricky to assemble after painting the pieces, so I went ahead and put it together. Good thing I did, too, because the back didn't fit quite right. I cut the back in two and attached each half so they lined up correctly, then filed between the seats on the front to make it look more realistic, since each half of the seat folds down separately on the 1:1. I just hope the gap isn't too big now. Quote Link to comment Share on other sites More sharing options...
Albie D Posted August 6, 2013 Share Posted August 6, 2013 Great work so far. I've had this kit for a long time, looks fun to build. Keep it going... Quote Link to comment Share on other sites More sharing options...
ImpalaBoy Posted August 7, 2013 Author Share Posted August 7, 2013 Engine and chassis are done, body is painted, interior is in process. I will try to take pics this weekend. No thread yet. Sweet, looking forward to seeing it! Quote Link to comment Share on other sites More sharing options...
ImpalaBoy Posted August 7, 2013 Author Share Posted August 7, 2013 Great work so far. I've had this kit for a long time, looks fun to build. Keep it going... Thanks! Do you plan on bringing yours to the workbench soon? It really is a great kit. Aside from the Tamiya Ferrari Enzo I almost forgot I started, this the next best kit I've ever put together! Quote Link to comment Share on other sites More sharing options...
ImpalaBoy Posted August 7, 2013 Author Share Posted August 7, 2013 I love how this kit has the frame separate from the floor pan! Sooo much easier to paint it cleanly! The underbody is Dupli-Color red oxide primer (I'll probably have to build a whole fleet of '50s cars to finish the can) and the frame is flat black with one coat of gloss clear to make it a perfect semi-gloss. Quote Link to comment Share on other sites More sharing options...
ImpalaBoy Posted August 7, 2013 Author Share Posted August 7, 2013 Is red oxide primer correct on a 57 Chevy? It sure is! Here's one of the reference pics I'm going off of. Quote Link to comment Share on other sites More sharing options...
Recommended Posts
Join the conversation
You can post now and register later. If you have an account, sign in now to post with your account.
Note: Your post will require moderator approval before it will be visible.