DrKerry Posted August 21, 2013 Share Posted August 21, 2013 I'm a watchin!!!!!!!!! Quote Link to comment Share on other sites More sharing options...
Kennyboy Posted August 21, 2013 Author Share Posted August 21, 2013 SMALL update pics: Quote Link to comment Share on other sites More sharing options...
Kennyboy Posted August 22, 2013 Author Share Posted August 22, 2013 Great Project Ken! My dad had a '62 when I was a teenager, Great Car... Thanks Ira! I bet that car was fun! Looking real good. Can't wait to see more progress. Thanks Virgil! Should have more soon, was in the lab...I mean shop painting yesterday. Quote Link to comment Share on other sites More sharing options...
Kennyboy Posted August 24, 2013 Author Share Posted August 24, 2013 UPDATE: Painted the chassis and exhaust, fitted the front wheels and brakes, and tested the ride height/stance. Quote Link to comment Share on other sites More sharing options...
Custom Mike Posted August 25, 2013 Share Posted August 25, 2013 (edited) Man, this is gonna be a killer model! Great work getting the chassis in there so well, and the ride height looks prefect! Edited August 25, 2013 by Custom Mike Quote Link to comment Share on other sites More sharing options...
James2 Posted August 25, 2013 Share Posted August 25, 2013 Looks pretty good... Removing the mold lines on the exhaust would go a long way. Quote Link to comment Share on other sites More sharing options...
Kennyboy Posted August 25, 2013 Author Share Posted August 25, 2013 Man, this is gonna be a killer model! Great work getting the chassis i there so well, and the ride height looks prefect! Thanks a lot Mike Looks pretty good... Removing the mold lines on the exhaust would go a long way. Thanks, good point on the exhaust. Was so busy working on other steps forgot to do that before painting. Quote Link to comment Share on other sites More sharing options...
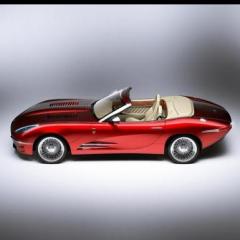
Kennyboy Posted August 25, 2013 Author Share Posted August 25, 2013 UPDATE: Decided to do the 1:1 front end afterall.... scratchbuilt a center grille insert and massaged the front bumper to fit and removed and cleaned up the bumper ends. The 1:1 for reference Quote Link to comment Share on other sites More sharing options...
Custom Mike Posted August 25, 2013 Share Posted August 25, 2013 (edited) Wow, that nails it! Just a suggestion, I'd go with Model Master Metalizer Aluminium Plate for the finish on that part, it'll buff up nicely and look just about identical to the 1:1 part! Here's what it looks like once it's buffed out. (It's on the exhaust) If you're looking for a more satin finish, use Tamiya Flat Aluminum, here's how it looks out of the can... Edited August 25, 2013 by Custom Mike Quote Link to comment Share on other sites More sharing options...
Kennyboy Posted August 25, 2013 Author Share Posted August 25, 2013 Great suggestion Mike! I do plan on having it look like the 1:1 finish on the front end. Still not sure on the LED turn signals....maybe?. Quote Link to comment Share on other sites More sharing options...
DrKerry Posted August 26, 2013 Share Posted August 26, 2013 Hey Kenny, not sure how close to accuracy your going for, but the grille surround corners on the 1:1 are rounded off. Just an observation.... Lookin good so far!!!! Quote Link to comment Share on other sites More sharing options...
Kennyboy Posted August 26, 2013 Author Share Posted August 26, 2013 Thanks Kerry. Noticed that yesterday too....guess I was so busy getting it built I did not notice til the end. When I get the ends done (one is almost there) I will most likely make the decision then if I will round them off. Quote Link to comment Share on other sites More sharing options...
DrKerry Posted August 27, 2013 Share Posted August 27, 2013 There ya go, just wasn't sure if you realized or not. Didn't want to see ya get it all puttied in and see it and scream out DOH!!!! Quote Link to comment Share on other sites More sharing options...
Custom Mike Posted August 27, 2013 Share Posted August 27, 2013 Ken, I have no idea how you could make the LED turn signals, you're on your own there buddy...but if you can pull it off, it'll be cool! Quote Link to comment Share on other sites More sharing options...
slusher Posted August 27, 2013 Share Posted August 27, 2013 Nice work on the grill Ken, love those wheels also... Quote Link to comment Share on other sites More sharing options...
Kennyboy Posted August 27, 2013 Author Share Posted August 27, 2013 Ken, I have no idea how you could make the LED turn signals, you're on your own there buddy...but if you can pull it off, it'll be cool! I have been thinking I could probably just make some pieces out of clear sprue, shape them and with micro drill put a series of small holes that would go only partways thru the backside of the clear piece and paint the holes chrome, and then cut into the bumper ends and smooth them in. Should look like a bank of LED lights (not going to make light up ones.....I'm not that good.) Nice work on the grill Ken, love those wheels also... Thanks Carl, just could not see the build with the atrocious looking wheels of the 1:1 Quote Link to comment Share on other sites More sharing options...
Kennyboy Posted August 28, 2013 Author Share Posted August 28, 2013 (edited) UPDATE: Cut the driver's side of the dash out and sectioned in the ZR1 dash cluster. This was a major PITA to get the angle right on. Now just have to fill with putty and do the "matching" of both pieces. The passenger side will have the original "handle" in it for HOLD ON times. Which will also continue the natural curvature of the dash from one side to the other (Looks strange without it, I know.) I will be installing the 2010 Z06 steering wheel. Oh yeah, I also have to remove the EXTRA set of pedals from the original floorpan! On the front end, I was able to complete the driver's side grille piece to match the center.....now for the Passenger side. Edited August 28, 2013 by Kennyboy Quote Link to comment Share on other sites More sharing options...
cobraman Posted August 28, 2013 Share Posted August 28, 2013 Coming along nicely. Quote Link to comment Share on other sites More sharing options...
Ira Posted August 29, 2013 Share Posted August 29, 2013 Great Progress Ken! Real Nice Interior & Front End... Quote Link to comment Share on other sites More sharing options...
Kennyboy Posted August 29, 2013 Author Share Posted August 29, 2013 Coming along nicely. Thanks Ray Great Progress Ken! Real Nice Interior & Front End... Thank you Ira, LOVED what you did with the USA1 build! Quote Link to comment Share on other sites More sharing options...
DrKerry Posted August 29, 2013 Share Posted August 29, 2013 That is lookin good Ken, love how the dash looks. Looks like it should of been made that way. Coming along great!!! Quote Link to comment Share on other sites More sharing options...
Kennyboy Posted August 29, 2013 Author Share Posted August 29, 2013 That is lookin good Ken, love how the dash looks. Looks like it should of been made that way. Coming along great!!! Thanks Kerry. Should be much farther along by Saturday. Quote Link to comment Share on other sites More sharing options...
Davewilly Posted August 29, 2013 Share Posted August 29, 2013 Looking pretty good! Quote Link to comment Share on other sites More sharing options...
Kennyboy Posted August 29, 2013 Author Share Posted August 29, 2013 Looking pretty good! Thanks Dave. Quote Link to comment Share on other sites More sharing options...
ScrappyJ Posted August 29, 2013 Share Posted August 29, 2013 Very cool project, Ken! I love the front end treatment too! Quote Link to comment Share on other sites More sharing options...
Recommended Posts
Join the conversation
You can post now and register later. If you have an account, sign in now to post with your account.
Note: Your post will require moderator approval before it will be visible.