Ron Hamilton Posted September 22, 2013 Share Posted September 22, 2013 Jo-Han 1967 AMC Ambassador DPL 2 Door Hardtop. I started with this one. The front suspension was broken in pieces. It was glued pretty tight, and it was a little dirty, but I was able to get it apart with little drama and it was cleaned and stripped. I had to rebuild the front suspension, and I lowered it while doing so. I decided on painting it with Testors' Fiery Orange Lacquer, with a Black Vinyl Roof, and Interior. I also added a set of wire wheel covers, with Goodyear Power Cushion Whitewalls. Quote Link to comment Share on other sites More sharing options...
modeler98 Posted September 22, 2013 Share Posted September 22, 2013 (edited) Pretty kewl. Wish I had half the talent of you. Or any body really. (: () Edited September 22, 2013 by modeler98 Quote Link to comment Share on other sites More sharing options...
Tom Geiger Posted September 22, 2013 Share Posted September 22, 2013 Lookin' good Ron! I was thinking about you today. I am working on a Revell '62 Valiant and the windshield top is way to low. I'm figuring I'd be taking it up to the top of the molding, and scribe a new one that much above. Didn't you do this modification? Advise? Quote Link to comment Share on other sites More sharing options...
Ron Hamilton Posted September 22, 2013 Author Share Posted September 22, 2013 (edited) Lookin' good Ron! I was thinking about you today. I am working on a Revell '62 Valiant and the windshield top is way to low. I'm figuring I'd be taking it up to the top of the molding, and scribe a new one that much above. Didn't you do this modification? Advise? Tom, I cleaned up the heavy mould lines on a AMT '61, and replaced the windshield and backlight moulding with plastic strip. On your Revell car, I would look at the AMT, measure the height of their windows relative to the edge of the roof, and remove that amount, and replace the mouldings. I'm also working over an AMT '60 Sedan, which is not as bad as the hardtop. Edited September 22, 2013 by Ron Hamilton Quote Link to comment Share on other sites More sharing options...
b_lever1 Posted September 22, 2013 Share Posted September 22, 2013 Superb restoration jobs all very nice Quote Link to comment Share on other sites More sharing options...
slusher Posted September 22, 2013 Share Posted September 22, 2013 Excellent work on the restoration. Beautiful model.. Quote Link to comment Share on other sites More sharing options...
peekay Posted September 22, 2013 Share Posted September 22, 2013 I like this a lot, very nice restoration. Quote Link to comment Share on other sites More sharing options...
Chris White Posted September 22, 2013 Share Posted September 22, 2013 Nice save, and cool too Quote Link to comment Share on other sites More sharing options...
krazyglu Posted September 22, 2013 Share Posted September 22, 2013 It's really cool that you bring back these kits and save them from certain doom. Very nice work. Quote Link to comment Share on other sites More sharing options...
crazyjim Posted September 22, 2013 Share Posted September 22, 2013 There's a shot - and a save. Way to go, Ron. I love the SHINY :) Quote Link to comment Share on other sites More sharing options...
Tom Geiger Posted September 22, 2013 Share Posted September 22, 2013 Thanks for the info on the Valiant, I think I'll be fixing two bodies this evening. Quote Link to comment Share on other sites More sharing options...
PappyD340 Posted September 22, 2013 Share Posted September 22, 2013 SWEET! Quote Link to comment Share on other sites More sharing options...
bbowser Posted September 22, 2013 Share Posted September 22, 2013 Great save, nice looking AMC. Quote Link to comment Share on other sites More sharing options...
Harry P. Posted September 23, 2013 Share Posted September 23, 2013 Dang, man! That is beautiful! Quote Link to comment Share on other sites More sharing options...
Helix Posted September 23, 2013 Share Posted September 23, 2013 Nice resto Ron, well done mate! Quote Link to comment Share on other sites More sharing options...
realgone58 Posted September 24, 2013 Share Posted September 24, 2013 Beautiful Ron!, I've yet to order a hood ornament for mine. Love the colors on it! Quote Link to comment Share on other sites More sharing options...
Sixties Sam Posted September 24, 2013 Share Posted September 24, 2013 Great build! It's good to see those old AMC's saved. Very nice work! Sam Quote Link to comment Share on other sites More sharing options...
Porscheman Posted September 25, 2013 Share Posted September 25, 2013 Another beautiful restoration!!! Quote Link to comment Share on other sites More sharing options...
Marc @ MPC Motorsports Posted September 25, 2013 Share Posted September 25, 2013 Another beauty! Quote Link to comment Share on other sites More sharing options...
TooOld Posted September 25, 2013 Share Posted September 25, 2013 Great restoration Ron ! Another beautiful model . Quote Link to comment Share on other sites More sharing options...
Bill Edman Posted September 26, 2013 Share Posted September 26, 2013 very nice resto's Quote Link to comment Share on other sites More sharing options...
Danno Posted September 26, 2013 Share Posted September 26, 2013 Nice. Quote Link to comment Share on other sites More sharing options...
charlie8575 Posted September 27, 2013 Share Posted September 27, 2013 Have one MIB I bought a few years ago when I had a little money. Question for you, Ron: what did you do to get a "well-glued" kit apart? I have a Buick with a bordering-on-fused glass unit into the roof and I'm trying to figure out how to remove the glass without destroying the body. Also, where did you get the Goodyear Power Cushions? That's a very nice build. I like the orange...looks very copper, and looks good with the black vinyl top. Charlie Larkin Quote Link to comment Share on other sites More sharing options...
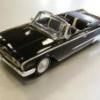
Ron Hamilton Posted September 27, 2013 Author Share Posted September 27, 2013 Have one MIB I bought a few years ago when I had a little money. Question for you, Ron: what did you do to get a "well-glued" kit apart? I used my trusty x-acto knife to get between the glue joints. Also, I use my Dremel with a fine toothed 1" Zona cutoff blade. I have to work very carefully at the glue joint. In some cases, the joint will not come apart without inflicting some serious damage, so I have to cut up the attached part close to the joint, not damaging the body, or some other irreplaceable section of the model. Next I grind off the balance of the old part with various grinding bits with my Dremel at a slow speed in order not to melt the plastic. Then I have to either get the replacement part from the Modelhaus, a used part from Ebay or the parts box, modify a similar part from another kit, or scratchbuild the replacement out of plastic. I have a Buick with a bordering-on-fused glass unit into the roof and I'm trying to figure out how to remove the glass without destroying the body. On this '60 Corvair, the glass was heavilly glued in at the base. I cut the glass loose at an inconspicuous place, using the Dremel with the 1" Zona circular blade, cutting just at the glass, and removed it from the car. And yes, It's ready for paint after a lot of work. Also, where did you get the Goodyear Power Cushions? The Lindberg 1961 Chevrolet Impala Convertible. I did my own whitewalls with a bow compass and flat white acrylic. That's a very nice build. I like the orange...looks very copper, and looks good with the black vinyl top. Charlie Larkin Thank You Charlie!!! Quote Link to comment Share on other sites More sharing options...
Dominik Posted October 2, 2013 Share Posted October 2, 2013 very nice! Quote Link to comment Share on other sites More sharing options...
Recommended Posts
Join the conversation
You can post now and register later. If you have an account, sign in now to post with your account.
Note: Your post will require moderator approval before it will be visible.