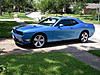
Mopar - D Posted April 10, 2014 Share Posted April 10, 2014 (edited) This is the MPC King Cuda kit that I built a couple years ago. The body has a 69 front and rear but has 68 style side lights so I'm going to use a resin 68 conversion kit to make it a 68. I'm going to replace the engine with a Ross Gibson 340. Debating on changing the chassis with one from the Dart. I'm going with new paint so I've started stripping the old off to replace with MCW Electric blue. Here's where I'm at now. Your comments and recommendations are welcome. Edited June 1, 2014 by Mopar - D Quote Link to comment Share on other sites More sharing options...
Mopar - D Posted April 10, 2014 Author Share Posted April 10, 2014 Quote Link to comment Share on other sites More sharing options...
slusher Posted April 10, 2014 Share Posted April 10, 2014 Looking forward to another Mopar build Dan. I have been enjoying your work... Quote Link to comment Share on other sites More sharing options...
1972coronet Posted April 10, 2014 Share Posted April 10, 2014 Is that conversion kit from Hart's Parts ? His parts are top notch ! Quote Link to comment Share on other sites More sharing options...
charlie8575 Posted April 10, 2014 Share Posted April 10, 2014 This'll be a nice project. Charlie Larkin Quote Link to comment Share on other sites More sharing options...
FASTBACK340 Posted April 11, 2014 Share Posted April 11, 2014 (edited) Looks like a good plan there! I have one of those conversion kits from Perry's Resin and haven't had the chance to try it. If you go with the Dart chassis, the level of detail is lights years ahead of that lump that came under the car, but you will have to hack off a section of the front of the interior bucket and leave the rear seat folded down to hide the generous grinding away of the tail of the bucket to fit the equally ground-down chassis to make it all fit. Care must be taken with the rear wheel wells on the chassis when grinding. It's a game of fractions and a slice here, and a shave there and it all goes together. Slice out the engine compartment pieces from the Dart body and it just drops….in….place. And as for the RG resin engine, spend extra care filing everything flush. The castings are crude to be polite. The detail is amazing, but the unfinished side is horrible. Shade the surface with a Sharpie to see where you have to sand and GO EASY! I use a piece of sandpaper on a smooth surface to level it. You know I'd love to see another `68 go together. I'm back on mine now too. Let's go! Edited April 11, 2014 by FASTBACK340 Quote Link to comment Share on other sites More sharing options...
Mopar - D Posted April 11, 2014 Author Share Posted April 11, 2014 John following your build is what gave me the insentive to rebuild this at this time. I've had the resin kit about a year now and this build was on the to do list but your build moved it up. I'll be checking your progress glad your able to get back on it and thanks for the advanced tips on the Dart chassis and the Gibson 340. Quote Link to comment Share on other sites More sharing options...
Mopar - D Posted April 12, 2014 Author Share Posted April 12, 2014 Have removed most of the paint just some clean up then I will ready to start cutting in the new resin front. Quote Link to comment Share on other sites More sharing options...
FASTBACK340 Posted April 12, 2014 Share Posted April 12, 2014 Cool!!!! Quote Link to comment Share on other sites More sharing options...
slusher Posted April 12, 2014 Share Posted April 12, 2014 Nice strip. what did you use may I ask?? Quote Link to comment Share on other sites More sharing options...
Mopar - D Posted April 12, 2014 Author Share Posted April 12, 2014 Carl I used brake fluid. The hard part was getting the clear coat off it took a couple days for it to soften up then it pealed off. I used a micro fiber cloth to rub the brake fluid on and remove the paint. I also wash it with soft soap a couple times as I'm removing the clear coat. Quote Link to comment Share on other sites More sharing options...
Mopar - D Posted April 13, 2014 Author Share Posted April 13, 2014 I've stated on the changing out the front grill. I cut out the old one frame around the grill and installed the new one. I'm working on thinning the out side edge of the grill to make it a smoother transaction like the real ones. The resin parts are fitting good. Thanks for your comments on this build. Quote Link to comment Share on other sites More sharing options...
10thumbs Posted April 13, 2014 Share Posted April 13, 2014 Hi Dan, I like these kind of builds! Thanks too for the tip with brake fluid. Have fun. Michael Quote Link to comment Share on other sites More sharing options...
om617 Posted April 13, 2014 Share Posted April 13, 2014 I like these kind of builds! Me too,also learn what diffrence the real cars in details. Nice job so far. Quote Link to comment Share on other sites More sharing options...
1 bad55 stan Posted April 13, 2014 Share Posted April 13, 2014 Nice work,Keep us posted Dan.. Quote Link to comment Share on other sites More sharing options...
FASTBACK340 Posted April 13, 2014 Share Posted April 13, 2014 Yes… plastic is being cut-up. Now we're cooking! Quote Link to comment Share on other sites More sharing options...
slusher Posted April 13, 2014 Share Posted April 13, 2014 Next time I have a strip I am going to use brake fluid. Real nice progress Dan... Quote Link to comment Share on other sites More sharing options...
Mopar - D Posted April 18, 2014 Author Share Posted April 18, 2014 I did more cutting and grinding today on the Dart chassis. I cut 5 scale inches out of the chassis and also the inter fender wells. Have started grinding the interior tub and chassis to get them to fit together. Here are today's progress pictures. Thanks for the comments and recommendations. I used some tubing on the outer edges of the chassis to give it support. Quote Link to comment Share on other sites More sharing options...
FASTBACK340 Posted April 19, 2014 Share Posted April 19, 2014 Deva Vue!!!!!!!!!!!!!!!!!!!!! Quote Link to comment Share on other sites More sharing options...
FASTBACK340 Posted April 19, 2014 Share Posted April 19, 2014 I did more cutting and grinding today on the Dart chassis. I cut 5 scale inches out of the chassis and also the inter fender wells. Have started grinding the interior tub and chassis to get them to fit together. Here are today's progress pictures. Thanks for the comments and recommendations. Unfortunately I couldn't save the rear seat area on mine. I'm forced to glue the seat back folded down covering the "fix" to make the new chassis fit the ancient interior tub. Luckily, I do the same with my 1:1. I never fold up the back seat. Quote Link to comment Share on other sites More sharing options...
drawingDrew Posted April 19, 2014 Share Posted April 19, 2014 what did you use to strip the paint so cleanly? I can't seem to strip the paint off my cars without taking 3 hours and still have paint spots everywhere Quote Link to comment Share on other sites More sharing options...
Mopar - D Posted April 19, 2014 Author Share Posted April 19, 2014 Andrew I use brake fluid to remove the paint. If there is a clear coat it will require letting the brake fluid to soften it and it will take a day for it to get where it will peel off. So what I did was to wipe the body down with a Miro fiber cloth a couple times with brake fluid until nothing else comes off then I coat the body with brake fluid and let it set over night and the next day I wash the body with soap and water and the clear coat starts to peel off. After the clear coat is off the brake fluid wiped on with the miro fiber cloth will remove the remaining paint very quickly. I wash the body 3 to 4 times in the process when ever the body starts to get messy I wash it off. I used a scrib to clean out the panel lines. It took me a week to clean off the body that's with allowing the brake fluid to soften the clear coat if there was no clear coat it would only take a couple hours. Hope this helps if you have questions let me know. Quote Link to comment Share on other sites More sharing options...
drawingDrew Posted April 20, 2014 Share Posted April 20, 2014 Thank you for explaining the process instead of just a one word answer. It helps me very much. Quote Link to comment Share on other sites More sharing options...
FASTBACK340 Posted April 20, 2014 Share Posted April 20, 2014 Have you tried Castrol Super Clean? There's pro's & con's as I personally don't like brake fluid, but the Castrol will eat through metal. I use a soft bristle tooth brush and scrub off the remains after I let it soak overnight. When done you strain it and it's re-useable. You can also pour it down the drain to dispose of. It's also great for stripping chrome. Brake fluid is a petroleum product that should be safely disposed of. Brake fluid works, but to me, is messy and icky….. Quote Link to comment Share on other sites More sharing options...
Mopar - D Posted April 20, 2014 Author Share Posted April 20, 2014 John I have not tried the Castrol Super Clean where can you buy it from? You are correct the brake fluid is messy and icky to work with. Quote Link to comment Share on other sites More sharing options...
Recommended Posts
Join the conversation
You can post now and register later. If you have an account, sign in now to post with your account.
Note: Your post will require moderator approval before it will be visible.