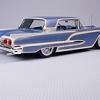
John Goschke Posted May 23, 2014 Share Posted May 23, 2014 (edited) Now She's a Hardtop! A while back I was fortunate to be able to pick up this really clean built-up '58 Bonneville ragtop. Stripped what little paint there was and gave her an attitude adjustment and new rolling stock... Problem was the car I really wanted to build was a hardtop, plus, without a roof it's real obvious that the interior in this old kit is kinda shallow and not very detailed. Wish it was a hardtop but, unfortunately, AMT's Trophy Series '58 Impala won't fit without more work than I care to do... Then a pretty horrendous hardtop body turns up on ebay that looks like it has a salvageable roof... Sold! After several hours under the scalpel (and other sharp implements) the main surgery's complete... Edited March 20, 2018 by John Goschke Quote Link to comment Share on other sites More sharing options...
Wonderbread Kustomz Posted May 23, 2014 Share Posted May 23, 2014 Nice work! Quote Link to comment Share on other sites More sharing options...
John Goschke Posted May 23, 2014 Author Share Posted May 23, 2014 (edited) While the roof wasn't perfect the rest of the hardtop body was pretty trashed, looking like someone had attempted to strip the paint with a wire brush and a utility knife! I wetsanded some scratches out of the forward section of the roof and did some other cleanup to make sure it was salvageable before marking the beltline and lower rear windows moldings for cutting with a razor saw. After those cuts were made I repeatedly scribed a cut with a #11 blade high on the quarter panel about a 16th inch from the base of the C pillar from saw cut to saw cut, freeing the back of the roof. The vent window and windshield posts were already cracked through so no cutting was needed there. Edited May 23, 2014 by John Goschke Quote Link to comment Share on other sites More sharing options...
John Goschke Posted May 23, 2014 Author Share Posted May 23, 2014 After the roof was cut free I made a light knife cut at the back edge of the vent window, then carefully shaved the remnants of the vent and windshield posts off. Then I highlighted the knife cut by rubbing a little pencil lead into it. This gave me a reference point for locating the roof on the convertible. I also carefully shaved the extra bit of plastic from the hardtop quarter panel off the base of the roof, right up to the beltline molding and the base of the C pillar and no more. Moving to the convertible body, I gingerly cut away the sun visors from the windshield frame. Then I held roof to body, and noting the reference marks at the vent windows, marked the location of the cuts on the beltline and rear window molding, and using the #11 blade, bit by bit, cut out the notches in the body for the base of the roof. Test fitting at frequent intervals prevented cutting away too much plastic. I also trimmed off the upper windshield molding from the hardtop roof since the convertible frame would take its place. At one point during the testfitting it appeared that some additional needed to be removed from the front edge of the roof and I did go too far, having to add a bit styrene strip along that edge to fix it. Quote Link to comment Share on other sites More sharing options...
John Goschke Posted May 23, 2014 Author Share Posted May 23, 2014 The convertible interior is the same as that used for the hardtop kit except that it has holes at the back for locating the boot cover. I used telescoping plastic tubing and rod cemented in with liquid cement and a little cyano for good measure to fill the holes. These were then cut almost flush, then shaved down with a #11 a bit more before being filed and wet sanded smooth on the top side. Quote Link to comment Share on other sites More sharing options...
John Goschke Posted May 23, 2014 Author Share Posted May 23, 2014 There's plenty left to do, including making a new rear window and adding weather seal and window channel detail to the side window openings. The windshield header will need to be reshaped once the top is glued on, then yadda, yadda, yadda... but I'm pretty happy with the result so far! Quote Link to comment Share on other sites More sharing options...
Ira Posted May 23, 2014 Share Posted May 23, 2014 Great Conversion! Quote Link to comment Share on other sites More sharing options...
cobraman Posted May 23, 2014 Share Posted May 23, 2014 I agree with Ira. Quote Link to comment Share on other sites More sharing options...
fitforbattle Posted May 23, 2014 Share Posted May 23, 2014 That is one sexy car. Quote Link to comment Share on other sites More sharing options...
drifterdon Posted May 23, 2014 Share Posted May 23, 2014 Super nice. Will be following this one. Quote Link to comment Share on other sites More sharing options...
Danno Posted May 23, 2014 Share Posted May 23, 2014 Terrific work, John! It looks great. I gotta admit, I was almost afraid to open this thread! Didn't know what to expect. I was pleasantly surprised! Quote Link to comment Share on other sites More sharing options...
Ramfins59 Posted May 23, 2014 Share Posted May 23, 2014 John, that is some great work you're doing on this Bonnie. I love it. Quote Link to comment Share on other sites More sharing options...
Brizio Posted May 23, 2014 Share Posted May 23, 2014 Beautiful work and car! Quote Link to comment Share on other sites More sharing options...
Jantrix Posted May 23, 2014 Share Posted May 23, 2014 Wow. There is no way I could have done that so cleanly. Quote Link to comment Share on other sites More sharing options...
fitforbattle Posted May 23, 2014 Share Posted May 23, 2014 She looks great in flat white by the way. Quote Link to comment Share on other sites More sharing options...
espo Posted May 23, 2014 Share Posted May 23, 2014 Great job on the new top. You cut it so precise that it will hardly need any filler. It looks like you have done this before. Quote Link to comment Share on other sites More sharing options...
Ron Hamilton Posted May 23, 2014 Share Posted May 23, 2014 Can we say "Hocus Pocus"? That is one magical conversion. Quote Link to comment Share on other sites More sharing options...
squirrel886 Posted May 23, 2014 Share Posted May 23, 2014 Nice work! Quote Link to comment Share on other sites More sharing options...
Guest Posted May 23, 2014 Share Posted May 23, 2014 My my this will be nice! Quote Link to comment Share on other sites More sharing options...
1 bad55 stan Posted May 23, 2014 Share Posted May 23, 2014 Bonnie is lookin great,some neat grafting going on. Quote Link to comment Share on other sites More sharing options...
Custom Hearse Posted May 23, 2014 Share Posted May 23, 2014 Nice conversion! You did an excellent job swapping the roofs. This is gonna be worth the effort you're putting into it! Quote Link to comment Share on other sites More sharing options...
MrObsessive Posted May 23, 2014 Share Posted May 23, 2014 John, that is some nice clean work! That was a stoke of luck that you came across a trashed body with a good roof..........Knowing me, I might have went through all of the trouble using the AMT '58 Chevy. I wonder if the roof off of the Revell kit might have worked, being that and the AMT are two different kits? Quote Link to comment Share on other sites More sharing options...
62rebel Posted May 23, 2014 Share Posted May 23, 2014 excellent exercise! exceeding expectations! re the 58 kits, wouldn't the rear glass from one of those work? Quote Link to comment Share on other sites More sharing options...
Belugawrx Posted May 23, 2014 Share Posted May 23, 2014 Cool mod Got a tutorial on the drip trim ? Cheers Quote Link to comment Share on other sites More sharing options...
donb Posted May 24, 2014 Share Posted May 24, 2014 John, that is some great work you're doing on this Bonnie. I love it. X2 Quote Link to comment Share on other sites More sharing options...
Recommended Posts
Join the conversation
You can post now and register later. If you have an account, sign in now to post with your account.
Note: Your post will require moderator approval before it will be visible.