Bob Ellis Posted May 24, 2014 Share Posted May 24, 2014 You did a fantastic job of cutting and fitting. Just an observation, it appears convertible kits are easier to find than hardtop kits. It seems this way for 1958-1965 annual kits anyways. Quote Link to comment Share on other sites More sharing options...
slusher Posted May 24, 2014 Share Posted May 24, 2014 Excellent work on the top change.. Quote Link to comment Share on other sites More sharing options...
1930fordpickup Posted May 24, 2014 Share Posted May 24, 2014 Stunning. Quote Link to comment Share on other sites More sharing options...
misterNNL Posted May 24, 2014 Share Posted May 24, 2014 I love what you've done so far.working on a project like this one makes you want to move very cautiously doesn't't it?It's not like you start wacking away at these thinking that you can stop by your local hobby shop and pick up another kit and move on.You're Woking with surgical precision and doing it right the first time.I have a pair of these '58 Pontiacs that I look forward to rebuilding at some point In the future so I will enjoy watching this build progress.Be sure to check with The Modelhaus for that windshield that you need. Quote Link to comment Share on other sites More sharing options...
am73grand Posted May 24, 2014 Share Posted May 24, 2014 That's pretty nice surgery!!! Looks great so far!!! Quote Link to comment Share on other sites More sharing options...
GLMFAA1 Posted May 24, 2014 Share Posted May 24, 2014 Good job, Better than a Beverly Hills plastic surgeon greg Quote Link to comment Share on other sites More sharing options...
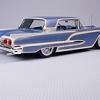
John Goschke Posted May 24, 2014 Author Share Posted May 24, 2014 Thanks for the encouraging words, gentlemen! Bill (aka Mr. Obsessive): The top from the Revell '58 Impala did occur to me, after I'd started the swap, of course. I don't have that kit in the stash, though. The Trophy Impala roof is a bit too wide, so the best way to swap it into the Bonneville would be to use the entire thing, including windshield and rear frames from cowl to tulip panel. I just didn't want to cut up the convertible that much. The work and time saved using the Bonneville roof made up for the fact that I paid more that it would've been worth if I was buying the whole body to restore. Curt (aka 62Rebel): The rear window from the AMT Trophy Impala has a different curvature, leaving large gaps at the lower molding. Bob Ellis: Yes it does seem that convertibles, particularly all the AMT and SMP '58s, seem to be more common than hardtops. I think the hardtops may have been released later, perhaps after the initial kit releases proved successful - but that's just a theory. Maybe a more knowledgeable kit historian can tell us. Quote Link to comment Share on other sites More sharing options...
jsc Posted May 24, 2014 Share Posted May 24, 2014 Roof looks great on this one! Great job. Any other mods coming? Quote Link to comment Share on other sites More sharing options...
David G. Posted June 14, 2014 Share Posted June 14, 2014 Nicely done! David G. Quote Link to comment Share on other sites More sharing options...
Tom Geiger Posted June 14, 2014 Share Posted June 14, 2014 Nice clean work John! Quote Link to comment Share on other sites More sharing options...
James2 Posted June 14, 2014 Share Posted June 14, 2014 Scary stuff right there! Looks like the surgery was a success though, hope the recovery is going well! Quote Link to comment Share on other sites More sharing options...
TFchronos Posted June 14, 2014 Share Posted June 14, 2014 Very nice job the hardtop. Quote Link to comment Share on other sites More sharing options...
DrKerry Posted June 14, 2014 Share Posted June 14, 2014 awesome work Quote Link to comment Share on other sites More sharing options...
Danno Posted June 14, 2014 Share Posted June 14, 2014 The more I look, the more I like. (I keep coming back . . . ) Quote Link to comment Share on other sites More sharing options...
John Goschke Posted June 14, 2014 Author Share Posted June 14, 2014 (edited) Thanks for the kind words everybody. Helps keep me going on this project. Haven't had a whole lot of time to work on the Bonnie – an hour here and hour there kind of thing. Anyway, managed to add some weatherstripping and window channel along the inside edge of the roof using styrene strip. The little gap above the vent window will close up when roof finally cemented on. Also added a ledge inside the roof for the rear window to fit against. Shaved the "Bonneville" script off the front fenders and worked on the headlight fit, removing moldlines and refining contours around the light bezels. Also shaved those crazy fake vents off the driver's side fender (still have to do the passenger's side.) A little kit accuracy trivia: the real car has four of those things on each side while AMT added five! Rep. stockers: shave off the top one and you're good to go! Edited June 14, 2014 by John Goschke Quote Link to comment Share on other sites More sharing options...
John Goschke Posted June 14, 2014 Author Share Posted June 14, 2014 Have also been prepping parts for plating, including stripping the head and taillights, and cleaning up a second rear bumper, removing moldlines and Pontiac's non-functional "exhaust ports." Also working on the fit of this piece. Misfortune struck last night after I had done a quick "tape 'n screw" mockup assembly to take to our club meeting when I knocked the model in its box onto the basement floor! Landed on the roof almost cracking it all the way in half. Repairable, but kind of disheartening! Quote Link to comment Share on other sites More sharing options...
DynoMight Posted June 14, 2014 Share Posted June 14, 2014 Considering that you've converted it to a hardtop pretty sure you could fix that no problem.. It's just the molded lights? at the top of the roof.. Quote Link to comment Share on other sites More sharing options...
Ron Hamilton Posted June 14, 2014 Share Posted June 14, 2014 Have also been prepping parts for plating, including stripping the head and taillights, and cleaning up a second rear bumper, removing moldlines and Pontiac's non-functional "exhaust ports." Also working on the fit of this piece. Misfortune struck last night after I had done a quick "tape 'n screw" mockup assembly to take to our club meeting when I knocked the model in its box onto the basement floor! Landed on the roof almost cracking it all the way in half. Repairable, but kind of disheartening! Ow!!! At least it happened at this stage while you can fix it, and there was no paint. It looks so good so far though. Quote Link to comment Share on other sites More sharing options...
impcon Posted June 14, 2014 Share Posted June 14, 2014 Lookin good! Man,but I love those old annuals!!!! Thank you for the photo tutorial on changing a roof - Hey mods - maybe this if John keeps this a good WIP thread, it could be stickied??? I think a lot of us could learn sme things from this thread. But John, judging by what I can see in the photographs, that hardtop body didn't look all that bad.. .. unless there was a lot of glue damage. I ted to really like thse cars in a convertible but I admire your tenacity and resolve to have a hard top. And thank goodness - no baby buggy wheels! The normal sized tires look good on that car.. Any idea as to colors yet??? PMing you now... Quote Link to comment Share on other sites More sharing options...
geetee66 Posted June 15, 2014 Share Posted June 15, 2014 I feel your pain with that cracked roof! All this will seem a distant memory when you complete it. It's looking really good so far. Top marks for resurrecting an old kit and breathing new life into it. Quote Link to comment Share on other sites More sharing options...
72 Charger Posted June 15, 2014 Share Posted June 15, 2014 This is great love the work your doing .I would love to find even a convertable one of these.Cant wait to see more Quote Link to comment Share on other sites More sharing options...
carrucha Posted June 15, 2014 Share Posted June 15, 2014 Good work so far. I am definitely following this build. Quote Link to comment Share on other sites More sharing options...
ChrisBcritter Posted June 16, 2014 Share Posted June 16, 2014 Beautiful work on this one! AMT engineered it well for this to work. I wonder if a lot more old models will be Frankensteined together this way now since there are fewer and fewer left? I've done it with a '61 Continental already, and a '61 Bonneville is in the pipeline (which may be tough since I only have one-and-a-half windshield pillars between the two). AMT's '59 Bonneville convertible even has little stubs of the C-pillars molded in (they're hidden by the top boot), so maybe they made the hardtop first? Quote Link to comment Share on other sites More sharing options...
John Goschke Posted July 10, 2014 Author Share Posted July 10, 2014 Finally got the hardtop roof permanently attached after repairing the crack shown last post with Plastruct cement for ABS and styrene flowed in from the inside. I reinforced the repair on the inside with some 1/32" ABS plastic. Plastruct cement was also used to cement the roof on, with the joint between the front edge of the roof and the convertible windshield header reinforced on the inside with a narrow strip of 1/32" ABS. Some minor gaps at the header were filled with thin cyano then the windshield header was filed down and the front edge of the roof shaped before the panel line for the upper windshield molding was scribed in. The damaged driprails were shaved off and replaced with some Evergreen strip. Also managed to scratch a rear window from clear PETE plastic from an egg carton. I made a pattern from a '58 Impala window, then the pattern was adjusted to fit the Bonneville. The pattern was used to cut a mockup "window" from a business card and further adjusted. The dummy window was used as a pattern to cut the final piece from the PETE. To protect the clear plastic during the cutting process I covered both sides with masking tape. Now I just have to decide whether to replace the windshield with a matching piece! Trim removal continued with shaving of the "Pontiac" lettering from the decklid along with the chrome fake handles. More kit inaccuracy trivia – AMT's kit spells out "Pontiac" on the hood and deck while the lettering spelled "Bonneville" on the real car! Quote Link to comment Share on other sites More sharing options...
John Goschke Posted July 10, 2014 Author Share Posted July 10, 2014 I finished shaving the fake vents off the passenger's side front fender, along with lettering from the hood. Next up for removal are the "flying wing" fender ornaments! What turned into the most challenging project with my worsening hand and arm tremor was using a Dremel to ream out the molded-in headlights for replacement with lenses from a Monogram (now Revell) '59 Eldorado ragtop kit. These are the most accurate GM quad lenses available, complete with nicely- done fluting and a representation of the Delco T-3 logo. After a little cleanup the housings can go to the plater. Hopefully I'll manage to get the lenses in straight during final assembly! Quote Link to comment Share on other sites More sharing options...
Recommended Posts
Join the conversation
You can post now and register later. If you have an account, sign in now to post with your account.
Note: Your post will require moderator approval before it will be visible.