Pete J.
-
Posts
3,981 -
Joined
-
Last visited
Content Type
Profiles
Forums
Events
Gallery
Everything posted by Pete J.
-

Resistance Soldering On A Budget!
Pete J. replied to Straightliner59's topic in Tips, Tricks, and Tutorials
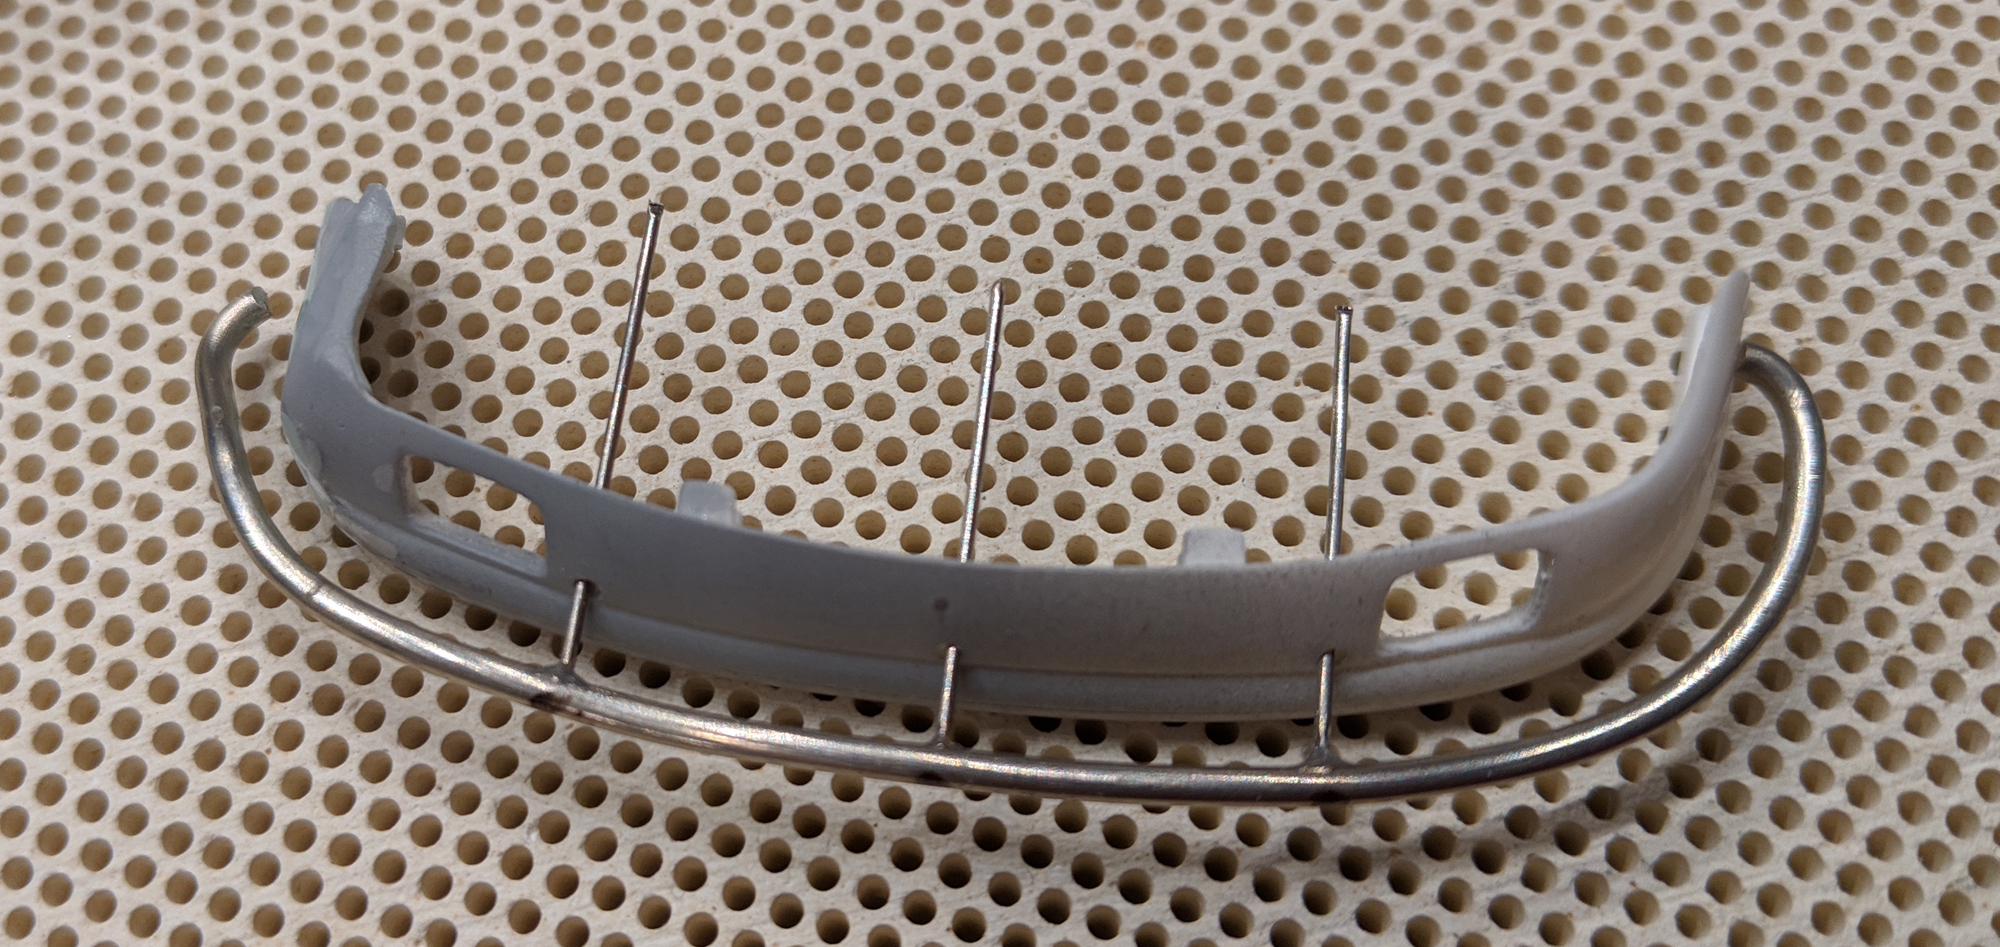
Glad to see your system worked! If I may make a suggestion. I see you are trying to burn your house down. Try Googling "honeycomb ceramic soldering board". They are not expensive and are a great alternative to a wood or asbestos boards. They come in a number of sizes. I use mine with a piece of foam underneath to stick the pins in. With the honeycomb pattern, it is easy to get things square and you have enough overlap that you can always find a way to secure the pieces. You also don't get wood smoke in your eyes. Hope this helps. -
Illustration- pavers are too even. They look like they are laid out in sheets.
-
Resistance Soldering Questions
Pete J. replied to Straightliner59's topic in Model Building Questions and Answers
When you get a chance dig up Gerald Wingrove's The complete car modeler. He shows how he built his own resistance soldering unit. I've been doing this for many years now and have always used a tweezer. It allows you to better control where the heat is applied as it will always be between the two electrodes. It also allows you to grip two pieces together such as photoetched. The best units(and yes they are quite expensive) are made by American Beauty. They have several differant types of probes that are relatively cheap to buy. I use a copper coated steel, but they also have stainless and carbon tips. You may want to wander through their website as they make a range of soldering equipment for industrial use. https://americanbeautytools.com/Resistance-Tweezer-Systems I have their 100 watt unit and if I were to do it again I would buy the 250 watt unit. I've been doing some very low melting point soldering lately(woods and rose metal) to solder white metal. I bought a 220 volt soldering iron from them. I use it with 110 volts to get the temp down were I need it. This was their recommendation. Good people. -
Not on their website yet but it is in their Facebook page. Scale Motorsport is going to release a super detail set for Revells Ford GT in late spring early summer. This is the first new product in a while and I am excited. Don't know what is in the set but knowing Matthew it will be excellent!
-
Oooo, not good! Sorry to see that happen. Been there done that. Those kind of cracks are almost always have to do with under thinning and too much paint all at once. Not so much temp and humidity. Sanding it down may work, but I've always stripped and started over when that happens. I don't like the risk of it continuing to crack after sanding. Clear coat seem to have a high chance of that happening. Good luck!
-
Say what you will about the Post office but it is still a pretty good deal. Think about this. If someone walked up to you and gave you a letter and two quarters and said "deliver this to Florida" what would your reaction be? I still think it is amazing that it can be done so relatively cheap.
-
How much will dehydronators reduce dry times
Pete J. replied to 69NovaYenko's topic in Model Building Questions and Answers
Ok, I'm going to add a little piece about enamels. After some research, the only way to speed up enamels is to use UV light. They cure rather than dry. I always get a chuckle out of people who say they painted something with enamel and put it in a box to keep the dust off and then wondered why it was still tacky months later. By keeping UV light off of it they are actually making the problem worse. If you put it outside in direct sunlight it will speed the process or you can get a UV light to put it under. Personally I have not done this as I don't use enamels that frequently to justify it, but a UV bulb would not be all that expensive. As to the food dehydrator, I wouldn't paint without it. I use it for two purposes. First, I store my rattle cans in it to keep the paint warm. The internal temperature is not sufficient to cause any issued with burst cans and this way the cans are ready to every time. Second, I paint with lacquers and it definitely cuts down the curing times. 5 to 10 minutes to flash off the lacquer so it is ready to recoat. Then when the final coat is down, overnight for a final cure. Definitely speeds up the process. If I lay down thin coats, I can cut and buff in under two hours. The heat also is great for accelerating the curing of two part fillers. Oh, and the temperature is low enough that I don't need to worry about warping plastic or most resins. -
Painting white plastic white
Pete J. replied to NOBLNG's topic in Model Building Questions and Answers
Plastic almost always has a slightly translucent quality to it, so if you don't want to have it look like plastic you need to do something too it and painting is almost always the answer. Now for the question you didn't ask. White? There really isn't any paint that is true white. Most have another hue in them. Often it is blue for a more "cool" white or brown for a "warmer" white. Car seats can vary quite a bit depending on if they are fabric, vinyl or leather. Hopefully with this tidbit, you will develop an eye for the various shades of "white". Try looking closer. Oh and by the way, this also applies to black. Most often black has a shade of green or red to it, not to mention the various shades from dark gray up. True black paint is rare. -
Ok, here's one I like. "Don't do anything stupid!" "I won't. Your taking all the stupid with you."
-
Ok Mark, this is no longer about talent, skill and perseverance. You are now into a realm of imagination that is beyond me. Great ideas to fill the trunk, none of which I would have thought of. Amazing stuff!
-
What did you see on the road today?
Pete J. replied to Harry P.'s topic in General Automotive Talk (Trucks and Cars)
Dave, Thank you. I might just do that! -
What did you see on the road today?
Pete J. replied to Harry P.'s topic in General Automotive Talk (Trucks and Cars)
Every two weeks I drive from San Diego to Ventura and there is always several interesting cars to see, especially near the the 405 and 101 junction. For those not familiar with the LA area, that is the area that Mulholland drive(dead man's curve) and Malibu canyon. Today my pick was what looked like a very nicely maintained original late 60's Porsche 912. Skinny tires and all. There was also a Ferrari F12 Berlinetta but I was a bit busy driving and didn't get a photo. One of these days I will need to get a GoPro hooked up in my 93 MR2 Turbo and drive up Mulholland drive just for kicks. I've never driven that legendary road. Got to be a bucket list item for most gearheads.
-
There must be a hundred glues that dry clear. My go to choices are Pacer Formula 560 canopy glue and Zap - Polizap( in the silver and blue bottle). 560 is a PVA glue designed to hold clear R/C aircraft canopies in place and it very strong and flexible. It also tacks up very fast. Polyzap is also in the R/C section and is a super glue for glueing Lexan bodies on R/C cars. It is a thick super glue that doesn't fog clear parts.
-
Wound up at Beale AFB for a week when they evacuated all the aircraft from Fairchild when Mt. St. Helens blew up in 1980. Was fun watching the Dragon ladies and Habus coming and going.
-
I do this all the time. I fact I do it so often I made a rig that works like a saddle valve. The threaded needle penetrates the can and you can control the flow by backing the needle out just a bit. One very serious caution. The propellent in most rattle cans is propane! When you do this, be very sure it is in a well ventilated area and there are no ignition sources around. There is sufficient propellent in a can to make a rather loud boom!
-
Very nice. One major part missing that makes it a U2 chaser. You can see it in the photos but it is easy to miss. In front of the light bar in the middle of the roof you should have a "blade" UHF antenna connected to a UHF radio in the car. In some cases it was mounted on the light bar or behind the light bar, but it was always on the roof of the mustang chase cars. This is how they talk to the U2 when it is landing.
-
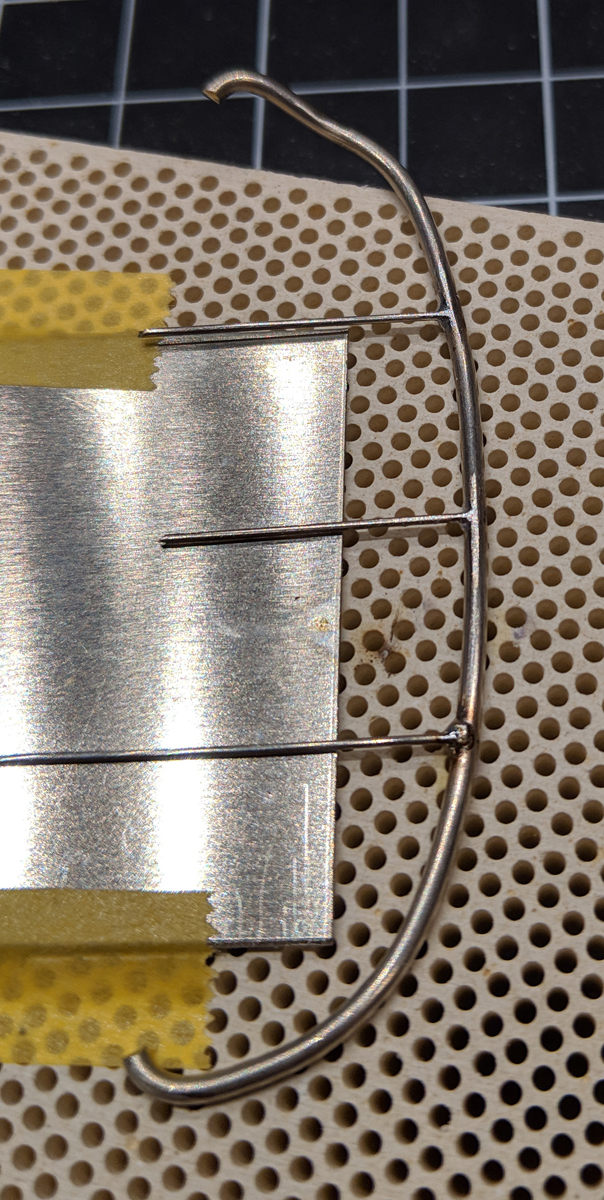
Just finished bending and fitting the nurf bar to the front bumper. The bar and attachment is all german silver wire, which is a nickel copper alloy. The damaged side is, of course bent out of shape from the impact with the rock. I still have a little polishing to get it to a chrome like finish but I don't want to do that until I am ready to mount it. I will probably use the same wire for the roof rack. German silver is really nice stuff to solder with silver solder.
-
Good pictures! Just an FYI next time you have this issue you need to change the white balance in the camera. There are a lot of differant ways to do that but most common is in the settings to select the type of illumination in setting. Often is shows "sun, florecent, incandesent and others". Try a test shot with each before you shoot the rest.
-
Mark, looking great, but I haven't seen the magic words yet. What is left to do? I can't imagine.
-
Love the Binford tool logo. All hail Home Improvement!
-
Frankly, I don't believe he exists! It is all a conspiracy to hide a band of renegade mad Scandinavian scientist who have perfected a shrinking ray and use these cars as a way to distract us from their real intention to take over the world by shrinking it one piece at a time. Boo ahh haaaa!
-
best knife for cutting holes in panels
Pete J. replied to fiatboy's topic in Model Building Questions and Answers
Not exactly sure what kind of holes you would be cutting. If you are talking about cutting panel lines then Hasegawa/Tritool has a great set of photoetched saws that do a great job of cutting plastic. -
I got it second hand on Facebook when they were running the "Go Fund Me" campaign. I would suggest that you go to his web site and use the contact page. I really don't have anything to give him to help out. I have chopped up too many parts on my 100P to use them as patterns for machining parts.
-
A quick google of "Bugatti 100P model kit" showed up a Sharkit in 1:72 scale and a Planet Model kit in 1:48 scale, which seem to be available. There are also a number of diecasts out there. I know they are not 1:24 scale but they are what is available. Your really need the larger scale with this model and the real deal aircraft is tiny. The 1:72 scale version would have a wing span of about four and a half inches. By contrast the 1:48 scale would be about six inches and the Fisher Pattern is about twelve inches. I can't vouch for the quality of these kits, as I have not seen them. I can vouch for the Fisher model. Great kit. Lots of great engine and gearbox detail. Also a pretty good cockpit. I have been working on it for a while and it is really nice, but finding one will be chore. I did see a call out not long ago. Paul Fischer was apparently looking for pristine copies of some of his kits to recreate the molds as I recall. Not sure if or when he will be back in business. The Camp Fire really did a lot of people in! Terrible disaster. I hope he can get back in business. You never really know what you have until it is gone!
-
I've got one of those in my stash and was thinking about using the engine for another project. That has the 3SGT-e engine in it which is the same engine that is in my 1:1 93 MR2 turbo. I have the Hasegawa model of the MR2 and it is curb side. Was thinking to stealing the engine and swapping it into that kit to make a miniature of my real car.