Straightliner59
-
Posts
5,815 -
Joined
-
Last visited
Content Type
Profiles
Forums
Events
Gallery
Everything posted by Straightliner59
-
 Try Ace Garage Guy's search tip that's pinned in one of the threads. That will likely find them.
 -
That looks excellent, Ian. Man, that is a lot of tubing! Beautiful work, my friend.
-
Thank you, Bob! I had planned to do it, back on the old SLM website, and never got around to finishing it. At that time, I was using my Junior Fueler, as the mule. It is great to be able to see the works of others, with fresh content, all the time, for sure!
-
I had to tape this roughly into position, to determine where I need to trim it. Figured a photo was in order!

-
Thanks, so much, Francis! Those little things are probably where I derive the most fun, from modeling. Whether it's details I'm adding, or details I'm discovering on someone else's model. It makes for a more interesting subject!? You're well on your way, my friend! Start stockpiling materials. I use a lot of Plastruct hex stock, especially in the .020"-.060" range. Model railroaders supply a good selection of nut/bolt/washer castings, and some without the washer. The only reason to do it, is because you want to; and, if you want to, you'll get to where you want to go!? I saw some small machines at Walmart.com that were interesting. They're combination mill/lathe machines, very reasonably priced. Reviews were good, and the only negative reviews were from guys who were trying to do more than the machines were designed for. The Sherline equipment is excellent in quality, and their service is second to none, based on everything I have ever heard from those with experience. The newer Unimat stuff is likely good, as well. Ace Garage Guy uses a vintage Unimat machine. If you can find one with all the parts, they're convertible. Those are decent--I had one, many years ago. I'm not sure what ancillary tools are available with any of the others. That's another place the Sherline excels--accessories. When you're ready, unless you opt for one of the combination machines, go with the lathe, first. Even that will open up your possibilities, a lot.
-
’72 Dodge Demon Drag Racer 1/25 scale
Straightliner59 replied to AmericanMuscleFan's topic in WIP: Drag Racing Models
Simply magnificent! The buckets look sweet. Excellent work, Francis! -
Front suspension looking good, Marcos!
-
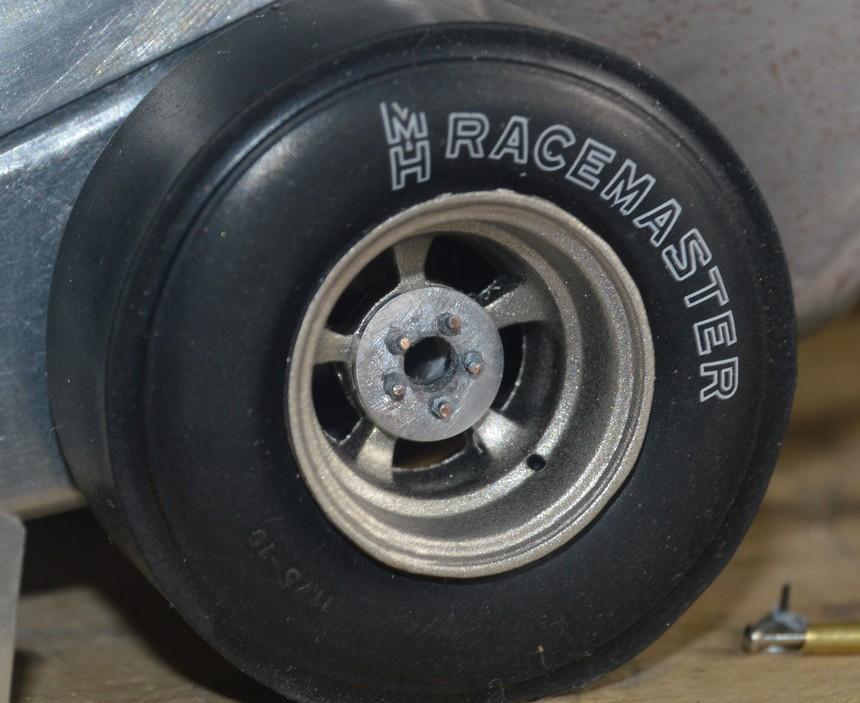
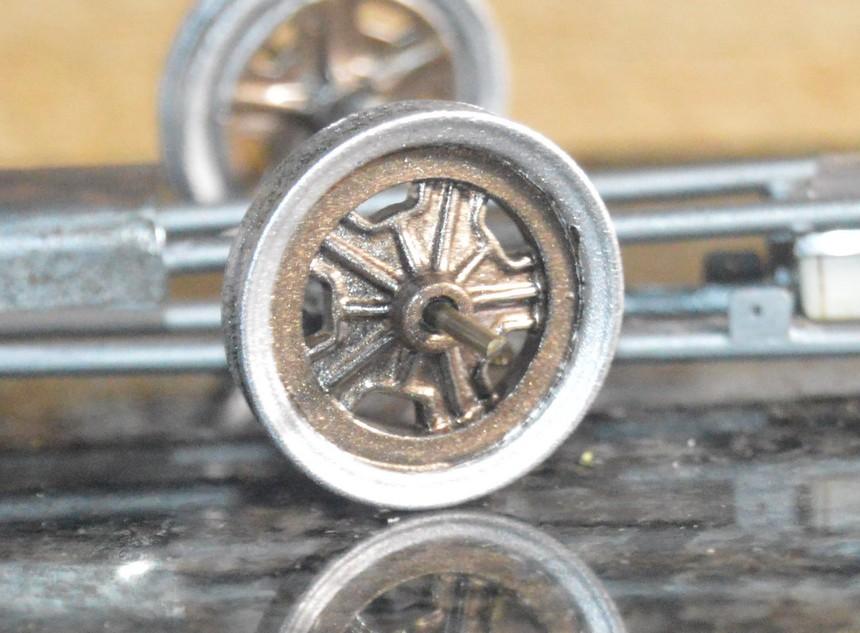
A couple of close-ups of the rear wheels. The disc is natural aluminum. The lug nuts are brush-painted Testors Model Master Metalizer Dark Anodonic Grey. Still need to add the valve stems and do some cleanup and a tad of weathering/wash. Comments are always welcomed. Thanks for looking!
-
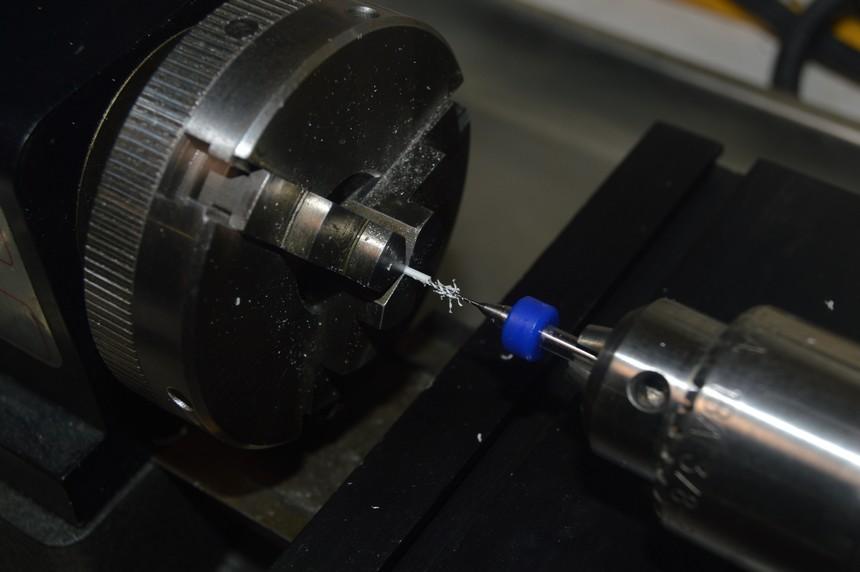
I used a Sherline vertical mill with a rotary table to do the plates, with the five-hole pattern. I have a Sherline lathe, to bore the .040" hex stock. They're not cheap, and you'll quickly discover a ton of accessories you'll want/need. As a scratchbuilder, though, they are extremely convenient, to have, if not, at times, necessary. I know Francis uses a Sherline mill, and I think Tim Hoaglund does, as well. Thanks, Marcos, as always, for your comments!
-
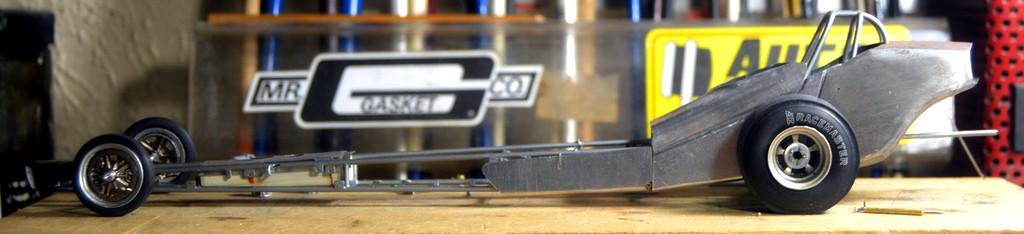
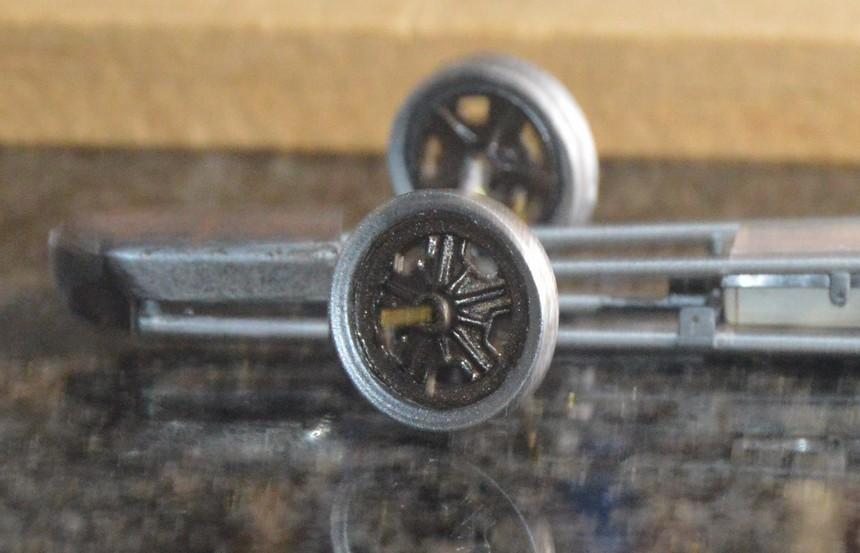
Rear wheels are nearing completion. Enough so, that I could get the car on them, to get a gander at the rolling stock. I like the color on the rear wheels. It's Krylon (Satin) Nickel. I picked it up at HL, a while back. It was the color I wanted for the front inners, but thought this was more silver than it is. Anyway, I think the wheels look pretty spiffy! The wheels had the lugs and the plate molded to them. I decided to mill off the cast-on details, and replace them with my own parts. I turned down some 1/4" aluminum rod to 7/32". I then moved the chuck, with the rod still inserted to the rotary table on the mill, and drilled the five-bolt pattern. Once that was complete, I set up the miter box to cut off the discs. Once I had sawn a line around the perimeter of the rod, I moved it back to the lathe. Using a Zona saw rubbed with beeswax, I let the lathe and saw do the rest of the work, cutting off the disc. I repeated the operation to create the other side's plate. The lugs and lug nuts were made using the center wire from some coils I picked up, somewhere--they look like, perhaps, an Axe Man Surplus find. The fine wire wrapping has also proven to be of use. Just always keep your "modelers' eyes" open--you'll start finding materials, all over the place! I placed some .040" hex stock in the lathe chuck, and bored it to accept the aforementioned center wire. This can be performed without a lathe, but, if you have one, use it. much, much easier! I cut lengths of the hex (I like the scalpel, here. It's sharper, and less likely to crush the stock, during cutting.), and slipped them over the wire "lugs". A dab of super glue to the end, holds the lugs in place. The nuts are pushed down, snugly to the disc. Finally, I'll add the valve stems.
-
How to mask your model
Straightliner59 replied to GoForItPainting's topic in Tips, Tricks, and Tutorials
My response, above, will be more helpful, with some illustration. I built these wheels for a Nostalgia Top Fuel dragster currently in progress. The centers are, clearly a mishmash of shapes, to attempt to cover. Most tapes aren't flexible enough to efficiently cover without some piecework with the tape. Parafilm is not only very flexible, it also stretches some, which was a big help, in this instance. It provided clean demarcation between the colors. The punch is from a Harbor Freight set.
-
How to mask your model
Straightliner59 replied to GoForItPainting's topic in Tips, Tricks, and Tutorials
Parafilm M works nicely, too. Thanks to Andrew Sapiro for that. I remembered reading about it in SAE or FSM, way back when. I'd forgotten about it, until I saw him using it. He uses it frequently to protect previously-built assemblies, while subsequent assemblies are being added. It's pretty neat stuff! -
What am I doing wrong?
Straightliner59 replied to FlyingDutchman's topic in Model Building Questions and Answers
That's what I do, too. I've had pretty good luck, through the years, except with the aforementioned '53 Corvette. It was a promo, so I suspect the plastic had something to do with that, being it's a harder styrene. -
Paint flames the clean ‘n’ easy way
Straightliner59 replied to OldNYJim's topic in Tips, Tricks, and Tutorials
Good stuff, Jim! One of these days, I swear I am going to learn how to use my Cricut! -
Well, there's always that!?
-
If you can, get it aligned so it's straight, by attaching it to a board with rubber bands, clamps or whatever means you can figure, and use hot water to straighten it. It will likely take a few attempts, but, it should work.
-
What am I doing wrong?
Straightliner59 replied to FlyingDutchman's topic in Model Building Questions and Answers
It looks to me like, unfortunately, the paint attacked the primer. Unfortunate, because you'll likely have to strip the body. I am making that assessment, because it looks pretty much like a '53 Corvette, I had that happen to, just a few months ago. There are others here, who may have a better idea, so don't throw it in the purple pond, just yet! -
Thank you, Joe. Appreciate you following along!
-
Ooh, la, la! Sexy! Thank you for your kind words, regarding the dragster, but, that thing is a downspout, compared to this!
-
Definitely some good info, here!
-
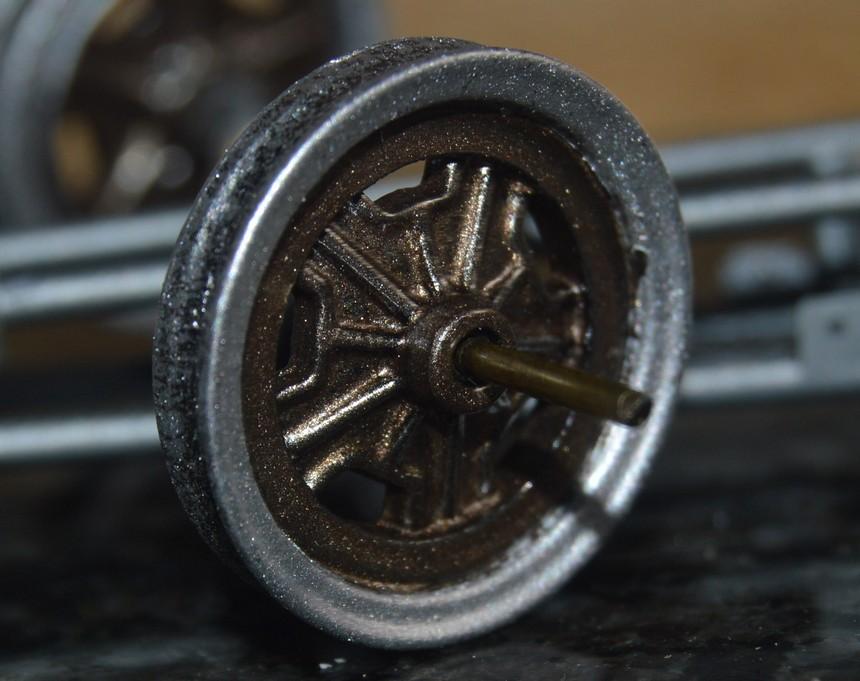
Since this project's inception, I had a certain idea for a front wheel. I wanted a dragster wheel that was patterned off Halibrand's "kidney bean" design. As well, since inception, the front wheels fought not to...be. The earliest attempts were made using Johan funny car front wheels. Two problems plagued these wheels: The Johan rims were super delicate, and, I think three of the four I had, then, had entire sections of the very outer rim, simply break off, seemingly from being looked at, oddly. Those wheels are also very thin. Before I realized, I had sanded through the edge of the inner section of the wheel. FF >> to the current time. Problems continued to plague these wheels. I discovered another Johan wheel, whose outer rim promptly broke, just to welcome me back to the fray. This time, however, I was able to chuck the wheel in the lathe, and turn the entire outer rim off the wheel, down to where the inner casting is. I fitted an appropriately-sized rim to the inner section, and another to the inside of the wheel, and I was ready to go! Unless something went wrong during the molding and casting process. Of course, it did. Between the first mold having some defect I no longer recall, and the next two not curing properly (of course, those would only be the second side of the mold), I determined to purchase a pair of Polar Lights front wheels from an Ebay vendor, in order to avoid having to remove the pair from my PL Mongoose 'Cuda FC. As soon as the new pair arrived, I began working on them, with the lathe. The first one worked beautifully! The second wheel met a tragic end, when it caught on the bit, and was twisted into something that would better serve a crash-scene diorama. That left me raiding the kit I'd hoped not to, in the end. Once I had that wheel cut to match the first, I found some wheels I could part the rims from, to make new, taller rims for the wheel centers. I found matching sets, and got them cut and assembled. That didn't happen, until after one of the new rims had fallen from sight, and, in the process of searching for it, I tore a hunk of skin open, on the side of my right index finger. Those fingers will bleed! I stanched the flow with a shop towel, and cleaned up the floor. Once the wound was better dealt with, I finally found the rim--nowhere near where I'd cut my finger, of course! I installed the centers, and, finally painted them.. I used an old PlastiCote craft paint, called "Iced Coffee" for the centers. I then used Parafilm discs (thanks to Andy Sapiro for reminding me of this stuff!), cut with punches from a Harbor Freight set, to mask the centers. The rims were then shot with Testors' Metalizer Aluminum Plate (Buffing). Lastly, I shot them with Testors' Semi-Gloss clear. The Iced Coffee was shinier than I liked, and needed toned down. Valve stems were made with filed-down strait pins. There was more than once that I considered doing something else for these. Something within me wouldn't let me sell my vision short. They ain't perfect, but they're true to that vision, and I am pretty happy with them! I will flow in a little wash, and maybe give them a very light dusting of pastel, just to tone them down, slightly more. I will turn some caps for the hubs, as well. Comments, critiques and questions are always welcomed. Thanks for looking!
-
Hey, Mike. You've got some really nice work, going on, here! It takes some real dedication, to see something like this, through. Good job, by you!
-
I can't remember what year Caboose Hobbies moved from downtown, to South Broadway, but, it likely would have been about 1980. That was about a year-and-a-half before I got back into modeling. I took about a five or six year break from modeling, right after I graduated from high school, in eastern Montana, and a few months later ended up here, because I was SO ready to ditch small-town, middle-of-nowhere, America, for the city. Being a preacher's kid, who had (and still do) a rebellious streak didn't make that life any easier! Those few years were all about the sex, the drugs, and the rock and roll--quite literally! It was hella fun, but an artist will soon find himself needing to create, again. I digress--Caboose had quite a few layouts of various sizes and scales on display. Colpar Hobbies would have been in Aurora, and there was Downtown Hobbies, which was, well, downtown! They later moved to Cinderella City Mall and were renamed Mile High Hobbies. I worked for them for several years, in the mall, for their wholesale distributorship, which was named DTH Distribution, and allusion to Down Town Hobbies. There was also a place up in Westminster called Mizell's Toy Trains. There's more than anybody ever needed to know about me, or the history of hobby shops in Denver! There were plenty more, too. This was really a good hobby shop town--and is still pretty decent. My favorite extant hobby shop is in St. Paul, MN and is called Scale Model Supplies. The locals call it "The Dungeon". I always looked forward to a trip, there, when I was living in Minnesota, and I would encourage anyone who is in that area, and has a chance--check it out. I promise you'll be glad you did!
-
Man! Awesome! $12.50 is a steal! I think I paid $80 for mine. The bumper won't cost you $67.50! ?