Straightliner59
-
Posts
5,816 -
Joined
-
Last visited
Content Type
Profiles
Forums
Events
Gallery
Everything posted by Straightliner59
-
 Man! Awesome! $12.50 is a steal! I think I paid $80 for mine. The bumper won't cost you $67.50! ?
 -
It wasn't quite as I'd planned for the SLM site, but if it gets the job done! ? You're most welcome, Mike!
-
Thanks, so much, Ian. Yes, I like the cowl, better, now. I need to fit the original, engine-turned windscreen to it. When I first conceived, and began building this, all those years back, I envisioned Halibrand-style front wheels. I am determined to make that happen! They can fight me, all they want--in the end, their resistance will have been futile! Thank you again, my friend!
-
Looking really good, Joe! Those model RR NBWs are the cat's meow! I've been using them, forever. There used to be one of the finest model railroad hobby shops, in the world, here in Denver, Caboose Hobbies. I bought so many detailing and scratchbuilding supplies, in that place, it's not even funny! It was a huge store. Sadly, no more.
-
I guess you have to make it up to manager, to be the designator! Dang it! My job has me in plenty of kitchens. I can tell that foodservice isn't for the faint of heart. I hope it all goes well, my friend! I am sure you will find a few little things you can work on, here and there. I'll be looking forward to seeing them, whenever you can! Thank you for your kind words, Ian.
-
You are making excellent progress, Ian. It's looking great! I'm feeling like a slacker!?
-
Hey, there's a song about this car! ? Nicely done, sir!
- 39,076 replies
-
- 3
-

-
- johan
- glue bombs
- (and 1 more)
-
Thank you, John! Thanks, Marcos. It works, beautifully! Wish I'd figured it out, years ago!?
-
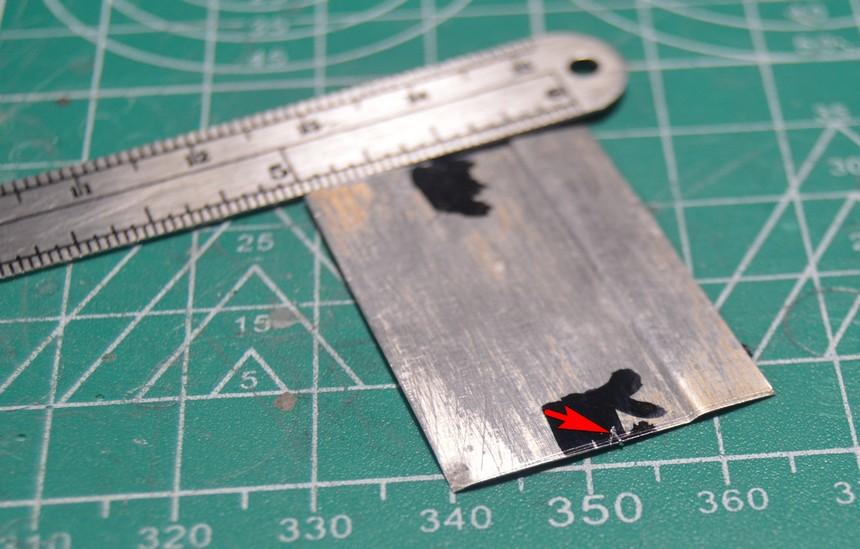
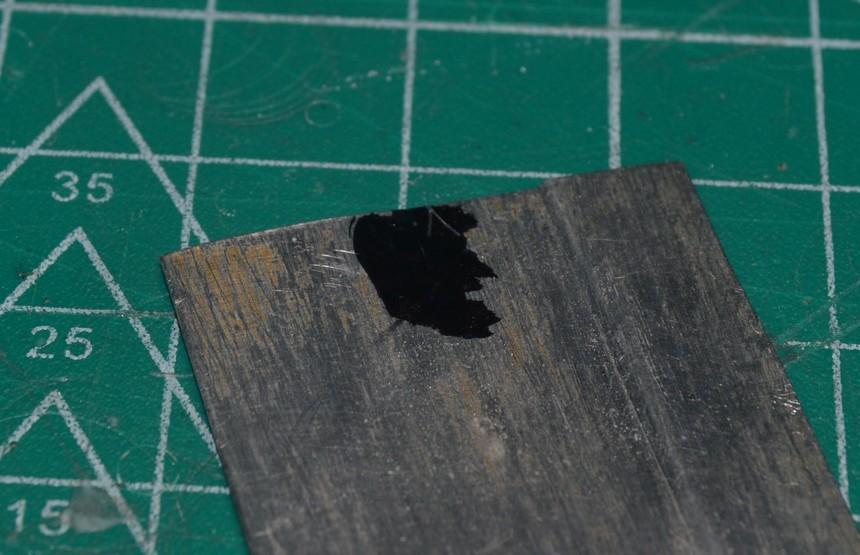
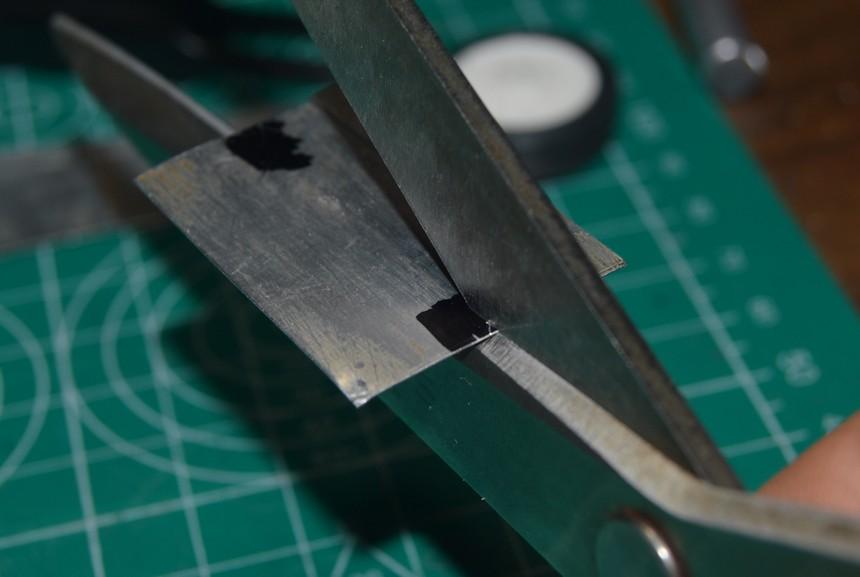
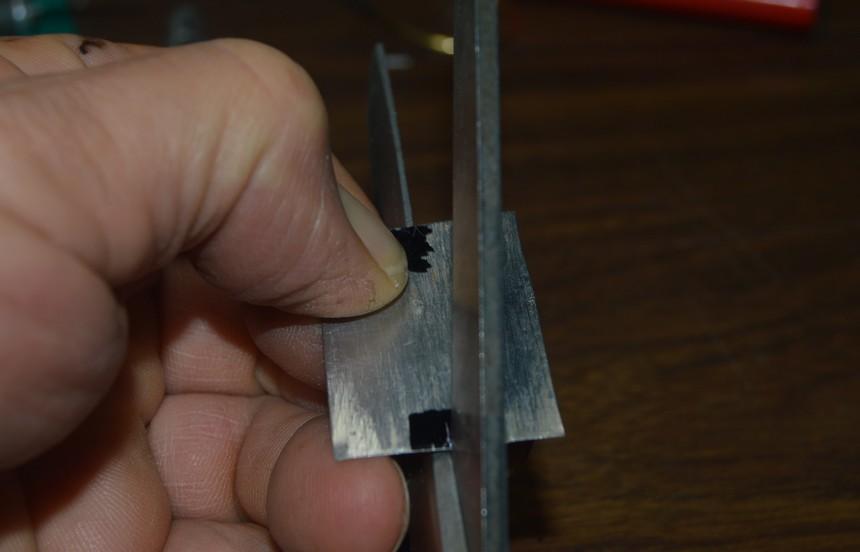
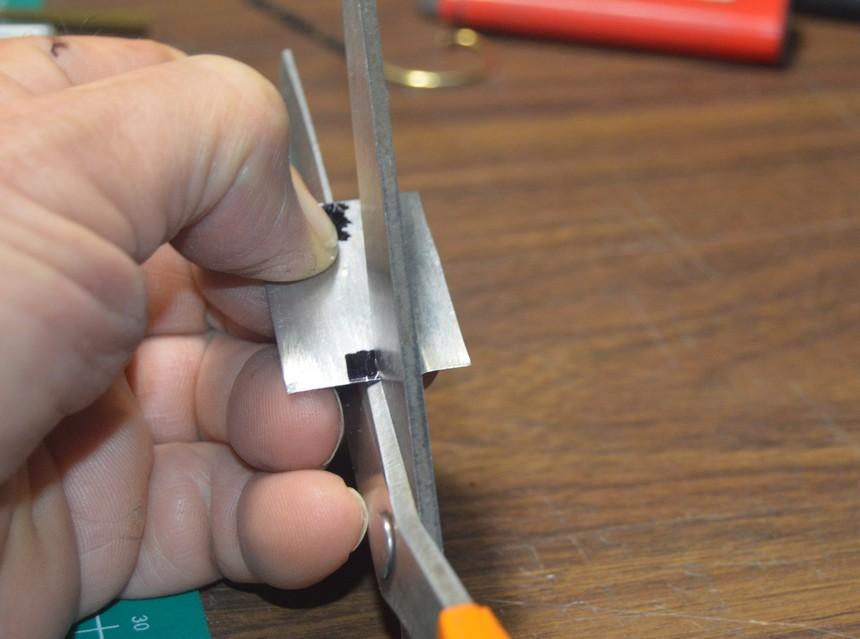
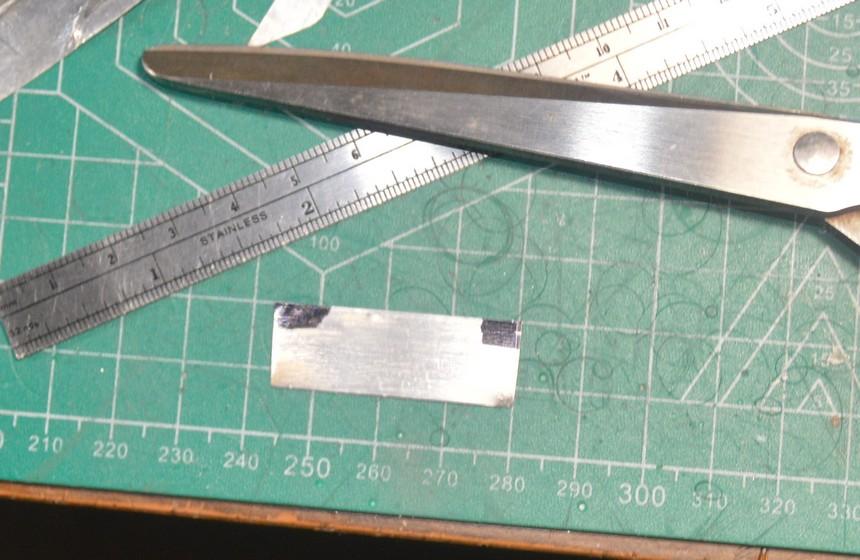
That is very kind of you, Francis! I am having fun with the project, to be sure! I cut the floorboard, today, and finally got some more "rise" around the cockpit opening, after re-annealing to cowl. The front wheels are fighting me, mightily. I got my wheels yesterday morning, and broke one of them, just a while ago. I'm considering turning some...stay tuned. Thank you for your comments, my friend. Also, a quick note on cutting straight lines, with scissors. When I cut this sheet, I mark the cut, on each end of the sheet. Next, I nick the mark on one end. Now, using my other hand, I hold the opposite mark in alignment with the scissors using the back of my index finger. The thumb holds the material flat against the cutting surface of the blade. This action keeps the material of the "good" side from curling, as it comes away from the blade. Generally, this can be accomplished by turning the material, and changing the direction from which you approach the cut. Not always, however. I bought a pair of left-handed scissors, for just such instances. Finally, maintaining alignment and thumb pressure, as you apply cutting pressure to the scissors , a virtually perfect cut can be made, without drawing an entire line to mark a cut Try this with any rigid or semi-rigid material you're using.

-
’72 Dodge Demon Drag Racer 1/25 scale
Straightliner59 replied to AmericanMuscleFan's topic in WIP: Drag Racing Models
Mike, the plate is cast aluminum tooling plate. You bolt it to the milling table, or rotary table, via the t-slots. It's meant as a kind of disposable work surface, in that it's customizable to suit your given application. -
Huh? ? Thanks, JC! Appreciate it.
-
That should be a fun reintroduction! Looking forward to it!
- 39,076 replies
-
- 1
-
-
- johan
- glue bombs
- (and 1 more)
-
hobby material alternative
Straightliner59 replied to MrMiles's topic in Tips, Tricks, and Tutorials
Thanks, Michael. That is excellent information from someone with a lot of experience, with it. -
Thanks, Joe! I don't really hang out with any other modelers, locally--that kind of comes along with working third shift--so, I may tend to share more here, than others. You know--I just don't have anybody else to show it to!? Thanks for your comments, and for following along! Thanks, Bob! You got it, buddy! This one is going to the display case, not back to the shelf of the eternal holding pattern!
-
My wife said, "It's me, or the models!", so I rented her a storage unit to stay in.? Problem solved. Actually, I'm not married. I like it better, this way!
-
Thank you, sir. It's no problem, regarding the time--I'm a little way off from that, still. I may not be too far from repainting the repaired areas of the chassis. I bought a pair of front wheels from a Polar Lights FC on Ebay, so I can just build my front wheels. I poured a mold to cast the one I'd made, and the rubber didn't like something--it's been a week, and it's still pretty gooey. Thanks again for your help, Ian. It's much appreciated!
-
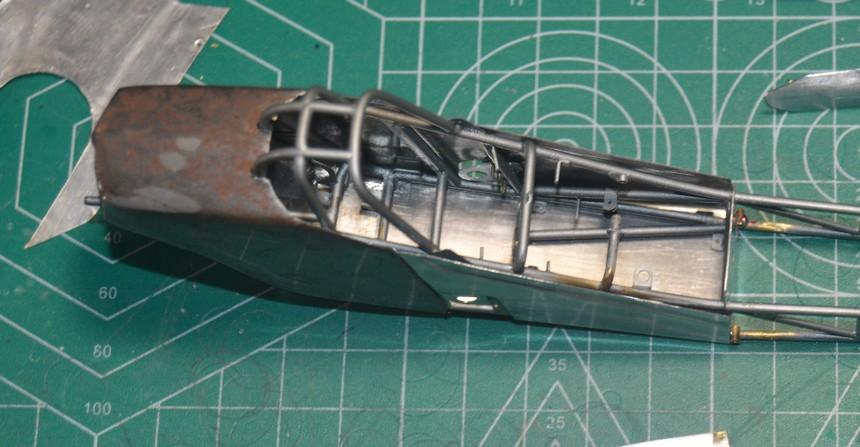
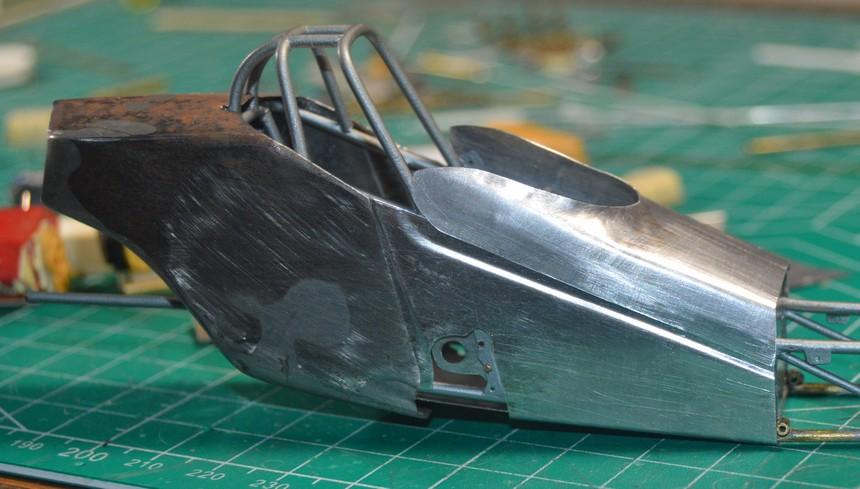
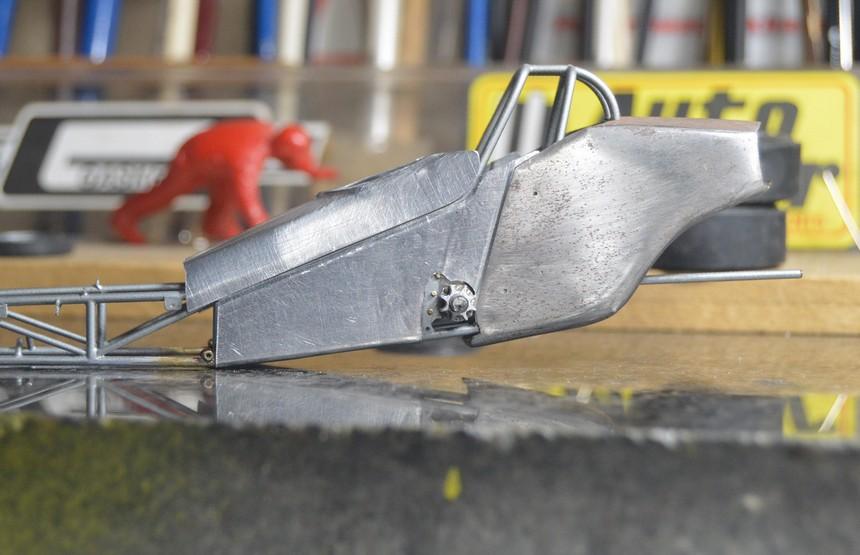
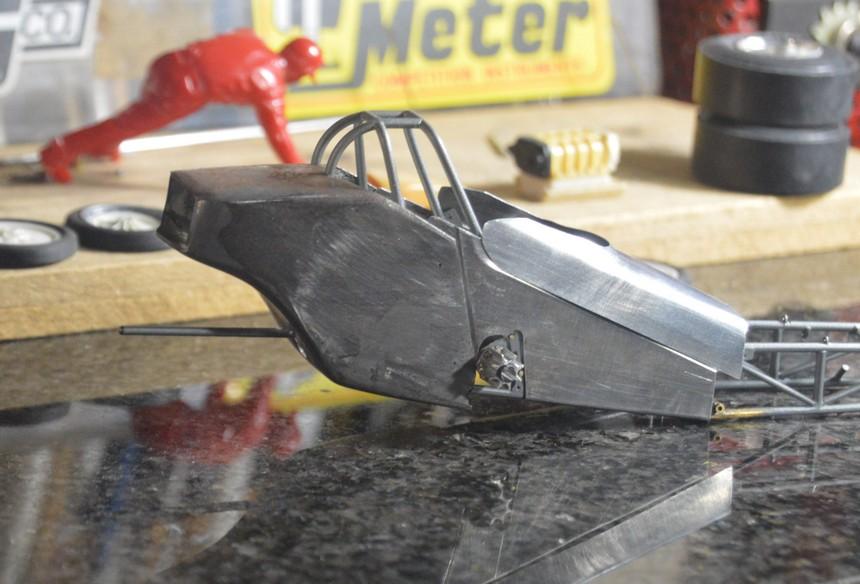
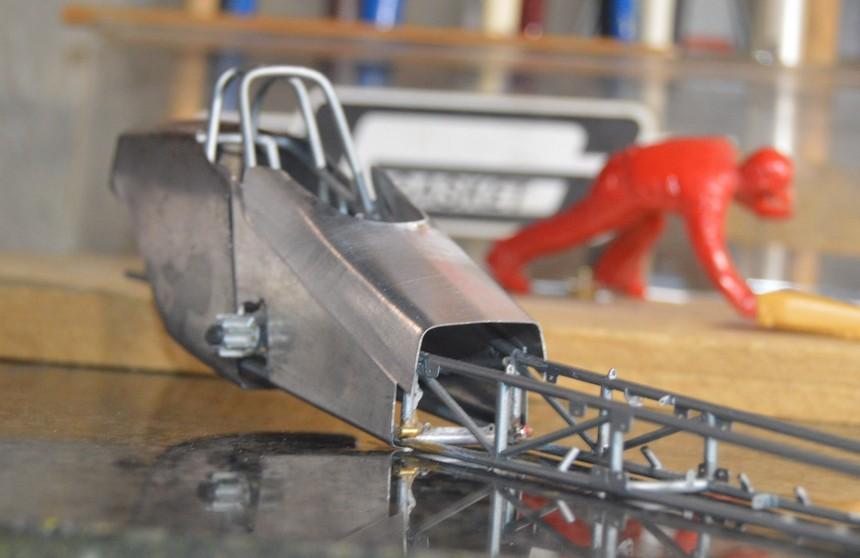
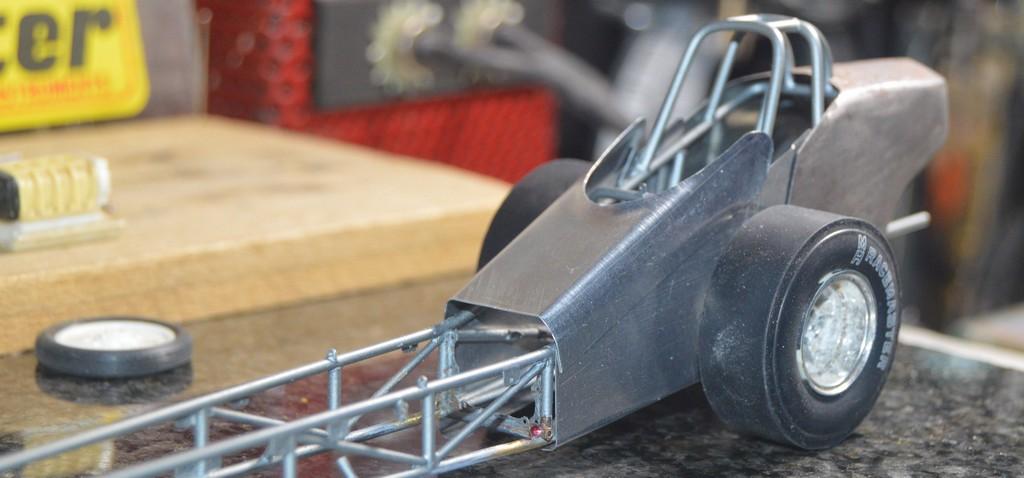
Thanks, man! Go for it! The more eye candy, the better! No?? I have all my body panels roughed-in. I am definitely going with open rails. That's always looked more "race car", to me. I still need to re-anneal the cowl, and do some hammer work, on it--final shaping and fine-tuning. Then, I'll get the panels drilled, and pinned in place (temporarily) for their final-fitting-fine-tuning (Wow! That's some alliteration!). Thankfully, i won't have to polish these panels as extensively as those on my Junior Fueler, as these will be painted. Maybe black--there's still time to decide. I am very happy with all my recent work on this car. I guess, as I was, when I did all the original work. The new body's better, though. In these photos, with everything sitting in place, I think the overall look is exactly what I want it to be--a fairly utilitarian early-2000s NTF Dragster. It will only have the blower restraint straps, and not the complete bag. It gets the Donovan, because the ANRA rules I was basing the car on, at the time stipulated that the hemi engines were limited to designs based on the early hemi design. No Elephants! Anyway, here ya' go. I hope to not burn you guys out, on this thing, if I haven't, already. If so, I apologize, but, dadgummit, I'm excited about it. Thanks for looking!
-
Perseverance is key! Just keep at it, and eventually, you'll get there. Getting closer...
-
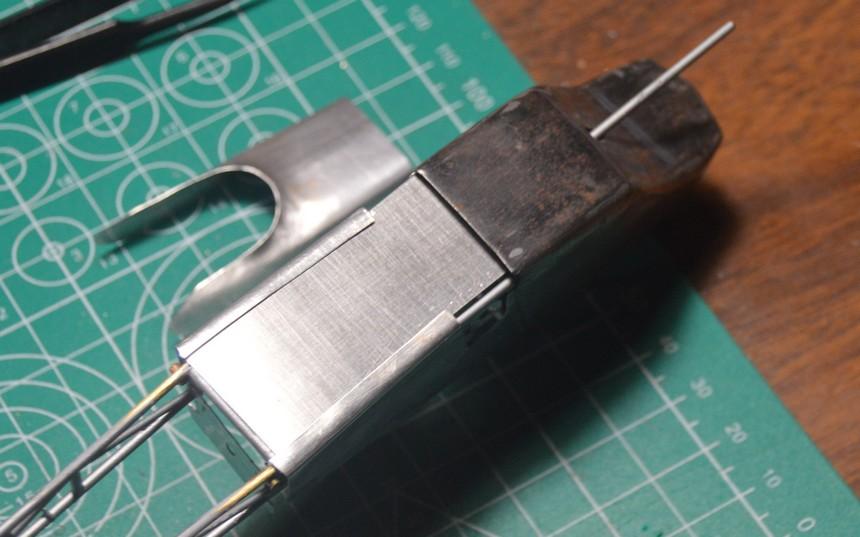
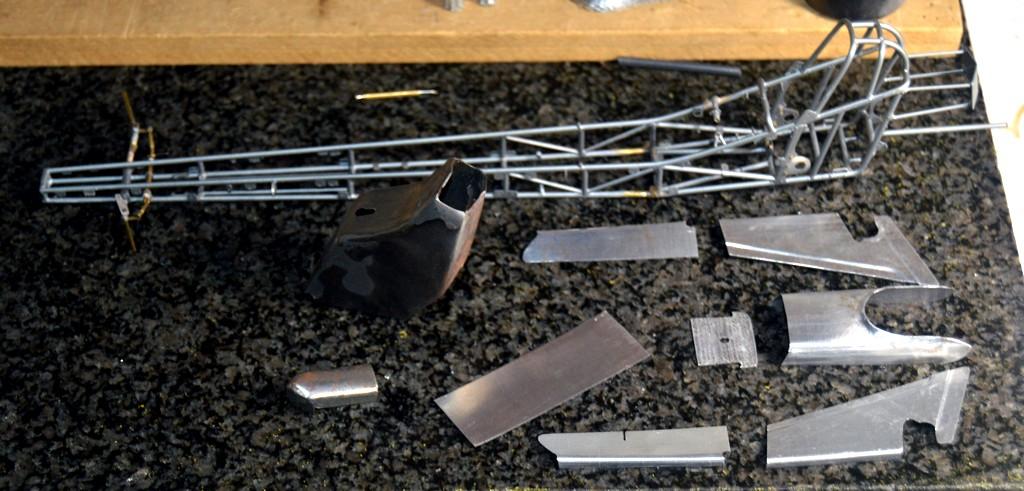
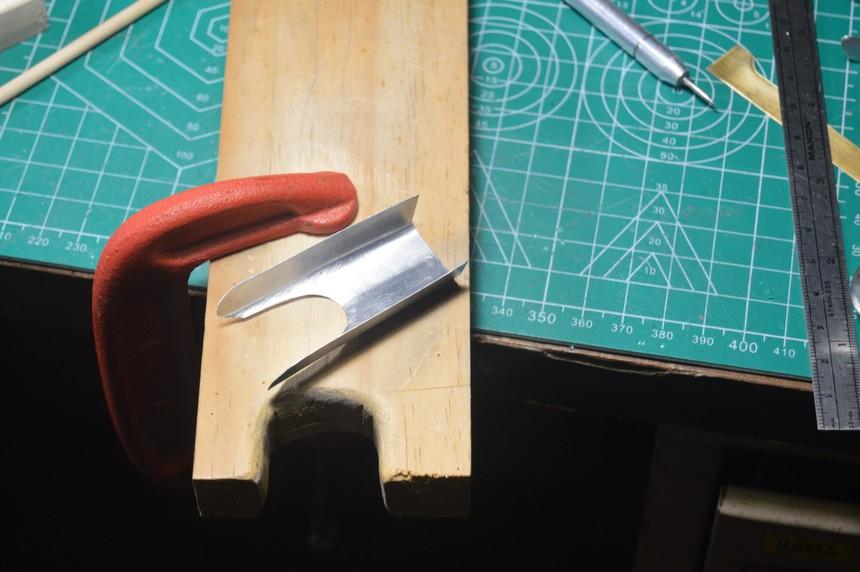
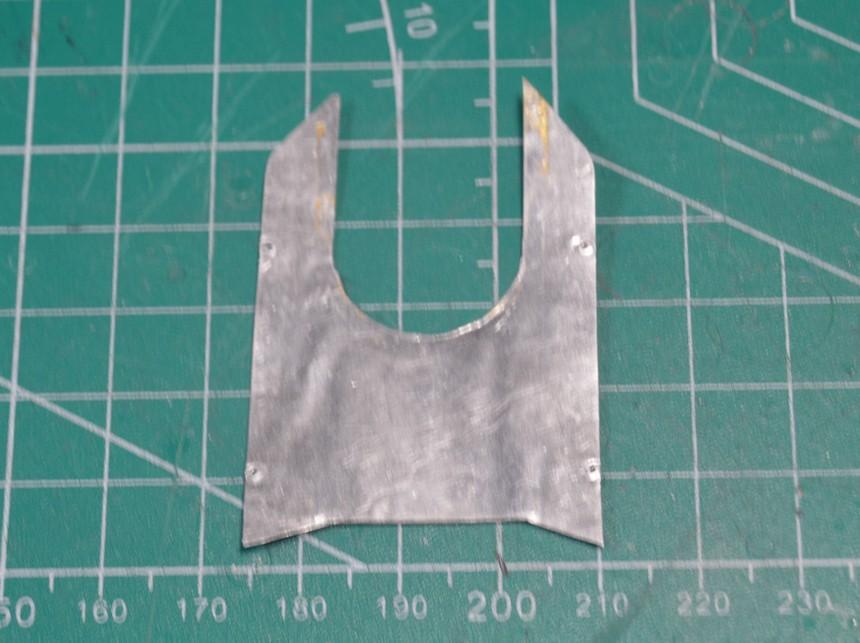
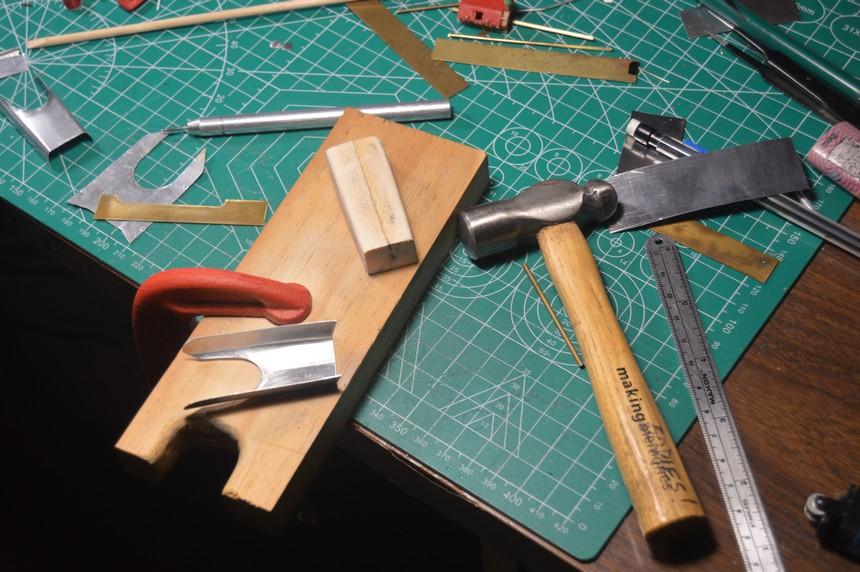
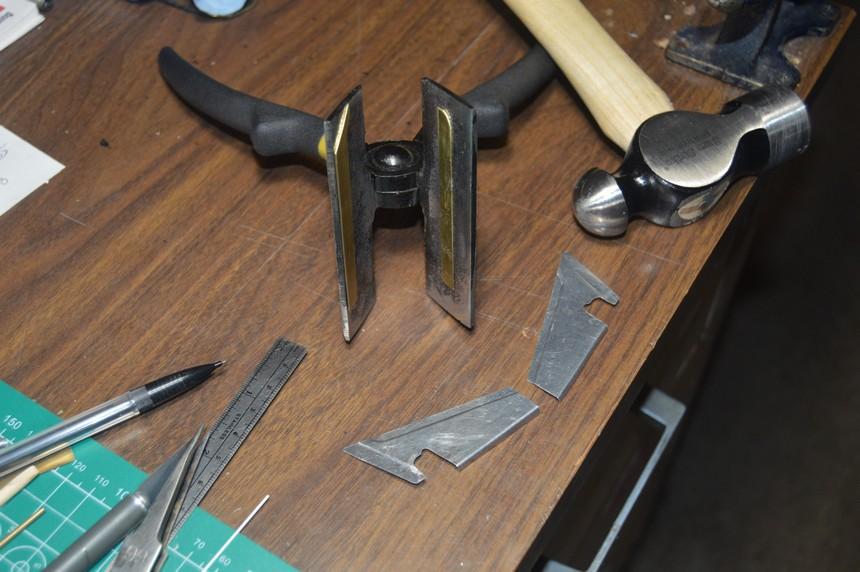
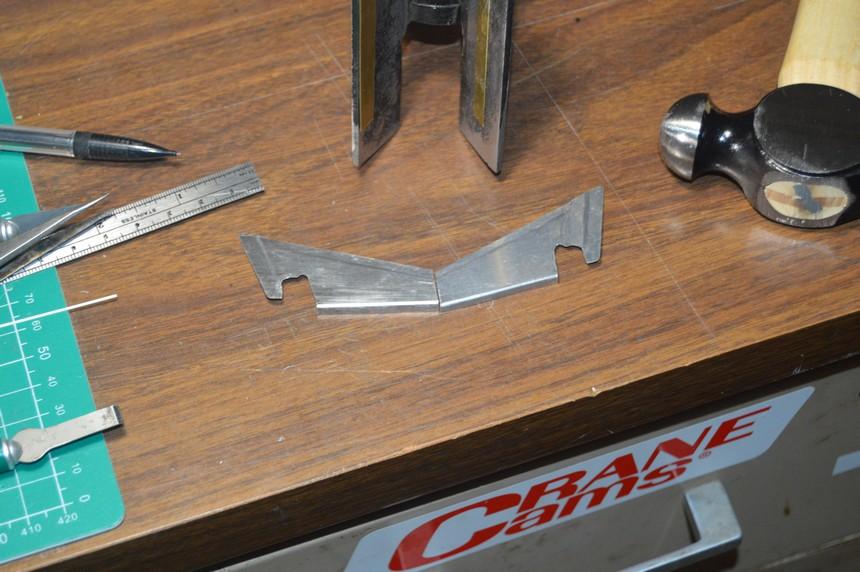
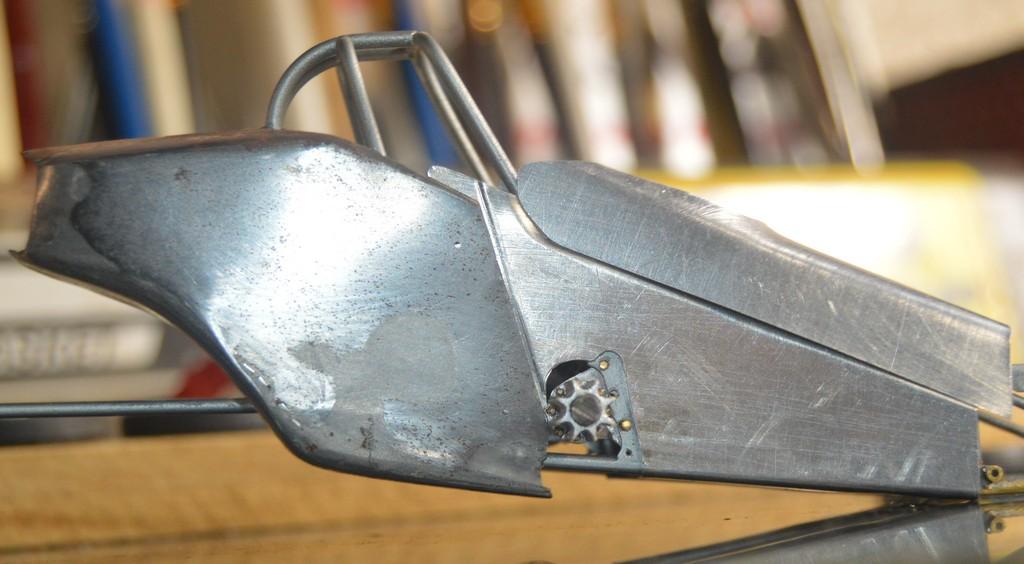
I made a new cowl. The first one ended up being too small. The new one (as the second one always does) fits much better! I need to get the side panels drilled for the fasteners, and pin those, them drill and pin the cowl, so that I have a definitive location to cut the front, back to the motor plate. The "press" and die worked well to create the lap for the cowl. I've added a few photos of some of the items I use to form the sheet. I really have no limitations, as to what I'll use. Hunks of wood, steel rod, several different types of hammers, tools I've made specifically for given applications...Essentially, whatever "feels" like might work. While there is a fair amount of technicality involved, there's also a lot of "feel", involved, in working sheet. Sometimes, the material kind of "tells" you what it requires you to do, and it may not be the way you were approaching it. I've learned to be prepared to "take notes" and do it over, again, if needed. Flat panels are simple, and virtually always nailed on the first shot! Items with compound curves often take a couple of tries. While technical aspects are easy to explain, the rest comes only from doing, and from developing a feel for the craft. That said, here's the new cowl, and the newly-lap-jointed cockpit side panels. All comments and questions are always welcomed. Thanks for looking! I made this form to shape the rolled edge, around the cockpit opening. This cowl will be re-annealed and have a bit more forming done, using this fixture. I made this form, to create the basic profile of the cowl. I flattened the original, soft aluminum cowl, to use as a pattern for the new cowl(s). An assortment of the tools I use. This is a small ball-peen hammer from a craft tools set. It's one that I use in forming dragster cowls, because it fits in there! This is the fixture I put together to create the lap joints. The brass stock is superglued to the pliers. Once it's positioned, and the panel is in place in the tool, I use this ball-peen hammer (a larger--not huge--Estwing tool) to give the pliers a few raps atop an anvil. It's the best way I've discovered, yet, to make lap joints! They are nice and "crisp". Pay no attention to the guy in the background. For some reason, whenever I don't have him pushing something around the bench, he break dances!? As I've been looking at pictures of NTF dragsters, I'm kind of leaning toward the nose/tail/under engine and cockpit panels only with open chassis between the nose and engine. I really like that look!
-
Wilson Livestock Trailer.
Straightliner59 replied to James Maynard's topic in Model Building Questions and Answers
Maybe drill and pin doll house hinges to the insides of the slats? There are several styles. One might be close to the prototype. -
Very nice, Marco! It's always cool, to get them up on the wheels! Keep up the great work, my friend!
-
Well, I had intended to get photos as I was working on this thing, but, I kind of forgot. I'll get some of the tools I used, later on. For now, here's where the cowl is. Still some forming to do, and fine tuning, before I can lay out the design for the laps. I will use the old panels to mark the holes for the Dzus fasteners. I think I can countersink those holes, and use one of the small nails in each to mount the panels, them, glue a PE Dzus fastener, over that. Anyway, sorry for the lack of photos of the process. Sometimes, just building gets in the way!?
-
Cam driven accessories. Help.
Straightliner59 replied to Tarkmucker's topic in Model Building Questions and Answers
I failed to mention the snout/tube on the "front" of the pump, as you mentioned, connects to the bottom hose outlet on the radiator. I think I blocked that part from memory! I would have barely had a clue about plumbing the thing, without a search engine! The good old days, weren't so good, in regard to research! -
Whew! That's some soldering, my friend! Very nicely done, Ian. Comparing that to me dragster--that thing is huge!
-
I was just looking at an issue of Hot Rod Deluxe, the other night--two were being flagged off, and both had headlights. They had tape on them, but, they were there. I know the rules say they aren't allowed, but, it seems to be a pretty loose rule, because I've seen photos of quite a few with the headlights on them.