Straightliner59
-
Posts
5,817 -
Joined
-
Last visited
Content Type
Profiles
Forums
Events
Gallery
Everything posted by Straightliner59
-
Excellent work, Jim! I will get those reference photos posted in a few. Hope it's not too late!
-

Mooneyes Dragster reference pictures
Straightliner59 replied to sflam123's topic in WIP: Drag Racing Models
I have some vintage photos that show the firewall both ways. If I remember, I can post them after work. -
Thank you, my friend! I really enjoy adding little bits of "eye candy"! Although I have seen them both ways, I just think they look so wicked, with that big old wing, up there!
-
You've a nice start, Bernard. I think offset drivelines were/are fairly common in streamliners. You have me eyeing the Dyna-Moe, I have!
-
It is now back in the box, in the closet. I kept everything together, because whichever way I go, there is usable stuff, there! When I took it down from the shelf above the workbench, I thought maybe it would inspire me to at least tinker, with it. Then I started looking at the things that still need fixing, and realized that all I wanted from the thing was the best Modified Production '70 Chevelle I could build, and there is a better way to go about it! Whew--at least I'm not sentimental about it!? That could lead to further irrational behavio(u)r! That's a thought. I could put it on the wheels, and put it in the display case. Hmmm...
-
Sometimes, you realize that a project is pretty much actually dead. This is one of those projects. Its history is documented in this thread, but, to condense it, it began as a mating of AMT's '70 Chevelle and '7? Monte Carlo, because that kit provided the best chassis available, at that time. When I resurrected it, I was informed (thankfully!), here, that the AMT body was not all that great. The Revell snapper is, however, so I began to mate the Monte Carlo chassis to the Revell body, and interior. That turned out to be a struggle I never quite got through. Subsequently, Revell released their '68, which, obviously provides a better option in the chassis department than the old AMT item. So...to swap the chassis out for the newer, nicer Revell item (along with engine compartment details, etc.), would pretty much literally meant that I had converted an AMT '70 Chevelle into a Revell '70 Chevelle. While I appreciate the humor that lies in that, I am disinclined to finish the joke. With this, I bid "goodbye" to a 20 year project that went nowhere, in the end!
- 72 replies
-
- 1
-

-
- kitbashed
- scratchbuilt
- (and 1 more)
-
Wheelbase questions
Straightliner59 replied to Reegs's topic in General Automotive Talk (Trucks and Cars)
I didn't want to say anything, but 125" was stuck in my head--you've proven that to be quite plausible! -
That is essentially what I have--except mine's crude!
-
Oh, man, Bernard! I missed the first one. It's perfect for what it represents--as your stuff always is. I am really looking forward to seeing this one come along!
-
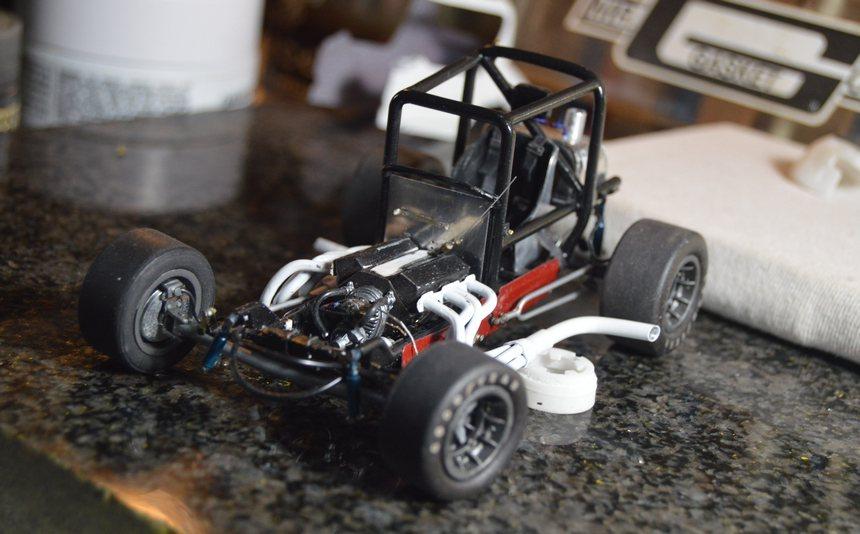
Okay...so, I made a new magneto. Once I had that done, I clamped the manifold in the mill vise mounted on the angle table, and drilled it for guide pins for the injectors. I had to see what that looked like, with everything sitting together. I am going to install a wing to the top of the cage. I really like the way these look with them! It's coming along! Questions, critiques and comments are always welcome. Thanks for having a look!

-
ROYAL CANADIAN 1/16 SCALE TOP FUEL DRAGSTER
Straightliner59 replied to Ian McLaren's topic in WIP: Drag Racing Models
That makes perfect sense. It's coming along, beautifully! The magnets are a great idea, as well. -
Nice work, so far, Jim. I especially like the mesh headrest! Super job, with that!
-
The most important thing is getting well! If we're not over here, drooling over your work, we have more time to drool on our own!?
-
ROYAL CANADIAN 1/16 SCALE TOP FUEL DRAGSTER
Straightliner59 replied to Ian McLaren's topic in WIP: Drag Racing Models
Ian, that looks excellent! How did you form the step, where the cowl overlaps? I found that to be a bit tricky. I ended up cutting a brass strip to shape, that I could form over. That's not ideal, but, it got the job done. -
Good news for a change...
Straightliner59 replied to tim boyd's topic in General Automotive Talk (Trucks and Cars)
Denver has always had a strong hobby shop scene. Unfortunately, one of my favorites is a mere shell of its former self. Caboose Hobbies always had the best selection of scratch building supplies, paint and tools, in town. It was sold, and moved, and has nowhere near the selection or space the old owner had. One of my favorite hobby shops, ever , is in St. Paul. Scale Model Supplies is absolute nostalgia in a basement! If you're ever up there, I would recommend a visit. -
64 Dodge D100 Pickup Pro Street
Straightliner59 replied to AmericanMuscleFan's topic in WIP: Drag Racing Models
I didn't think of it, until I ran across some tiny photo-etched Ford scripts, in a drawer of parts and pieces! Then, the wheels started turning! -
Thank you, Andy. It's funny; I posted photos on my Facebook page, and Guy Beaudette responds : "That's how I've been doing it, forever. Just dab a little super glue on the inside corner, before you paint them." ? Leave it to Guy to have it figured out! These seem pretty sturdy. They look much better than my former way of doing them. Yes! I am glad I had them, too, because I feel like X-Acto blades would have crushed the thin walls of this stuff! Thanks, Francis!
-
64 Dodge D100 Pickup Pro Street
Straightliner59 replied to AmericanMuscleFan's topic in WIP: Drag Racing Models
Simply beautiful work, Francis! I found a Ford script in my stash that I plan to use similarly on my Model A, when I get back around to it! -
Very cool, watching this come together. Craftsmanship.
-
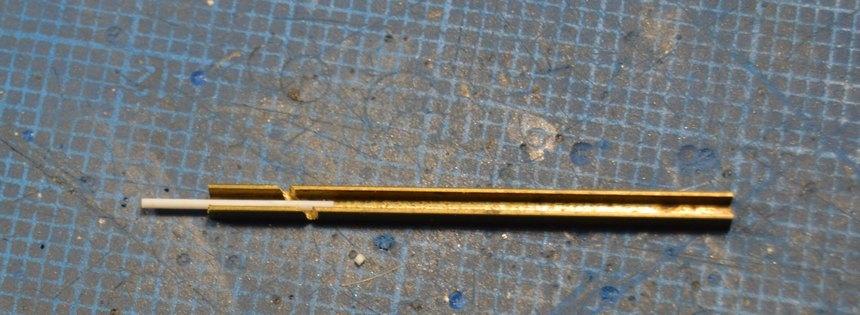
I went and got me one of those giant dimes, like Francis has! I have always made my 90 degree plug boots by cutting a wedge from wire insulation. It looks okay, but, I figured there had to be a way to make them better. Enter HS PC board bits (I love these things!). Using a .0197" bit (.5 mm), I bored through lengths of .030" Evergreen rod. I then made a tiny miter box, and cut sections of hollow rod, at 45 degrees, using a scalpel blade. I glued sections together, using a roughly 50-50 blend of Weld-On 4 and Testors liquid cement, to form "elbows". With any luck, I will be able to insert a plug wire in one and, a short length of brass wire in the other, for the spark plug hole. I think it'll work out, pretty well! Thanks for looking!
-
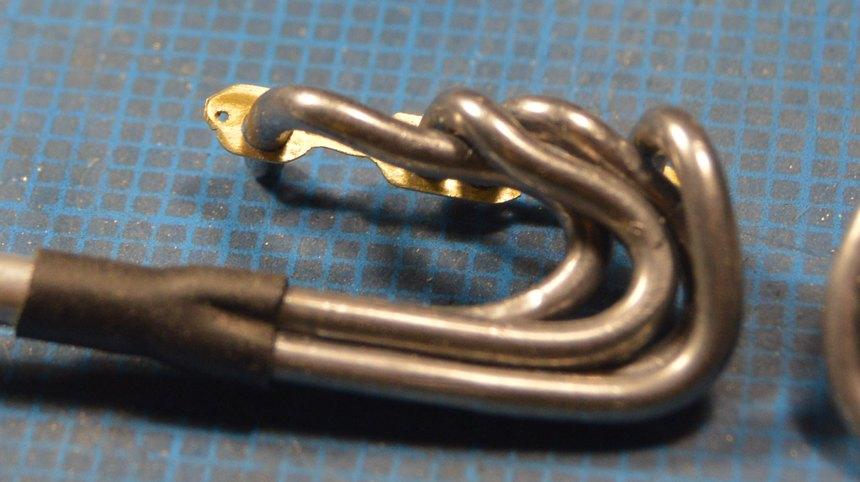
I've got them to the point they can pretty much be just plugged in. I'm going to throw a bit of weathering on them. Then, next up, I am going to see if I can come up with a better way to make 90 degree plug boots. Comments, questions and critiques are always welcome. Thanks for looking!
-
'66 Shelby Mustang Group II
Straightliner59 replied to afx's topic in WIP: Other Racing: Road Racing, Land Speed Racers
Looking very good, so far, JC. Love the work you did on the pan, especially! -
MPC 1/16 Charger, Buddy Baker
Straightliner59 replied to JET.'s topic in Stock Cars (NASCAR, Super Stock, Late Model, etc.)
That is utterly beautiful work! The finish is incredible. Well done!