Straightliner59
-
Posts
5,814 -
Joined
-
Last visited
Content Type
Profiles
Forums
Events
Gallery
Everything posted by Straightliner59
-
I'm not sure what you might have used, but I use aluminum step flashing. A lot of it! This is a very cool project. I've only seen one other replica of it. That one was built by Neil Van Zile. I think he used a diecast body. Maybe.?
-
 The line-lock is fabulous.
 -
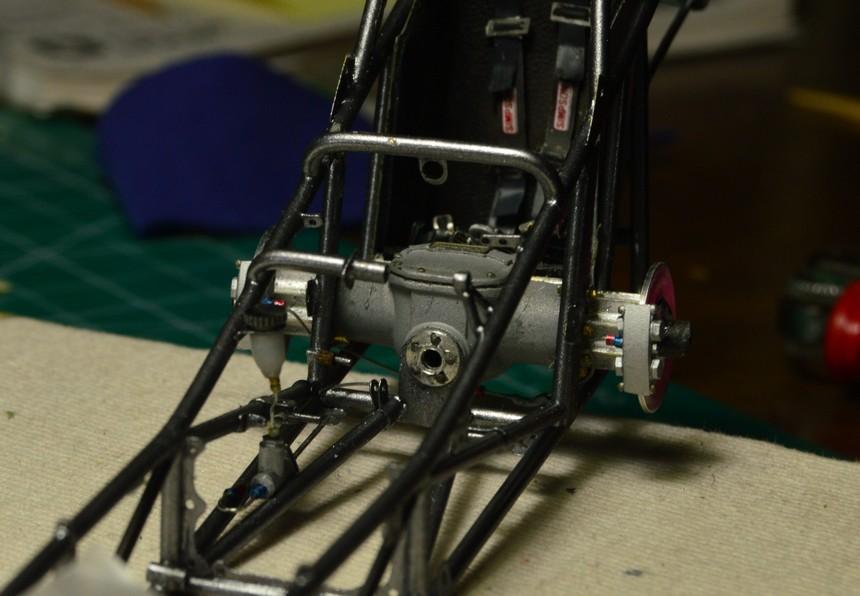
I'm going to give it a bit of weathering, but, this is otherwise done! Next up, I will work out exactly how I'm going to install this and the motor plate, so that the engine can be easily installed, when its time comes. I used short lengths of black wire insulation for the reverser bolts. Most of the Lenco reversers I found had black anodized cap screws, so...Questions, comments and critiques are always welcomed. Thanks for looking!

-
Great choice of motivation! The OHV conversion is way cool! I'll be watching this--I have a Monogram Model A coupe about half way done. Nice work on the trans!
-
I'd never tried it as an undercoat, but, it does look super-slippery. Thank you, kindly, sir! I hope to keep this thread interesting. I enjoy sharing what I'm doing, and it's nice to hear when others are enjoying it, too!
-
Ain't that the way it goes?!? Sometimes, I think it's just as easy to scratchbuild something--but, that might just be because I enjoy that more than cleaning up parting lines and stuff. It will be a pleasure to watch this come along. Thank you for your kind words, Jim.
-
It's coming along, beautifully, Ian! The headers are just right. Excellent work, my friend.
-
’72 Dodge Demon Drag Racer 1/25 scale
Straightliner59 replied to AmericanMuscleFan's topic in WIP: Drag Racing Models
I love seeing this stuff! Those look great, Francis! Have you considered purchasing a rotating column attachment for your mill? I bought one around the end of last year, and I really like it! It makes milling angles a much simpler proposition. Or, do you have one, and find the tilting angle table to be better?
-
’72 Dodge Demon Drag Racer 1/25 scale
Straightliner59 replied to AmericanMuscleFan's topic in WIP: Drag Racing Models
No kidding! Can you imagine this forum, if we all had to do that, still?? -
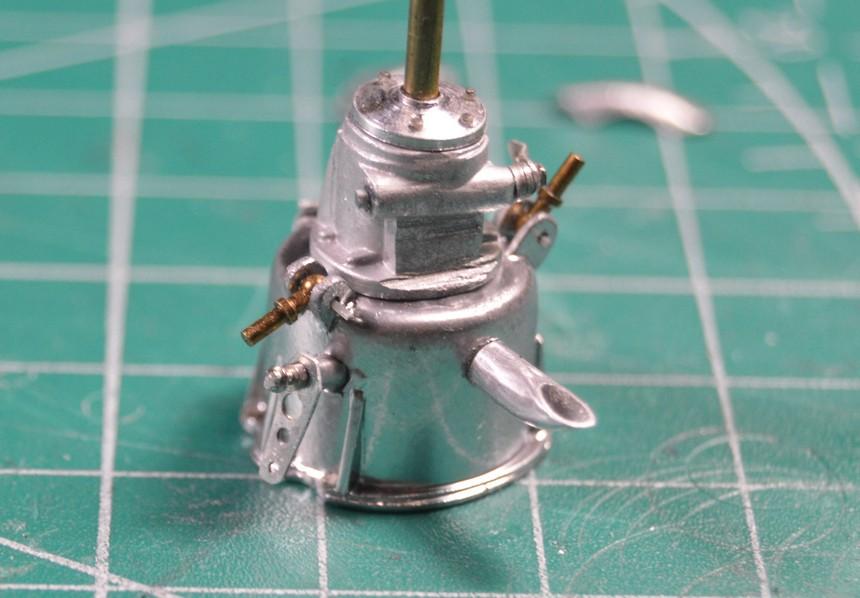
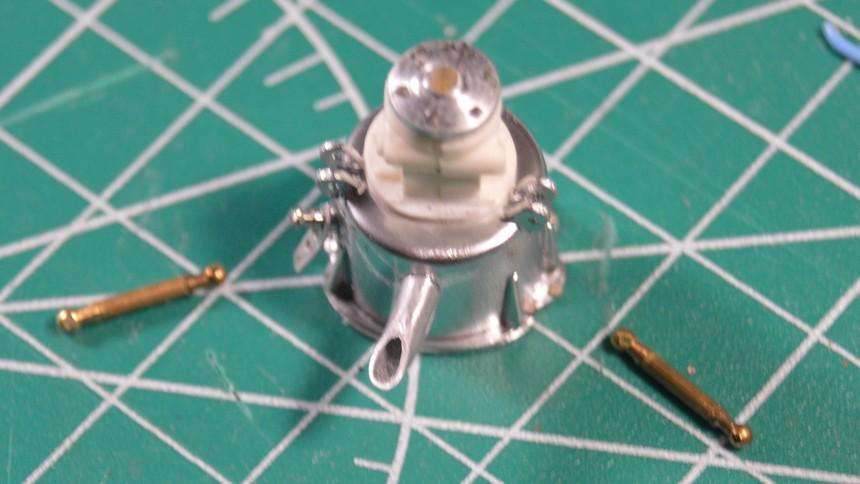
Added more details to the clutch can, and reverser. This stuff is all just stacked on hat 1/16" rod, and none of it's cemented, yet. I made the new inspection cover from flashing, and polished it. I can say this: Krylon Original Chrome is a dead match for polished aluminum. I think the driveline is getting close. I need to figure out exactly how I am going to install the driveline into the cockpit, along with the motor plate, and be able to plug the engine into that, once it's built. I have an idea, and I don't think it'll be too difficult, but I want to make sure I'm not wrong.?
-
Sometimes, it's just necessary. ? Looking good, Jim!
-
Simply gorgeous! What are you using for your secondary wiring?
-
Rattle can "glop" leakage
Straightliner59 replied to plasticprime's topic in Model Building Questions and Answers
Valid points, lest you end up looking like the guy pictured, above.? To be on the safe side, I'd probably wrap the can in an old t-shirt, or something. -
Hot Rod Black Paint
Straightliner59 replied to Zippi's topic in Model Building Questions and Answers
I agree. It looks more like something I'd use to replicate a black plastic finish. -
I got the Revell 240Z I mentioned winning, above. It's pretty much perfect, sans a couple of slight scuffs on the box. Pretty dang nice for a 50 year-old kit!
-
Paint too expensive? Try mica powders.
Straightliner59 replied to Bills72sj's topic in Tips, Tricks, and Tutorials
You can use metal powders, as well. I even mixed some of those into resin, with decent success. I have some pearl powders I picked up, back in the '80s, too. As Noel said: Experimentation is beneficial to the hobby. And looking outside the modelling "realm", you will often find the same products at much more cost-effective prices--I mean, much of the stuff marketed to us hobbyists is priced the same way cops estimate the value of a gigantic drug bust. -
Thank you, so much, Ian. I appreciate knowing that it's inspirational and informative, to others!
-
She's a beauty!
-
I've got a little more work done, over the last couple of days. Still working on the driveline, so I can finish the cockpit. I painted the data link connections, and the bellhousing. I started work on a new reverser. I painted the bellhousing with Krylon Original Chrome over Walmart Paint Place Gloss Black. I got a little hasty, and left a couple of small marks on the finish. Since one will be down, under the reverser, and the other beneath the adjustment/inspection cover, they won't be any issue. I decided against stripping the part. The dust exhaust tube is 3/32" aluminum tube, bent using a bending tool I made, many years ago. Its length will be adjusted, once the floor pan is fitted to this assembly. Questions and critiques and comments are always welcome. Thanks for looking!
-
Those looks very nice. Your manifold is excellent! Great work, Ian!
-
I just scored this at auction, for under $25, shipped! I ran across it, and couldn't help myself. It's from right about the time I began modeling. I had a BRE version of this, when it came out. It's a beautiful little kit.
- 39,076 replies
-
- 4
-

-
- johan
- glue bombs
- (and 1 more)
-
I found it on Ebay. There are several variants: https://www.ebay.com/sch/i.html?_from=R40&_trksid=p2047675.m570.l1311&_nkw=disc+cutter+punch&_sacat=0
-
’72 Dodge Demon Drag Racer 1/25 scale
Straightliner59 replied to AmericanMuscleFan's topic in WIP: Drag Racing Models
I absolutely relate to that response! I just shoot a ton, and hope a couple come out!? -
Thank you, Dan! It's just what I enjoy doing.? I'm always happy to share what I'm working on. It's extra cool if somebody gets something useful out of it. Thanks again, sir! Thank you, so kindly, my friend! I'm pretty happy with the way it's going. Positive response is truly icing on the cake!