Straightliner59
-
Posts
5,815 -
Joined
-
Last visited
Content Type
Profiles
Forums
Events
Gallery
Everything posted by Straightliner59
-

GSL Common Kit: [revision] just another Model A Roadster
Straightliner59 replied to 89AKurt's topic in WIP: Model Cars
That fire bottle looks mucho better! Nice touch with the suicide knob, too! -
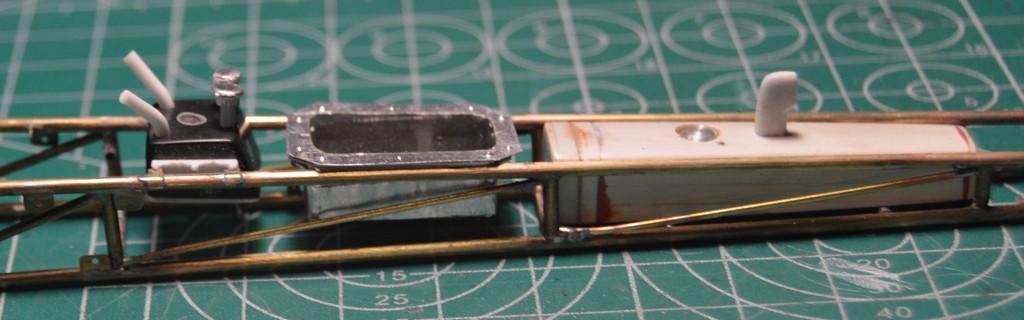
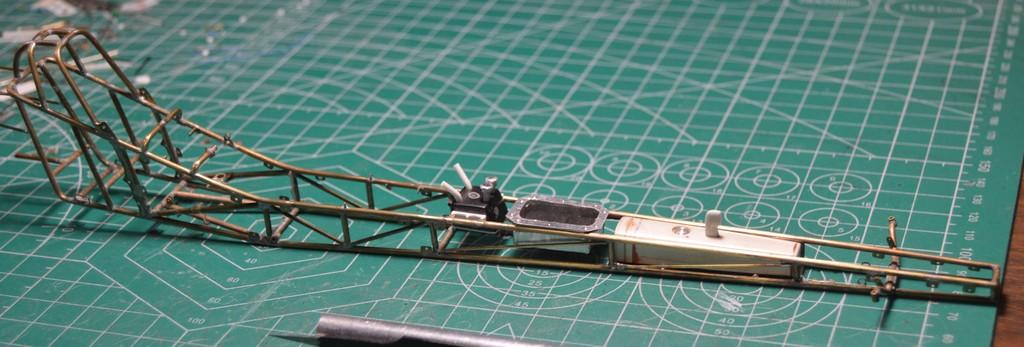
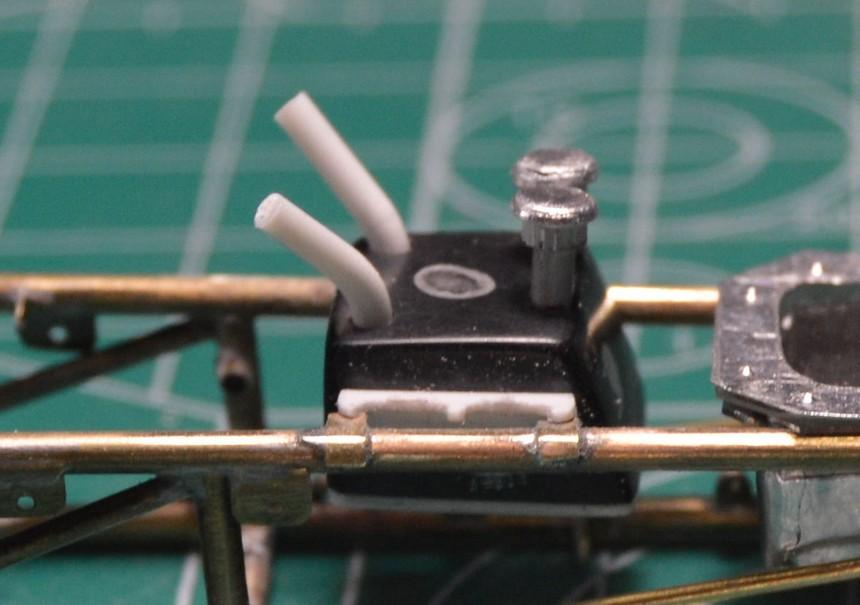
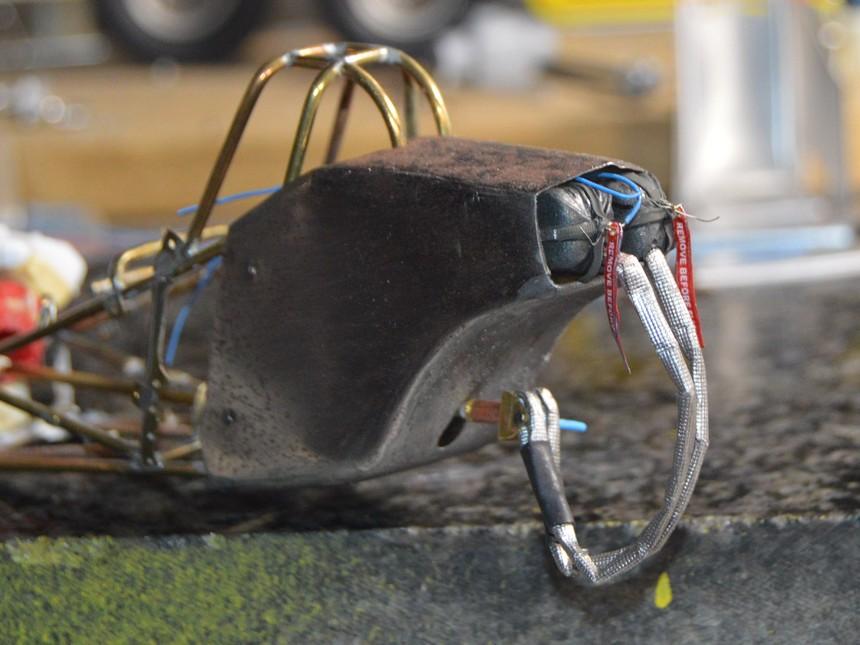
I got the tabs made and soldered, that support the puke tank. I used a .060" wide strip of brass (.008"). I bent it across the chassis, in the places the tabs needed to be, trimmed the ends, then soldered the two strips in place, across the chassis. I then cut the mid sections out of the two strips, leaving four tabs. I sanded them to clean them up. Next, I'll drill the tabs on the puke tank (I'm going to cut off the center ear, on each side), and use those holes to drill the tabs on the chassis. I am going to narrow the flange around the perimeter of the electronics box--it just looks too bulky, the way it is. I found a schematic for the Racepak, online. I'll use that to properly wire it up. Questions, critiques and other comments are always welcomed. Thanks for looking!

-
Thanks, Marcos! I'm going to look for textured paper, and have a look at Evergreen styrene siding sheet. You'll do a fine job, man!
-
Ah! Your scratchbuilding is awesome! Truly a man after my own heart!
-
Can't Edit Topic Heading...Again
Straightliner59 replied to Straightliner59's topic in How To Use This Board
Exactly! I'll just try it, until it's able to be turned back on. Not a big deal! -
’72 Dodge Demon Drag Racer 1/25 scale
Straightliner59 replied to AmericanMuscleFan's topic in WIP: Drag Racing Models
That's exactly right: We can employ techniques from any number of fields of endeavor. And, we should! I cut some strips of wood that I plan to bend into a steering wheel, one of these days. Woodwork and metal work don't know scale, so virtually anything that can be accomplished in the 1:1 realm, can be adapted to ours! -
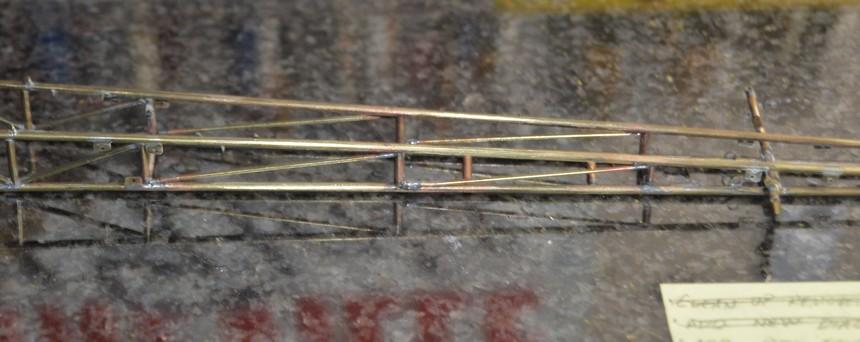
The knurls have been handy, lately! I used them on some 3/32" aluminum tubing, to make a pair of breathers for the puke tank. I punched the tops from tooling aluminum, and used a straight punch to roll/fold the edges. I also ruined a Sticky Notes pad, in the process--but it worked! I will polish those with a 4-way polishing stick. I also added two pairs of side frame diagonals. I still need to clean those up. Thanks for looking!
-
1932 ford saltlake car
Straightliner59 replied to charlie libby's topic in WIP: Other Racing: Road Racing, Land Speed Racers
Those Webers are gorgeous! All your work is, but those Webers! -
Wheelie bars are looking great, so far. The casters really look awesome!
-
Very nice work, Joe. Looking forward to watching this come together.
-
Love the paint, Andy! These Millers are so cool, anyway!
-
’72 Dodge Demon Drag Racer 1/25 scale
Straightliner59 replied to AmericanMuscleFan's topic in WIP: Drag Racing Models
Excellent work, my friend! Laminated sheet for the wheels tubs is a great idea! -
This thing just keeps getting better and better!? Excellent work, my friend.
-
Can't Edit Topic Heading...Again
Straightliner59 replied to Straightliner59's topic in How To Use This Board
Understood. I'll just try it, periodically, until it's ready, again. Thanks, Dave! -
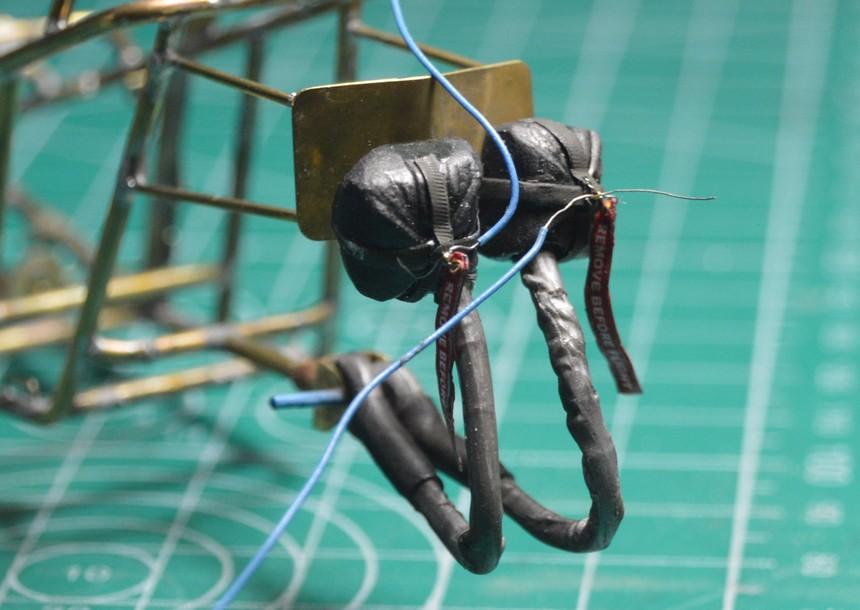
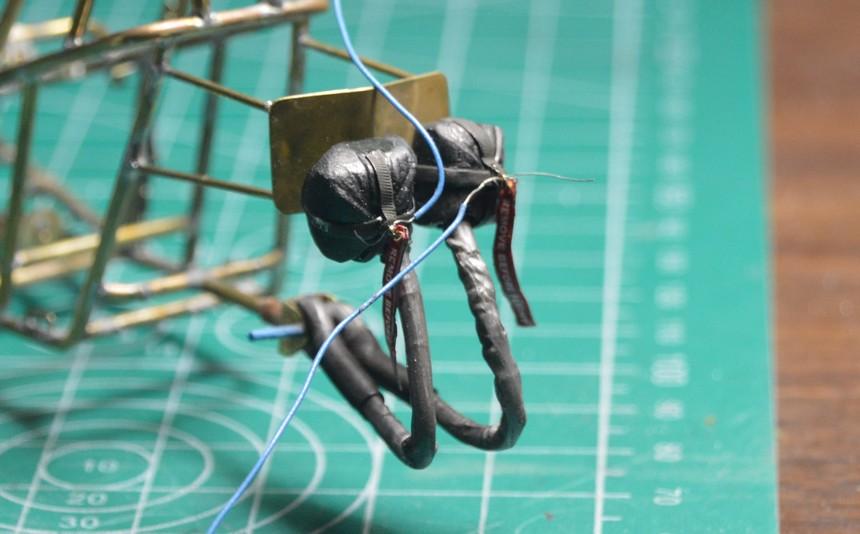
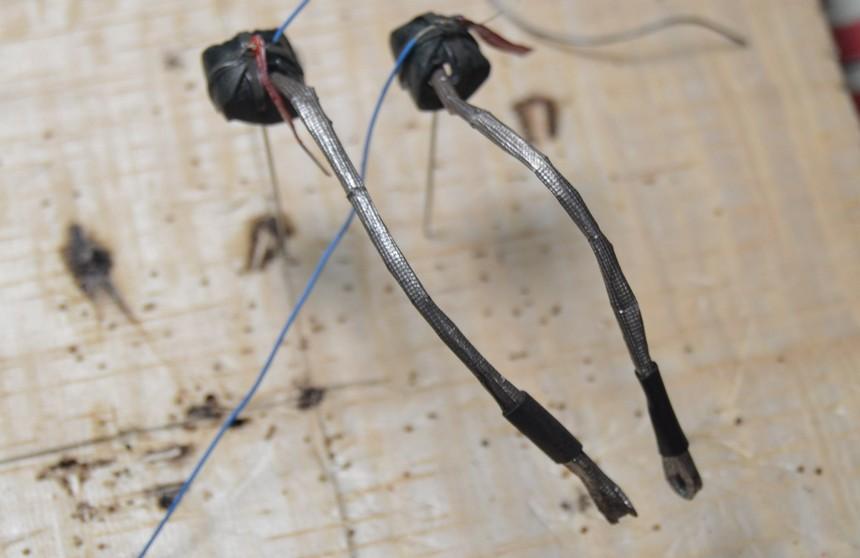
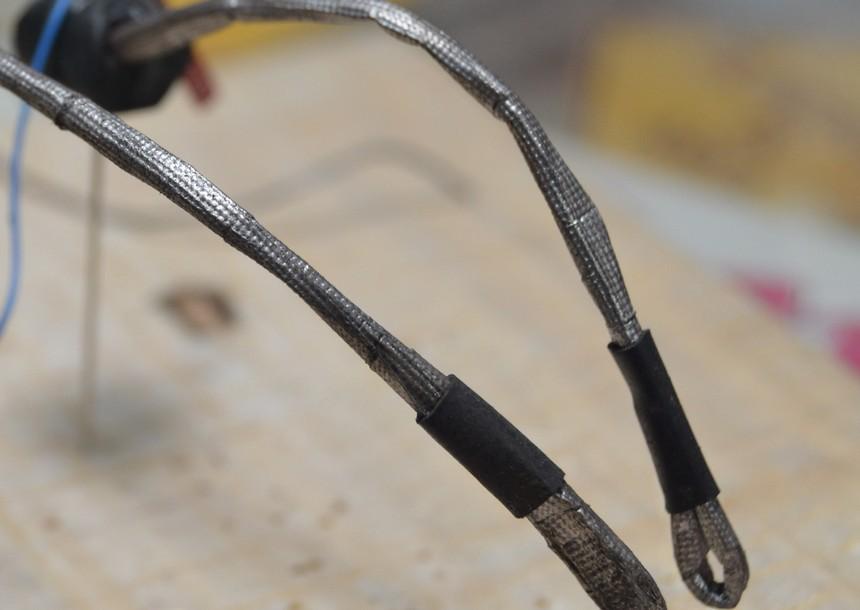
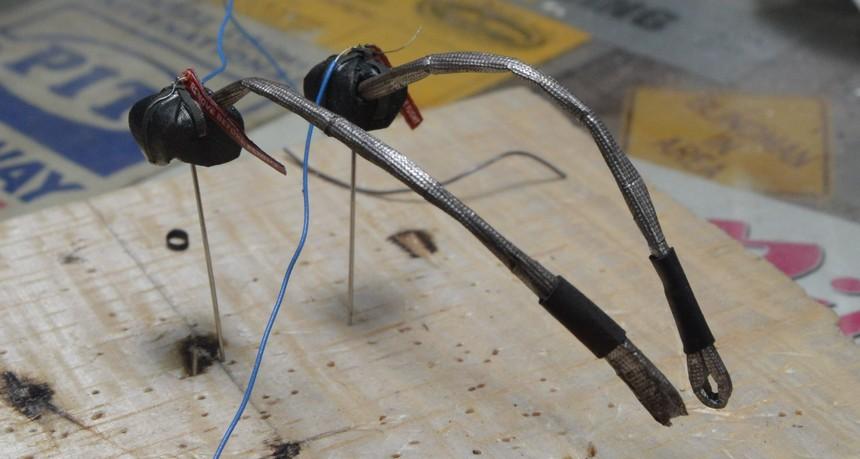
Thanks, Marcos! I appreciate your kind words, Ian! You know how it is--I get something "finished", and it's okay, but I already know that I'm not quite satisfied that it's the best I can do, so the wheels are already turning!? I'm not quite sure about the electronics box's lid, yet, either!? Thank you, my friend! I think it may be the same brain damage you've suffered that compels me in that direction!? Here are a couple of photos that better illustrate the new 'chute line sheathing. While I did like the look of the embossed paper (while I used the liner of a cigarette package, very similarly textured foiled paper is available by the roll at craft stores), I just didn't feel like it would be anywhere near durable enough for a creation that I hope will be around for longer than I! In that light, I just kind of kept thinking about what other material might work. I bought a roll of the cheapest "Duck" brand tape Walmart had, to experiment with. It's very thin, and flexible, thus was easily rolled around the wire core (insulated, single-strand copper, I'm guessing around 24-26ga.). When I wrapped the wire, I left one end of the tape "long", so that the end of the sheath would be sans wire. That made it easier to loop the end, and still have it fit into the heat-shrink I used as a collar. It also facilitated the canopy lines fitting through the mounting bracket. Once the sheaths were made, I brushed them with an acrylic matte clear. They were then dusted with pastels. Finally, I set the pastels with some good-old cheapo Aqua Net hair spray! Thank you all for your comments, and for looking in!
-
Just finished my first diorama! Asbury, NJ streets!
Straightliner59 replied to GlueSniffer's topic in Dioramas
What a fantastically real-looking (is that an oxymoron?) diorama! You've taken what may have been just another brick wall on a diorama, and given it life...history. You've transformed a sheet of scale asphalt into something that's not only been driven on--it's been lived on! Excellent work! -
Coming along nicely, my friend!
-
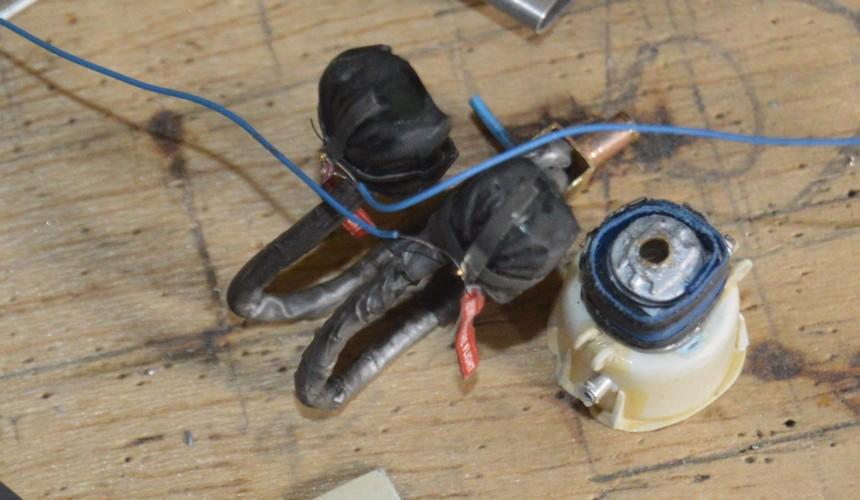
I've been working and reworking a couple of things. I think I have finally decided on the sheathing for the parachute cords: I made a new set using cheap duct tape, rolled around a length of wire. The wire makes it more poseable, and the color is good. The paper lining from a cigarette pack looked nice, but, was simply too fragile. I've also built about 6 boxes for the computer and battery, before I finally came up with this one. First, I needed to improve my design, to create a tidier-looking box. I mis-folded a couple, so they were several thousandths too wide. Duh! I also decided to build a clear lid for the box, so that the innards are visible, and I don't have to remove the lid for display. Sure, it'd be easier to poke a couple of holes in the box, and fake the whole thing, but, that'd be boring! I still have some cleanup and trimming to do, to it. As always, yer comments, questions and critiques are always welcomed. Thanks for looking!
-
Generally, with engine halves, I sand the mating surfaces with sandpaper, on a flat surface, then align them manually. It's the easiest way to go about that particular task!?
-
Had to have a look...?
-
K&S Metals foil
Straightliner59 replied to Sidney Schwartz's topic in Model Building Questions and Answers
Thank you, kindly! -
1932 ford saltlake car
Straightliner59 replied to charlie libby's topic in WIP: Other Racing: Road Racing, Land Speed Racers
There are several modelers here, whose work I go to look at, when I need a reality check. You're one of those guys. -
Wow. The Webers, like everything else here, are slack-jawed amazing! Colors, textures, absolute realism. Excellent work, my friend!
-
Thanks again, Francis. I decided to change the shroud/canopy lines with a casing, which is more correct. I used the foil from a cigarette package, and rolled it, and worked it until I got it roughly to shape. Then, I shot it with matte clear coat. Once that had set for a few minutes, I dusted it with pastels. I think it looks much better! I also got a lot of work done to the puke tank--I still need to make the breathers and drain cock for it. The tabs are made, and ready to solder in place. I've been devising an anti-shock mount setup for the computer box, and working out the mounting for the battery. I'm pretty excited about this thing! I just keep plugging away at little projects. Trying to decide on a paint color(s), but leaning toward black and gold. I guess it'll get figured out, when it needs to! Thanks for looking!
-
Eh, there's not much to hit, in eastern Montana?