peteski
-
Posts
9,227 -
Joined
-
Last visited
Content Type
Profiles
Forums
Events
Gallery
Everything posted by peteski
-
 No, the manufacturers don't think modelers are stupid. Often times manufacturer designs semi-generic parts to use in multiple models. Sometimes they just use totally wrong parts from one model on another (because producing another new steel molds with more accurate part would be too expensive). A lot of times they also "cut corners" to save on cost. Then there are limitations of the plastic molding process. Some parts are simplified or body shapes inaccurate because it would be impossible to mold their shape 100% accurate. Also remember that many of the model kits produced today were not designed for discriminating adult modeler - they were made for kids to build and play with. Accuracy was not all that important. Also, 20 or 30 years ago, there was no Internet to do your research. You looked at books for photo references, or went to car shows to take photos of the 1:1 cars. But the more recently produced models are designed on a computer, often using CAD drawings supplied by manufacturers for reference, so they are usually (but not always) much more accurate than old kits. But the limitations I mentioned above still apply. What is helping in obtaining better accuracy is using media other than just injection-molded polystyrene. Some kits include resin-cast parts (which can often have better and more accurate details). 3D printing is also entering the hobby kit market, allowing for better accuracy.
 -
Like others have said - you are probably using too much pressure while cutting the foil, and you are nicking the paint too hard. I like using #11 scalper blades - they seem to work better than standard hobby blades. And don't be cheap - make sure the blade you use is brand new (sharp). If you use sharp knife blade and a metal handle, the amount of pressure needed would be as little as the weight of the handle. Also, when peeling the unwanted foil off the body, don't peel it straight up (perpendicular to the model's surface). Peel it by folding it back on itself (almost parallel to the model's surface). And go slowly - don't peel the foil off to fast.
-
Wespe Model Kit 1/35 scale . Resin Kit ?
peteski replied to rob1957's topic in Model Building Questions and Answers
Why do you think that? Wasn't the price of this "odds and ends" kit set by the owner? You had no say about the price - you just found the kit interesting, and with what seemed like a good price, so you purchased it. Why should the hobby shop accuse you of doing something wrong and banning you from shopping there? -
I thought those aerodynamic wheel covers were called "wheel spats", not "pants". https://en.wikipedia.org/wiki/Wheel_spats
-
Billy Carter's Truck
peteski replied to Brizio's topic in WIP: Model Trucks: Pickups, Vans, SUVs, Light Commercial
Steering wheel looks great, especially after the stalks were replaced with more in-scale metal ones. Did you use common pins? -
Thanks! Yes, those photos came out pretty good. Actually these are just scans of the 4x6 paper prints, so the colors are a bit washed out. Yes, the rubber mat does come in handy, and can be rolled up for easy transport. A sheet of plywood painted flat dark gray (regular latex house paint) should work too (just a bit awkward to move around). But if you were to stage the model somewhere at your house, that should work ok. I've seen some people place their "asphalt base" on the hood or roof of their car to get just the right perspective of the background scenery. That also makes it easier to get a low-angle view of the model (since you do't' have to lay on the ground to take the photos like I did.
-
Billy Carter's Truck
peteski replied to Brizio's topic in WIP: Model Trucks: Pickups, Vans, SUVs, Light Commercial
I guess we all have different things that bug us about inaccurate kits, and yes, it would be quite a challenge to make the model 100% accurate. I will also leave mine RWD. But the air-horns are way off too - I found ones that look closer to the 1:1 ones. Looking at the photos I found online, there seems to be the original truck, and a replica with slightly different lettering. Funny that you mentioned taillights. I am planning on 3D printing the correct looking ones. This should be an easy fist 3D design project (since I really don't have much experience in CAD). I found bunch of photos of those taillights online, plus took measurements of the real ones on a friend's truck. Now to find the time to do the design. If the decals that came with the kit were not damaged, I would have just used those, but since I had to make my own, I decided to make them more accurate. The only thing I'm lacking to make them complete are the front and back license plates. The original truck had a some sort of confederate-theme front plate (and that is not kosher today), and I don't know the numbers on the rear plate. Could not find any good photos of either plate. -
I knew it!!
-
Outdoor photography is quite easy, since the sunlight provides a very realistic lighting, and you have a choice of realistic backgrounds. For example, like this photo. I took this photo about 35 years ago (long before digital cameras)with my 35mm Nikon SLR camera, but the same process applies to any camera. Cars are 1:32 scale. The background building is the company I worked for at the time. I went there over the weekend, so the parking lot was empty. 1:1 asphalt's texture is way too coarse (out of scale) for the models, so I scored a large sheet or rubber roofing material (scrap from when I had my roof redone). That is what you see representing pavement. The models are positioned in a way to get best illumination. As you can see by the shadow,, the sun was high up in the sky, but I made sure that the front and right side were not shaded. Camera was sitting on the ground, and close to the car's nose to get them photographed at an angle which makes them look like real cars. I used a fairly wide angle lens (28mm). Wide angle lenses exaggerate perspective, again making small model look like real car. I had the lens set for smallest possible aperture (f32) to get the largest depth of field (area of acceptable focus). Of course since this was a film camera, I was shooting the photos "bind", and didn't really know how good they would be until I had them developed. With digital cameras you get instant photo quality verification. Most digital cameras have a wide angle lens (when zoomed out), so you should be able to get a nice perspective. the aperture is harder to control, but set it for the smallest one if you can. Of course there is now a focus-stacking software available where you take a series of photos, each focused progressively further, and the software will merge them so all the object in the photo are sharp. That greatly adds to the realism. Taking photos from a low angle is also very important for the realism. It fools the viewers brain into thinking the model is real. It is all just an illusion. Again, most cameras (including smart-phones) can be set right on the ground with the lens closest to the ground.

-
LOL! That's where calculators come in - just as easy to divide as it is to multiply. They can be had at a dollar store, or even any smart phone, tablet, or a PC have those built in. I also see where you are coming from - fine if you are a single-scale modeler it is easy to just remember couple of figures.. But if you work in multiple scales (I work in 1:6, 1:8, 1:12, 1:16, 1:24, 1:25, 1:32, 1:43: 1:64, and 1:160), so I just use a calculator. I have few of the tiny ones from Staples always handy on my workbench. I have too many things on my mind to remember bunch of scale related numbers. I do remember that 1mm is 0.039".
-
But European makers were not burdened by the government rules that only allowed manufacturers to use only 4 types of sealed beam headlights. 2- and 4-lamp round headlights, and 2- or 4- lamp rectangular lamps. European manufacturers were free to use any shape headlights they desired.
-
Billy Carter's Truck
peteski replied to Brizio's topic in WIP: Model Trucks: Pickups, Vans, SUVs, Light Commercial
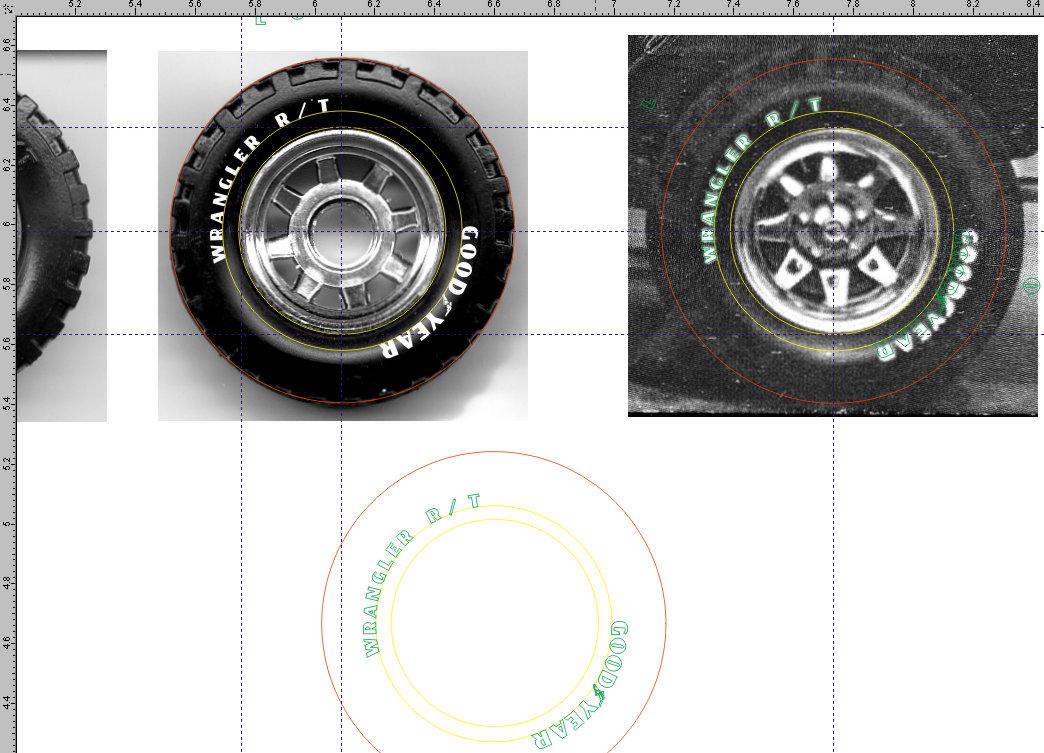
I somehow missed this thread until now. I also have that kit and I'm going a bit overboard with it. That is why it will take me forever to finish it. The Revell rear fenders (wrong shape) bugged me, so I will use the fenders (and likely the entire bed) from the MPC Stepside kit. I like the way the Wrangler R/T tires look, but I agree that the ones with this kit are c r a p. I found better tires in the MPC Rescue Blazer kit. They are 2-piece styrene tires, but they have good details of that unique sidewall tread pattern I like. The decals that came with the kit were water damaged (and inaccurate), so I took upon myself to design and print a better set of decals. I will also include the beer can labels (if they will even be readable in this scale). Here are some screen shots of the artwork I'm working on. It is traced from the original truck photos. This is my "sketch pad" once I get all the images done, I then create another file with print-ready decal artwork. I'm also going to print decals for the tire lettering. This artwork still shows it for the Revell tires, but I'll modify it to fit the MPC Blazer tires (which have taller sidewall). Of course, I've been working on this for couple of years already (in between many other projects I'm working on). No glue has been used yet. I even bought a 1:1 scale Billy Beer can on eBay. I will display this model on a mini diorama with the beer can behind it. I'll be watching your progress. Looks great so far!
-
The ‘other’ mag is stopping publication
peteski replied to cruz's topic in General Automotive Talk (Trucks and Cars)
That is when you learn not to ever grab the front issue from the stack. You reach in and grab one of the pristine copies in the middle of the stack. -
Yes, multiplying by 0.04 or dividing by 25 will yield the same result. In math there are usually multiple ways to arrive at the same results. To me it seems more intuitive to use the division method (since you are directly plugging in the scale ratio number into the equation, rather than its reciprocal). Not many average people know off the top of their heads that reciprocal of 25 is 0.04.
-
Yes, this is basic arithmetic, but since a wheel diameter is mentioned, there are other things to consider. A 14" car wheel's visible outside diameter is actually 15.5". So that is what you need to use for calculation.
-
True, but I also experienced shrinkage (slight sink line) at the joint (I assume due to the solvent evaporating from the plastic joint). That is why I recommend gluing the parts together, then waiting (few days) for all the solvent to evaporate, and only then sanding and finishing the part.
-
The skin tones are very well done (of course the entire figure is excellent too).
-
And what's wrong with this section of the forum? You are getting plenty of attention here. If you build something nice and post photos, people will come and comment, regardless of where it is. BTW, you did a great job on that trailer - if you photographed it in some natural setting outdoors it could be easily mistaken for a 1:1 trailer. The entire ensemble looks really good too.
-
Umm . . . and this is your first model since you were a teen? Looks to me like you jumped with both feet and both hands into some advanced model techniques!! Printing your own decals for your first model (after about 25 years of not building)? Flocking? Airbrushing? Alclad? None of this stuff I would think a novice would use. Novice usually starts of with box-stock kit painted with brushed-on and spray can paint. I'm amazed J.J! I too am curious to see the finished model.
-
Testors is just some MEK (Methyl Ethyl Ketone) in a small bottle. MEK evaporates fairly slowly. While that is desired in some instances I think here I would use a faster evaporating liquid cement. That is the cement both of us recommended. That cement evaporates much faster than MEK alone.
-
Yes, with a real tire manufacturer name no less.
-
If both the hood and strip are styrene then any liquid cement should do the trick. Those cements actually dissolve the plastic's surfaces and "weld" the parts together. The basically become a single piece. That should result in the strongest possible joint. I like the Tamiya extra thin cement, and I would also wait couple of days before shaping or sanding the glued pieces (to allow for all the solvent to evaporate).
-
Bumpersticker: a blast from the past
peteski replied to peteski's topic in General Automotive Talk (Trucks and Cars)
I'm glad to see more of those bumperstickers out there. Now that I found mine, I should display it in my workshop. -
Revell 1/24th scale Jaguar E-Type FHC: Test Shots
peteski replied to Justin Porter's topic in Car Kit News & Reviews
Maybe the mods can merge these topics. I'll contact them. UPDATE: Looks like they did merge the new topic into the existing one. Thanks! -
Yes, the MS Liquid Decal Film should work well. Obviously you can't wet them to get the surface clean, but maybe brush any debris off with a brush and some compressed air. If you are careful, you can even try to brush the film only over the images (instead of just covering the entire sheet). I would apply multiple layers (2 or 3). That film dries very thin. Test the film thickness on some unused image (like the legend lettering on the lower left).