Chariots of Fire
-
Posts
2,782 -
Joined
-
Last visited
Content Type
Profiles
Forums
Events
Gallery
Everything posted by Chariots of Fire
-
 Would love to! If there was a show to take it to!
 -
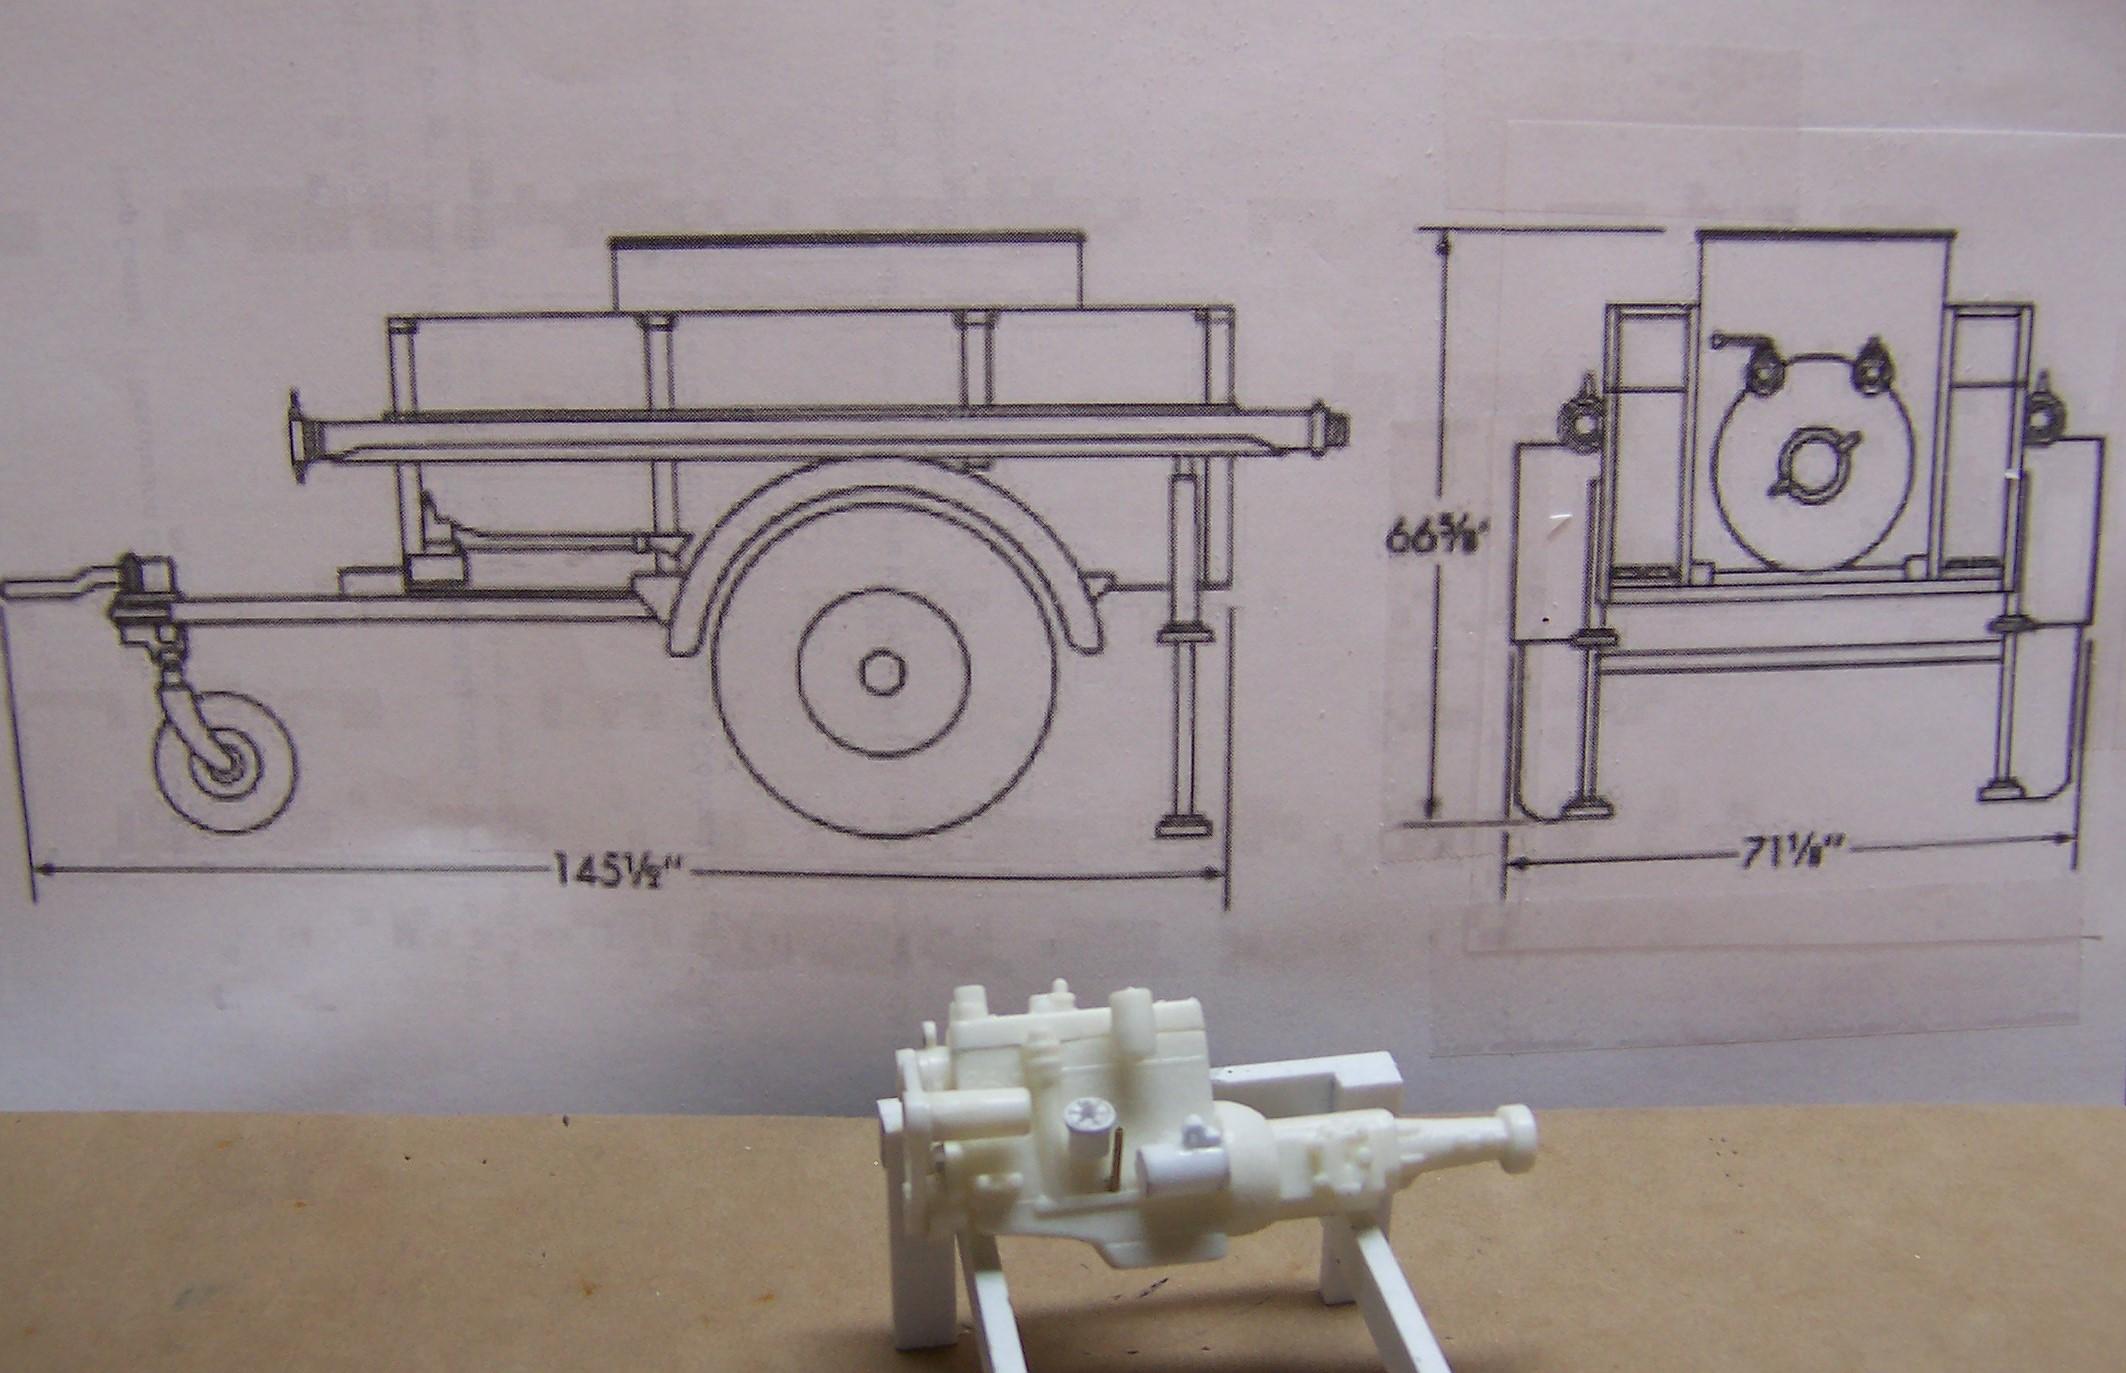
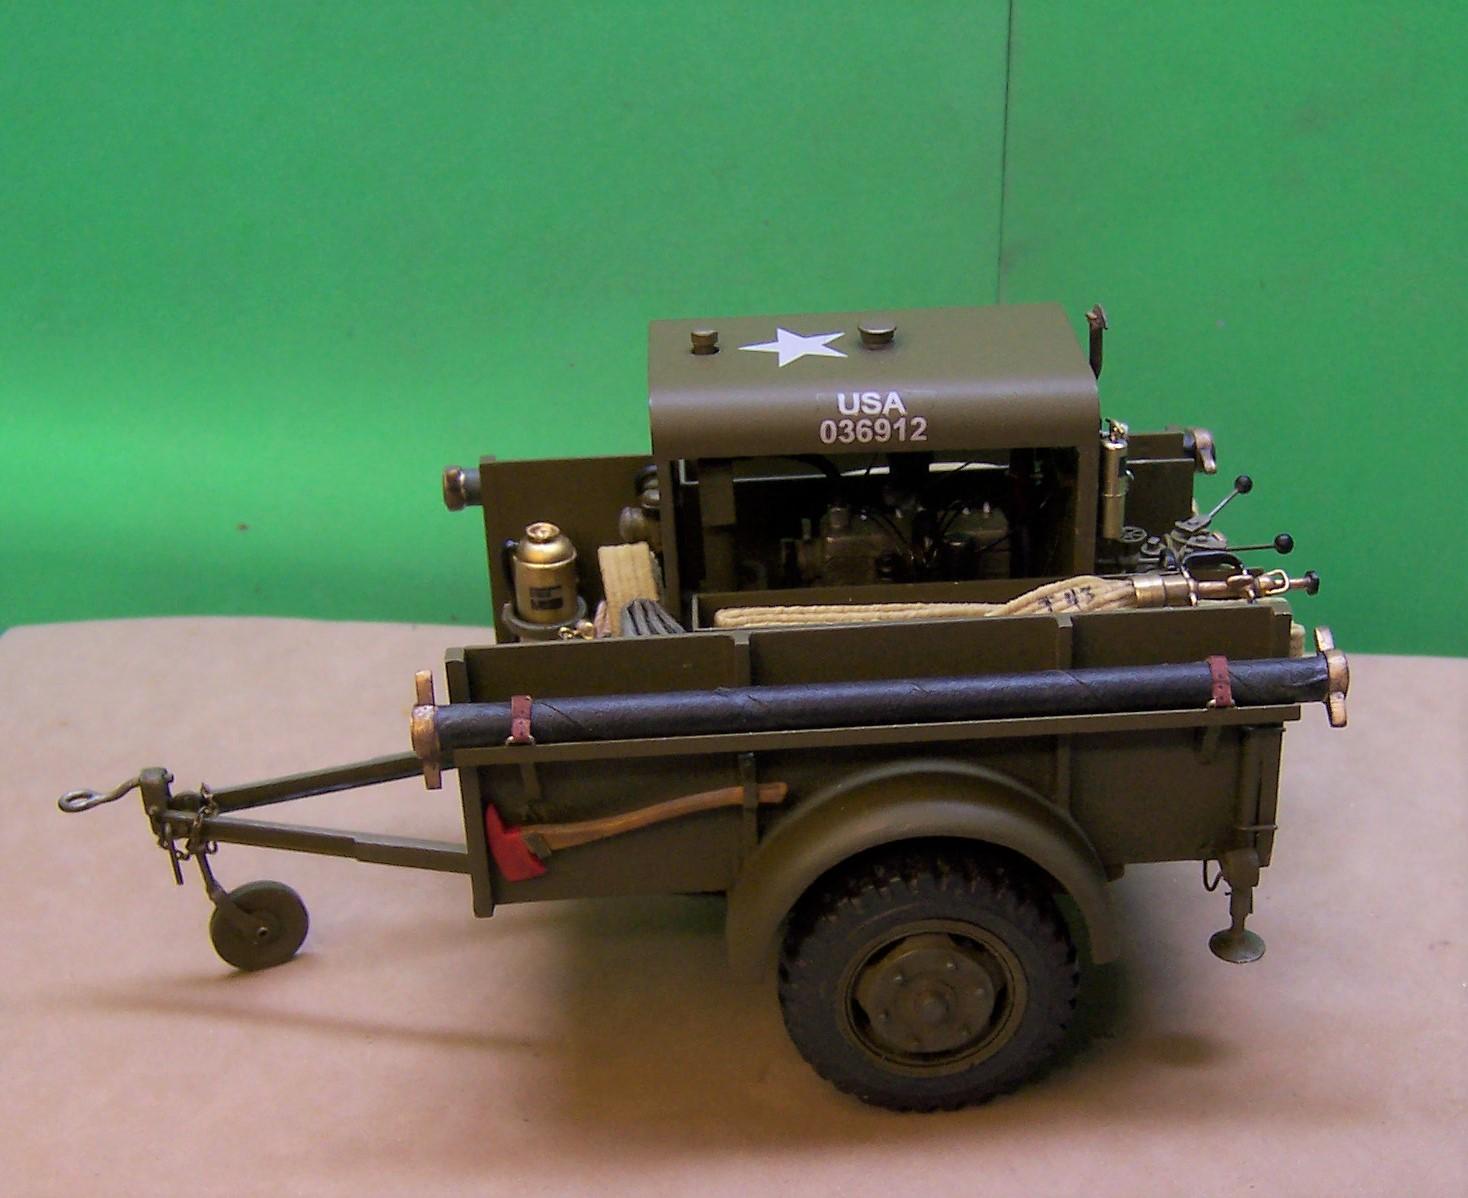
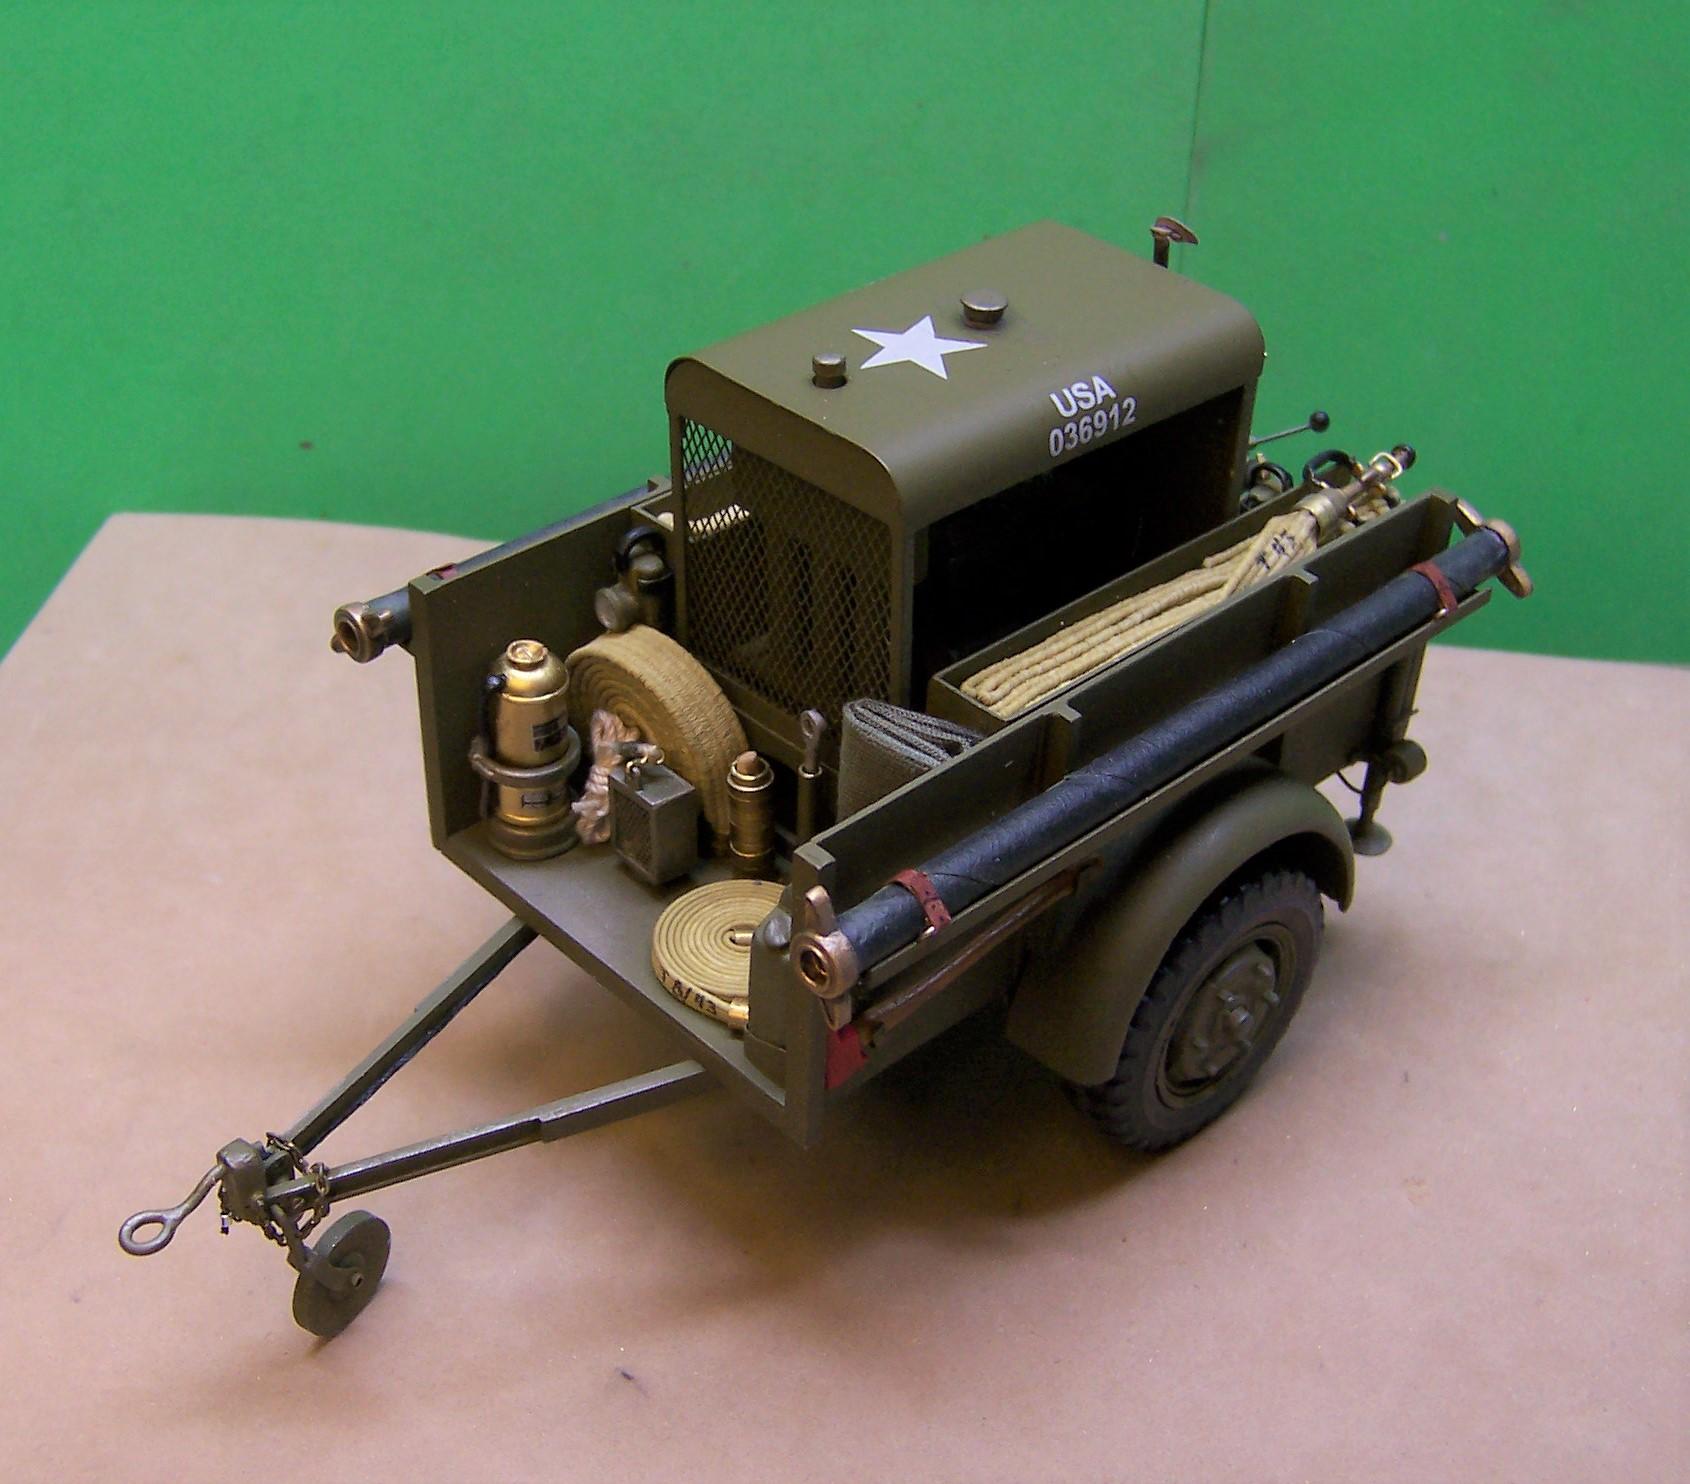
In recent weeks this 1/25 scale Class 1000 fire fighting trailer has been under construction. These were built by many manufacturers during WW 2 for the US Army. Power is from a Dodge 6 cylinder gasolene engine with a direct drive to a 500 GPM Hale pump. The trailer carried 1-1/2" and 2-1/2" hose along with a variety of hand tools and equipment. Paint is Master Modeler Olive Drab. Decals are ALPS printed. Engine came from a Plymouth kit and the pump was scratch built. The dolly wheel in front is turned brass, swivels and can be raised out of the way when the trailer is hooked up for towing. Engine cover is also brass. Tires are resin castings. Hose is stained sewing elastic.

-
I use mold making rubber RTV from Micro-Mark all the time. I use it for simple molds as well as more complex two piece molds. It is re-usable and is flexible with excellent reproduction of minute details. It's mixed 50/50 and has a set-up time of about 4 hours. Two part molds need mold release between them in order to get them apart for casting purposes.
-
Those tracks are super great! What an improvement over the original kit pieces! Nice work going on here!
-
'90s GMC TopKick C7500
Chariots of Fire replied to Sergey's topic in WIP: Model Trucks: Big Rigs and Heavy Equipment
Amazing work, Sergey! Your attention to detail is exceptional. It is a joy to watch your progress. Thank you for sharing your talent and skills. -
BRBO 2020 Paystar and lowboy
Chariots of Fire replied to Sam I Am's topic in Model Trucks: Big Rigs and Heavy Equipment
Nice clean work, Sam. Thanks for sharing! -
back to the forum, no more FB!
Chariots of Fire replied to Gramps2u's topic in Welcome! Introduce Yourself
Welcome to a great modeling site! Don't do FB at all. I like keeping life simple! Lots of great people here with plenty of great ideas. Hope you have a great time! -
Night to day
Chariots of Fire replied to Rockford's topic in WIP: Model Trucks: Big Rigs and Heavy Equipment
I've got plenty of those tires if they would be of any help. Just send me your mailing addy and I will send them to you. Charlie -
Organizing Evergreen strip stock. Super easy
Chariots of Fire replied to LDO's topic in Tips, Tricks, and Tutorials
Years ago I bought a cardboard shoe arranger that had several cubbies in it. 10 , 20 in one, 30, 40 the next, 60, 80 next and finally 100. Tubing and rod are similarly separated according to size. Odd shapes like angle and H sections go in a separate one. -
1955 IH RDTC Highbinder
Chariots of Fire replied to DRIPTROIT 71's topic in Model Trucks: Big Rigs and Heavy Equipment
Well done, Brian and a great looking piece of IH history!! That's a lot of work. Love the tires!! I know what you mean about a windshield. I had the same problem with my IH R190. No real way to make a place for it to fit. I wound up grinding a groove with a small dremel bit all the way around the opening and then fitting the clear plastic into it. IT worked. -
Night to day
Chariots of Fire replied to Rockford's topic in WIP: Model Trucks: Big Rigs and Heavy Equipment
Here's a suggestion. If you have an extra kit that has the same tires, cut the face off the extra tires, sand them smooth and glue them to the inner face of the tires you are going to use on the model. Makes all the difference in the world. -
Tom: Good luck on your surgery. I had cataract surgery on both eyes and what a difference it has made both in clarity and brightness of colors.
-
I've used two part epoxy for most all glass installation. But lately with some windshields and glass being in a flat plane I have taken the time to make sure the clear plastic fits as smoothly and completely as possible so that I can position it out near the edge of the opening. On my last build of the Sterling I did that and simply sealed the edges with Testors' clear lacquer. So far so good. Plus it looks right.
-
I'm with Steve and David. 2 part epoxy but let it get real tacky before trying to set the glass in. Before doing any of that do a dry fit of the glass to be sure that surfaces are clean and that the glass will touch all around. No worry about scraping paint off. The epoxy will bond to the paint surface without a problem. If you need a chrome or rubber gasket do that before applying the epoxy.
-
Where to Begin (Again)
Chariots of Fire replied to Ouch1's topic in Model Building Questions and Answers
There are two or three rattle can paints I have used and would recommend. First is Duplicolor automotive paints. They are thin and require several coats to get a good color but the results are great AND they dry quickly and hard so polishing is easier to do. Second and third would be Tamiya paints and even some of the craft paints that can be found in places like Michaels. Both are much softer and require a longer drying time but they give good results as well. The biggest thing is take you time and don't try to rush the paint portion of the build. Let them dry well before attempting to handle them or there will be fingerprints, especially with the Tamiya or craft paints. -
Heavy Haul Project
Chariots of Fire replied to Mopar - D's topic in WIP: Model Trucks: Big Rigs and Heavy Equipment
That's going to be some big rig!!? -
1941 Chevy Pickup
Chariots of Fire replied to KWT's topic in Model Trucks: Pickups, Vans, SUVs, Light Commercial
Awesome building and painting, Jeremy! Nice work! -
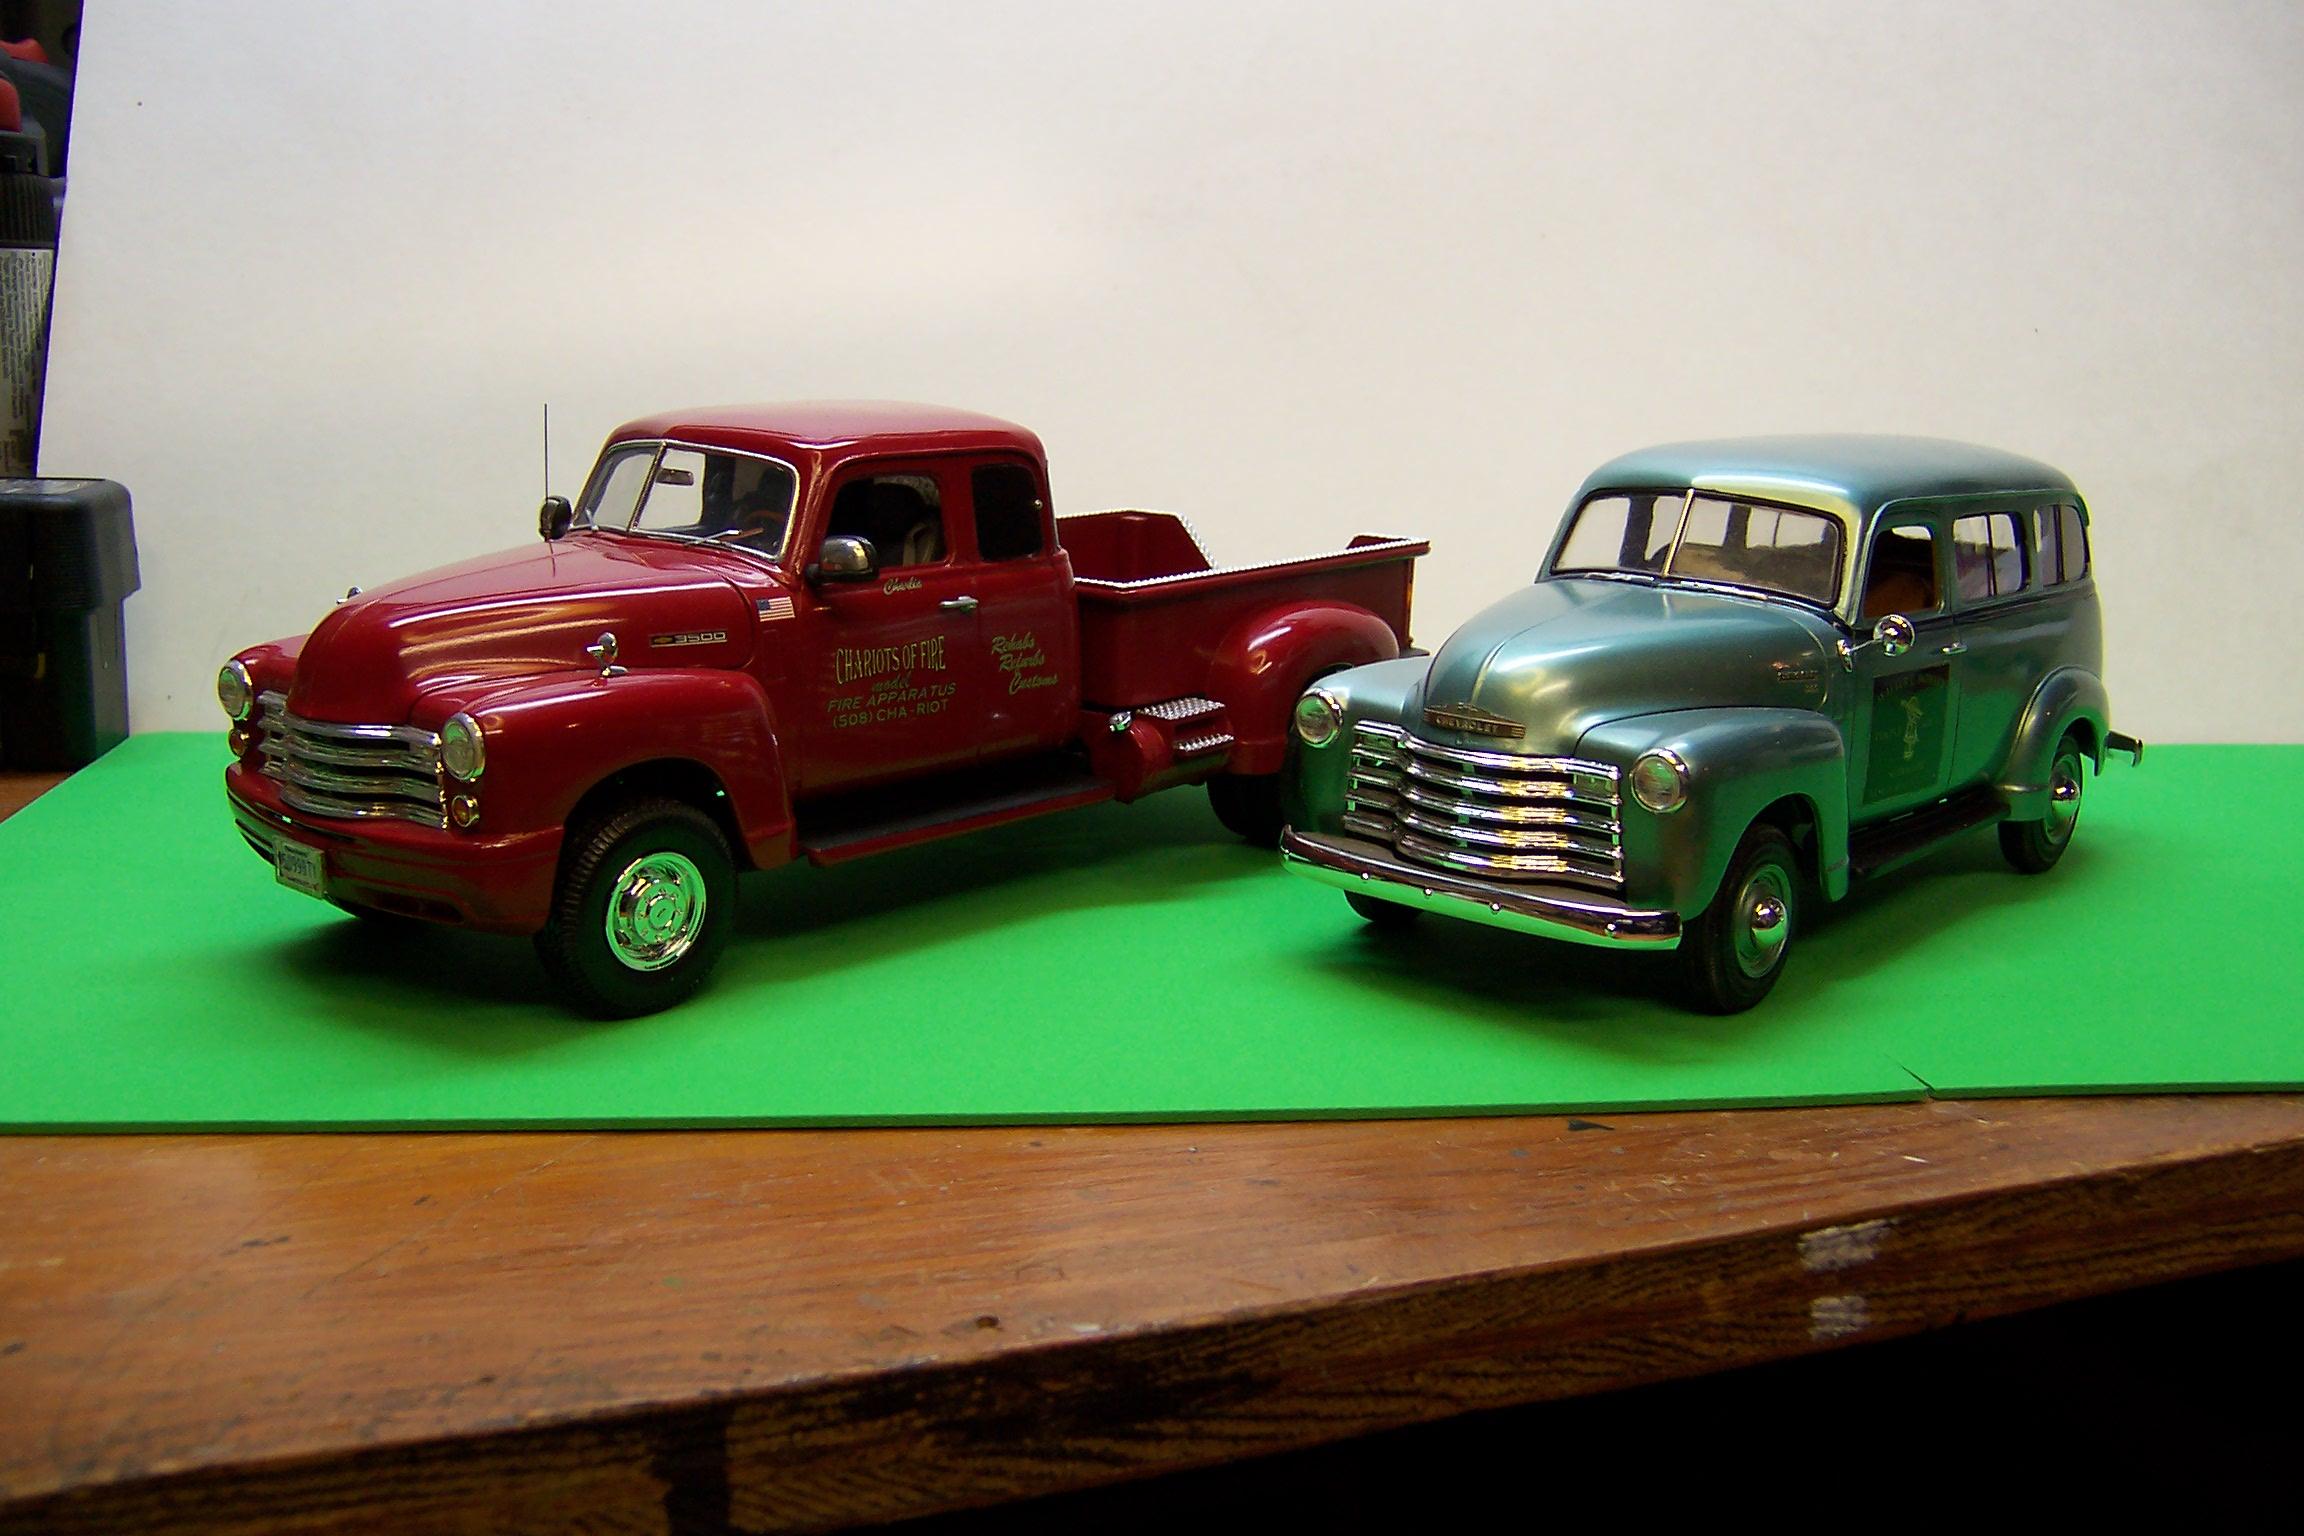
1950 Chevy 3100
Chariots of Fire replied to KWT's topic in Model Trucks: Pickups, Vans, SUVs, Light Commercial
That is some nice work from both you guys. Makes me want to get my kit out and make one up. But I did do these two a while back. Not exactly the same but close??
-
359 / tanker combo
Chariots of Fire replied to purepmd's topic in Model Trucks: Big Rigs and Heavy Equipment
Fine piece of work!? -
1948 Sterling Dump is done
Chariots of Fire replied to Chariots of Fire's topic in Model Trucks: Big Rigs and Heavy Equipment
Hey, Warren. There are similar rigs in the New England area that have made their way around the Antique and Historical Truck groups. They may look familiar because I took a lot of my ideas from them. Many on line photos of them. -
Well done! Great interior detailing. Good to see another fire modeler!
-
1948 Sterling Dump is done
Chariots of Fire replied to Chariots of Fire's topic in Model Trucks: Big Rigs and Heavy Equipment
Hi, Brian. That's not a new concept. I found that same type of hoist mechanism on the 1929 Coleman project. Exact same thing. I suspect that most have a more modern style of mechanism that includes a permanent attachment for the cylinder. But since I found proof of that type in a photo of a Sterling, that is what I used. -
Bernie's Mack
Chariots of Fire replied to Rockford's topic in Model Trucks: Big Rigs and Heavy Equipment
I always thought those Monogram kits were great. Even though there little things like the hollow tires. When I built mine I used extra kits to slice up tire sidewalls and add them to the hollow sides. The Mack pumpers were great kits too but had similar little oddities that had to be improved on. Nice work on your rig. Love the color! -
1948 Sterling Dump is done
Chariots of Fire replied to Chariots of Fire's topic in Model Trucks: Big Rigs and Heavy Equipment
With the door open I can see what you mean. Guess I'll have to get out the magic marker! -
1948 Sterling Dump is done
Chariots of Fire replied to Chariots of Fire's topic in Model Trucks: Big Rigs and Heavy Equipment
HAH! Wouldn't be the first time it was done that way! How about I wet the dirt first!?