Alex Flint
-
Posts
418 -
Joined
-
Last visited
Recent Profile Visitors
2,398 profile views


Alex Flint's Achievements
MCM Avid Poster (5/6)
-
1959 Chevy El Camino
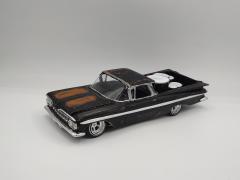
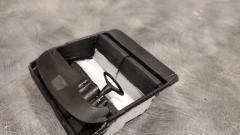
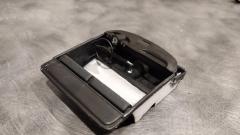
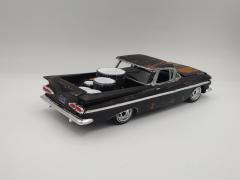
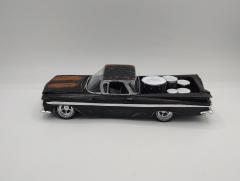
I named this build ROCK STAR. it's painted entirely with a paint brush. I used four different shades of brown acrylic craft paint and then a semi-gloss black acrylic craft paint and sanded through each layer with sandpaper. The drum set and the flame electric guitar are 3D printed and hand painted to look used. The license plate I custom designed for this specific build. The wheels are Pegasus Sovereign wheels. The was kept chrome plated and painted with flat black acrylic craft paint and then the excess was wiped off with a Kleenex exposing the chrome parts I wanted to keep. The chrome trim is painted with a Molotow Liquid Chrome marker. The interior is painted to look like it's been restored. The engine is completely box stock. The body has been lowered. This was a fun kit to build.
- Updated
- 10 images
- 10 images
-
1941 Plymouth Barnette Hearse
I named this build HELL'S ANGEL. It has absolutely nothing to do with the biker gang. The "Hell's" part comes from the 3D printed Iceman Collections modern Hellcat engine and the "Angel" part comes from the Kustom Canz Base Pearlz Snow White paint job. The main body of it is a Jimmy Flintstone 1948 Chevy Barnette Hearse resin body with an AMT 1941 Plymouth Coupe front end molded on to it. The interior, the undercarriage, and the frame has been stretched. The interior cab is just the stock front half of the 1941 Plymouth Coupe kit and painted with a Matte Burgundy. The gauge cluster is scaled down from a picture I found on Google. The shifter is from a 1959 Chevy El Camino kit. The rest of the interior is completely scratch built. The casket in the back is 3D printed and painted to match the body. All the windows except for the windshield is made from scrap plastic from some old electronics packages. The wheels are old kit wheels I had laying around. The trim on the rear panel is from a Lindberg 1931 Bugatti Royale Victoria kit. The license plate is one I custom designed for this specific build.
- Updated
- 5 images
- 5 images
-
1960 Chevy Apache Pickup
I call it TOXIN. It's painted with a Kustom Canz Base Pearlz Sugar Apple. The wheels are from the Fast and Furious Plymouth GTX kit and paint with a Dark Grey primer with a Satin clear coat over the top. The frame is made from scratch. The custom airbag suspension is also completely scratch built. The airbags on the suspension are made out of two rubber o-rings I got at my local hardware store and two Eyelets I found at Hobby Lobby. The fuel cell is 3D printed. I had to cut out the rear wheel tubs and certain spots in the bed in order to get it to sit low. The frame and suspension is painted with a Rust-Oleum Aluminum color. The engine is a 3D printed Iceman Collections modern LS Corvette engine. The engine wiring is done using bead wire I got at one of my local craft stores. I even added a dip stick tube made from a piece of brass tubing. The drive belt is a rubber hair band I got at Walmart. The racing seats and the fire extinguisher came from a diecast 2010 Chevy Camaro kit. The seats are painted with a Matte Black color. The floor mats I designed myself. The shifter was just a part I had laying around. The license plate is one I custom designed for this specific build. I built this for a SEMA themed build off on Instagram in 2020.
- Updated
- 8 images
- 8 images
-
1953 Hudson Hornet
I call this build FIRST LOVE. It's painted a Kustom Canz Base Pearlz Pink Fantasy with Kustom Canz Base Pearlz Snow White flames. The paint mask I used to paint the flames was custom cut using my Silhouette Cameo vinyl cutting machine and from some Vvivid Vinyl paint masking material. The interior is painted with the same colors. I used silly putty as a paint mask for the interior. The interior is box stock. The grill came from a 1949 Mercury Chopped Top custom kit. The engine is box stock and painted to match the rest of the car. The undercarriage is painted the same Pink Fantasy color as the body. The frame and suspension is painted with a Rust-Oleum aluminum color. All the chrome trim around the windows is painted with Molotow Liquid Chrome. The chrome trim on the sides of the body is chrome bare metal foil. The license plate is one I custom designed for this specific build.
- Updated
- 7 images
- 7 images
-
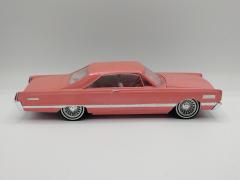
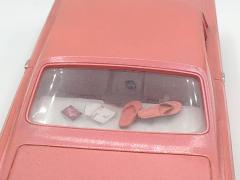
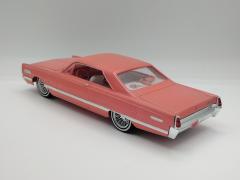
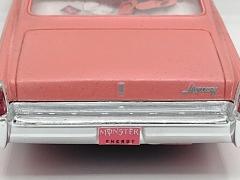
1966 Mercury Parklane
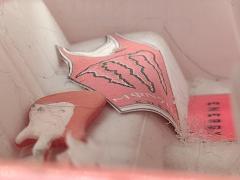
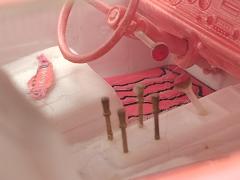
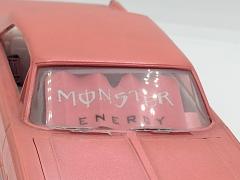
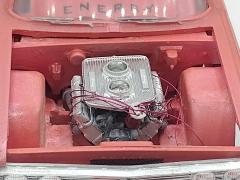
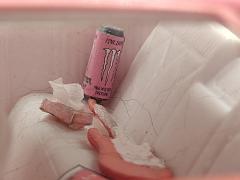
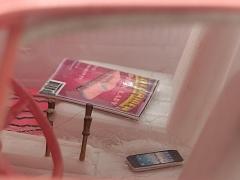
I call this build PINK LADY. It's not actually pink though. It's a Rust-Oleum Gloss Coral with a Testors Color Shift Green Copper over the top. The interior seats is not painted, just detailed. The steering wheel, steering column, and dashboard are painted the same way as the body. The switches on the center console are brass model ship detail parts. The shifters are jewel sequin pins I found at Hobby Lobby. The switch on the left side of the steering column is a brass model ship detail part. The floor mats I designed myself and are printed out on glossy photo paper. The smartphone is made from scratch and the screen is scaled down from a picture I found on Google. The Lowrider Magazine is one of my custom designs with this build on the cover. The mask is another custom design I did in 2020 during the pandemic. The electric guitar is 3D printed on my old filament printer I don't have anymore and is painted to match the body. The box of Kleenex is a cut and fold design I found on Google with a real Kleenex piece in it. The Monster Energy can is 3D printed but the label is one I custom designed for this specific build. The tank top is another custom designed accessory I made. The flip flops are 3D printed and painted to match the body. The postcard is one I custom designed with this build on it. The envelope has my mailing address as the return address and my mom's mailing address as the receiving address. The license plates are ones I custom designed for this build. The windshield sun shade is another one of my custom designs I did for this build. The carpet and headliner is some white craft felt I got at my local JoAnn Fabrics craft store. The chrome trim is done with bare metal foil and the emblems are done with Molotow Liquid Chrome. The suspension, gas tank, and exhaust system is painted with Molotow Liquid Chrome. The wheels are from a Jada Toys diecast car. The engine is wired with pink bead wire I got at my local JoAnn Fabrics craft store. I used a hole punch to punch out a circle of styrene plastic to attach the wires to the distributor easier. The clear coat on this is a Rust-Oleum Gloss Clear Lacquer and is not color sanded or polished. The finish is straight out of the spray can.
- Updated
- 13 images
- 13 images
-
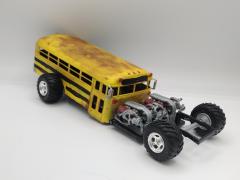
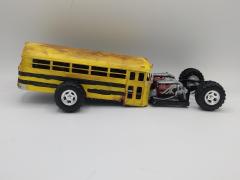
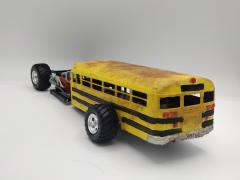
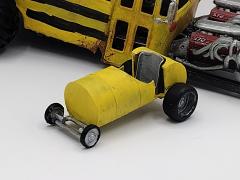
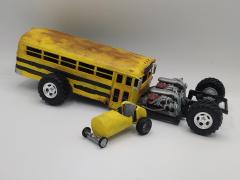
Rat Rod School Bus
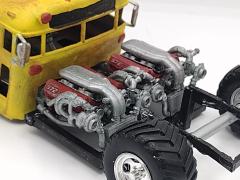
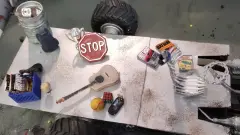
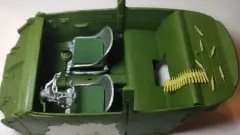
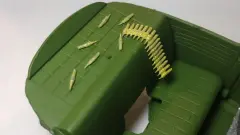
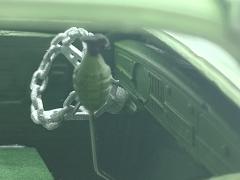
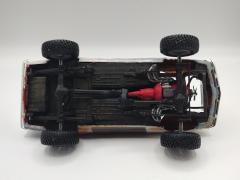
I call it THE BEAST. It's a 1/24 scale 3D printed body. The whole thing is painted with a paint brush. The patina is done with a craft sponge. The engines are two Black Box STL twin turbo 572 Big Block Chevy engines. The middle part of the frame is made from scratch but the front and rear of the frame is a modified 1980 Jeep Honcho kit frame. The hubcaps are 1980 Dodge Ramcharger kit hubcaps. The tires are Hot Wheels Monster Truck tires. The rear axle is a modified Nahuel Customs skull rear axle. The interior is scratch built. The bone seat is a 3D printed Nahuel Customs design. The Stop Sign is one of my own designs and is 3D printed. The other 3D printed items are a Beer Keg, a Jim Beam bottle, a backpack, a milk crate, a skateboard, a Funko person painted to look like me, an acoustic guitar, a softball, a Rubik's Cube, a Playstation Portable, a pair of headphones, a cinder block that the Stop Sign is leaning against, a Marvel Comics Number One comic book, and the chain link steering wheel. The trophy is pulled from a model kit. The magazines are ones I custom designed. I tried to add school accessories to the interior. The only two accessories that are more college dropout items are the Beer Keg and the Jim Beam bottle. The person figure is a 1/24 scale 6 feet tall. The body is also 1/24 scale so if it was a real bus it would definitely have one hell of a chop to it.
- Updated
- 7 images
- 1 album comment
- 7 images
- 1 album comment
-
1968 Volkswagen Beetle Rat Rod
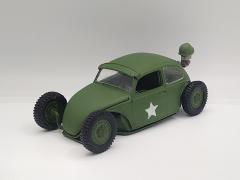
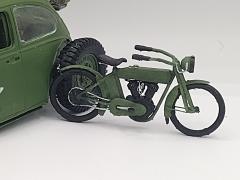
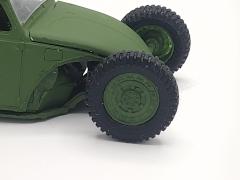
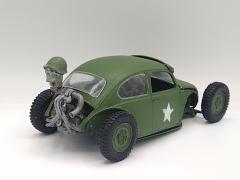
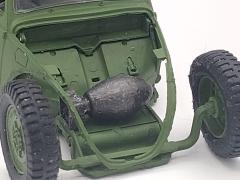
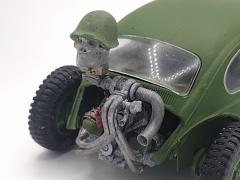
I call it WAR MACHINE. It's my Vietnam War veteran tribute build. It started out as a Revell 1968 Volkswagen Beetle. I cut off the fenders and the running boards. The wheels are Daft Designs Black Rhino Armory wheels with vintage military tires and are printed in flexible black resin. The body, front hood, interior, front axle, rear suspension, wheels are all hand painted in an acrylic craft paint called Foliage Green. The star on the side is painted on using a stencil and a paint brush. The front axle is a Matty's Custom Scale design and purchased from Iceman Collections. The engine is a Black Box STL Flat 4 engine with a turbo upgrade and is 3D printed and purchased from Iceman Collections. The skull on the engine is one I 3D printed myself and resized to fit the specific engine I used. The wiring is copper bead wire. The drive belt is a real rubber belt. I had to modify the position of the rear suspension in order to get it to sit low. The fuel tank is a 3D printed Vietnam War era military bomb. The chain link steering wheel, the bomber seats, and the grenade shifter knob are all 3D printed. The shifter boot is made from a couple of tiny rubber o-rings. The shifter handle is a sewing pin. The seat cushions are made from some army green EVA craft foam. I had to cut a hole in the middle of the back seat to get the engine to sit level. In order to cover it up I 3D printed an ammo box and painted it to look like a Vietnam War era box. The 50 caliber ammo belt and bullets are also 3D printed. The rear fender wells are made from scratch styrene sheets. The visor above the windshield is a Black Box STL design and is 3D printed and painted the same color as the body. I wanted the body to look like a Vietnam War era army helmet. This is my 4th version of the Revell 1968 Volkswagen Beetle kit and I have a lot more to come.
- Updated
- 15 images
- 15 images
-
1926 Ford Suicide Door Sedan
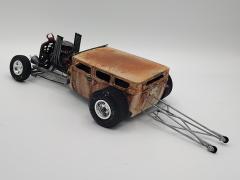
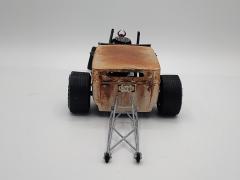
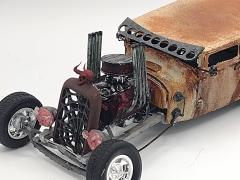
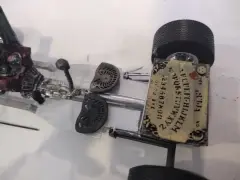
I call it OUIJA. The body is a Jimmy Flintstone resin body. The engine is just some random parts from different kits. The headers are designed by Nahuel Customs and are 3D printed. The grill is also a 3D printed Nahuel Customs design. I designed the frame myself to fit this specific body and is 3D printed. The headlight lenses are 3D printed in crystal clear resin with a transparent red dye. The headlight pods are also 3D printed. The stands for the headlights are made from a paperclip. The front suspension is a fully 3D printed Nahuel Customs design with the spindles held on with some sewing pins. The steering linkage on the body is a Matty's Custom Scale design and is 3D printed. The steering rod is a piece of bead wire. The skull rear axle is a 3D printed Nahuel Customs design but I had to extend it to fit the wheels on the outside of the body. The 4 link rear suspension is a 3D printed Nahuel Customs design. The airbags on the rear suspension is 3D printed in a soft rubber resin. The driveshaft U-joints are 3D printed but the main body of the driveshaft is a styrene tube. The floors are made from scratch from a thin styrene sheet. The tractor seats, the shifter, the dashboard, and the barefoot gas pedal is a 3D printed Nahuel Customs design. The skull steering wheel is one of my 3D printed designs. The steering column is a piece of styrene tubing. The Ouija Board and Planchet is 3D printed. The wheels are from a 1941 Willys Coupe kit. The wheelie bars are 3D printed. The 1959 Cadillac taillights are a Nahuel Customs design and are 3D printed in crystal clear resin with a transparent red dye. The license plate is one of my designs and is designed for this specific build. The demon skull hood ornament is 3D printed. The visor is a 3D printed Nahuel Customs design. The skeleton hand side mirrors are one of my 3D printed designs. The entire building is hand painted with a paint brush. The rusty look was done with three different shades of brown acrylic craft paint and two different color tint washes. The rusty look on the roof was done with three different sized sponges but the sides were done with a paint brush. This is one of my favorite rat rod builds I've done.
- Updated
- 6 images
- 6 images
-
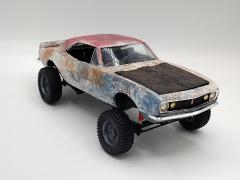
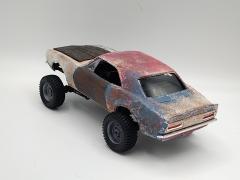
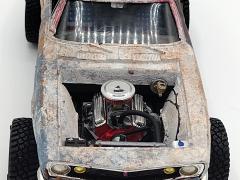
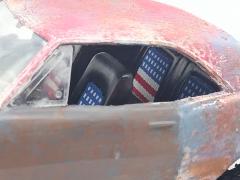
1967 Chevy Camaro Z/28
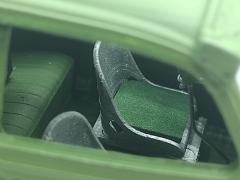
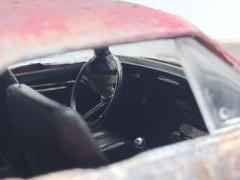
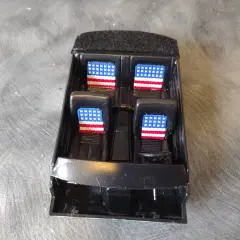
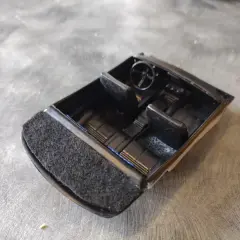
I call it THE HEAD HUNTER. Body is dented up with a candle lighter and then painted to look rusty and beat up. Headlights, turn signal lights, and taillights are painted with some calligraphy ink. The wheels and tires are 3D printed by Jaysresinwheels1948 on ebay. The rims are painted with a metallic charcoal gray color. The lift kit is from the Wild Hoss Ford Bronco kit. The transfer case is 3D printed. The front and rear axles have been extended so the wheels would fit. The u-joints on the driveshafts are 3D printed but the rest of the driveshafts are made from scratch styrene tubing. I scratched the windshield with an exacto knife blade to simulate a crack without breaking the window. The engine is box stock except for the air cleaner. That part was pulled out of my parts box. The radiator hose is made from a hollow rubber bead cord with a piece of bead wire inside so that the bead cord will hold it's shape. The interior is painted Matte Black. The carpet and headliner is black craft felt. The seat inserts are made of an American flag ribbon I found at Hobby Lobby. The shrunken head hanging from the rear view mirror is 3D printed. A piece of black embroidery thread holds it on the mirror. The stance looks like it's accelerating down a gravel road. I built a diorama display base for it using a piece of foam board and some model train scenery detail supplies I got at Hobby Lobby. The dust cloud is just some pillow stuffing I had laying around. This is one of my favorite 4X4 builds I've done.
- Updated
- 9 images
- 9 images
-
1954 Chevy Milk Truck
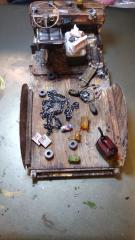
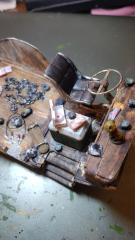
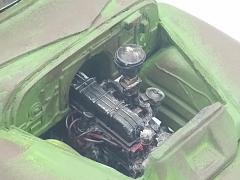
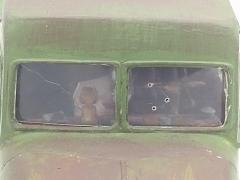
I named this one JUNKYARD DOG. It's a resin model from Resin Model Ranch. The 1950 Chevy 3100 Pickup kit is what I used for a donor kit. I painted it a Foliage Green acrylic craft paint and weathered it with 3 different shades of brown paint applied with craft sponges. The decals are pulled from a 1965 Chevy Stepside Pickup kit. The interior is mostly scratch built. It's painted a light brown and weathered with black calligraphy ink. I modeled the interior after the Divco Milk Truck interior. The interior junk includes 3D printed Grizzly Tobacco cans, rolls of duck tape, crushed energy drink cans, a skateboard, a broken bottle, a fuel can, a pair of jumper cables, some oily rags, a bobblehead dog, two boxes of Champion Spark Plugs, a real metal greasy chain, a Coleman Cooler, a Duncan Donut box with a donut inside, a box of Kleenex with real Kleenex inside, and a melted Crunch candy bar on the dashboard. The steering wheel is salvaged from my parts box. The seat is also salvaged from my parts box. The Guage cluster is made of some jewelry necklace rings and some UV Hardening resin. The radio face is 3D printed. The windshield was scratched with an exacto knife blade to simulate a crack. I also drilled three holes in the glass to simulate bullet holes. The frame has been extended to fit the body. The driveshaft is made from scratch. The engine is weathered with black and brown calligraphy ink to make it look greasy. The engine is also plumbed and wired using rubber bead cord and bead wire. I also eliminated the bumpers. The wheels are pulled out of my parts box. I even 3D printed a person figure to go with it.
- Updated
- 12 images
- 12 images