

leereyn
-
Posts
23 -
Joined
-
Last visited
Content Type
Profiles
Forums
Events
Gallery
Posts posted by leereyn
-
-
Nice looking Monte. My brother had a light blue 76. Monte Carlos, Olds Cutlass's, and Pontiac Grand Prix's were some the cool cars in my teenage years. Flip the breather lid, hit the gas and make the four barrels moan. lol
-
Nice job and almost everything looks great. The only thing that takes away from the build to me is the exhaust. It isn't correct for these cars out of the box. I also know this kit has the exhaust attached to the leaf springs. I don't detail under my models so it was easier for me to do but I cut my exhaust off and replaced it using coffee stirrers and also raised the springs from the front to raise the car some. I'm not trying to be critical of your car. You aren't the first one I've seen to just shackle the leaf springs on these kits to raise the rear of the car.
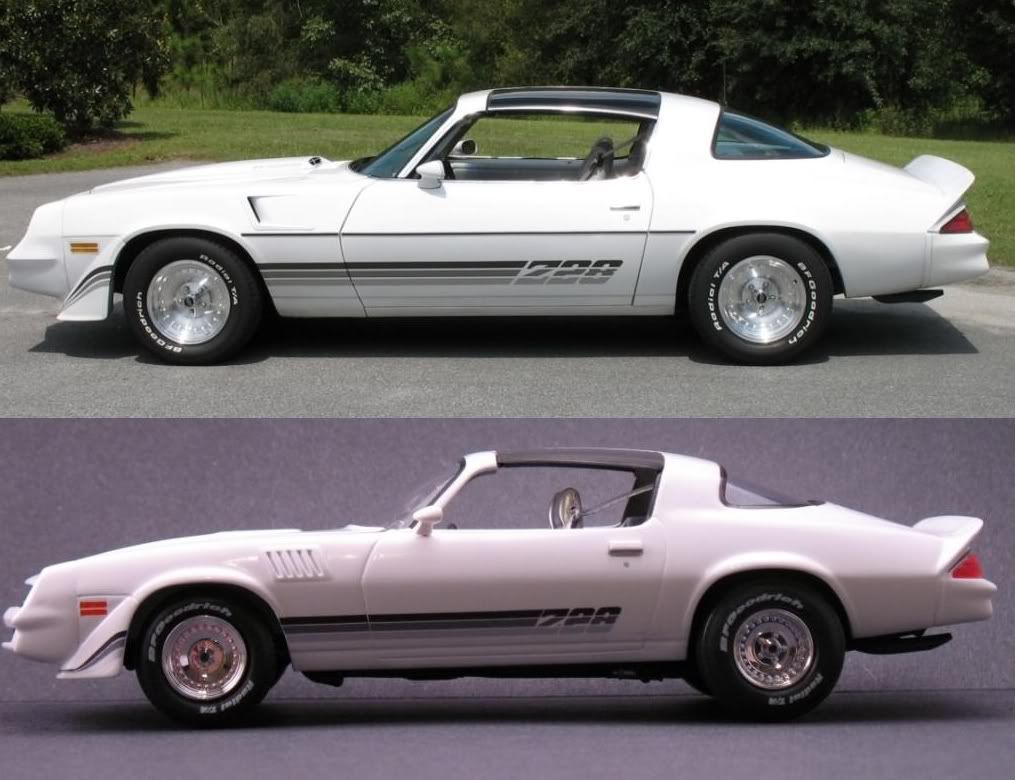
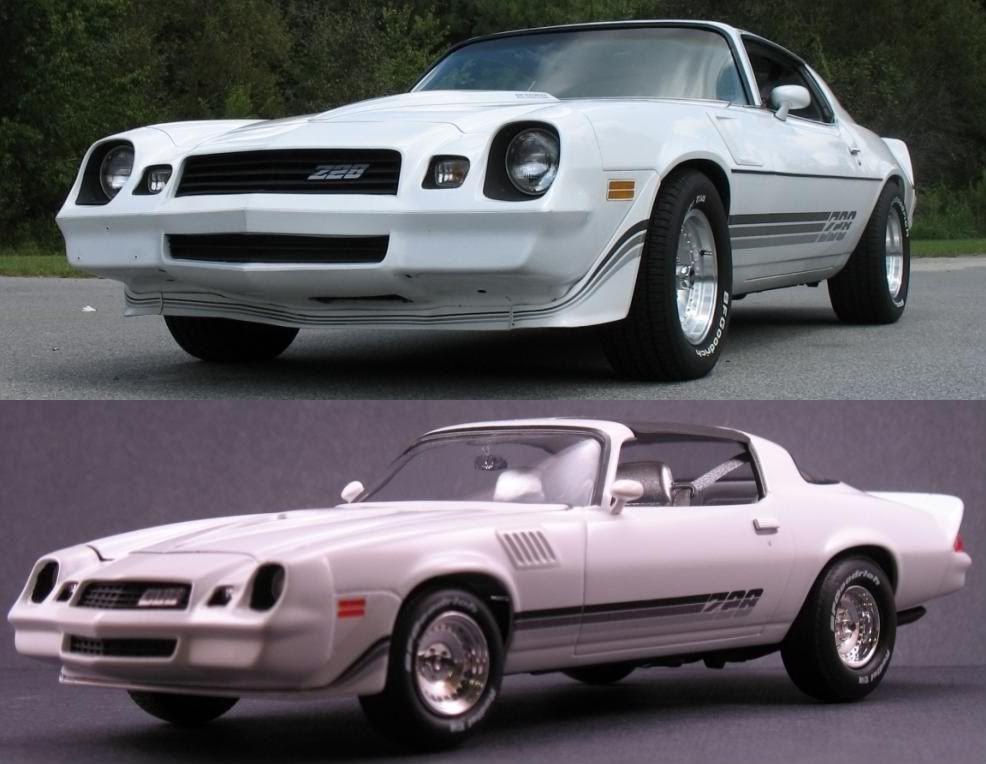
Here's a pic of my 1:1 1981 Z28 and my replica using this same 1979 kit.

-
Thats really cool. Whats the story with the driver figure?
I noticed him too. I think the car might go faster if he lost some weight. It looks like Peter Griffin is behind the wheel. lol Cool car.
-
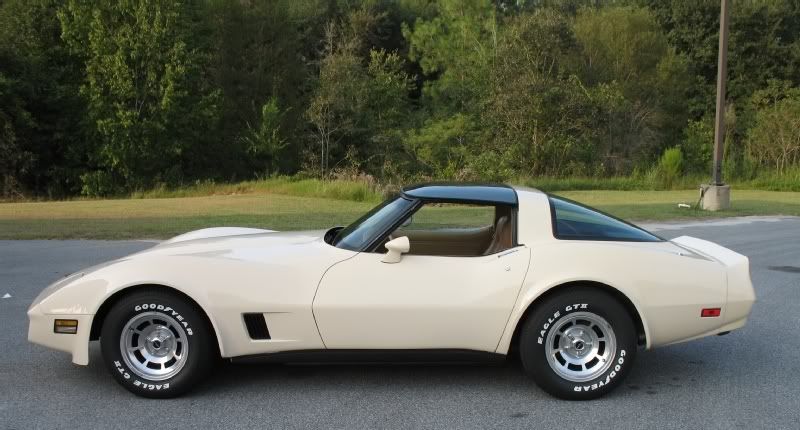
Thanks for all the compliments. A couple of you mentioned or asked about the color. The 1:1s color is called frost beige. The closest color I could find at Wally World was ivory. I took a few indoor shots in my light tent but they looked awful so I took it outside to get natural light.
Midnightprowler
you mentioned getting my angles lower. I had some that were too low. I was trying to replicate the pics of the 1:1 and I think I came close.
Marty
No, I'm not a member of NCRS. I'll look into joining.
-
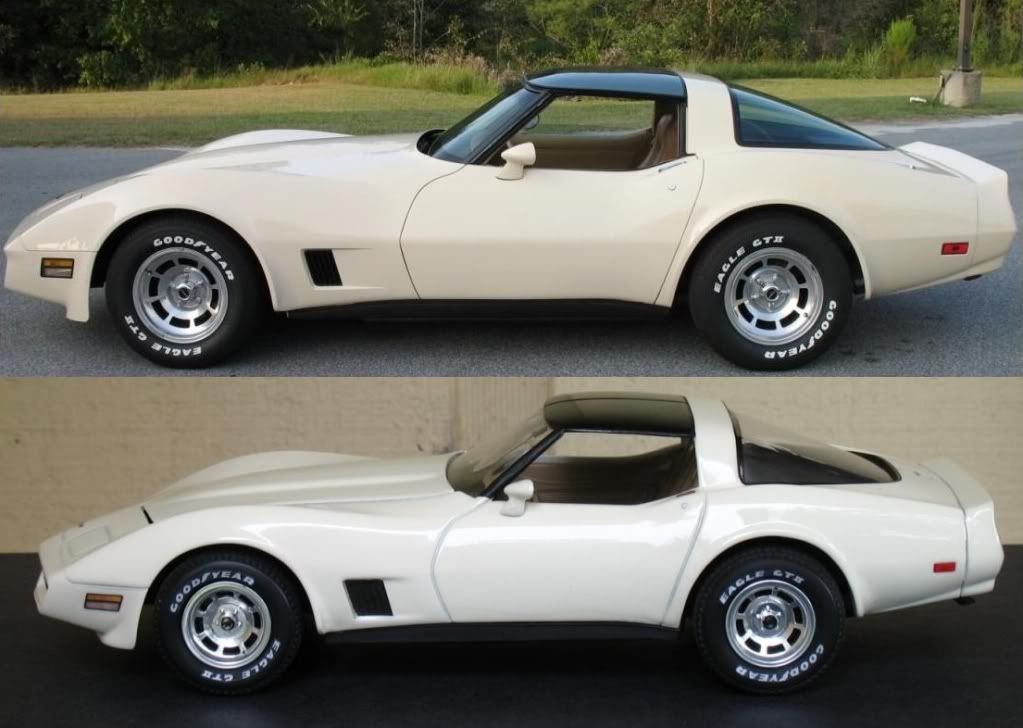
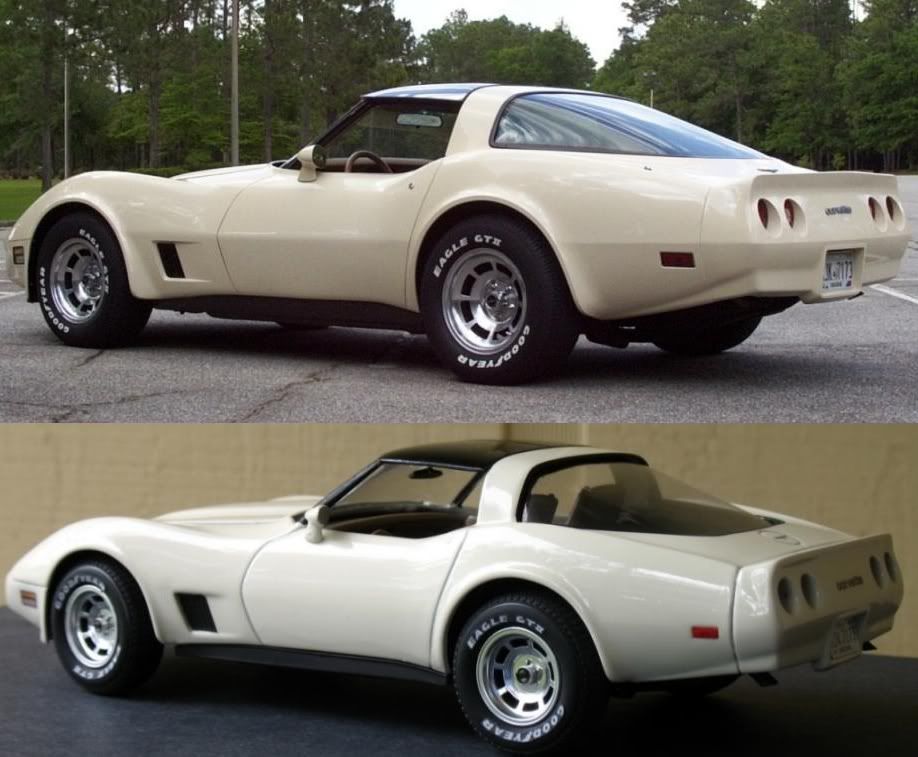
I've been working on this for a couple of months now. I'm pretty happy with the results. The car is built from two 1/20 kits. Main kit it the MPC Stinger Corvette and a parts donor kit is the Monogram Corvette Coupe. I tried to get a few more angles, but these were the only ones I was happy with. The 1:1 I've owned since 2006.
-
I can only speak for myself, but as the owner of a donut shop, I have local law enforcement where I want them. If they mess with me then they know I'll cut them off. lol
BTW the donut and cop stereotype Isn't a myth.
-
I am building the companion 1980 Trans Am kit and it is equally dismal.
All they did was tool up different front and rear ends for the 2 kits. The Pontiac still has a Camaro dash in it. What I don't get is the fact that Testors switched the wheels sets between the 2 kits. The Camaro has the Trans Am wheels , and the Pontiac kit has what I believe are Monte Carlo SS wheels from the 80s.
Some of the 1980-81 Z28s had factory wheels that looked like, if not identical to, mid 80s Monte Carlo SS wheels.
-
Is the engine in your Z28 stock or?? Mine is a .030 350. I just put some world heads on it and a new bigger cam.
This car was my daily driver for about 20 of the 23 years I've owned it. 50 miles a day, 6 days a week for 20 years. It does still have a 350 in it but I'm on about my third engine and it's nothing fancy. It looks faster than it is. lol
-
Hi Lee
A very clearly stated question, and good timing. I'm working on a pretty intense decal project right now, that's clear coated.
As I stated in my post, I have a 24 hour window of time to work in. The other thing I keep in mind is that I like my decals to dry overnight so there is no moisture present when I clear-coat.
Given those two parameters, I also like to start applying the decals about an hour or so after the last coat of color or clear.
For me I start applying the decals around 1 or 2 o'clock in the afternoon, after shooting my last coat of paint around noon. This gives the paint I use plenty of time to dry, before the decaling begins.
This also gives me plenty of time to lay down the decals, and allow them to dry over-night, and then start shooting the clear in the morning, or at least within that "24 HOUR WINDOW".
If for some reason you don't get all the decaling done all at once, the next day you can lay down a light and medium coat coat of clear, for a glossy finish, and then finish up your decaling later, followed by the normal three steps of clearing. For me, after the decaling is done, I do the three-step several times to get the build up I want, waiting about an hour between each 3-step for drying, and then sand where the edge of the decals may cause an un-even surface, spray a third three-step at least once, then let dry 12 hours, and polish. Remember, 15 minutes between each coat of clear.
Now remember I'm retired, so I can choose the time of day to start and finish a little easier than "working guys", so you may have to be a little more creative in your timing, but at least you get the general idea
.Everybody ends up using their own techniques, but at least this gives you something concrete to start with.
Hope all this was clear enough to help. Good luck on your project, and don't forget to do samples first when your un-sure - dave
Perfectly clear and thanks for the reply Dave. Actually, I'm on vacation next week so the timing is perfect to try your method. I hate that I messed up in the first place but when life deals you lemons as they say.........I'm looking forward to trying this. You gave me a schedule and everything. How did anyone learn anything before message boards? Thanks again.
-
This sounds like great advice that I am going to try Dave. I just lost a painted and decaled body when I went to clear it because the paint was applied about two days before. DOH! It's in the "dip" as I speak. My question is I'm doing a replica of my 81 Corvette and I want my decals under the clear. They are small and not difficult to do but there are about 9 to apply. I want to take my time applying them so how long do I wait after I paint the color coat to apply them and how much time do I have after I'm done so the clear won't attack the color coat? I hope this isn't a confusing question.
-
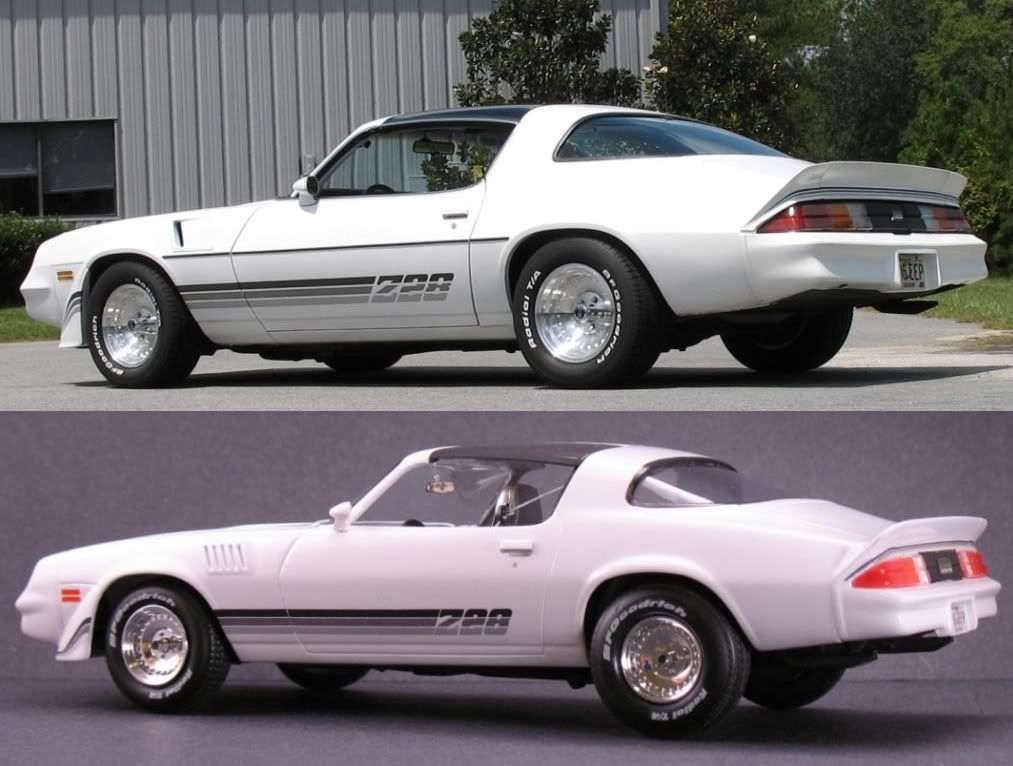
I also have an 81 Z28 and I never could put my finger on it with this kit but I think with the comments I just read and looking at the built model it absolutely looks like a T/A with Camaro bumpers. I just did a replica of my car using the 1979 Camaro Revell Streetburner kit. It's alot more accurate. The Testors kit is a cool looking hybrid though.
Here's my 1:1 and model and I yes know the hood and fender vents are 79.
-
you have a wife and a girlfriend???? you lucky sucker!!!
Nice 'vette
It's a wife and two girlfriends. Technically a girlfriend and a half, but if the wife hadn't left I woudn't have been able to buy the Vette or the El Camino. Kind of like the man who told a friend that his wife left and took his dog and he was going to miss the dog.....
-
Is that factory ride height? I like that stance. Sharp car......er truck...... Elky.
As far as I know it is. I'm really not much of a gear head. I don't work on my stuff, I just drive them.
-
My wife. 1981 Z28. We've been together 23 years.
My girlfriends. I bought the 1970 454 SS El Camino in 2003. My brother owns half of it. I bought the 1981 Vette in 2006.
My daily driver is a 1999 Honda Accord.
-
Awesome build. I hope you don't mind I took the liberty of editing another comparison pic for you. I recently built a replica of my 81 Z28 and I know how hard it is to make a model look like the 1:1. If I were you, I'd have to built two. One to keep and one to send to the Uncle. No big deal right. lol
-
Thanks for all the positive comments. I have a few of what I call "poor mans muscle cars" and my next project is my 1981 Corvette. Since I've had the Z28, by far the longest, I refer to her as my wife and I refer to my Corvette and 1970 SS El Camino as my girlfriends. Thanks again for the comments and the great support, tips, and information that can be found here.
-
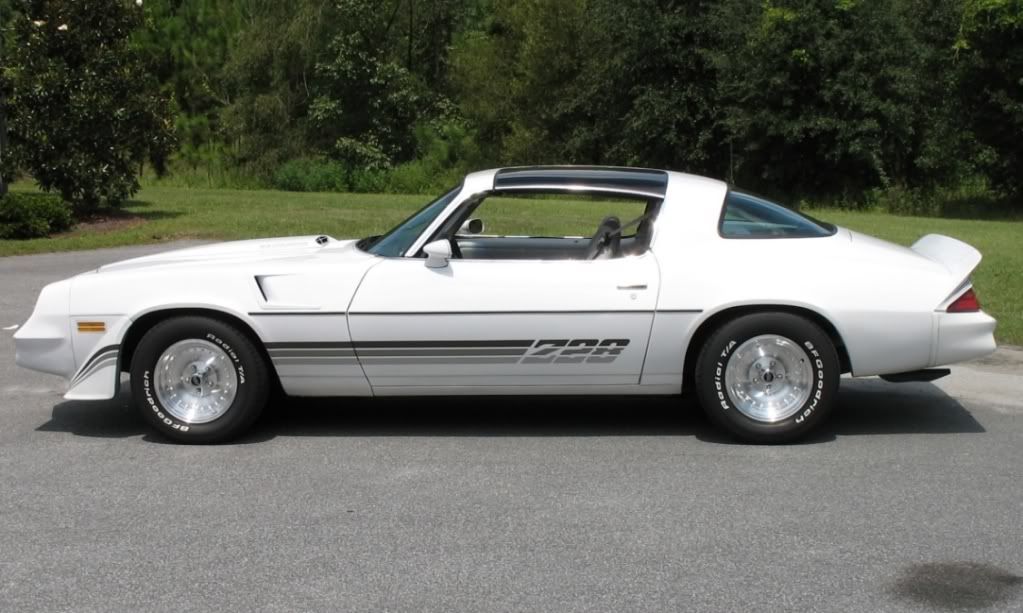
I just finished the tribute to my 1981 Z28 that I've owned for the last 23 years. I used the Revell 1979 Z28 kit because it came closest to resembling my car. I know the hood scoop, fender vents, and grill are different so use your imagination. The late 70s and early 80s weren't the most popular years for the Z28 but they were the cars of my youth. I also haven't built a model since I was a kid, but I'm very pleased with how it turned out thanks to a wealth of info and tips I got from this message board. Thanks to everyone who replies to questions (stupid and otherwise) and offers their knowledge and thanks for looking. I hope the pics post. Fingers crossed.
-
Why did the chicken cross the road ?
To prove to the possum that it could be done. Ba da bump.
Why did the chicken cross the road?
He wanted to see a man lay a brick.
A man walks into a bar with a duck on his head. The bartender says "We don't serve pigs in here." The man says "It isn't a pig, it's a duck." The bartender says "I was talking to the duck!"
A man walks into a bar and orders a beer. The bartender gets his beer, the man drinks it, looks in his shirt pocket and orders another. The bartender gets another beer, the man drinks it, looks in his shirt pocket and orders another. The bartender brings the third beer and asks the man why he looks in his shirt pocket after each beer is drank. The man says "I have a picture of my wife in my pocket and when she gets good looking I go home."
-
That's going to be a nice El Camino. My brother and I co-own a 70 SS. Ours is a 20 footer though. It's still a head turner and a hoot to drive.
-
I know the 1985 issue did because I built it when it came out.
I have a re-issue from sometime with in the last couple of years that has the Centerlines, BBS style and the factory wheels.
The Centerlines are also in one ore more re-issues of the Monogram '70 Chevelle SS
I really appreciate the info. I've been lurking these boards for a week or so doing my homework and I want to thank you and everyone here for the wealth if information I've gathered.
-
The Centerlines in that kit are very good replicas. BTW The Monogram Z28 has those wheels as well. It also is a T-Top car.
Thanks for the info. Is it the Monogram Z28 kit issued in 85 or the 91 kit that have those wheels, or both? They both say they are kit #2717. I actually also had a 79 Z28 so if my first build goes ok I may build that car also so I can use another kit.
The R-M kit in general would be a good starting point. It replicates a '79, so the stripes are wrong, and the hood "scoop" and fender gills will need a bit of a reworkThanks for the comment. I know what the differences are. I'm in the process of trying to get a set of Keith Marks 81 three stage silver stripes and I'm looking for an 80/81 hood. If you look at the pic of my real car you'll see the rear fender flares are not there like they should be on an 80/81 Z28. I had them removed when I had the car painted years ago, so if I find a hood the only difference would be the side fender vents that won't be correct. I can live with that.
-
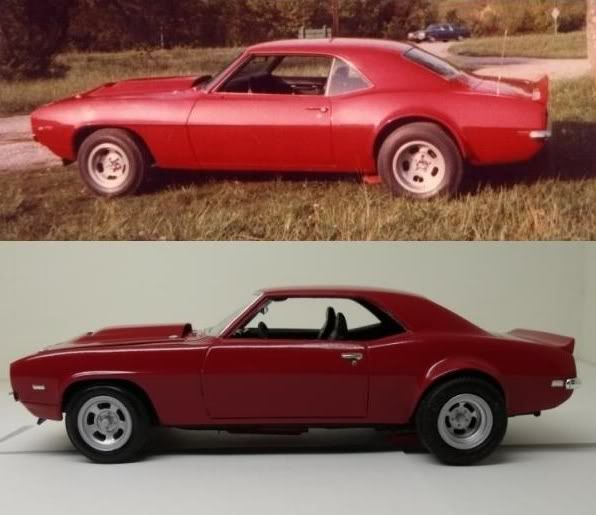
I'm building a replica of my 81 Z28 and I'm trying to find wheels that closest match my American Racing Outlaw 1:1 wheels. I've found a 1957 Nomad kit that looks like my wheels but I'm not sure. Here's a pic of my car and the Nomad kit if anyone can steer me in the right direction I'd really appreciate it.
 .
. .
.


1981 Ford Bronco
in Model Cars
Posted
Wasn't it Al Cowlings Bronco? Maybe I thought that because he was driving it. Wikipedia says it was a 1994. Yours looks good.