

miatamadman
-
Posts
201 -
Joined
-
Last visited
Content Type
Profiles
Forums
Events
Gallery
Posts posted by miatamadman
-
-
Close up of the LPR's

Close up of the takedowns
-
As some of you might be aware, the last 6 months has been very hard on me dealing with a separation/divorce and lawyers. This project was my therapy to keep my mind away from the negative thoughts.
This just proves I'm getting back into the swing of things. I hope you guys enjoy this. A few tid bits on this project. A few of the parts are Art's excelent resin cast items, but with a bit of my touches added to them. I went hog wild with the LPR's....you'll see in the pics. I also used Art's Video camera, center console, front license plate holder and GPS puck. The mirror strobes are hand made. I actually made resin copies of the mirrors, hollowed them out, inserted NANO chips and topped it off with a clear lense. Super cool! Rear deck lights are resin copies of the center brake light. Baseball cap on the rear deck is a resin casting I made from a Police Figurine I had satanding around :
. I modified the front seats by removing the headrests, filled in the hollow parts, added 2 posts to each headrest and reinserted them onto the seat backs. Something else I added were the takedown lights. Each takedown is made using 2 square LED's glued together and wrapped with electrical tape. Wiring was replaced with magnet wire. Decals are all printed with my inkjet. Total number of LED lights used is a whopping 47.interior shots
Check out the clothes rod and hanger in the vest
-
it started off as a Motormax CHP crown vic. Stripped and repainted with duplicolor products. The light blue is Krylon Bonnet Blue.
-
With all the ###### that has been going on in my life, I finally finished this 1/18 scale Hyattsville K9 replica. Model has 26 LED's including the the lightbar. Windows were tinted with Tamiya smoke. I added ABC's LPR's, windshield mounted video camera and front license plate bracket. Art makes some great resin parts! Gotta make the video now. Model also has a 4 tone siren plus a barking german shepard sound board and radio chatter.
-
that's no model!...
That is a perfect anbd flawless build. Great job!
-
I built this using the newly released 2011 blank white Motormax Charger. The dark blue is Rustoleum Navy blue which is an exact match to the 1:1 car. I added my own decals and printed K9 kennel.
The fog lights are MV lenses. Everything else you see is straight Motormax with just some detail painting. -
- after seeing this, I think I'm throwing my legos out. HOw on earth did you come up with that. Fantastic model and great creativity!!!!!
- after seeing this, I think I'm throwing my legos out. HOw on earth did you come up with that. Fantastic model and great creativity!!!!!
-
You know I couldnt leave this one alone ;D! After stripping it down to bare metal and drilling a few holes for the antennas and spotlight, I repainted the body using Duplicolor Generic Gloss White after priming the body with etching primer and filler primer. Interior was sprayed with duplicolor HotRod primer. What you see here is a pretty simple repaint with all of the body trim being correctly painted. Only additions to the MM model are the spotlight, mirror undermount strobes and antennas. Decals are my own custom creations. It's amazing how a little detail painting can turn a "toy" into a great looking model.
-
Just put the finishing touches on this replica before shipping it out! I removed the front door moldings, relocated the spotlight from the windshield to the A-pillar, scratchbuilt the front pushbar and made the decals.
Body was repainted with Duplicolor Generic White. By the way, it's a perfect match to the factory Motormax paint color.
-
Here's a few of mine
-
I have trieds all the brands and the best paper by far is Supercal Decal paper. I use Papilio's flexible decal sealant to seal the ink. The paper in the Testors kit comes from decal paper.com which also goes by several other names as well. All junk in my opinion.
When sealing the ink, DO NOT USE Krylon. Your decals will be usuless within a few days. The Krylon will crack which will result in the ink bleeding. Trust me on this one.
-
-
shot some nice white paint over the weekend. One step closer to the eye candy stage.
-
Here is my on and off again project. It's now full steam ahead with the goal of having it complted for NNL East!
-
Believe it or not, this is 1/43rd scale! I just got a case of these fantastic blank First Response Replicas Impala's. I disassembled the model, painted the green using Tamiya Metalic Green, bare metal foiled the window trim and wheels, added my own decals, detailed the interior, added my own simulated paper LED lights to the pushbar, mirrors and rear parcel shelf. Needless to say, there will be more of these to come!
-
that is freeking KILLER!!!!!!!
-
Mr. IBITE is a fellow Miata car club member. Yes, he does get a lot of people taking pictures of his car........I wonder why?
-
Just an FYI......Motormax is retooling the die to remove the sunroof from the charger body. I also heard throught the grapevine that Motormax will not be available through Walmart anymore.
-
That's pretty darn cool looking!!
-
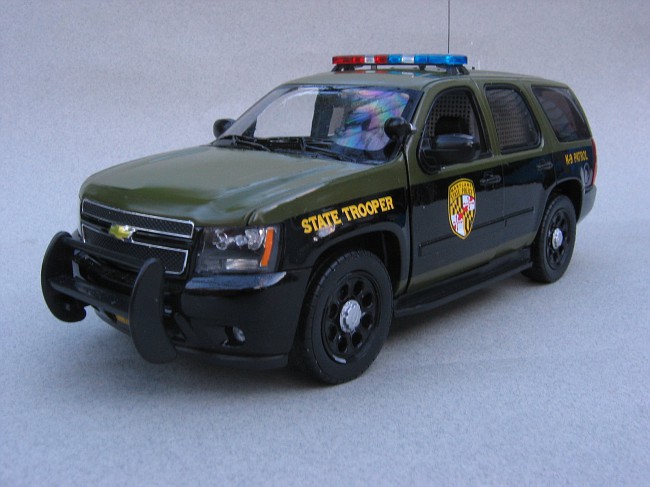
MD State police use all black Tahoes which in my opinion just looks booooooooring! So, I painted one up in the traditional Olive/Black scheme. Much better in my opinion. The Tamiya Olive Drab was sprayed over the black factory finsh.
I also went ahead and constructed a K9 enclosure and added a few interior strobes as well. The rear window has a full length strobe that just doesn't photograph well through the tinted glass.
-
Real sharp! How did you get the white border on the text on the green background?
The white is an underlay that I had a friend print with his Alps.
-
One of my all time favorite departments. Here we have a Welly Diecast Tahoe that I stripped, removed the body side molding and repainted using Duplicolor Acrylic White Enamel and Tamiya Metalic Green. Graphics are my own inkjet printed waterslide decals. The "suspension" if you could call it that, has been lowered, spotlight added to the A-Pillar, headlight buckets blacked out, side view mirror strobes added and the front pushbar was replaced with the one out of the Lindberg Charger Kit. The lightbar also was sourced from the Charger kit and detailed with my paper LED's. I also added my paper LED's to the front pushbar, running boards and rear tailgate.
-
-
If Ford was to build this, I would be the first guy standing in line


 . I modified the front seats by removing the headrests, filled in the hollow parts, added 2 posts to each headrest and reinserted them onto the seat backs. Something else I added were the takedown lights. Each takedown is made using 2 square LED's glued together and wrapped with electrical tape. Wiring was replaced with magnet wire. Decals are all printed with my inkjet. Total number of LED lights used is a whopping 47.


My therapy project
in Diecast Corner
Posted
9volt battery is in the trunk. 3 power switches and 3 tap switches are underneath.