Search the Community
Showing results for tags 'camaro'.
-
Built back in the 1982 to 1984 era. I liked this one! In fact, I liked it so much I got a sealed kit from ebay a few years ago to redo it. Painted Testors' White enamel with a black interior. I made a custom twin turbo intake system for it :-) Pictures of the sealed kit I have. Thanks for looking :-)
-
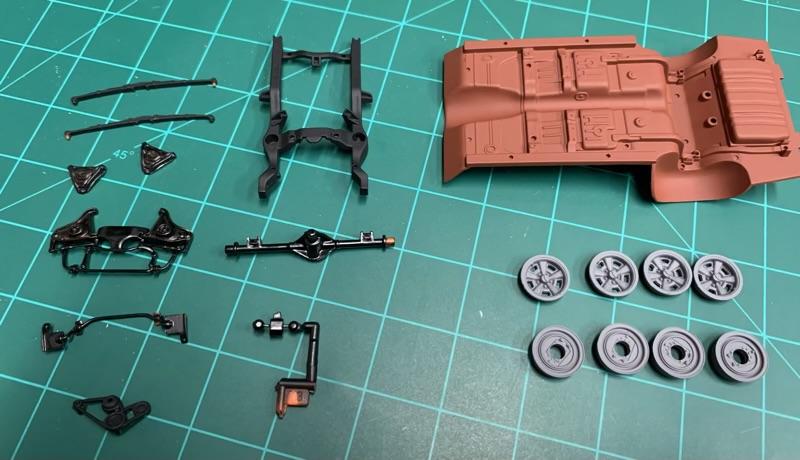
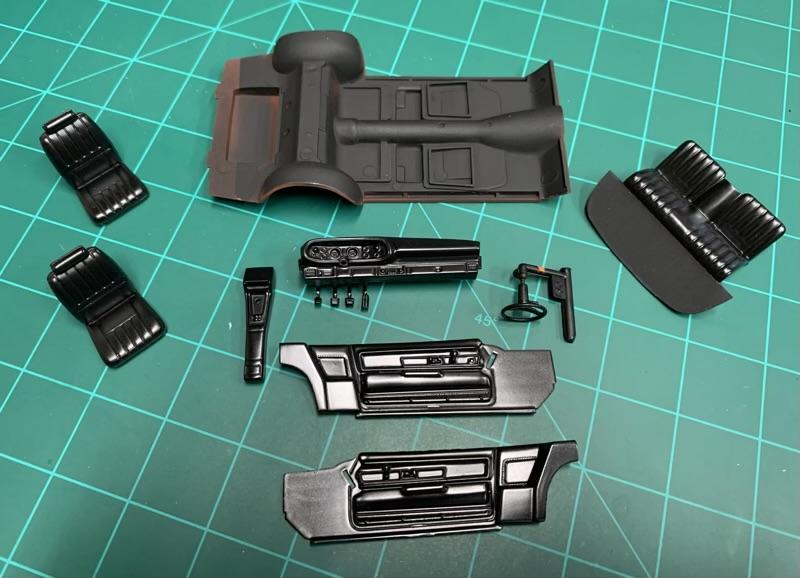
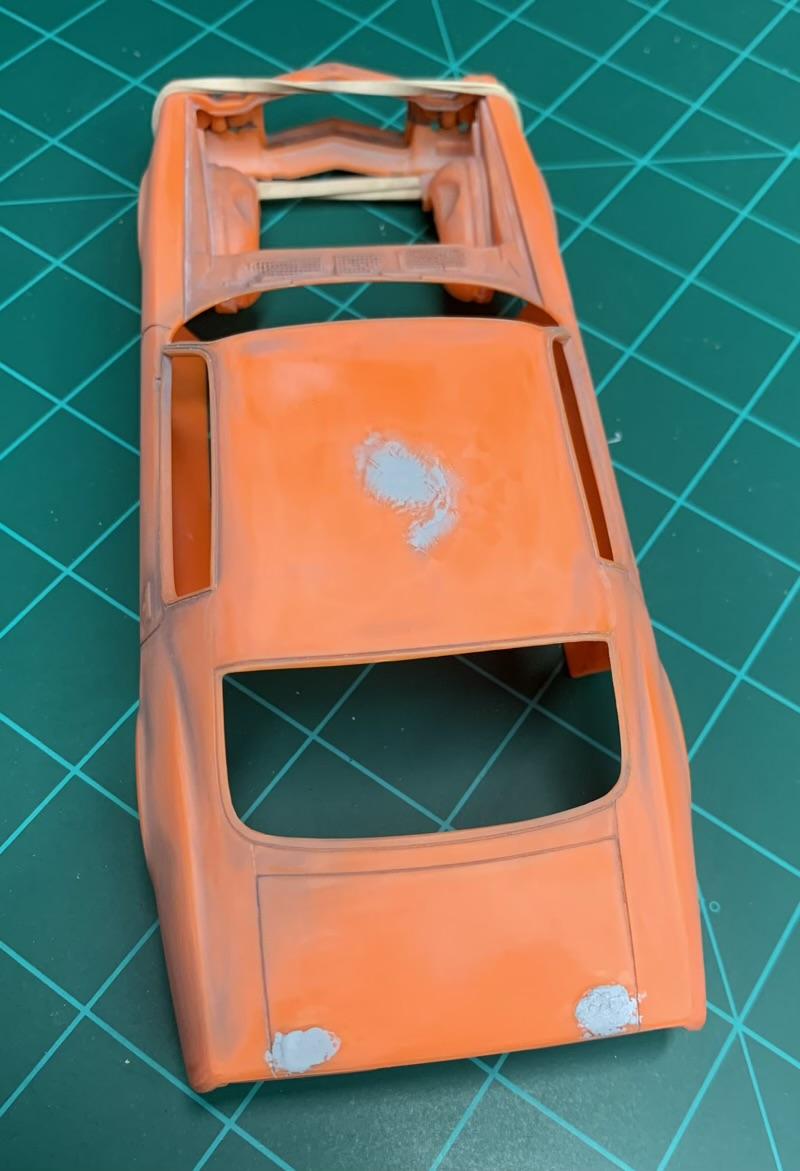
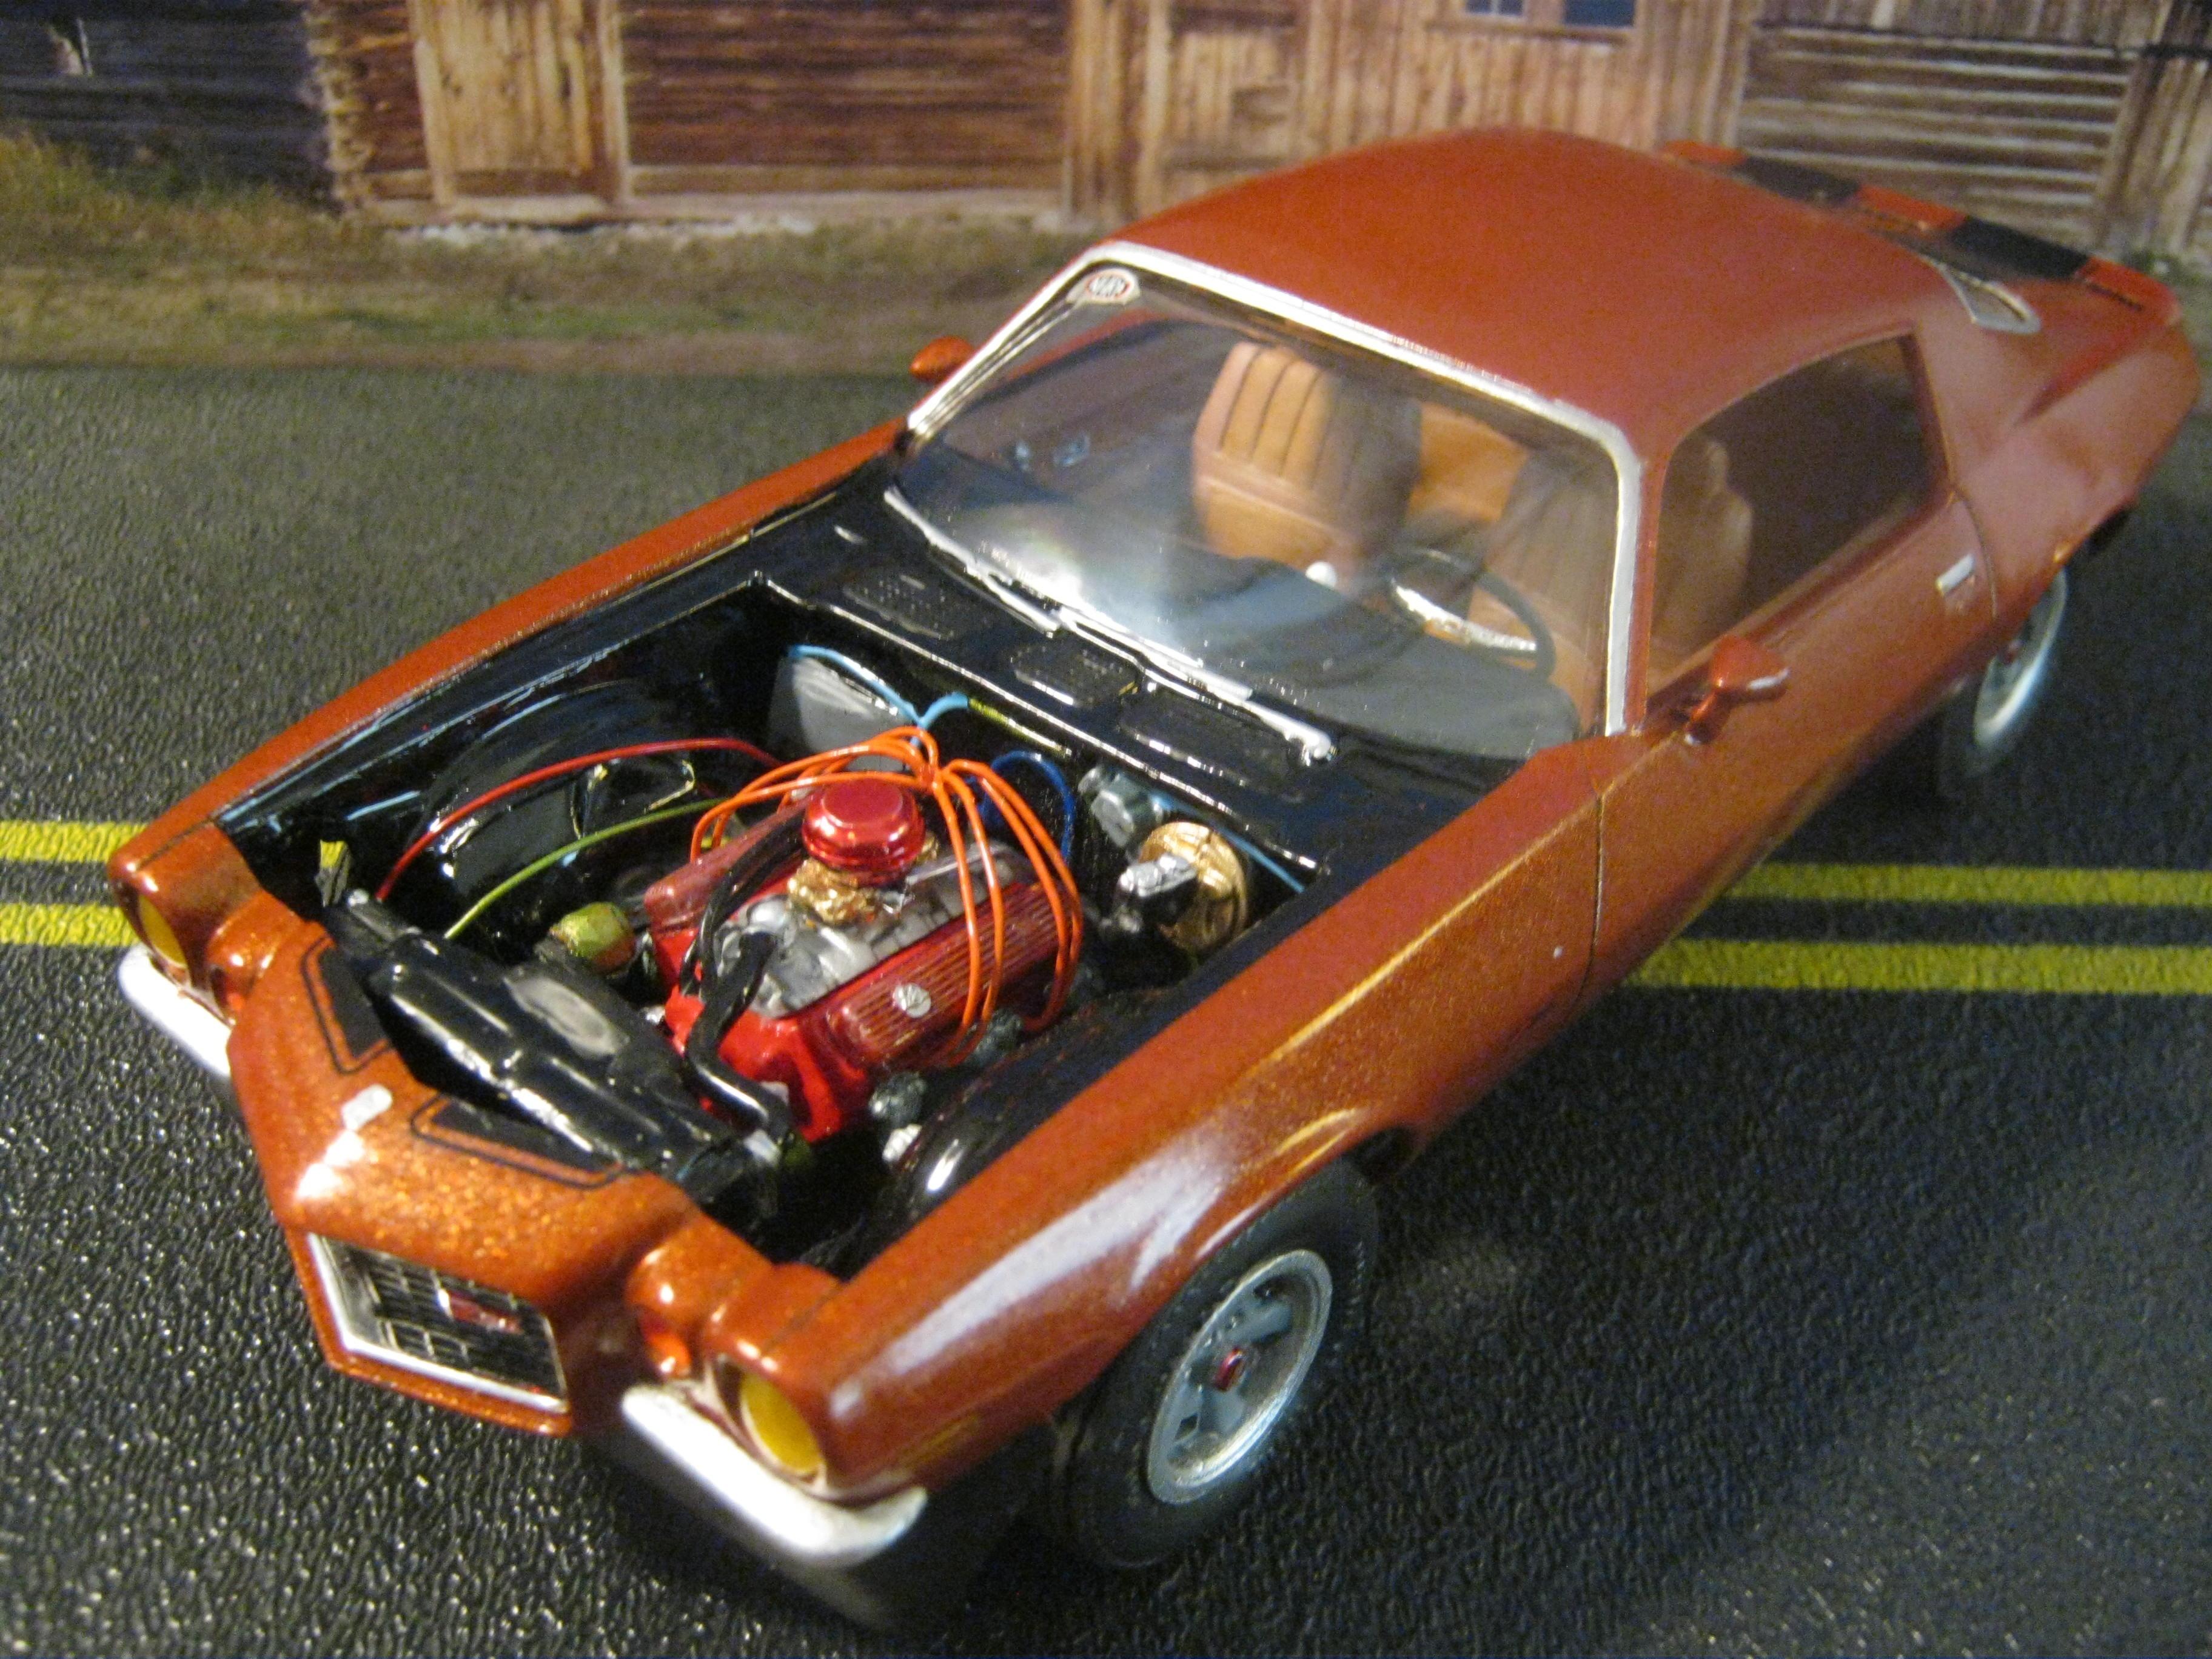
 I’ve been working on this kit for a few months now. It started life as practice for painting. As such, it’s been stripped three times now. I started with Rustolium (shot it too thick and had runs), switched to Dupli Color Perfect Match (first time using it and I got terrible orange peel), stripped and shot it again, only to burn through on the polishing stage. This has become a great tool for learning the trade. Each screw up has been my own fault and I think I’ve learned from my mistakes (boy I hope so…😂). Originally I didn’t intend to do a wip on the Camaro, but I started thinking about what a journey it’s been already. Many of you have seen the stages of this in other threads I started. So now it’s time to get a little more serious about this kit and see what happens. Here’s where it stands today. I have a few versions of this kit, but I picked this one up most recently. They sell pretty cheap now and I couldn’t resist. Floor pan, suspension components, and wheels are painted. There is still some detail painting to do, but it’ll wait for now. I did some research, and it seems some of the Camaros had black floor pans and others had red oxide. Depends on where they were built. I’ll probably weather it very lightly, just to bring out some definition. Interior is painted and awaiting details. I actually just shot the engine Chevy engine orange just before I wrote this. It’s still wet here. And finally, the body…. Ah yes. I’ll keep the story short (too late!). I plan to build this as more of a stripped version, sort of basic Camaro. I’ll still be using the same engine, but just to be different from the crowd, this one won’t have stripes, and I’m leaving the rear spoiler off. The kit comes with indents for mounting the spoiler, that are filled here. Also, there is a sink mark on the roof above the dome light. That’s filled here too. Not difficult, but this step has had to be repeated every time I stripped the body and restarted. I think that’s it for now. Love it or hate it, let me know what you think. Thanks for following along!
-
First stage of painting on BM Camaro is done. I shot the auto-touch up white yesterday and the MCW rally green today. Plans call for installing the decals then clearing it with some Tamiya TS-13. Thanks for looking all comments welcomed.
-
Hello, I have a 1968 Camaro modified with all the technology of the 2010 Camaro. The front & rear axle with all the suspensions were installed. Also the exhaust system is from the 2010 Camaro. The center section of the new model was integrated into the hood. The taillights I have made with 3D printing. The decals are self made.
-
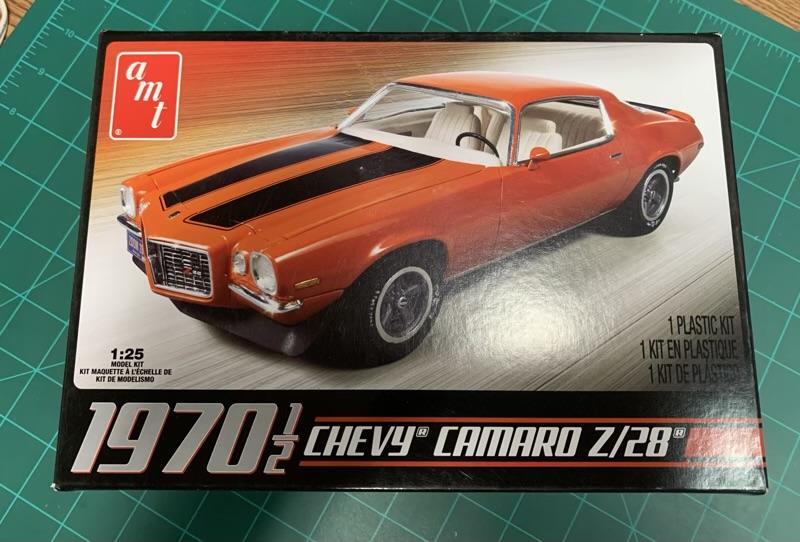
1970 Trans Am Rivals Last 2 builds of 2022 Revell 1970 Mustang Boss 302 built as the Bud Moore Trans Am race car. Doors and trunk opened, wheel arches bulged, engine rebuilt with scratch built induction, roll gage added, fuel cell and trunk detail added, R & M Minilite wheels, decals from 5 sources, and custom Tamiya paint and trim. AMT 1970 ½ full bumper Camaro Z28 built as Jim Hall Trans Am race car. Doors and trunk opened, wheel arches bulged, R & M Minilite wheels, engine rebuilt and under hood ram air tunnel added, roll gage added, fuel cell and trunk detail added, decals from Pattos Place from Australia, and rattle can refrigerator white paint.
-
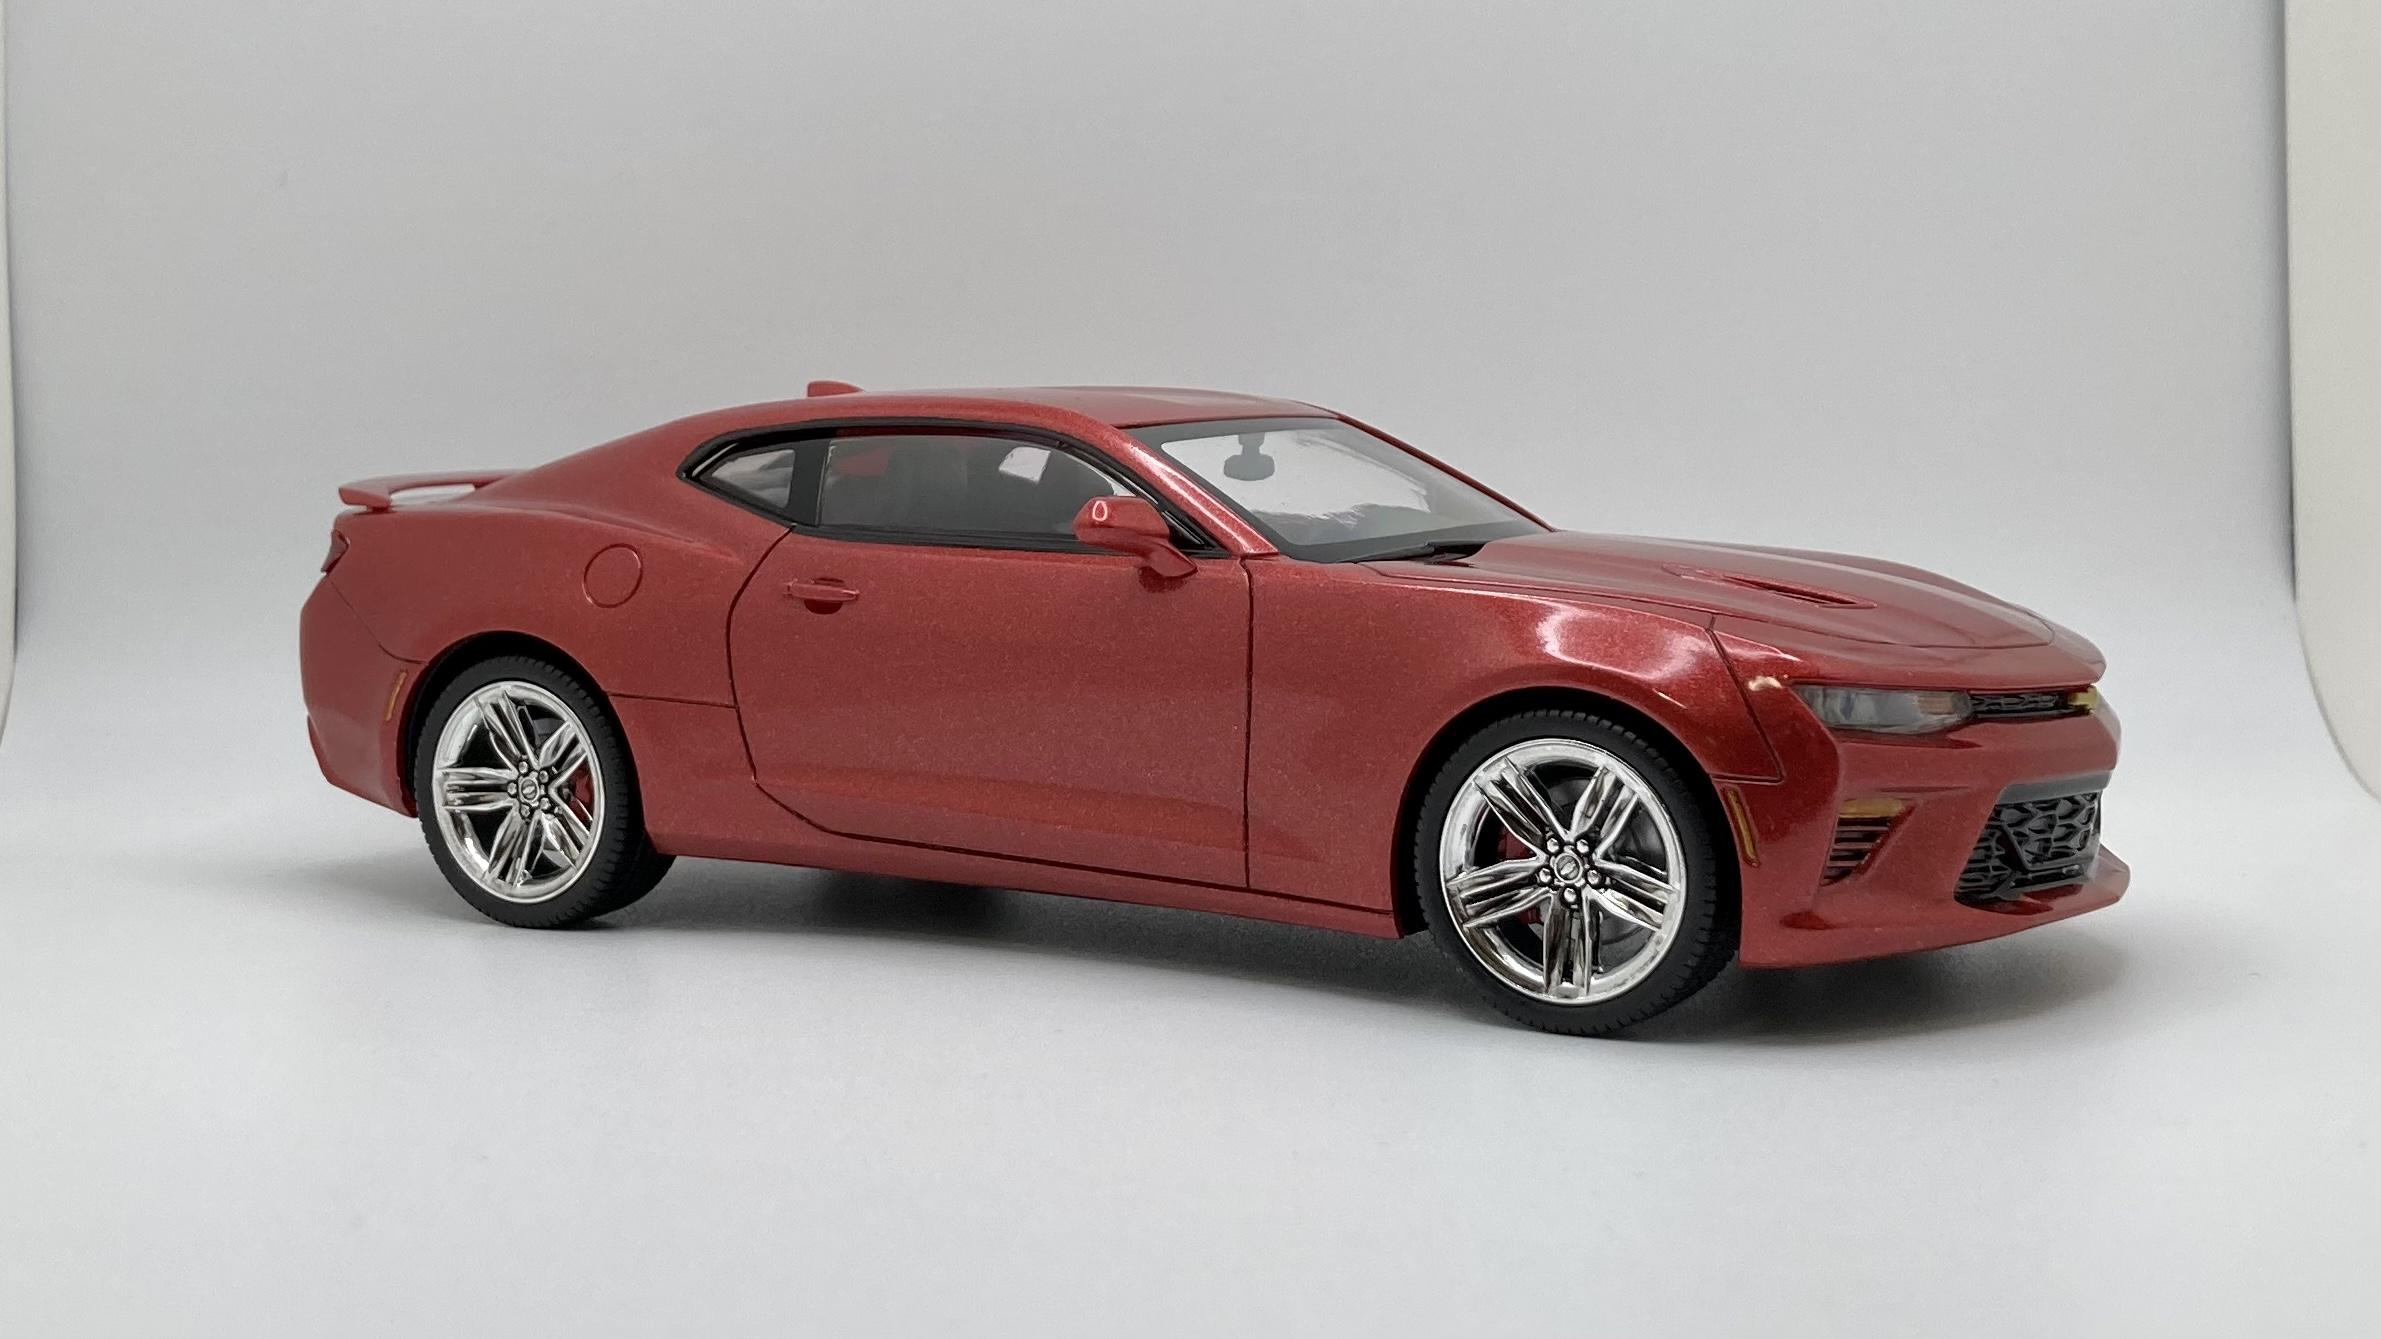
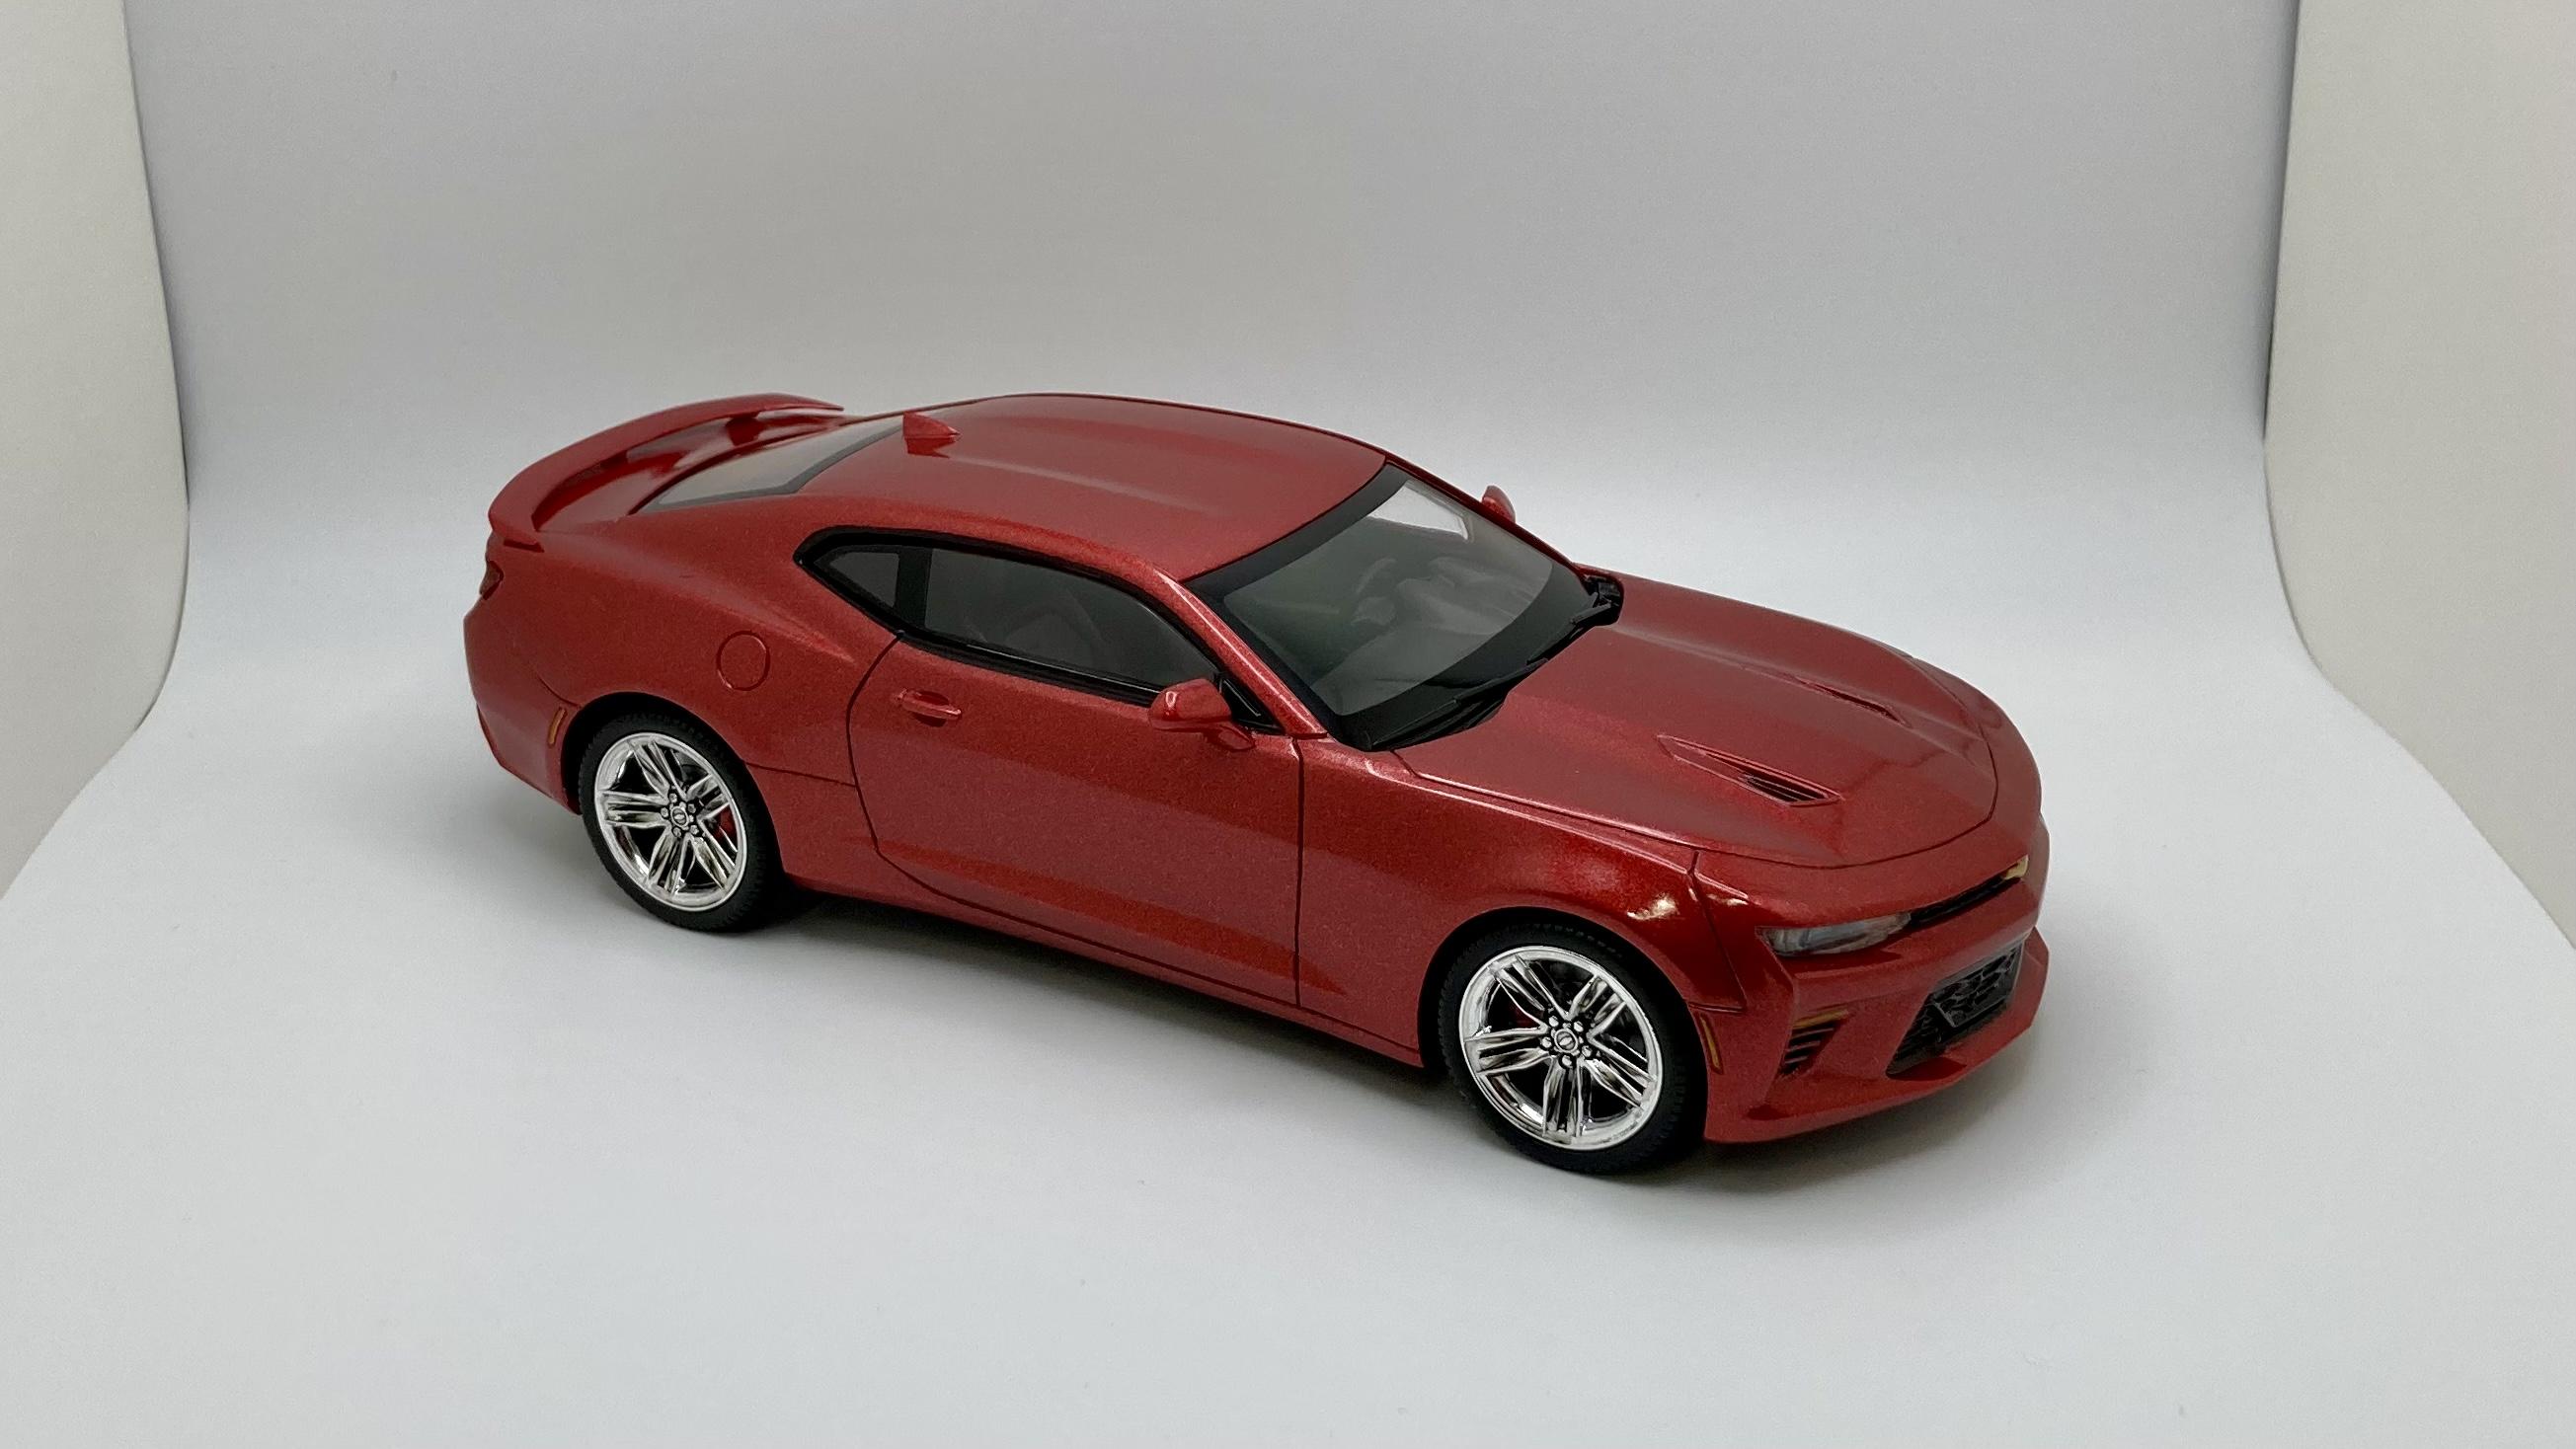
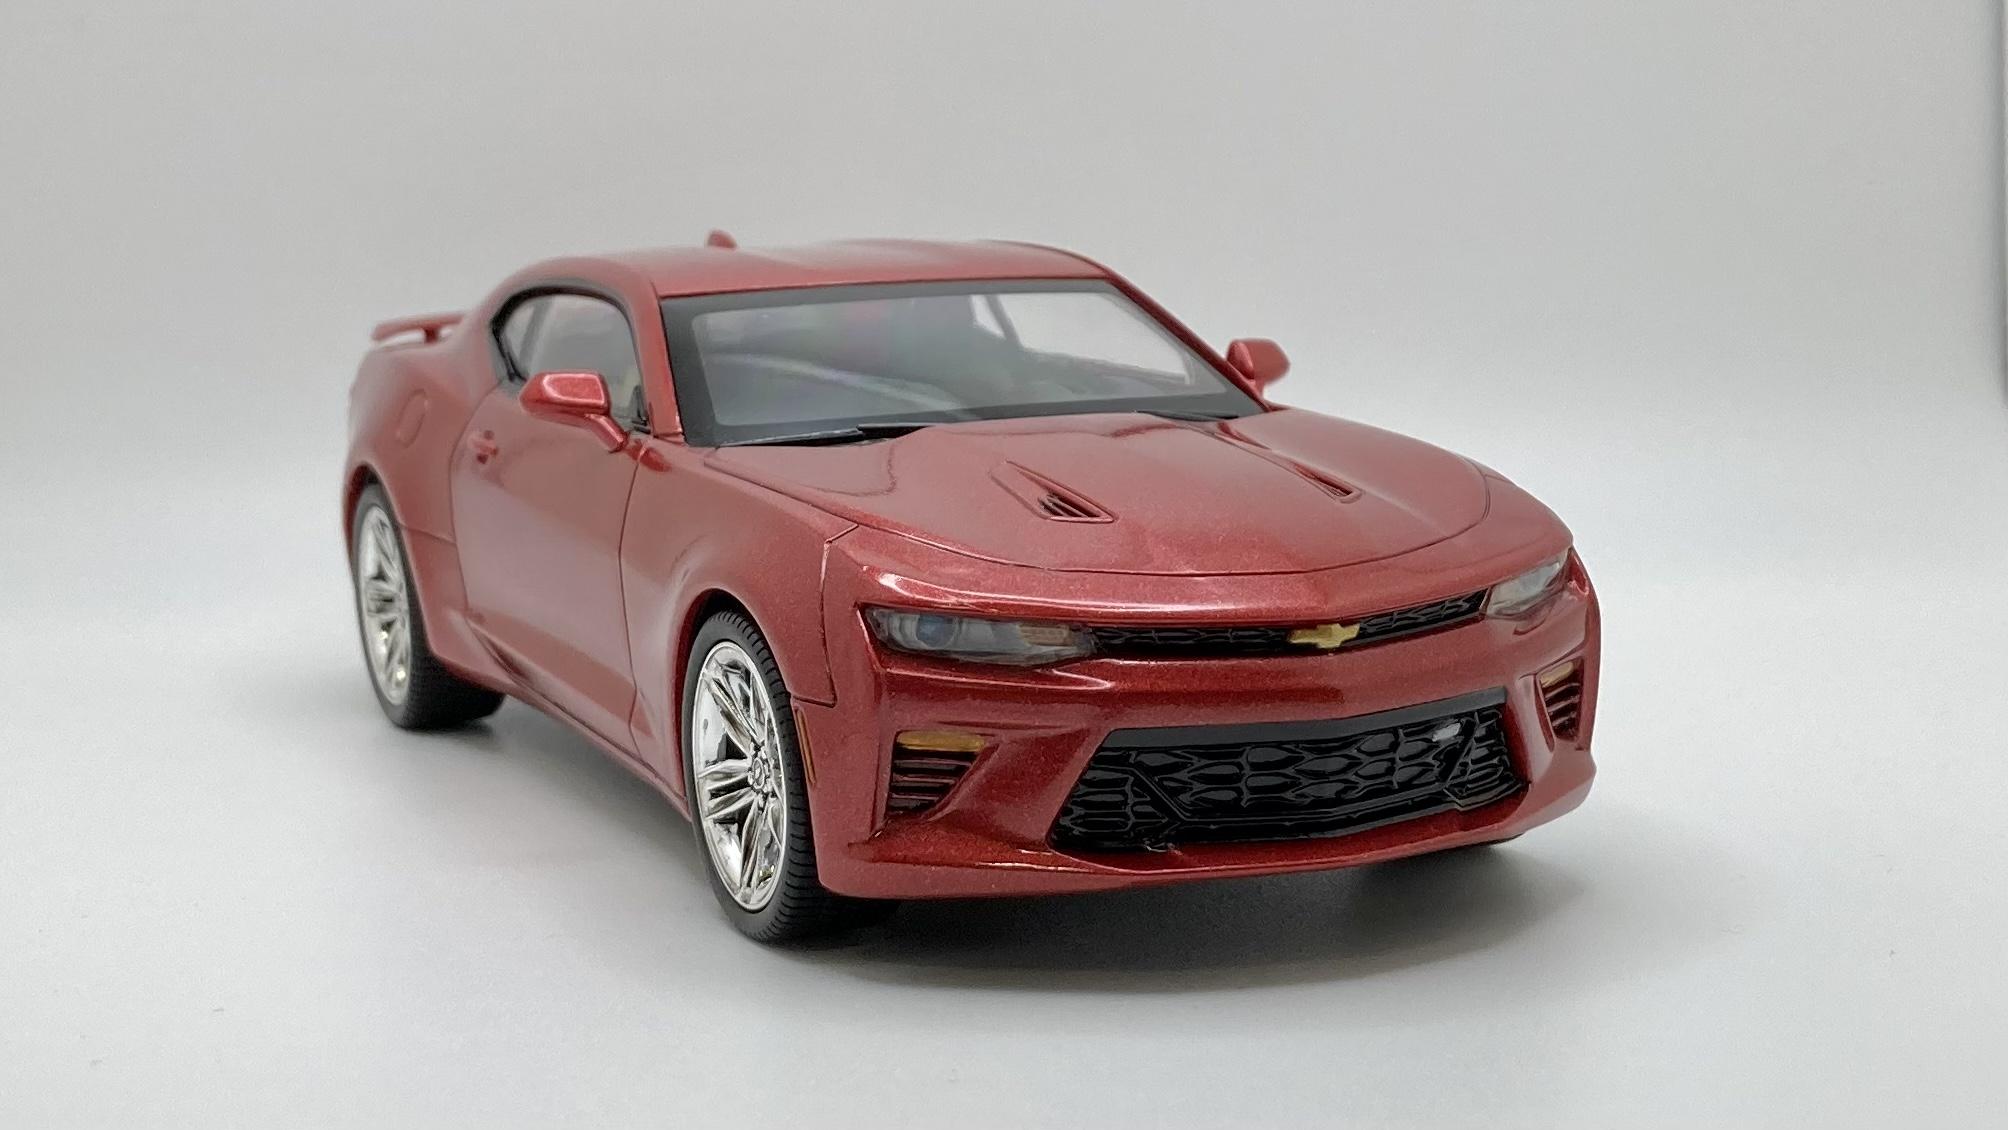
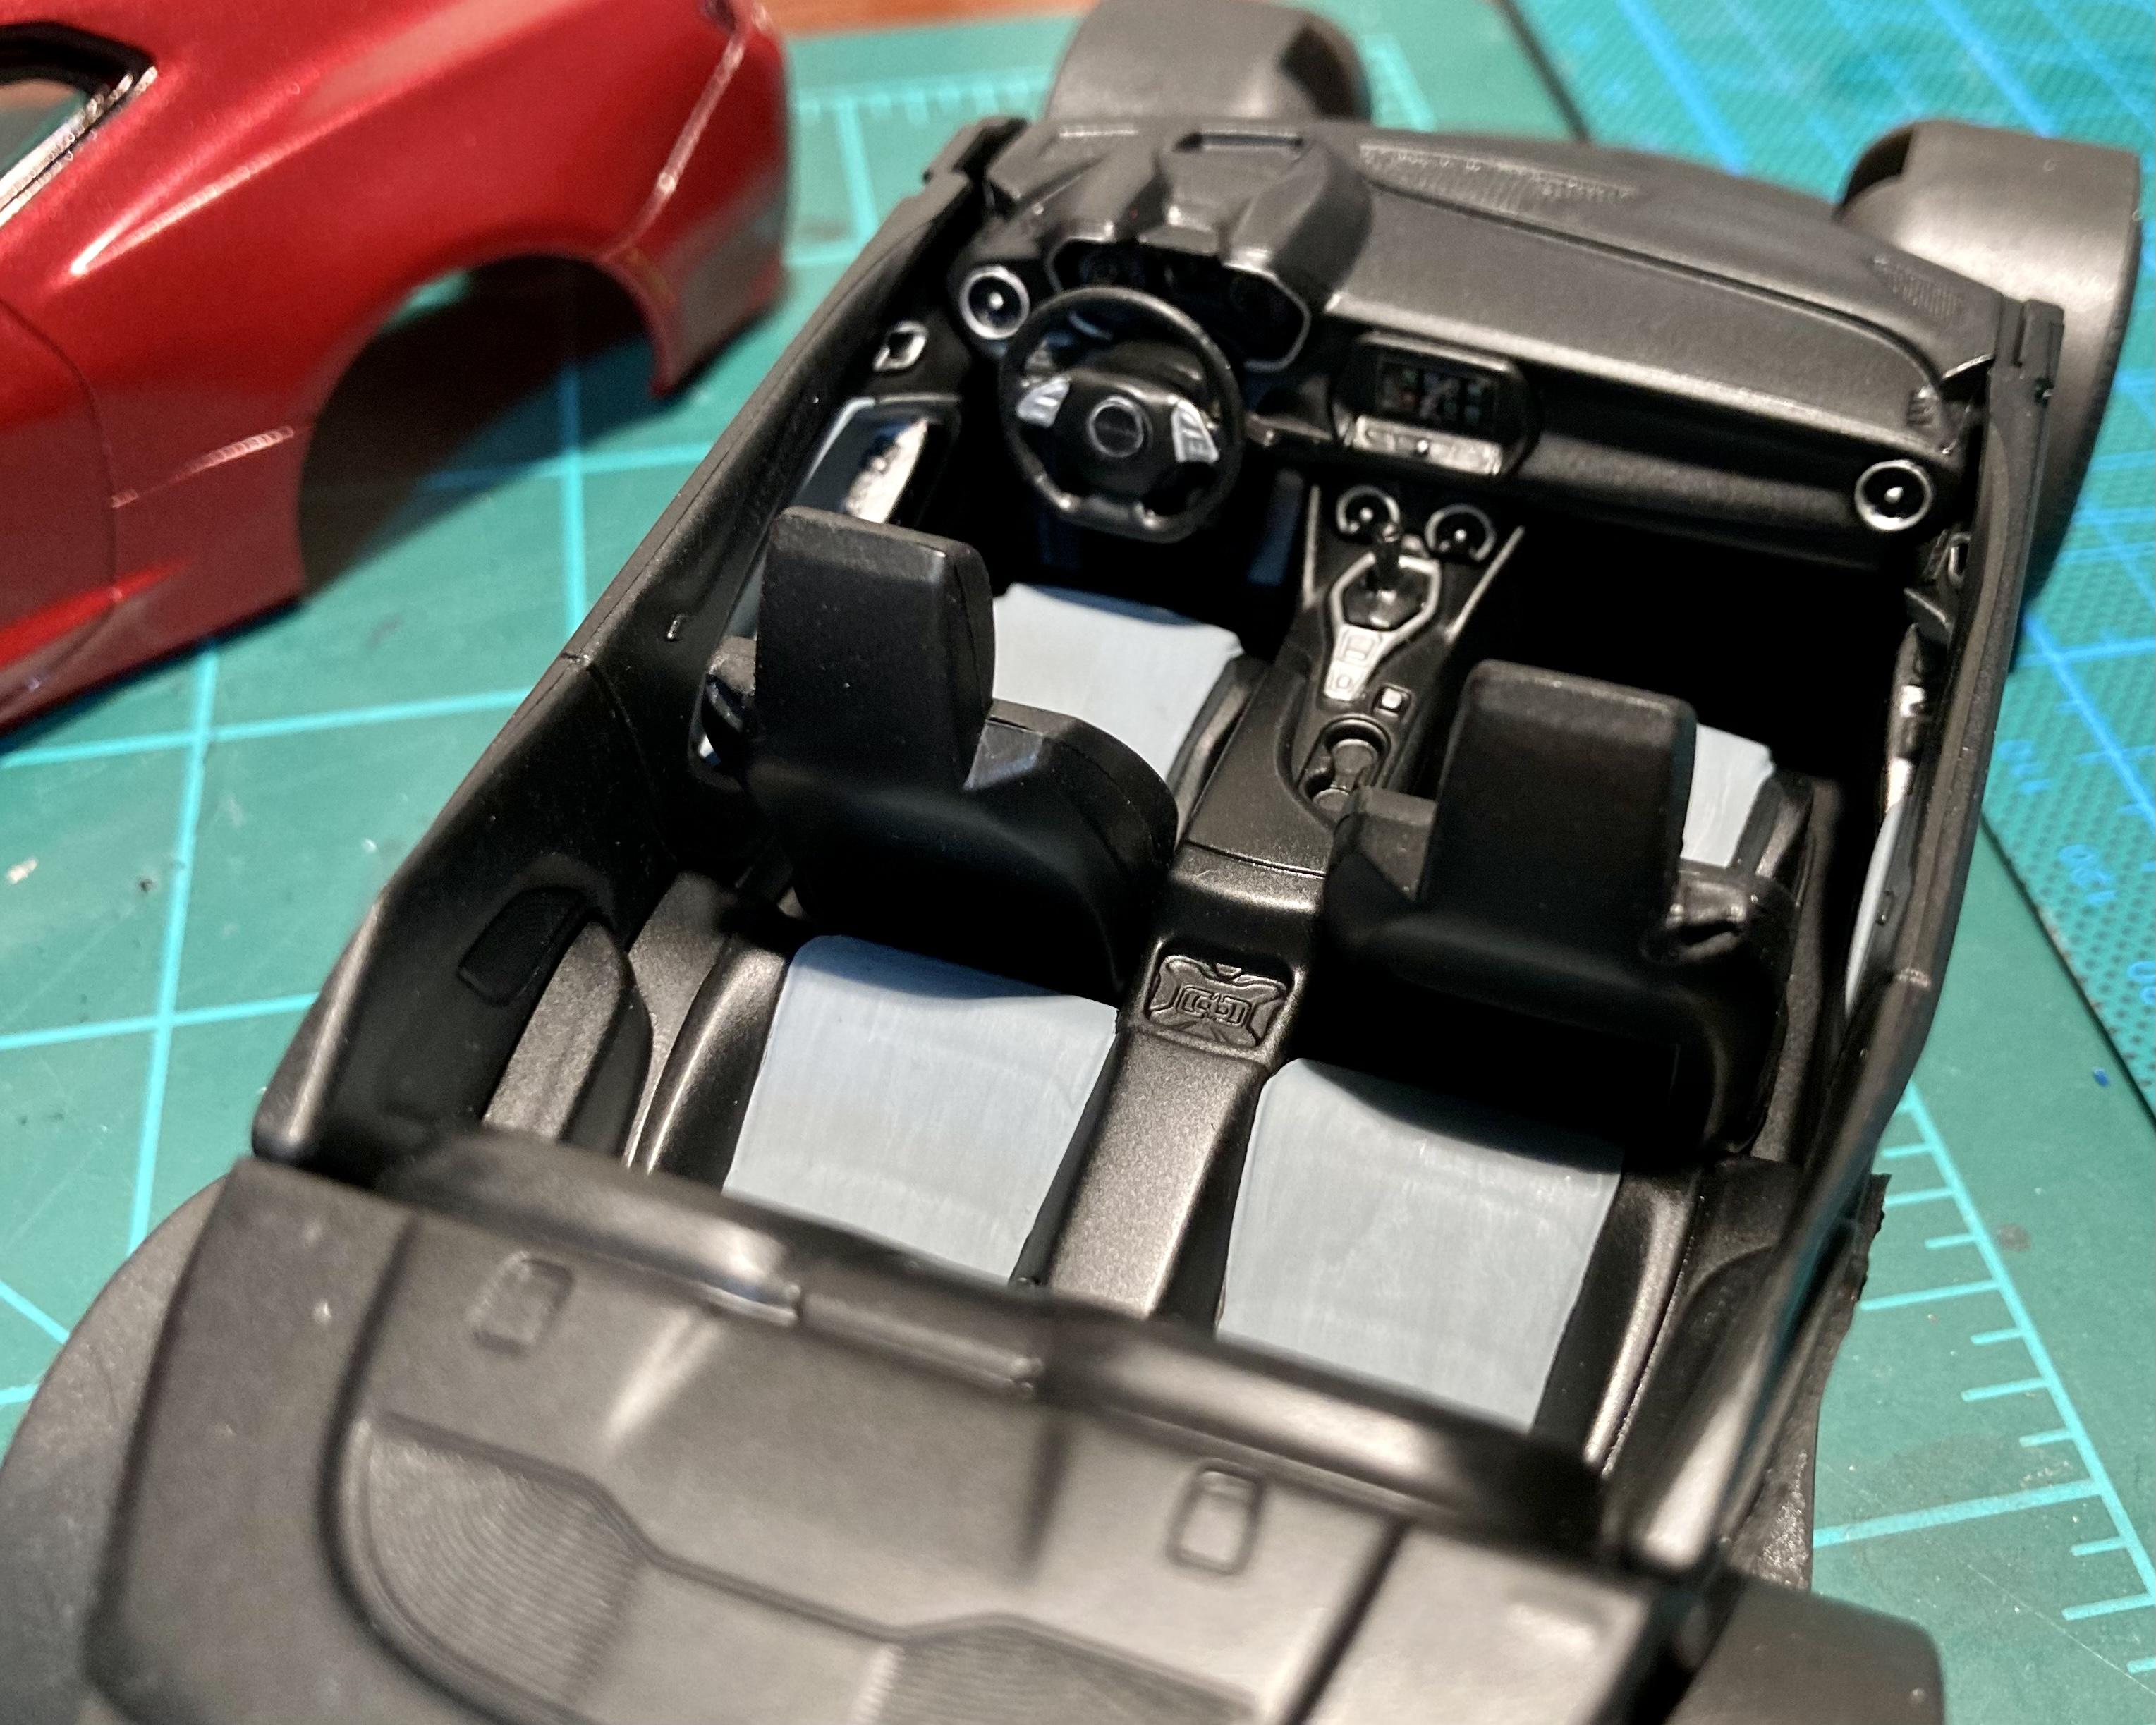
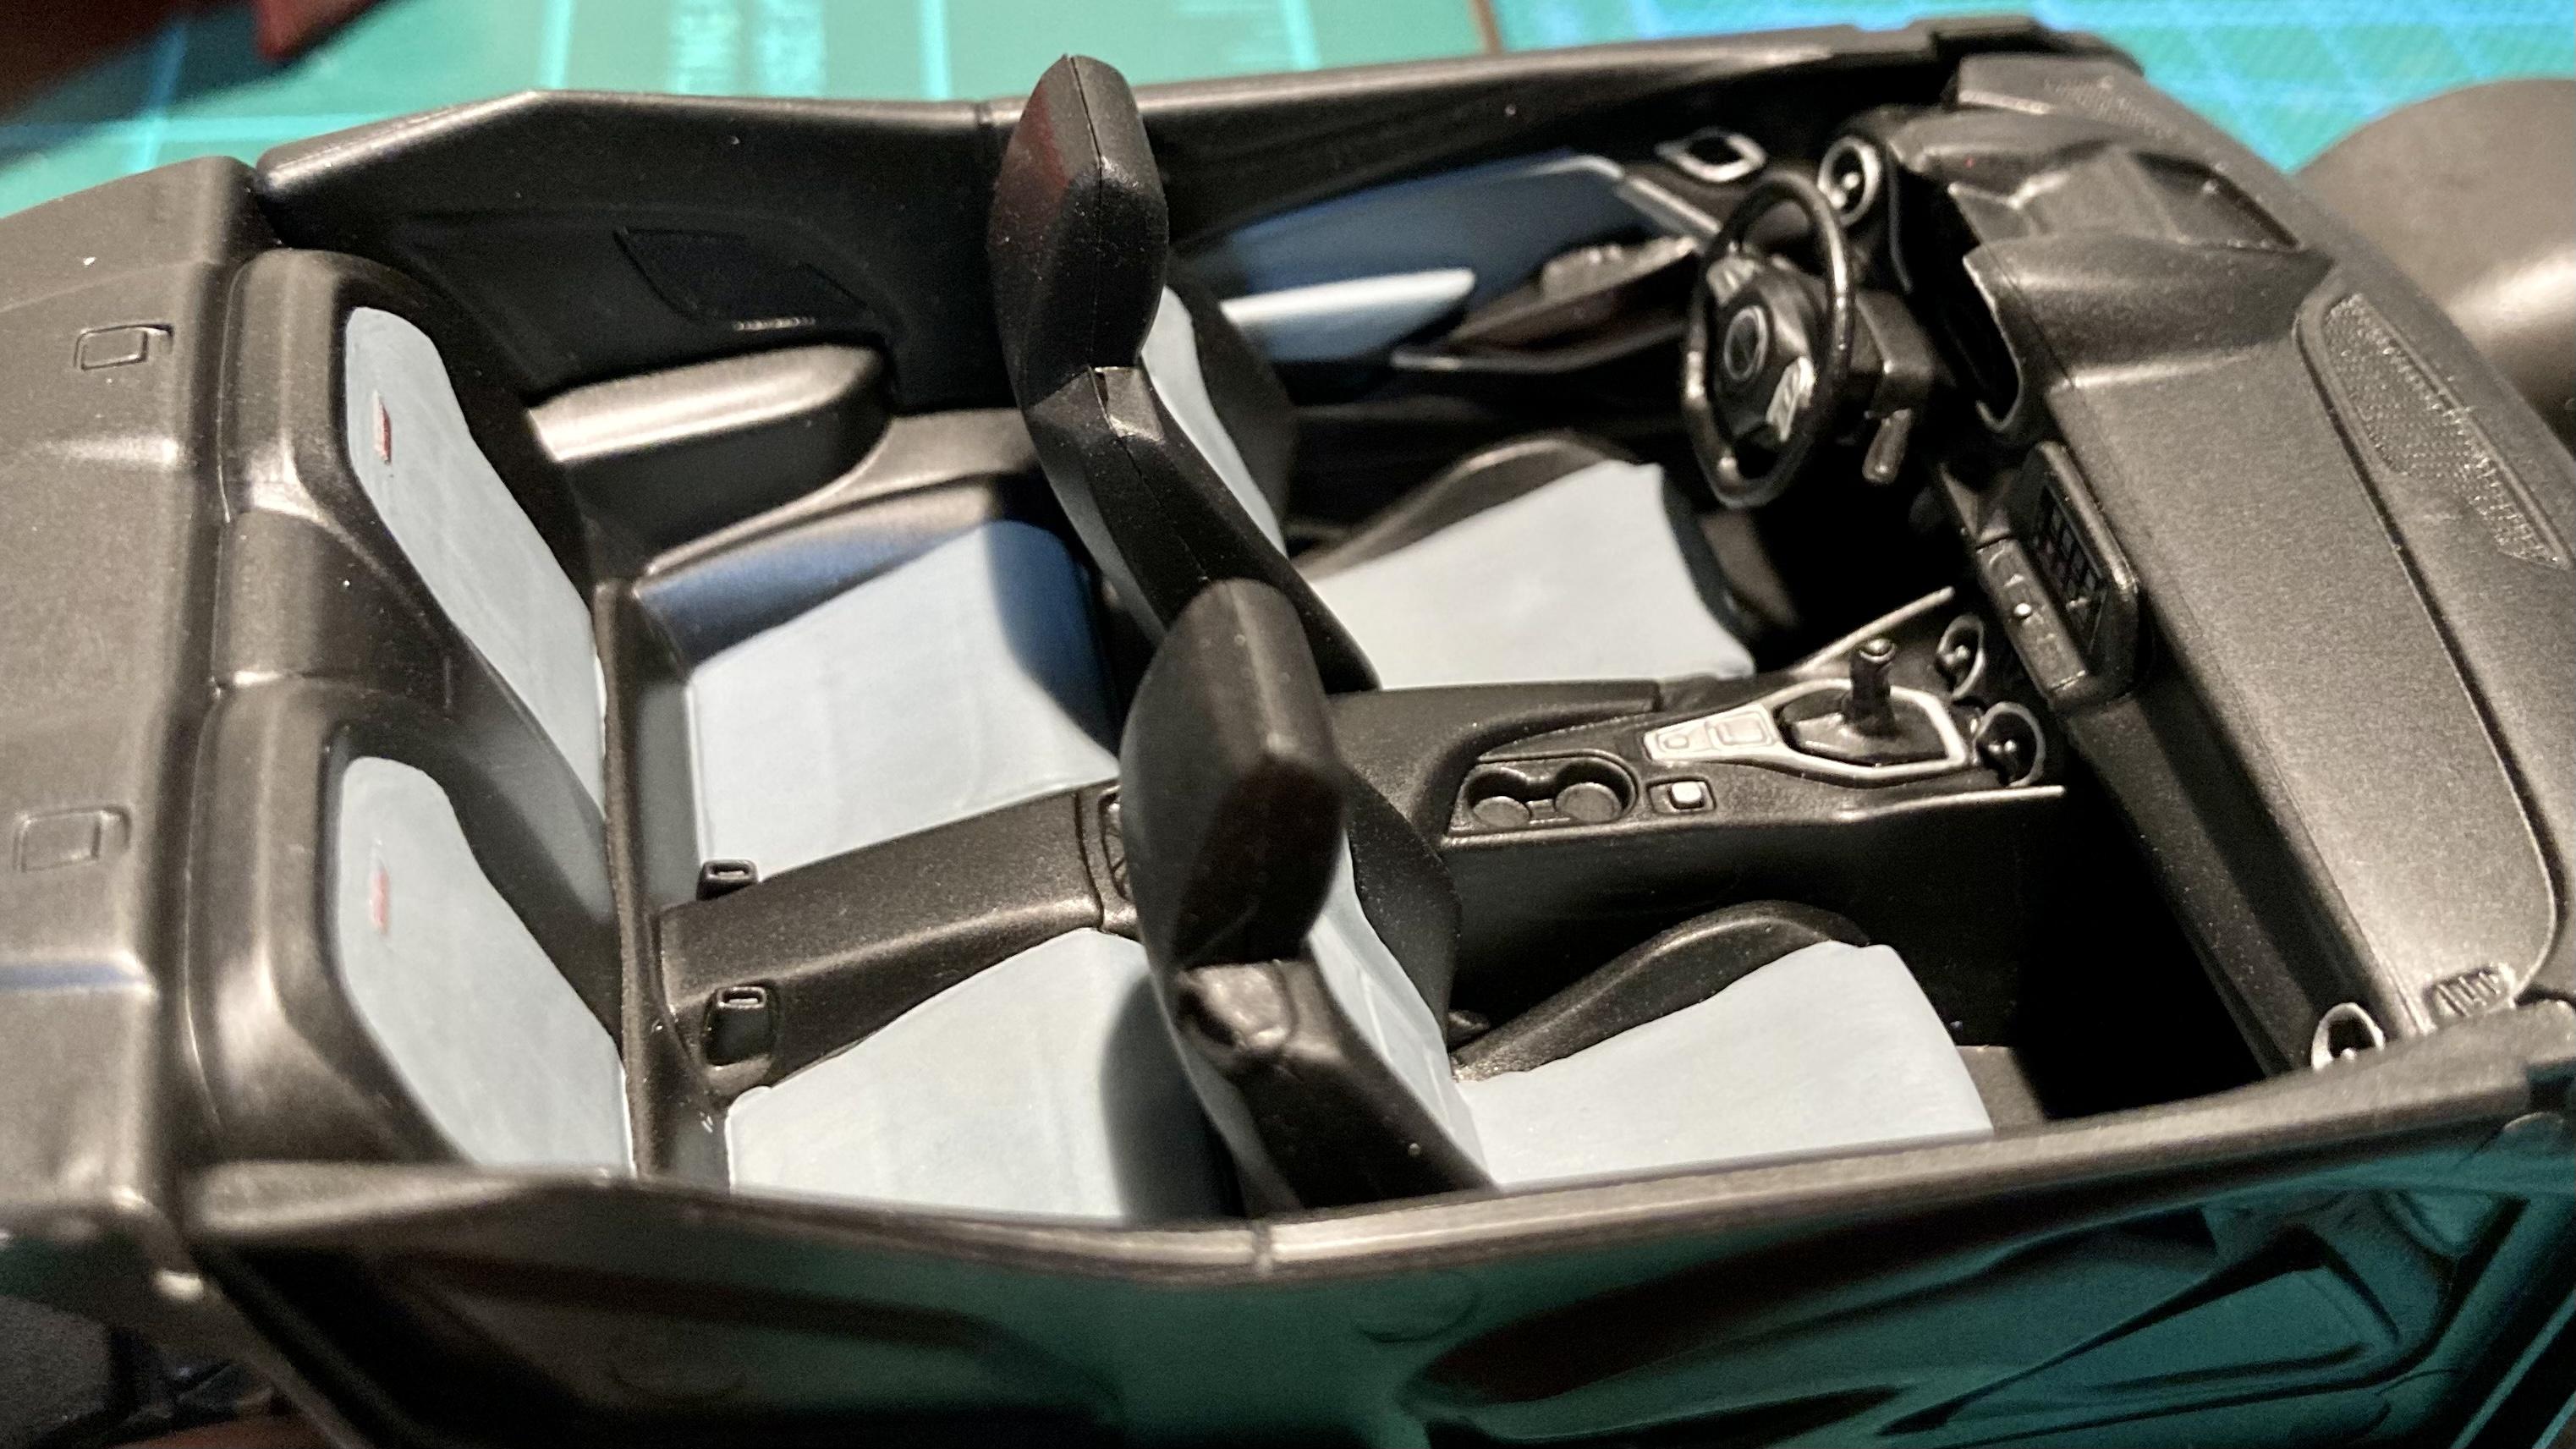
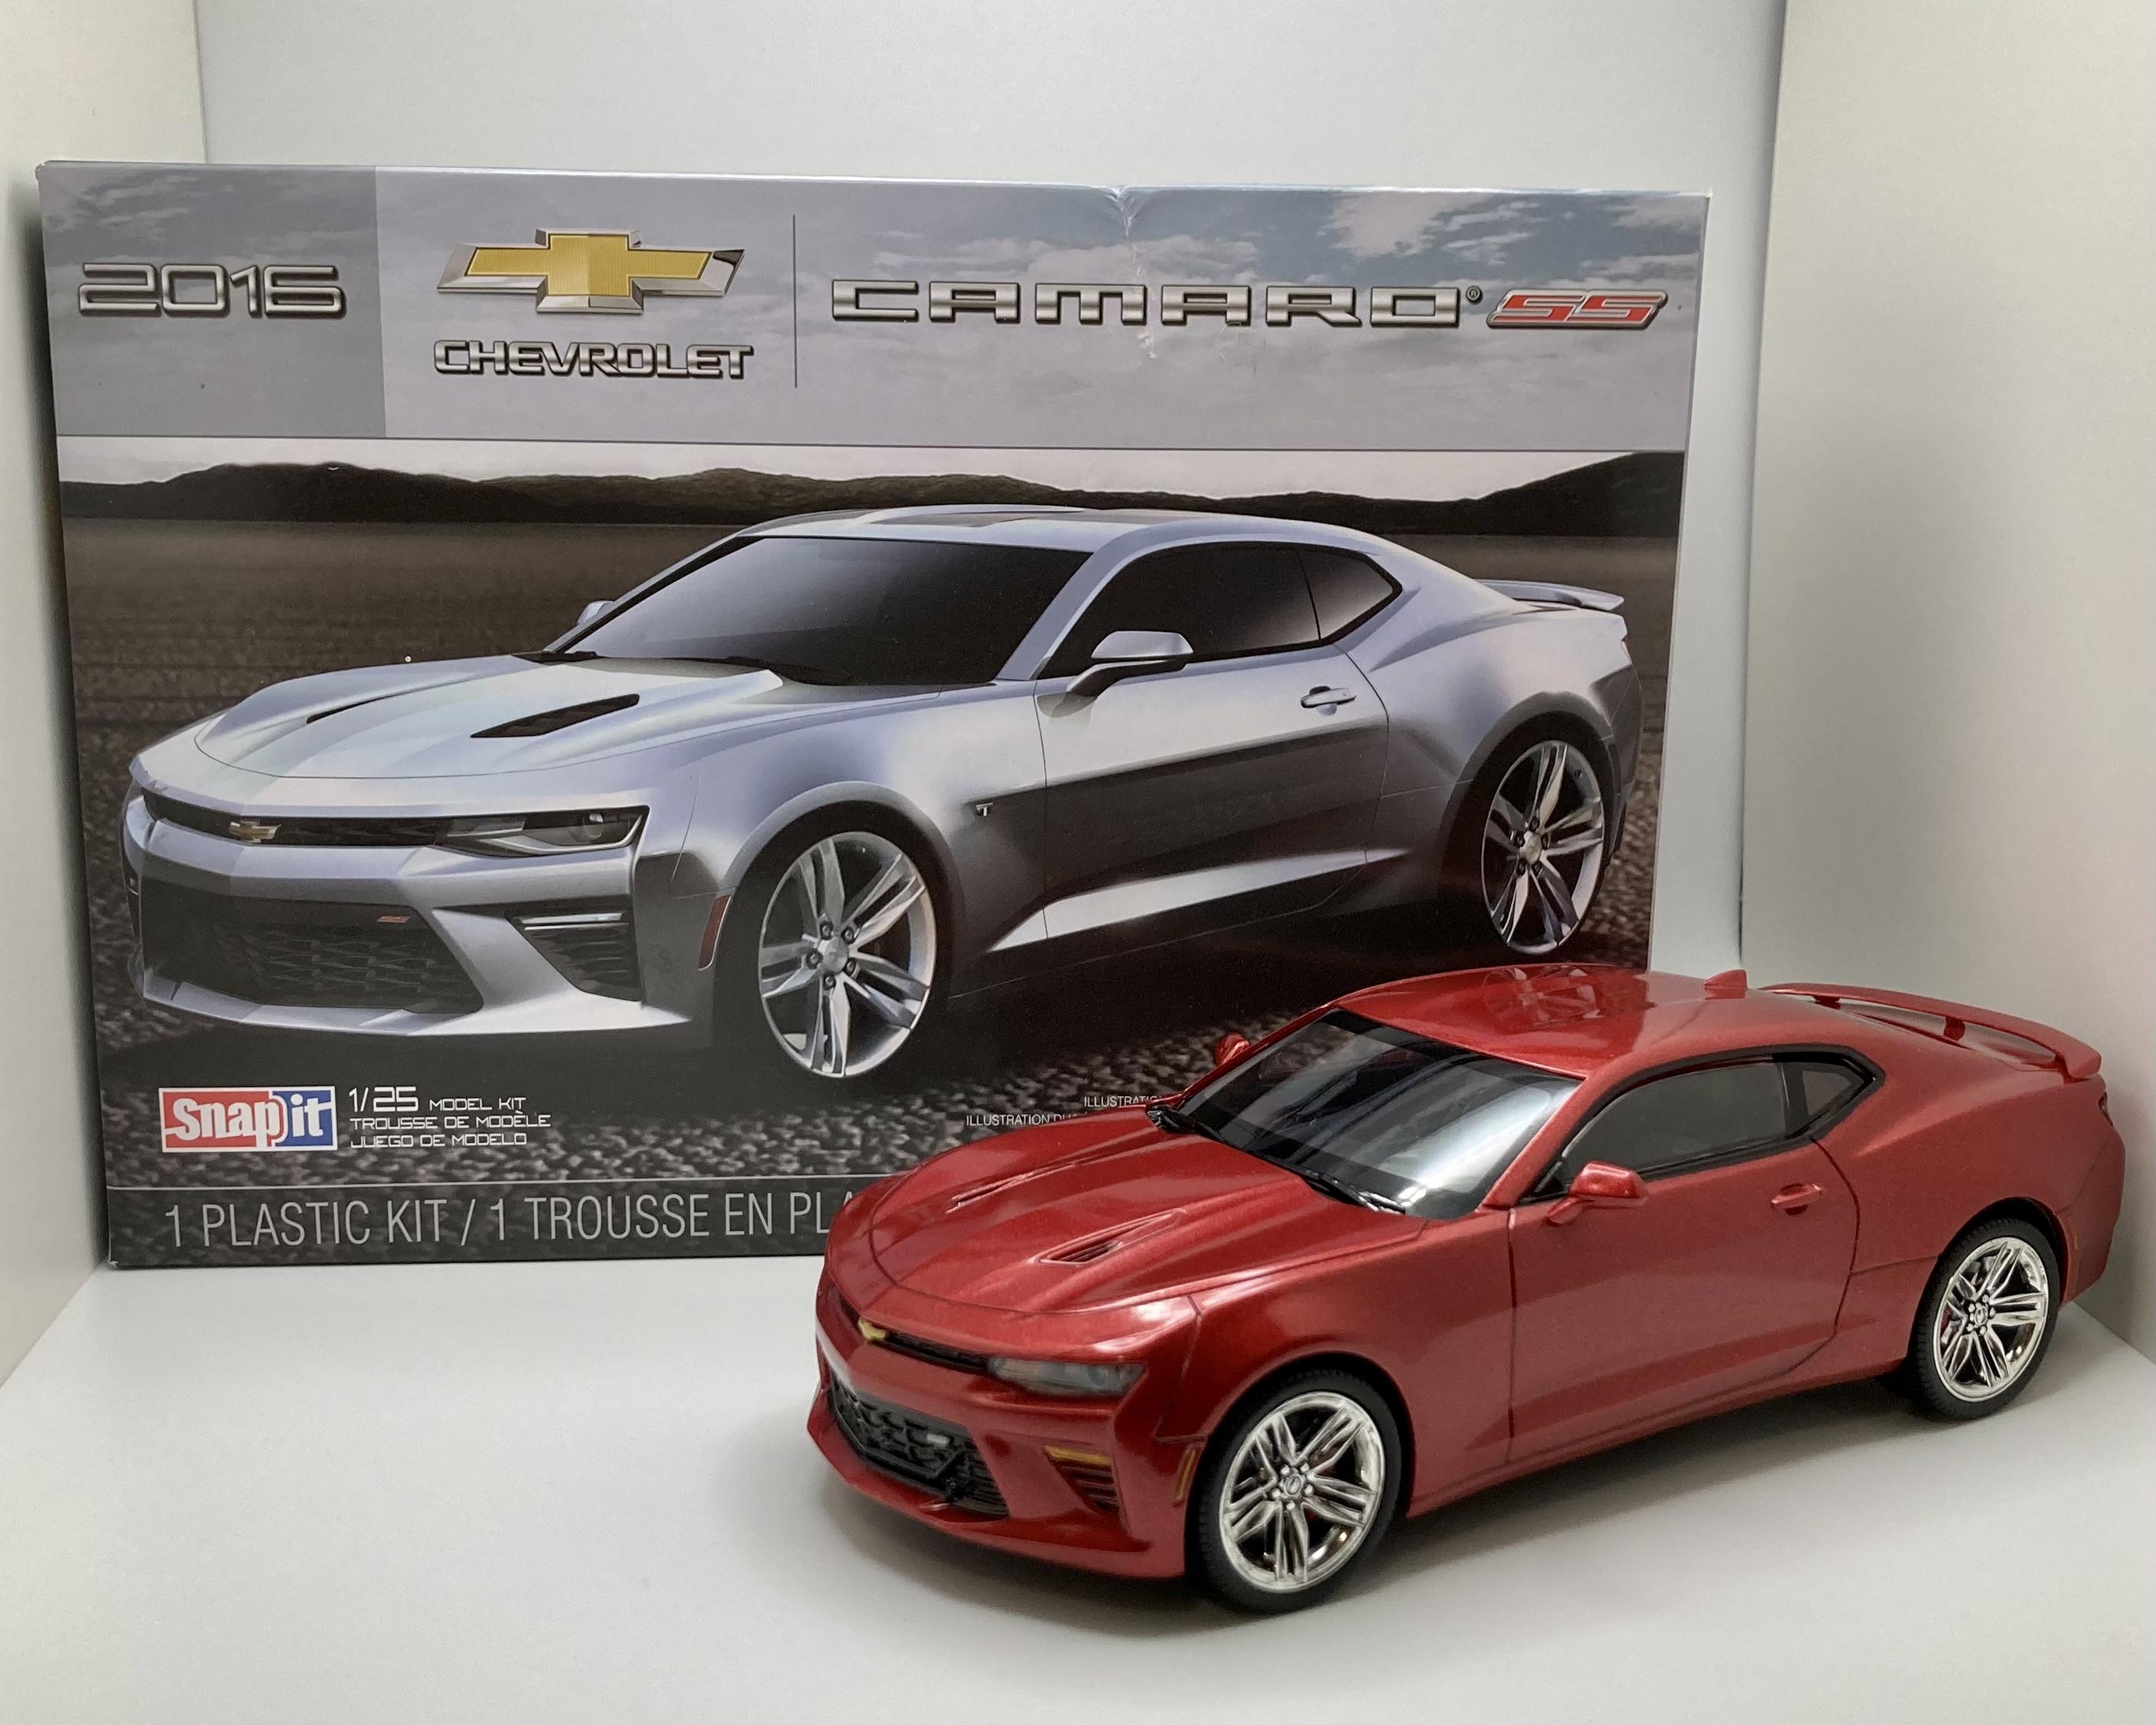
Here’s my build of AMT’s Snap-it 2016 Camaro! I painted it Tamiya TS39 Mica Red directly over the metallic red plastic the body was molded in (possibly TS19 Metallic Red; I painted the body two months ago and chucked the empty can 😂). Interior is Krylon black primer with XF66 light gray for the seat inserts. I love the pre-painted glass it came with, complete with amber rear window defrost lines. Despite being a snap kit it has a ton of detail and it goes together perfectly!
-
Hi all,,its labor day already,,wow summer went pretty quick as always. Hope you all are having a good one,, up for review is the AMT 68' Camaro,,this kit has been around for quite awhile,,great features come with this kit,,mine had some general tooling/molding issues,,but the wonderful folks at Round 2 were very helpful at fixing the issues. Hats off to them. I wont bother going into it all,,no need to really. At any rate,,things I added that didnt come in kit: larger back tires,,scratch built carb scoop from a ww2 airplane drop tank, leaf spring riser lift pads to allow larger rear tires,,additional engine bay details. Sprayed w/testers quikdry turquoise using white primer,,it turned out more of a mint green,,which is cool. I was going to put the kit supplied stripes on it,,but after mocking it up w/body on chassis,,I liked it better without the stripes. Hand painted the rim detail, +,interior 2 tone work. Other than that,,its a real basic kit,,and looks great on the shelf! Thanks for looking and keep up the great works here! Skymnky over and out.. https://www.flickr.com/photos/153516536@N08/52333565774/ https://www.flickr.com/photos/153516536@N08/52333502848/ https://www.flickr.com/photos/153516536@N08/52333503828/ https://www.flickr.com/photos/153516536@N08/52333569264/ https://www.flickr.com/photos/153516536@N08/52333568639/ https://www.flickr.com/photos/153516536@N08/52333570459/ https://www.flickr.com/photos/153516536@N08/52333274121/ https://www.flickr.com/photos/153516536@N08/52333702610/ https://www.flickr.com/photos/153516536@N08/52333704475/ https://www.flickr.com/photos/153516536@N08/52333703575/
-
Yesterday I used almost a whole can of flat black paint to do the interiors and frames on two of these builds. I just had to see how they looked sitting on wheels. Thank you for looking all comments welcomed.
-
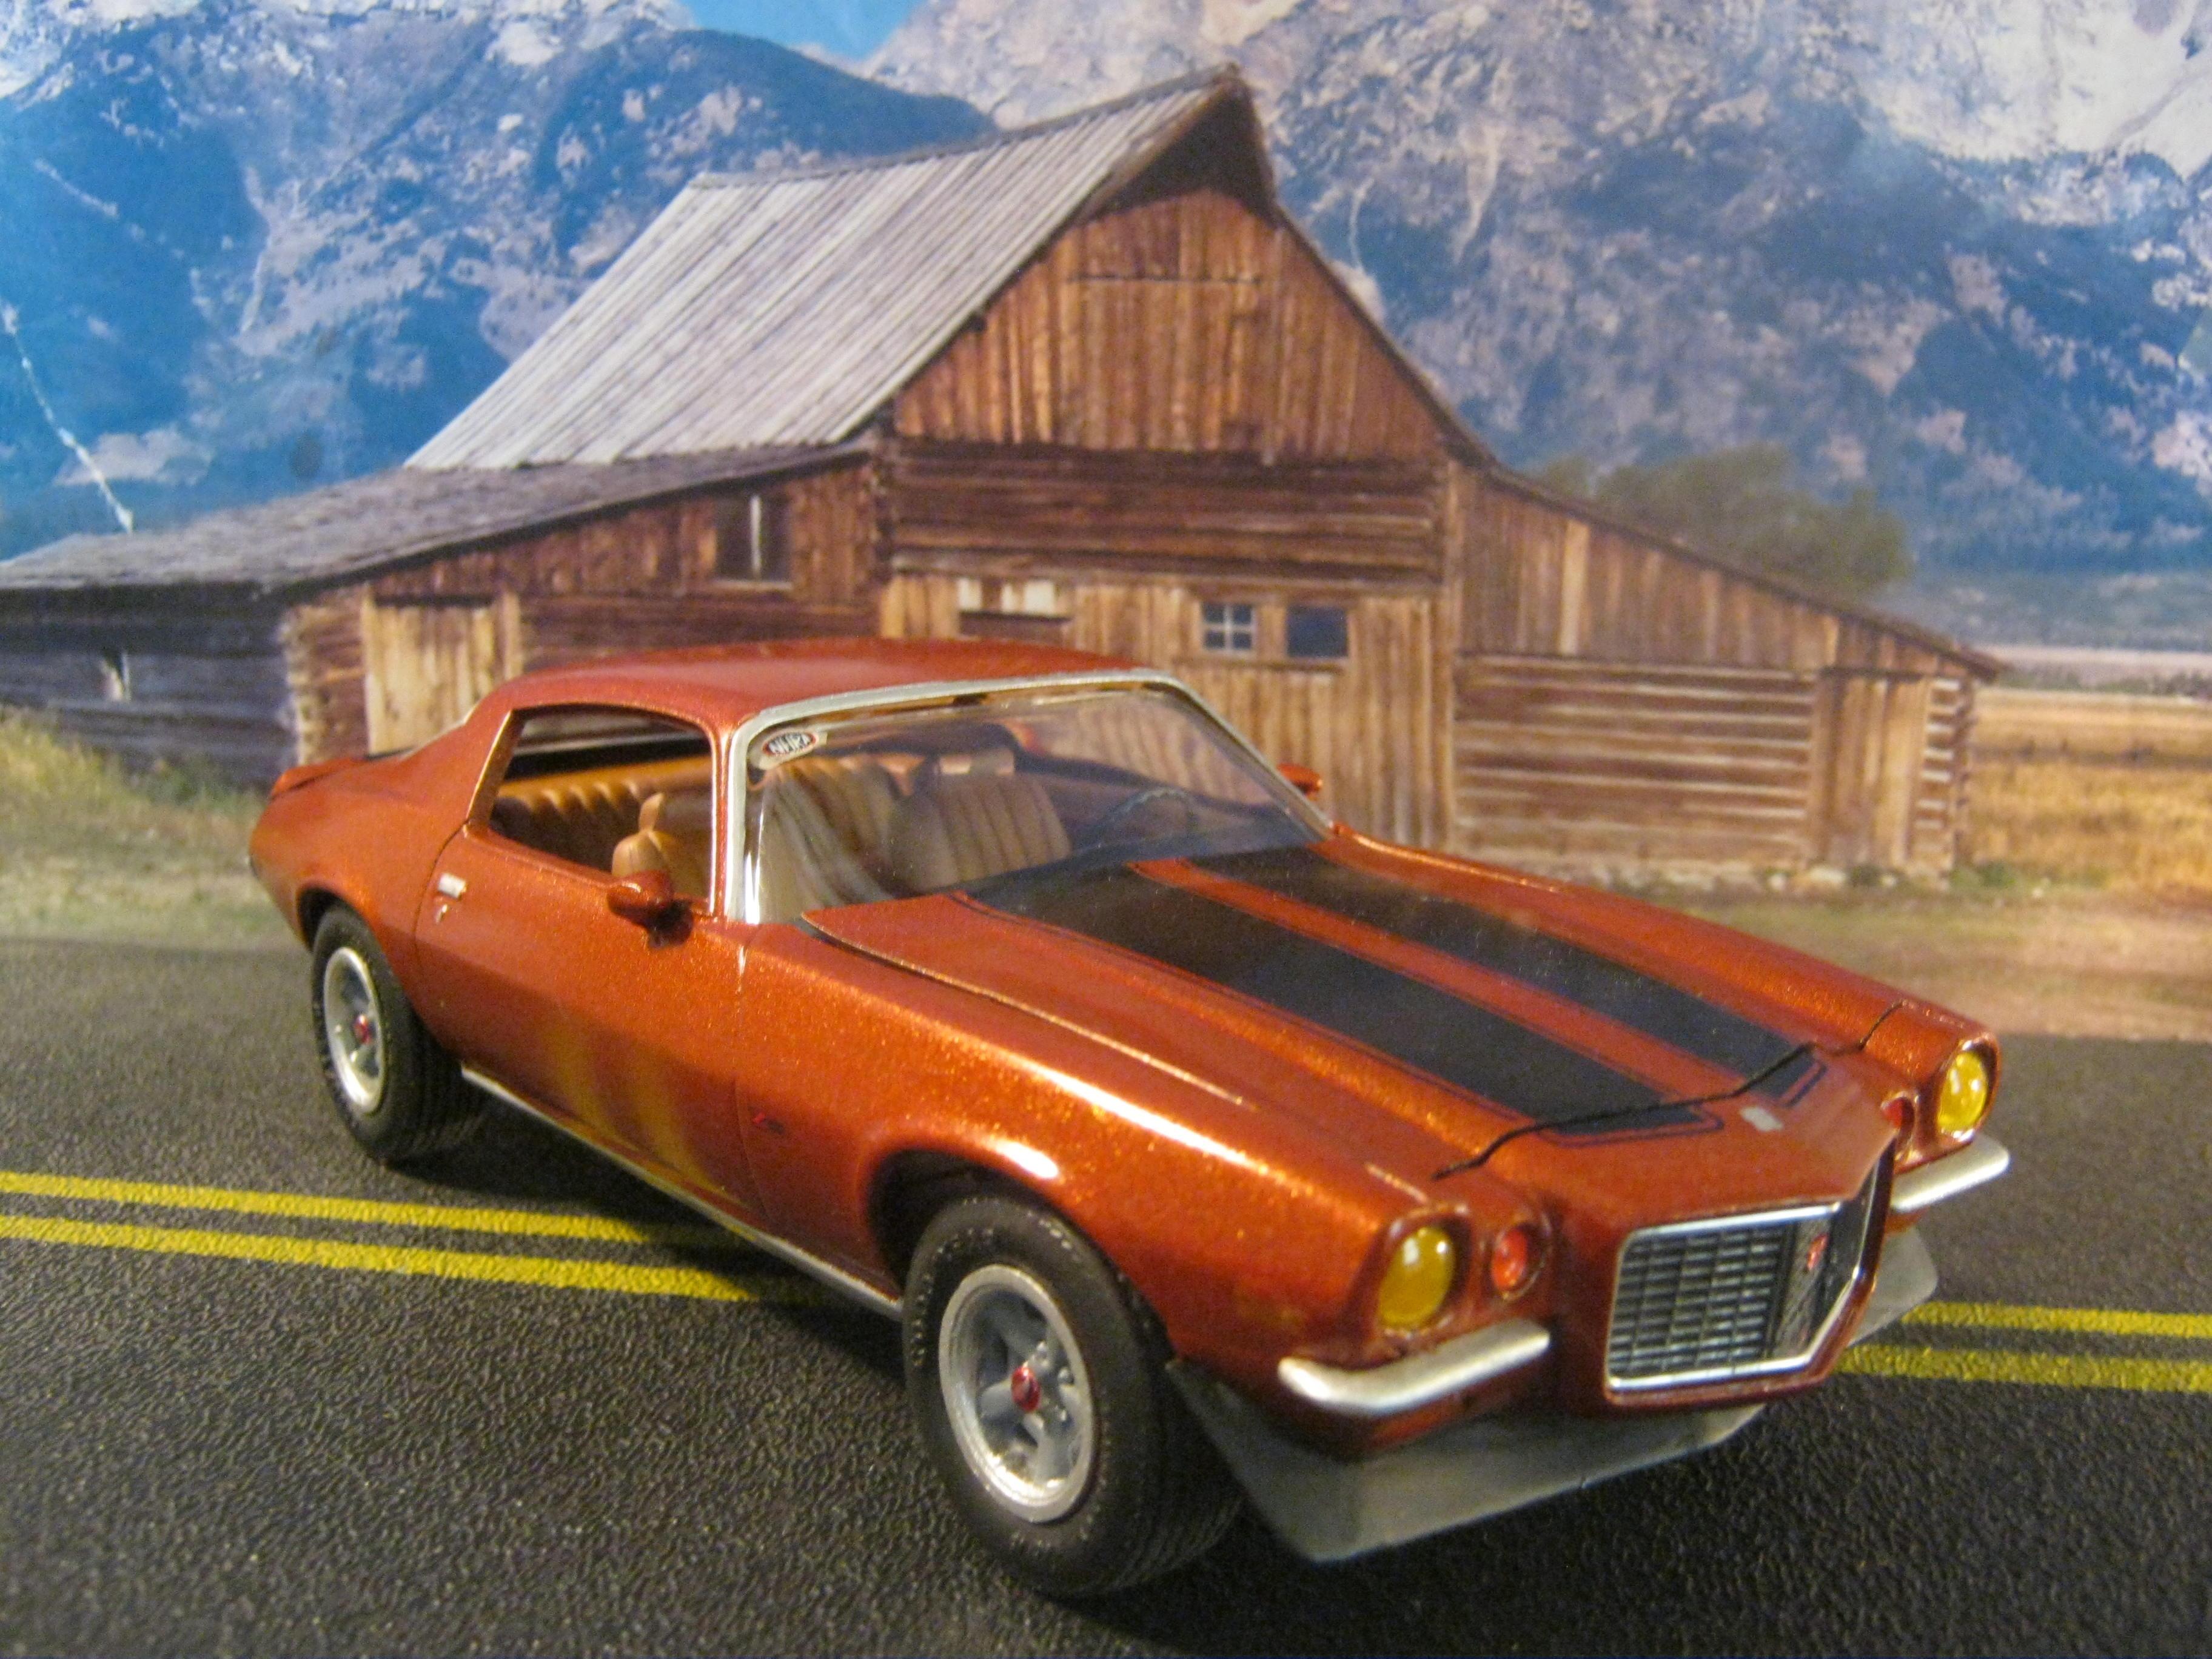
Another Camaro project started. This time it's the convertible by Revell. Painted Tamiya TS-86 Pure Red. Here it is before the paint, mocked up with a set of AMT Firestone tires and Revell 69 Nova SS wheels. I finally figured out what is wrong with the Revell SS wheels, they are molded without the trim rings installed. A set of these from the AMT 69/70 Chevelle kit looks much better. They are the ones I'm using on the Revell 69 Chevelle. Thanks, all comments welcomed.
-
Started yesterday, I believe that anyone that builds Camaros needs to have a Hugger Orange 69 on their shelf. Here is mine. Painted with Testors Hugger Orange and wet look clear. I took off the Camaro emblems for a cleaner look. This will be built out of the box except for tires and wheels. In other words, the cross ram intake with headers and the barely there exhaust system. I'm using the non SS grille on this build as well. I have a simple black interior to go along with the orange body. I want to put the black stripes on this, I hope they cooperate. Thanks for looking and all comments welcomed.
-
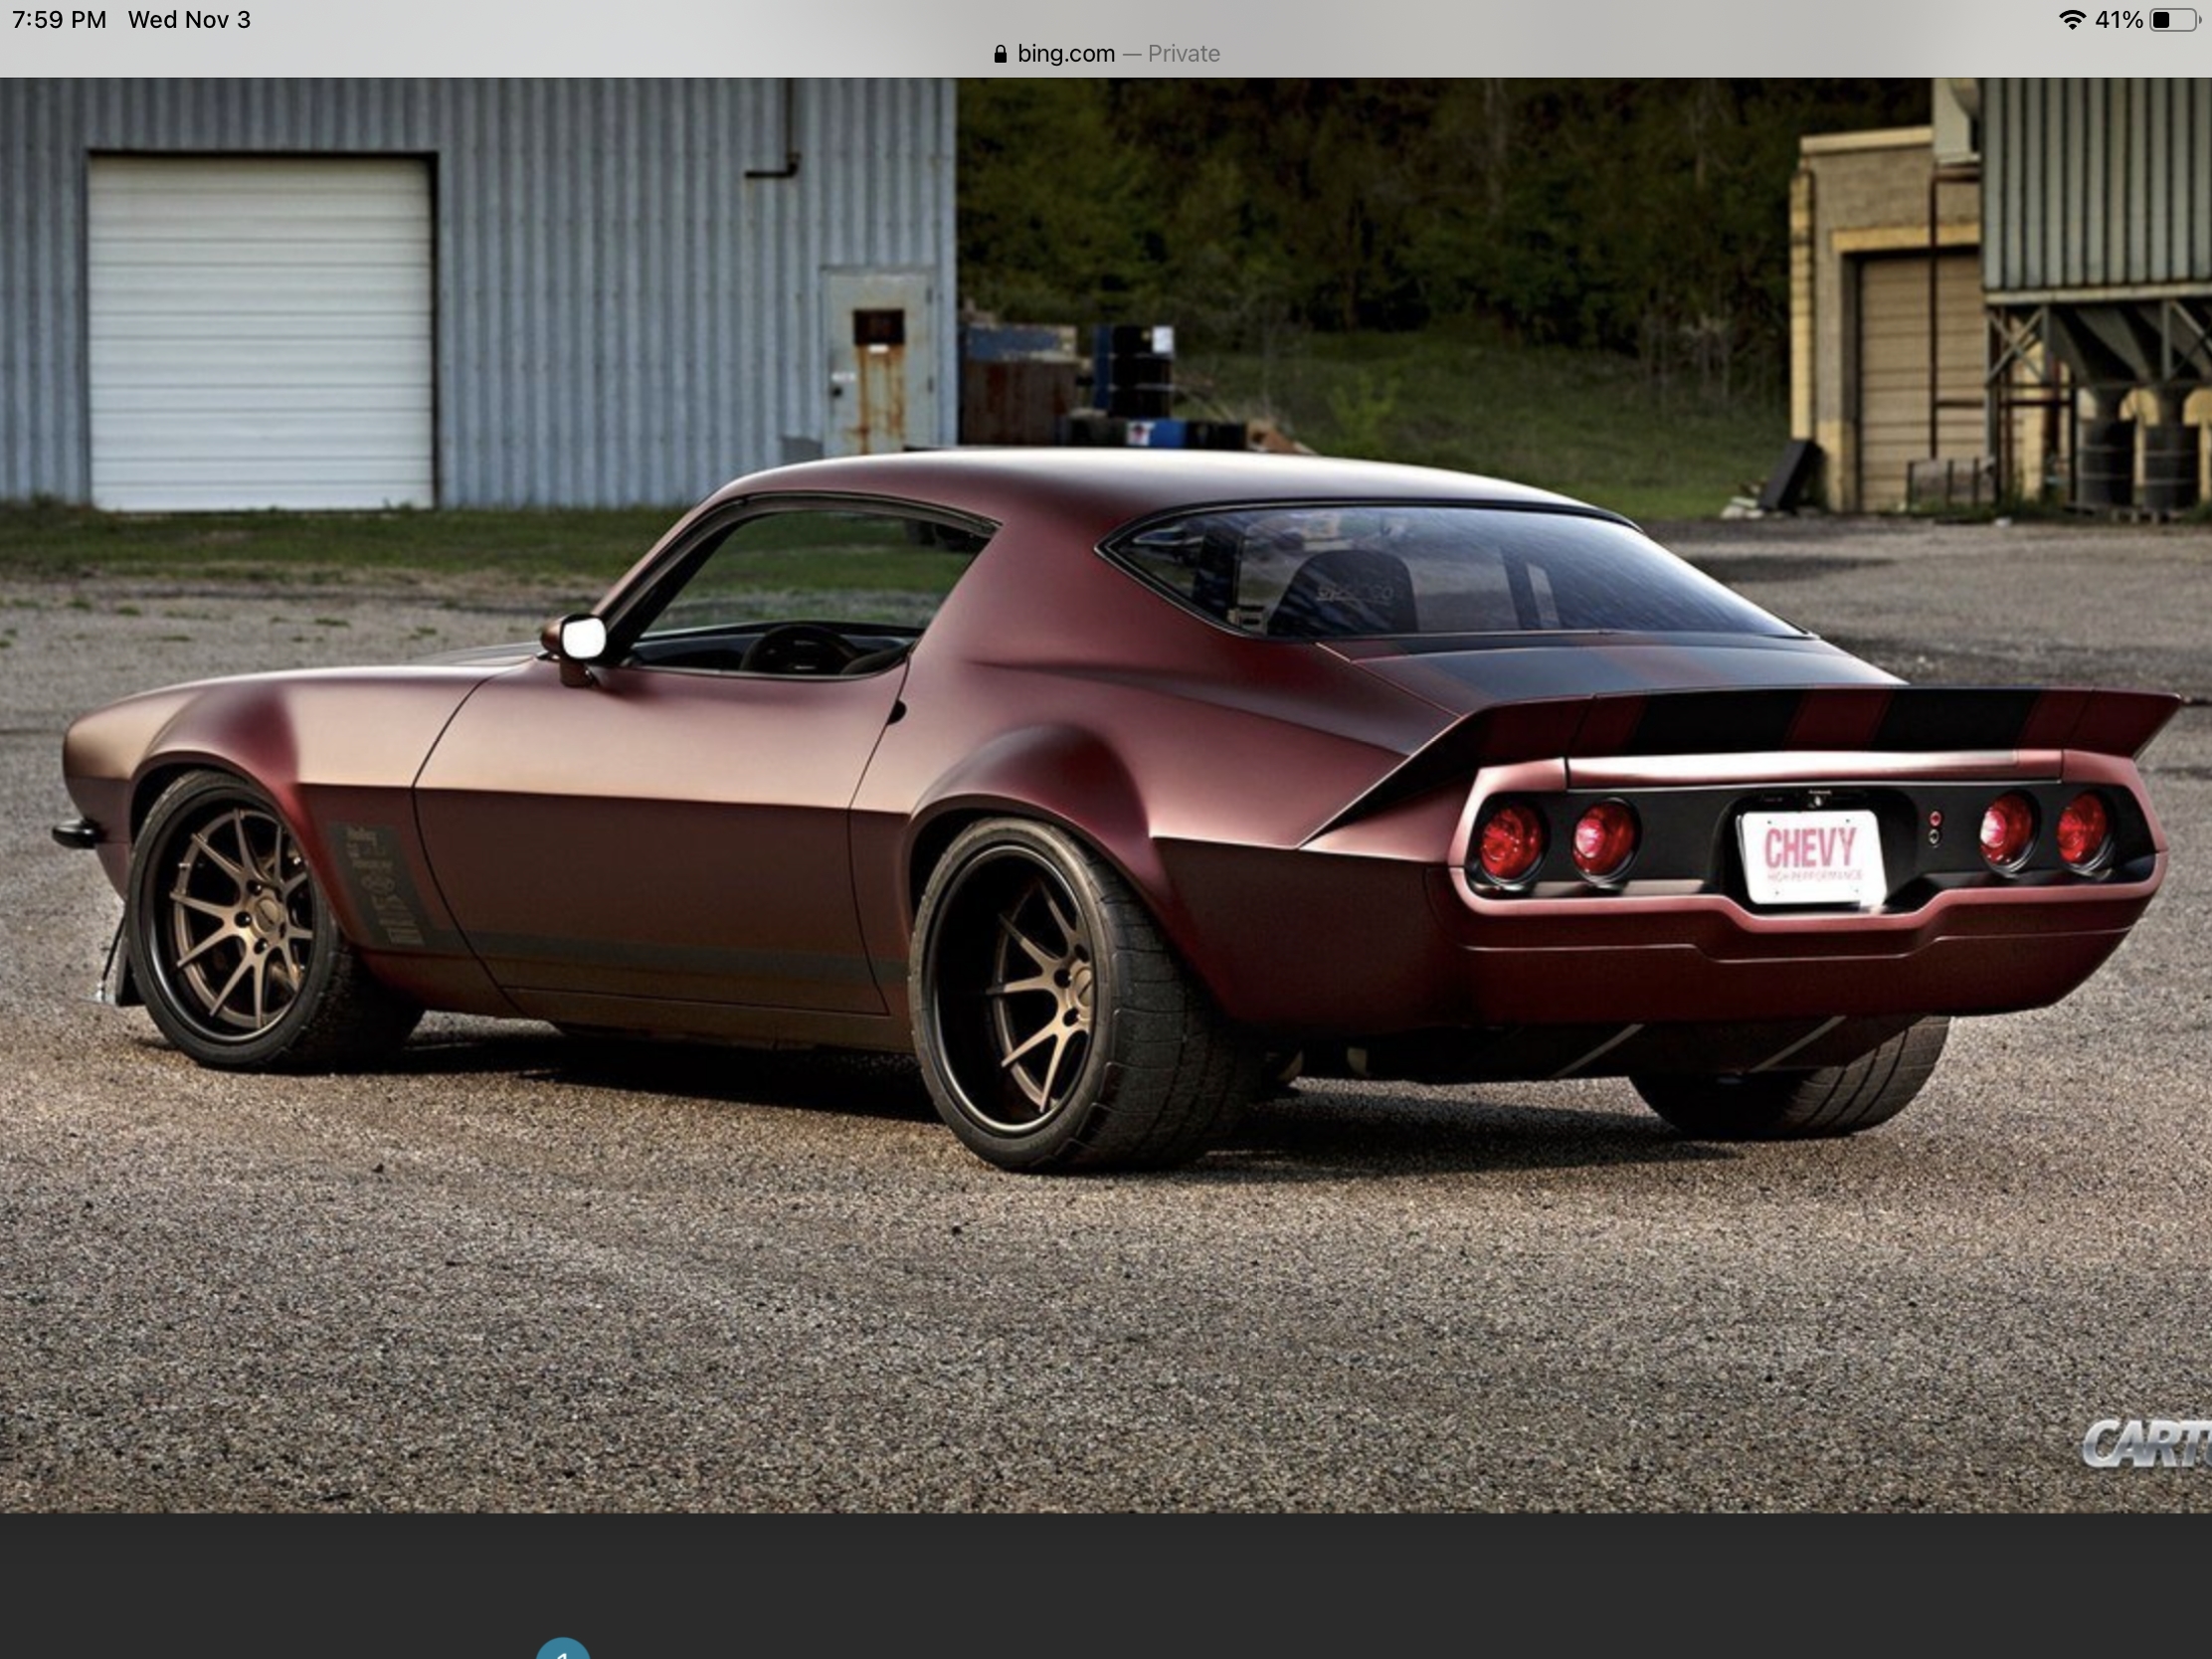
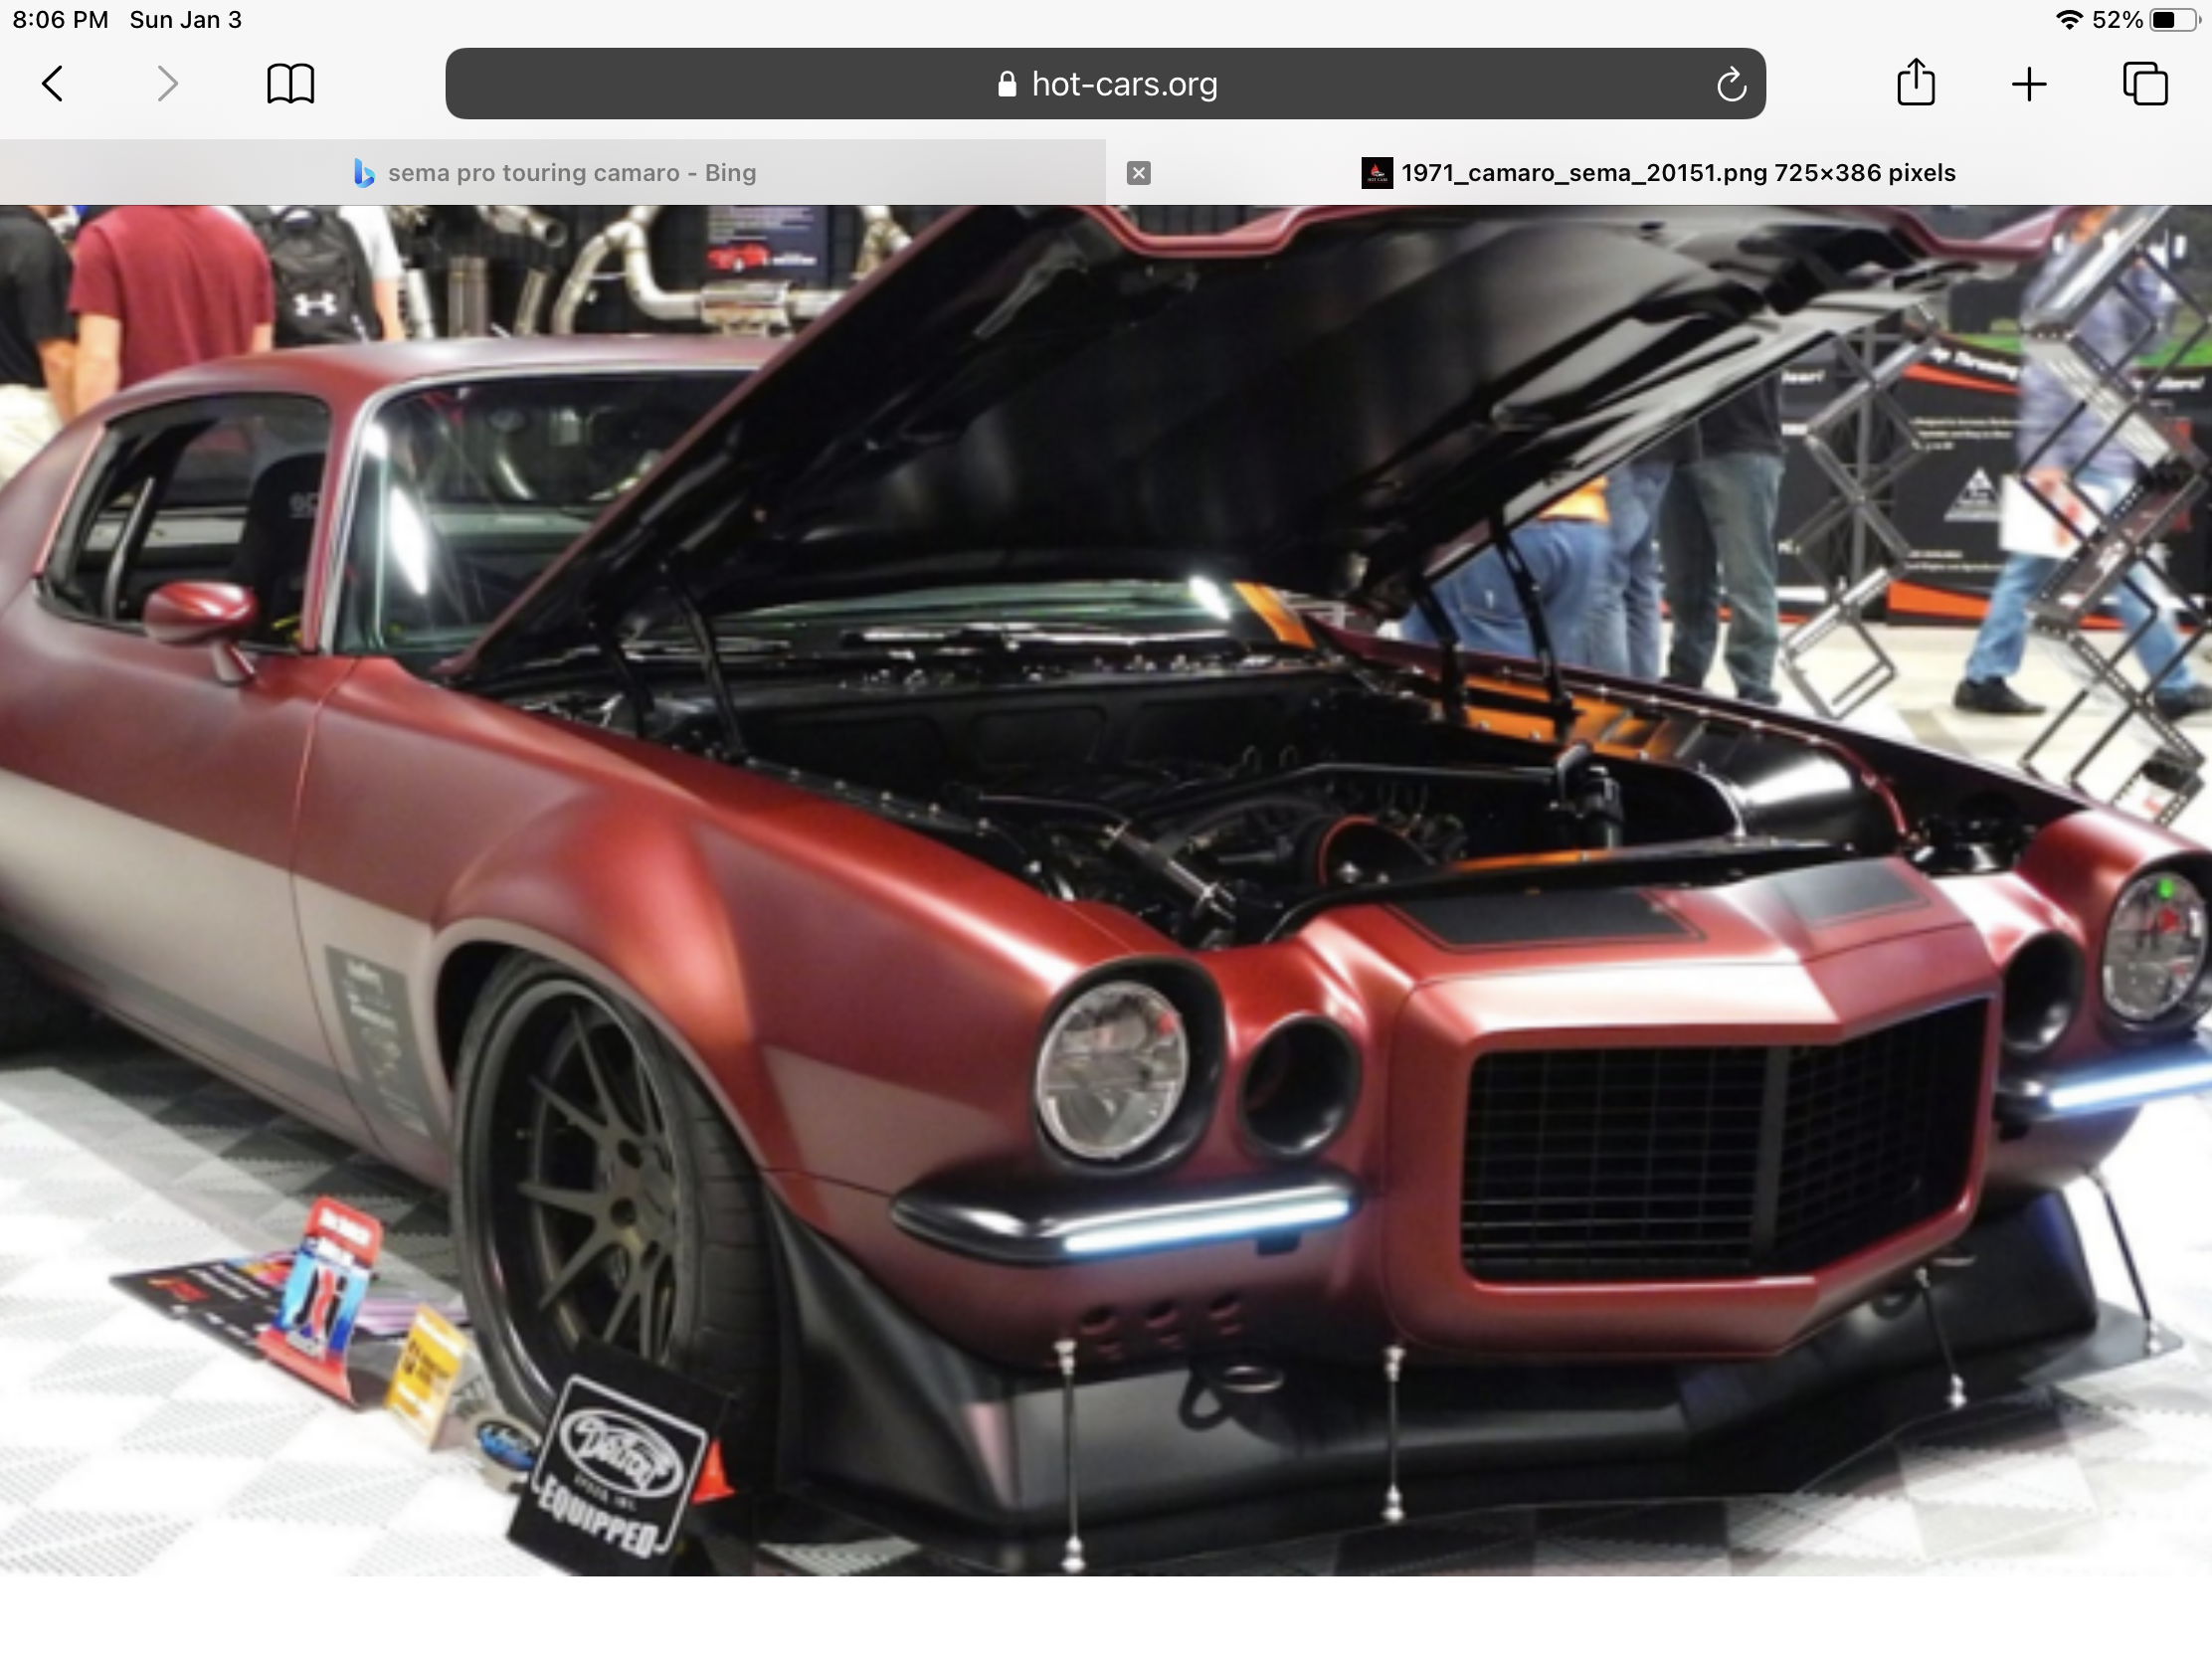
Hi guys, Time for the next build. I’m really liking the pro touring style of cars right now. I still like pro street too of course, and… well anything low. So here’s the inspiration. Dutchboys 71 Camaro built for the 2015 SEMA show. I haven’t done a deep dive on the car, just some images online. I fell in love the second I saw this beast. The colour is absolutely killer. I will not be doing an exact replica, but I intend to capture the overall look of the car. For any of you that saw my 300c build, that was a build to prep for this one. As I understand it, this car set the bar (and raised it) for all pro touring cars in 2015. Some of the mods include air intakes where the turn signals were to cool the brakes. Turn signals are in the front bumpers, not sure yet if I will do that, (still lots of planning and decisions to make) but it’s on my “maybe” list. I am going to replicate the door handles, and the trim will be black, I also intend to do my best to replicate the body colour. I’ve started work on the body and will post some pics of progress tomorrow. Cheers, Steve
-
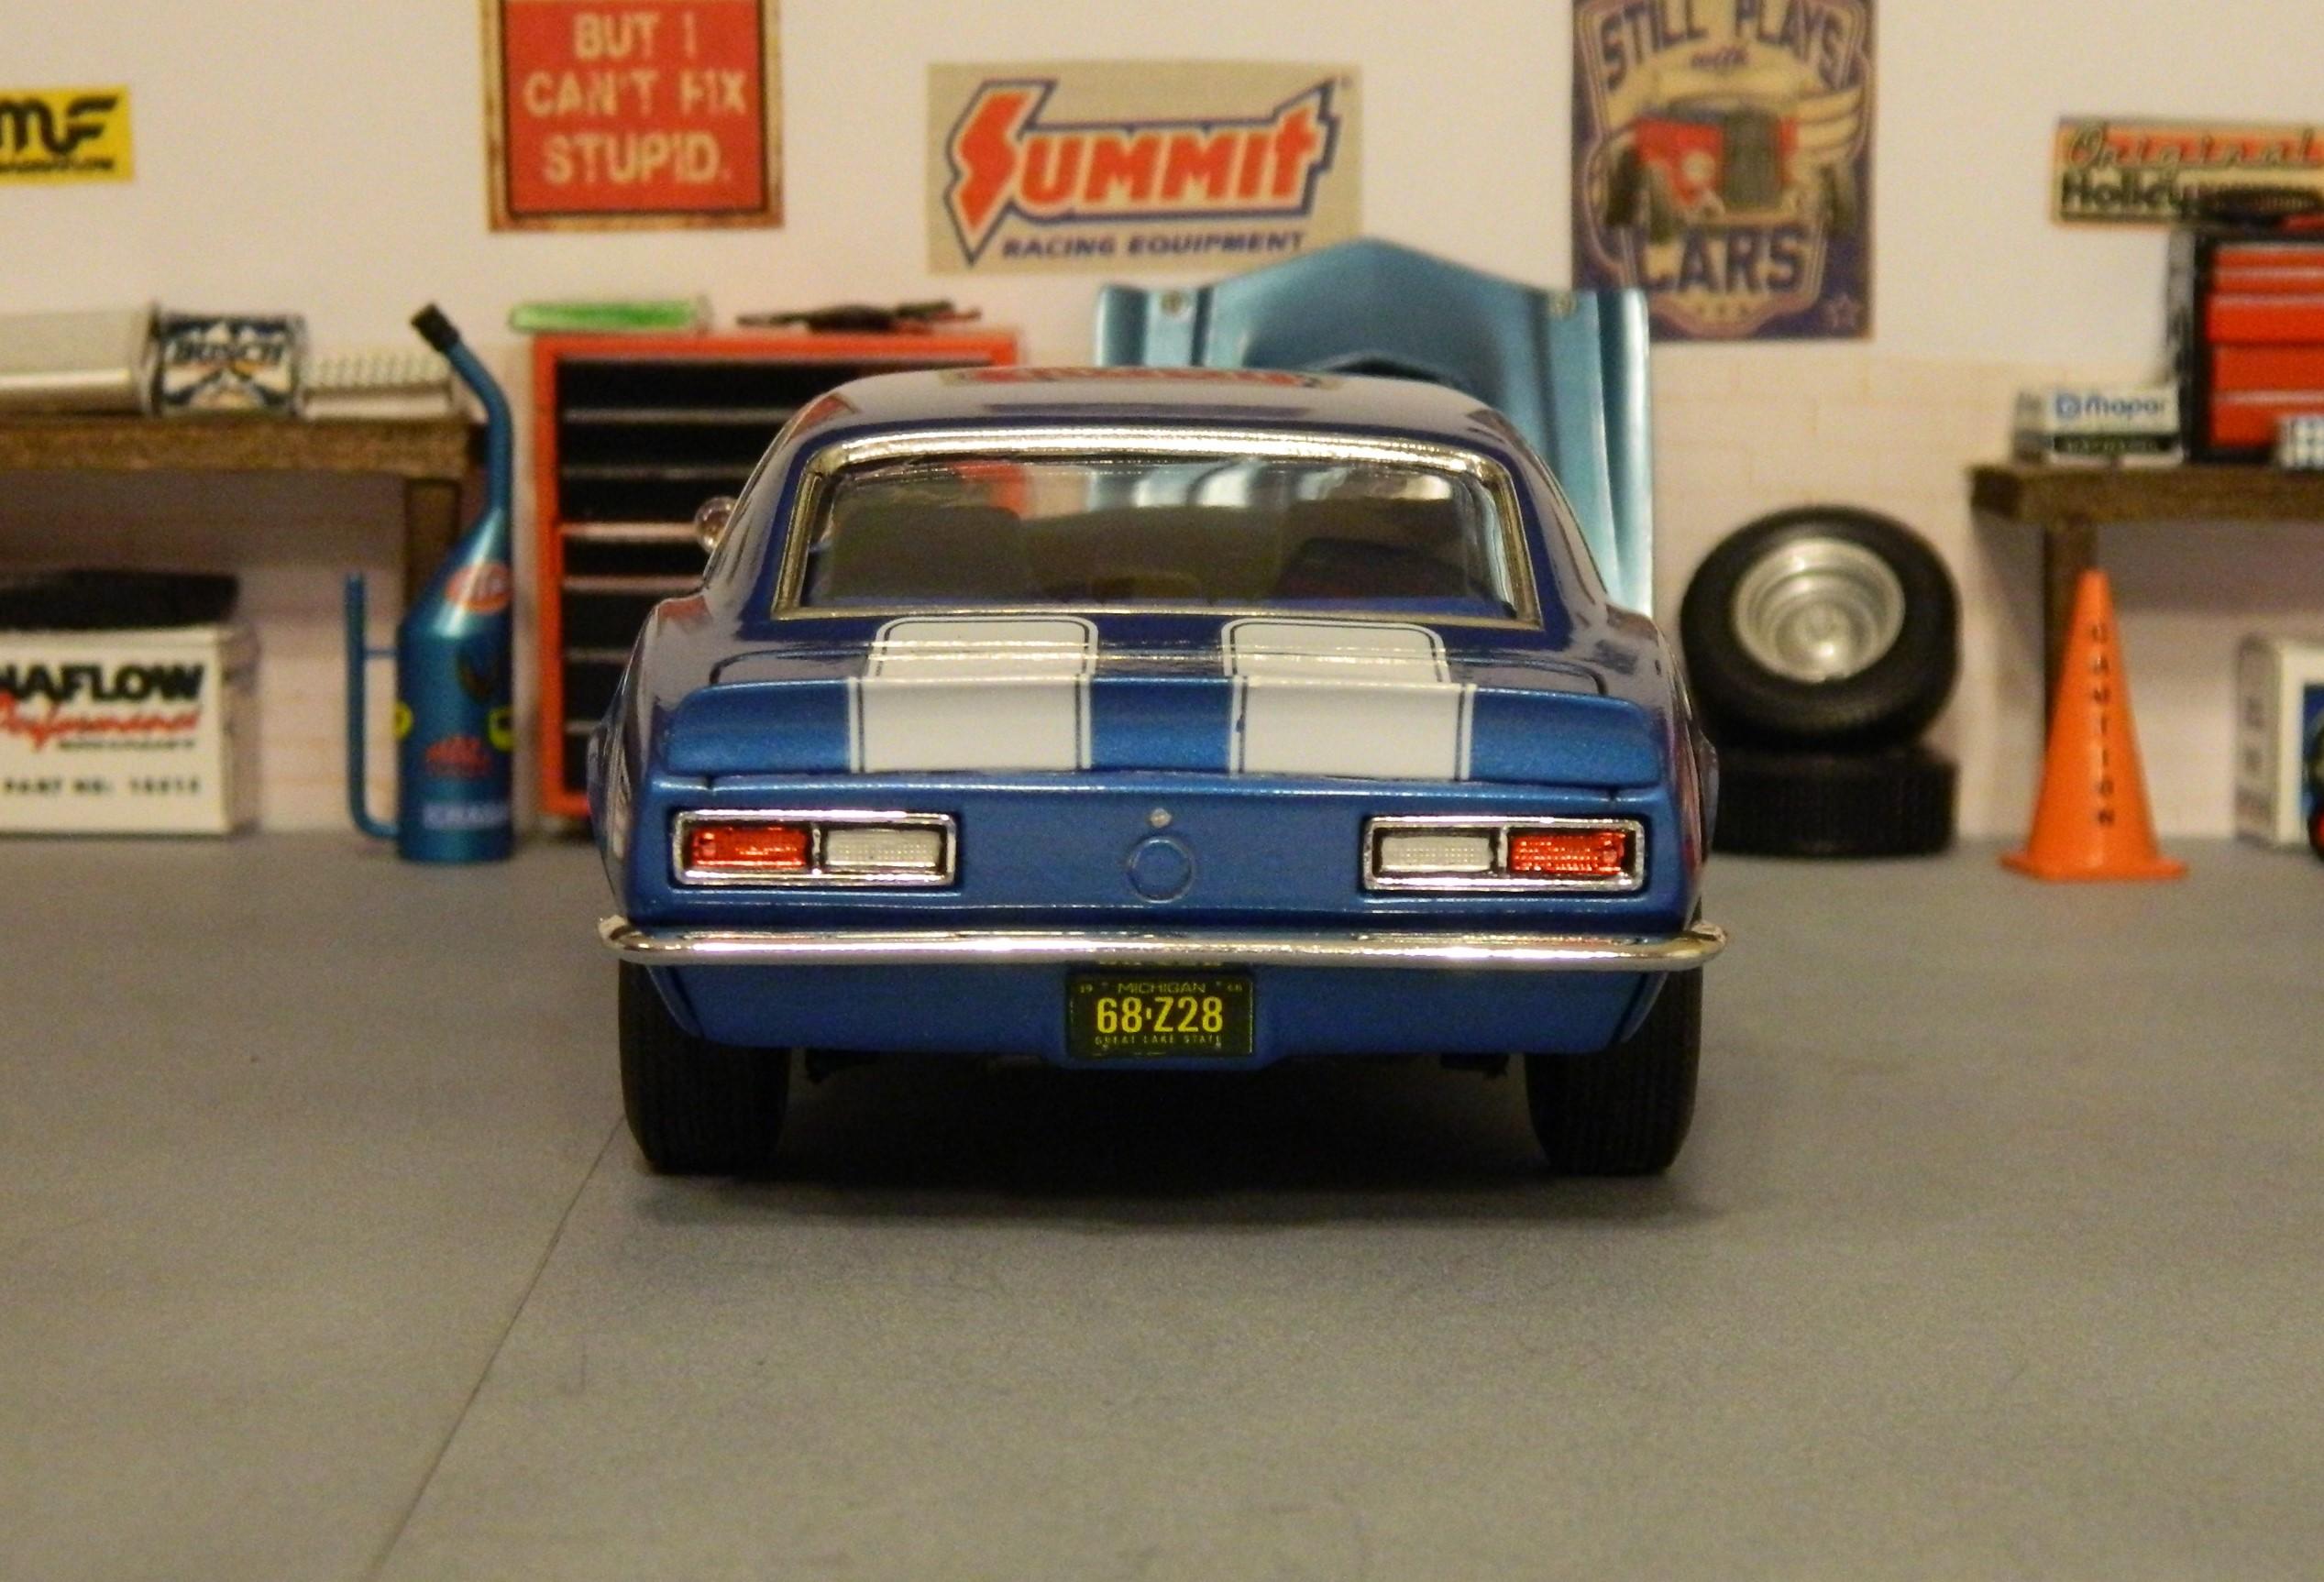
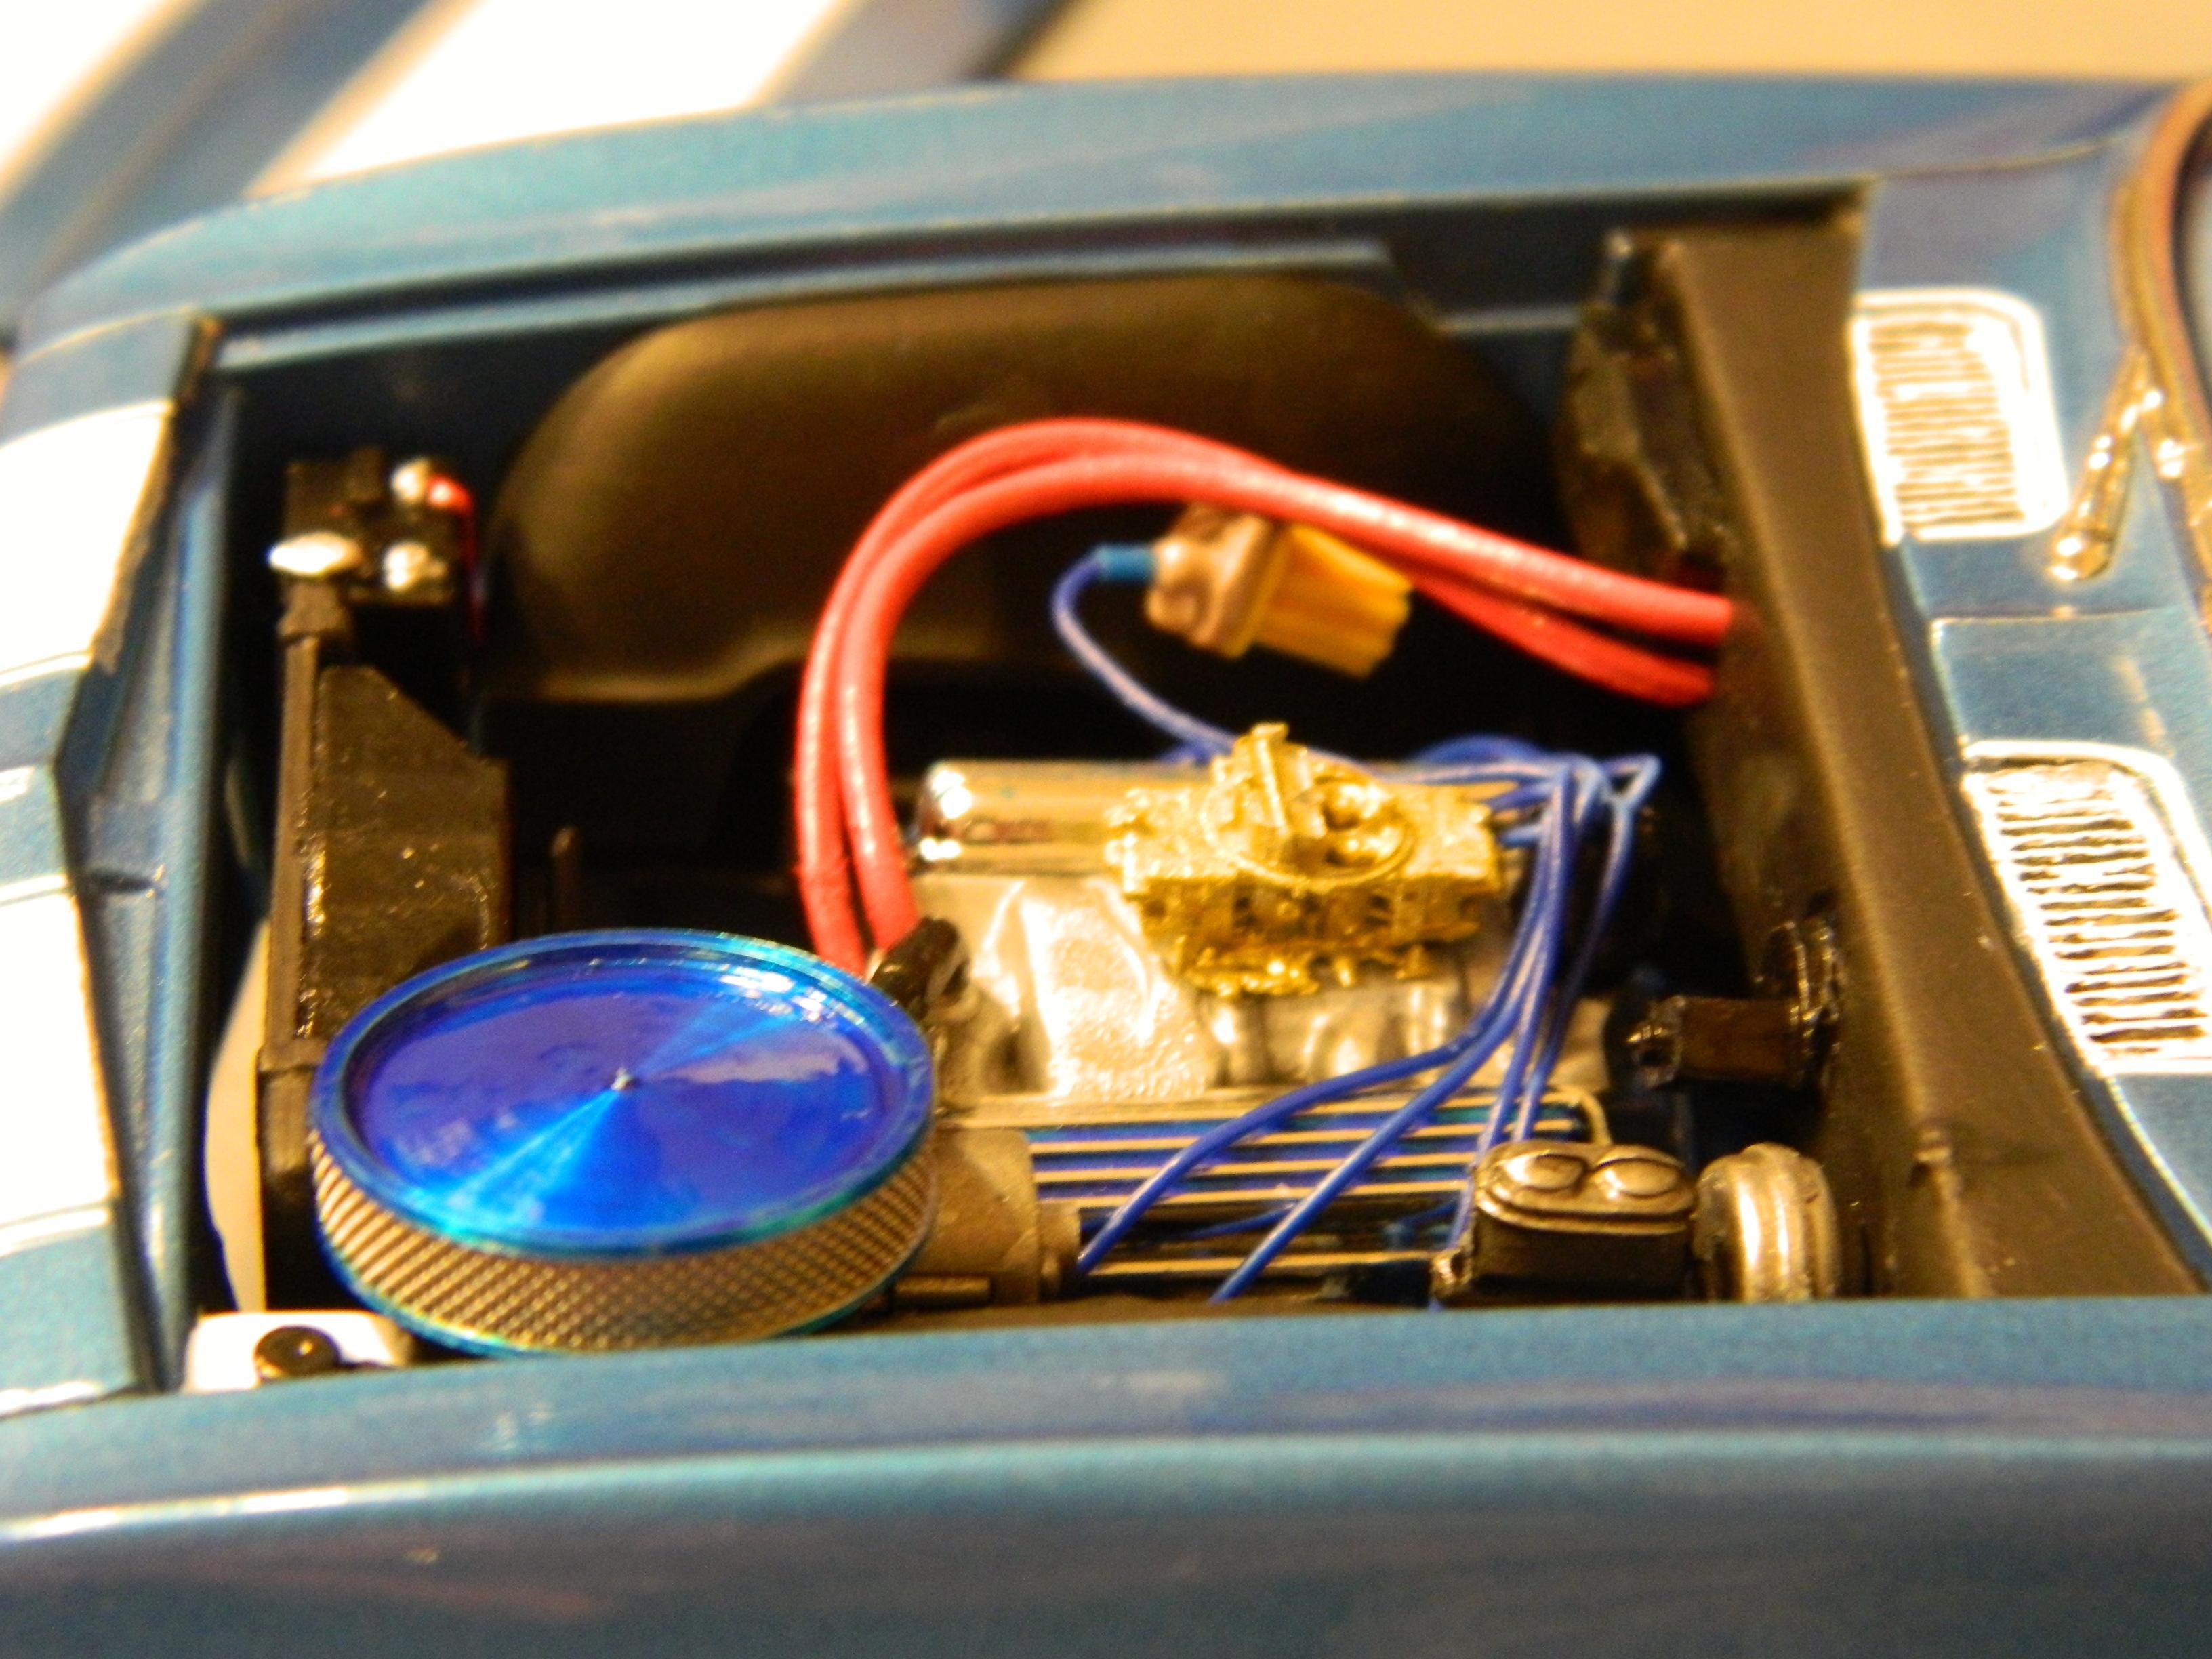
Here's the AMT 1968 Camaro Z28 that I finished over the weekend. It's painted in Model Master Nassau Blue Metallic, and cleared with Model Master Clear Gloss. I gave it the usual wet-sand, polish, and wax treatment. The interior is two different mixtures of craft paints, one for the seats, door panels and dashboard, and the other for the carpet area and rear shelf. The wheels are from MAD Modeling, and were airbrushed with Molotow Chrome from a refill pen, and the spokes were painted with Anita's Galvanized Tin. The air cleaner is a machined unit from Off The Sprue, the carburetor is from Fireball Modelworks. The trim was done with Bare Metal Foil, and I added valve stems, ignition wires, and heater hoses for extra detail. This was a typical older mold from AMT with a not-so detailed one piece interior tub, but it did go together really well and was a really fun build, so a definite thumbs-up from me. Thanks for looking!
-
hi everyone !😄 this is my REVELL 1/25 '69 camaro,an very nice kit and easy to build!! hope you guys like it!!🙂 and here is the video build if you are interested..🙂
-
Building the amt 69 camaro convertible. Simple kit to get me back into modeling. Goes together pretty good. Thanks for looking
-
Hey its gettin warmer,,happy spring to all. Just finished the AMT 70 1/2 Camaro,,I wanted it orange,,similar to box art,,but I used flat black primer,, sprayed w/Testors quikdry "Flaming orange" it turned out "Rootbeer Brown metallic" ,,which is ok too I guess. I should have used red or orange primer to get a better orange effect. Changed out the kit tires with some larger /wider profile,,added some basic wiring in Ebay,,made some seat belts from x-tras bx ,,hand painted the trim work. I do use BMF at times but not all the time,,depends on how crisp the molding work is on the kit to begin with. `Fun kit to do,,now on to my 68' Shelby GT-500 in pearl green,with the drag pack version! Thanks for lookin,,and get out and enjoy the warmer weather! Cheers.
-
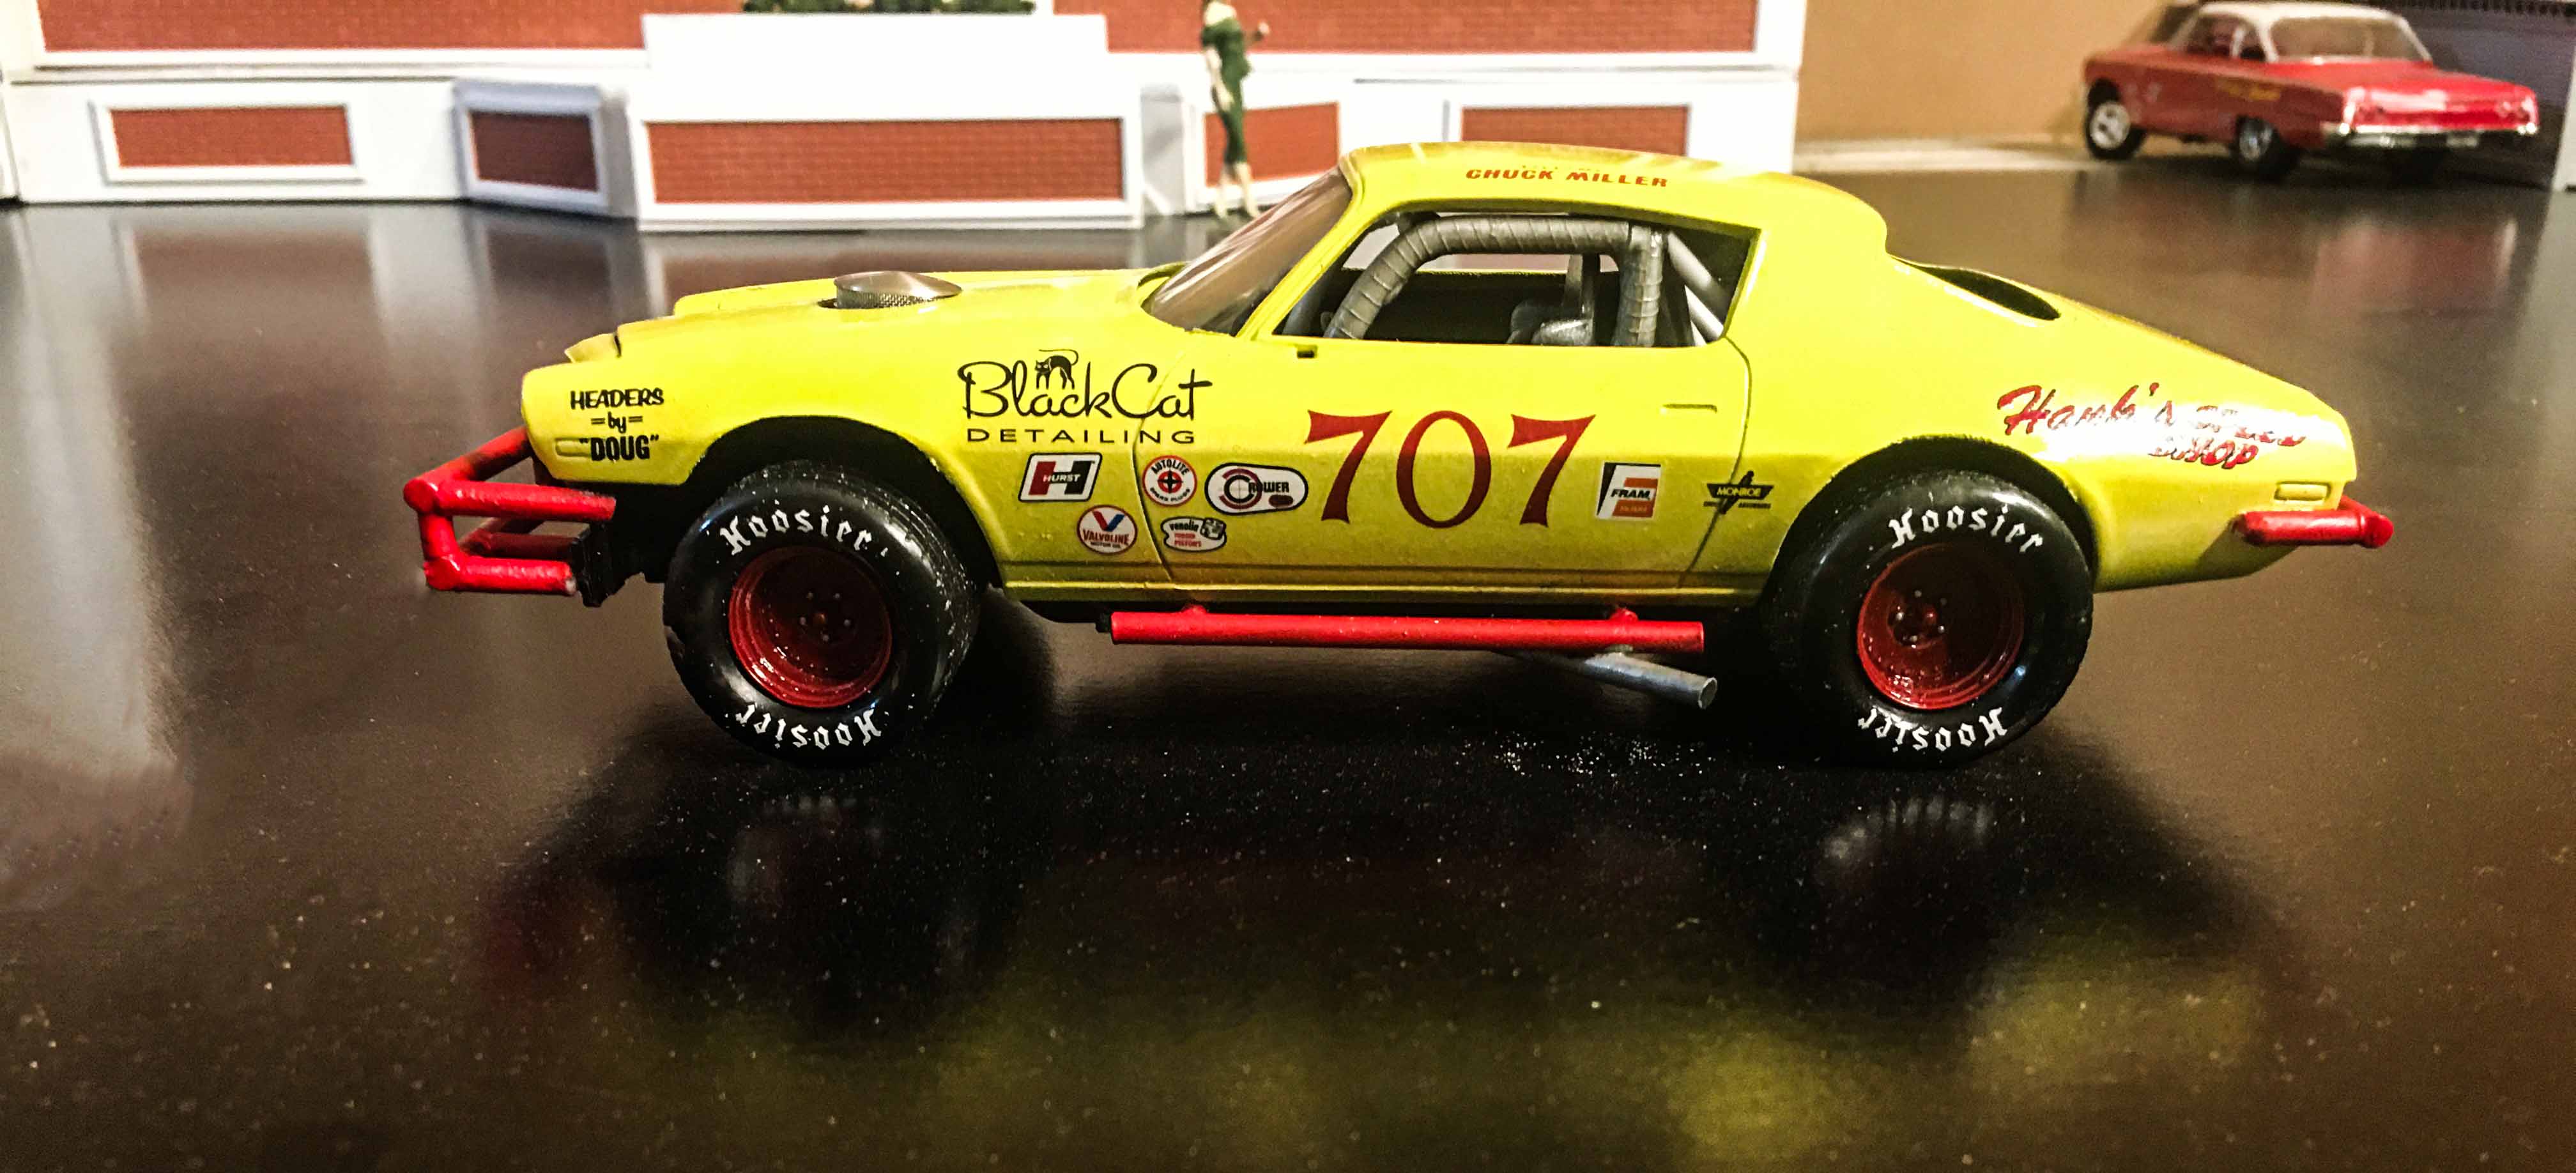
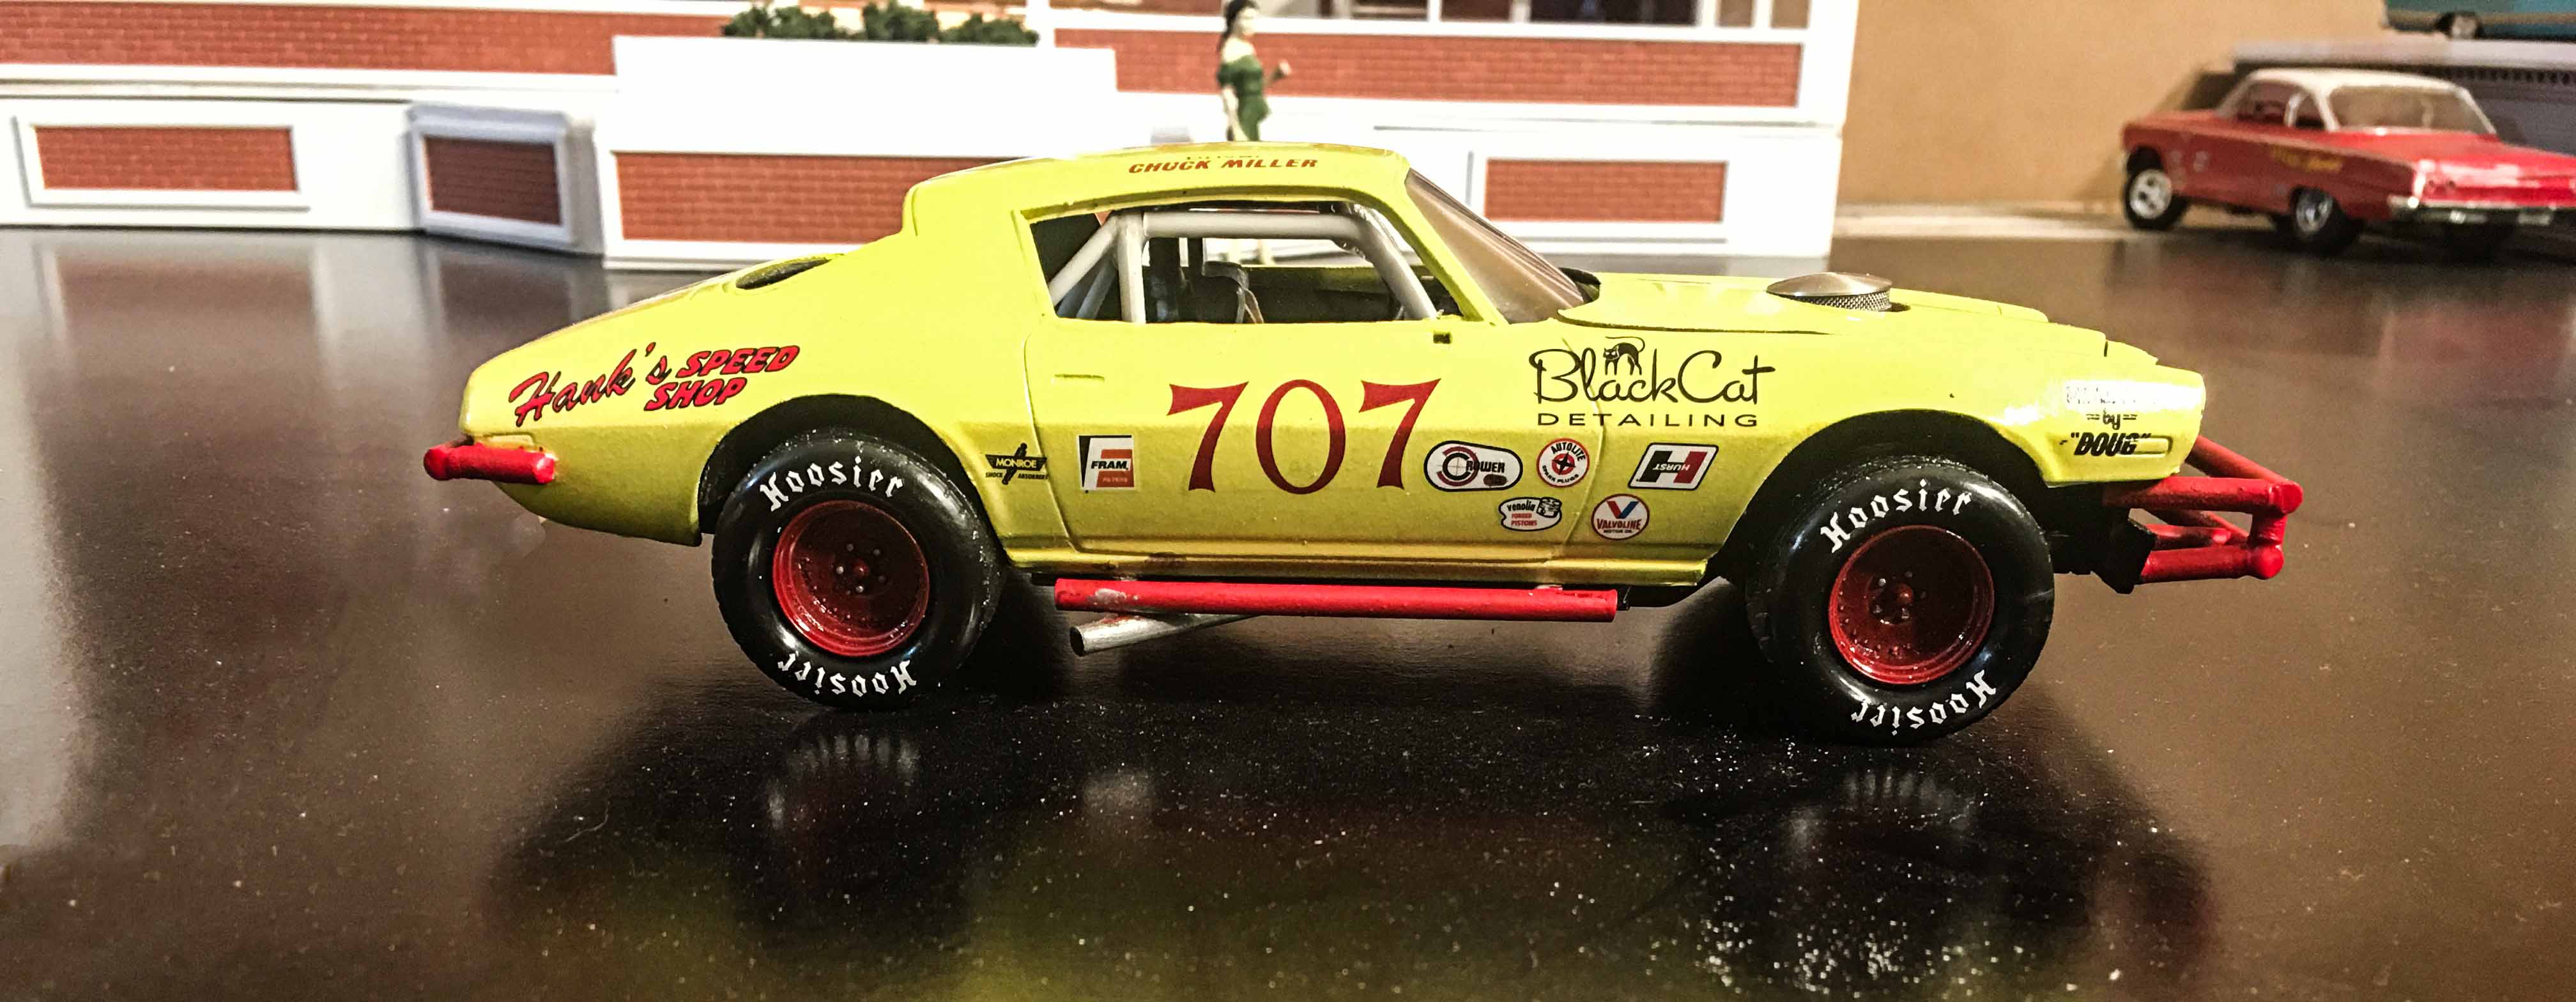
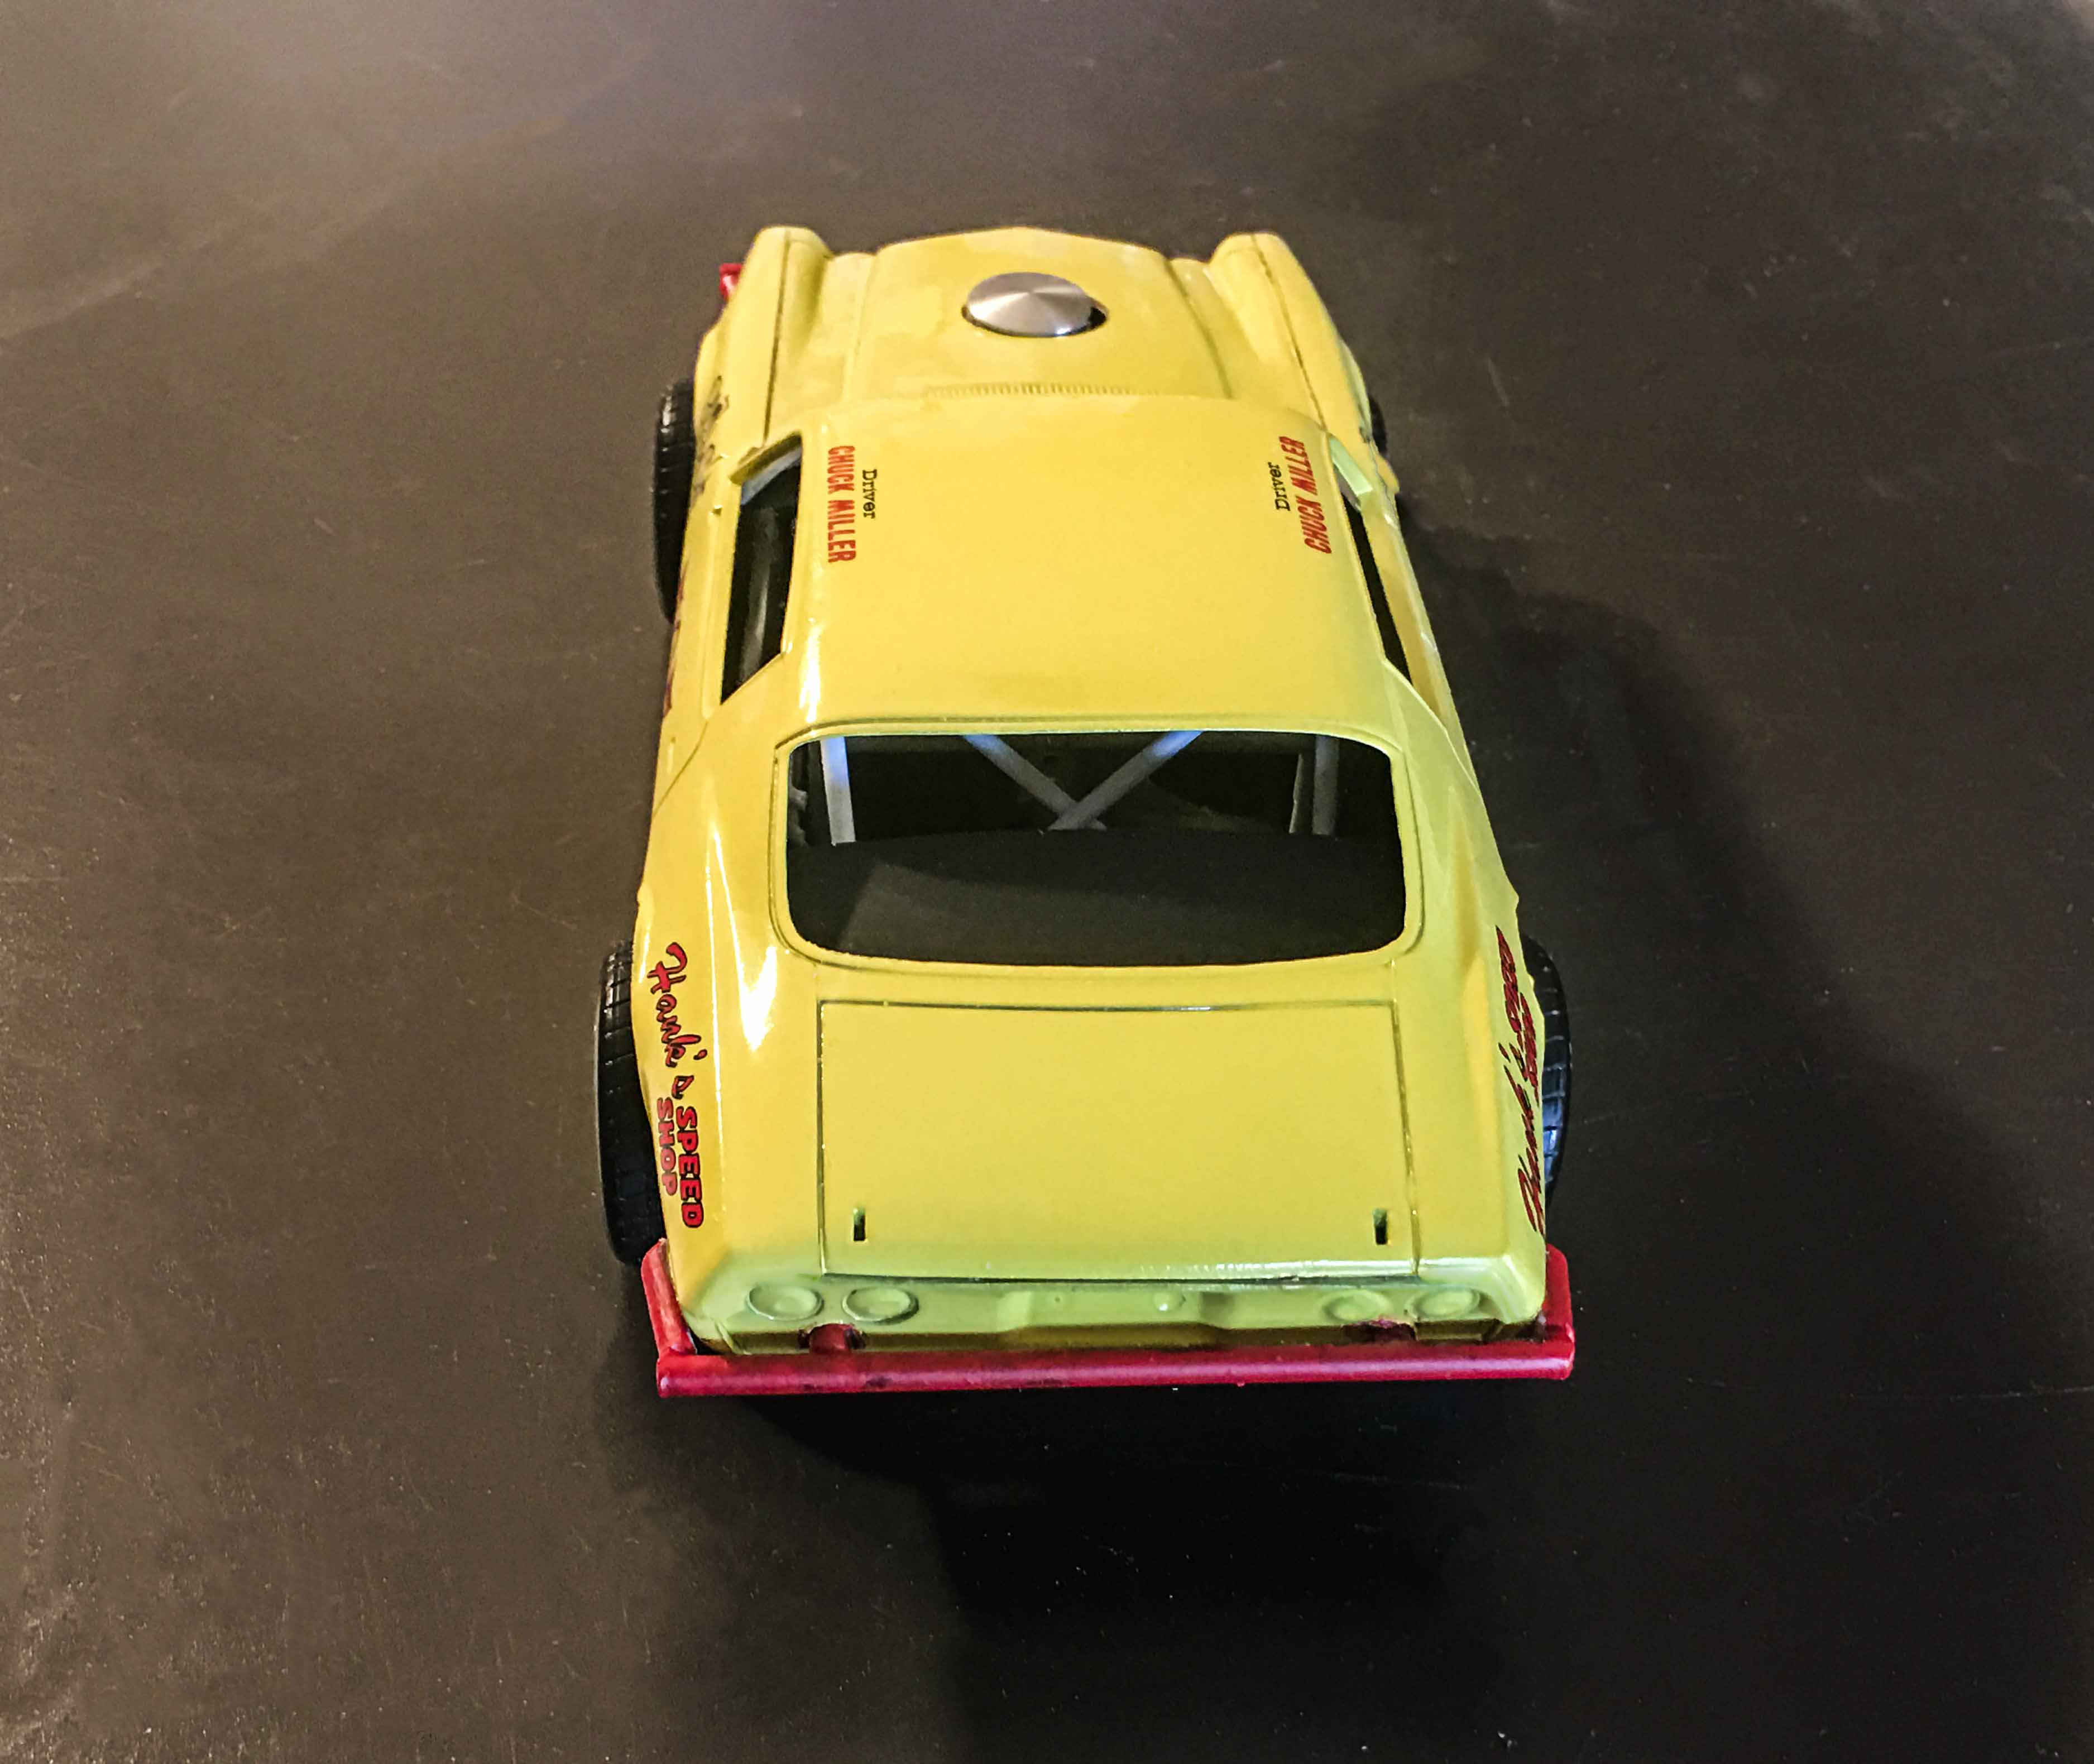
 My hometown of Oskaloosa Iowa had an amazing 1/2 mile dirt track, with Eldon Iowa, about 40 miles to the southeast, also having a very good 1/2 mile dirt oval. Both ran stock cars; Oskaloosa on Wednesday nights, and Eldon on Saturday nights. What I'm picturing here is a representative of what could be found on those tracks back in the 1970s.
-
Out soon:
-
Painted (I think) Testors Italian Red with ultra gloss clear, interior is Tamiya medium grey. This one is the original issue. Built box stock except for swapping out the 3 barrel for triple duces. Started in 2012 and just finished today. I had to super glue the top of the firewall to the body and then the front subframe to the body to get it all together. Frustrating kit for final fitting but looks good when done. Thanks for looking, all comments welcomed.
-
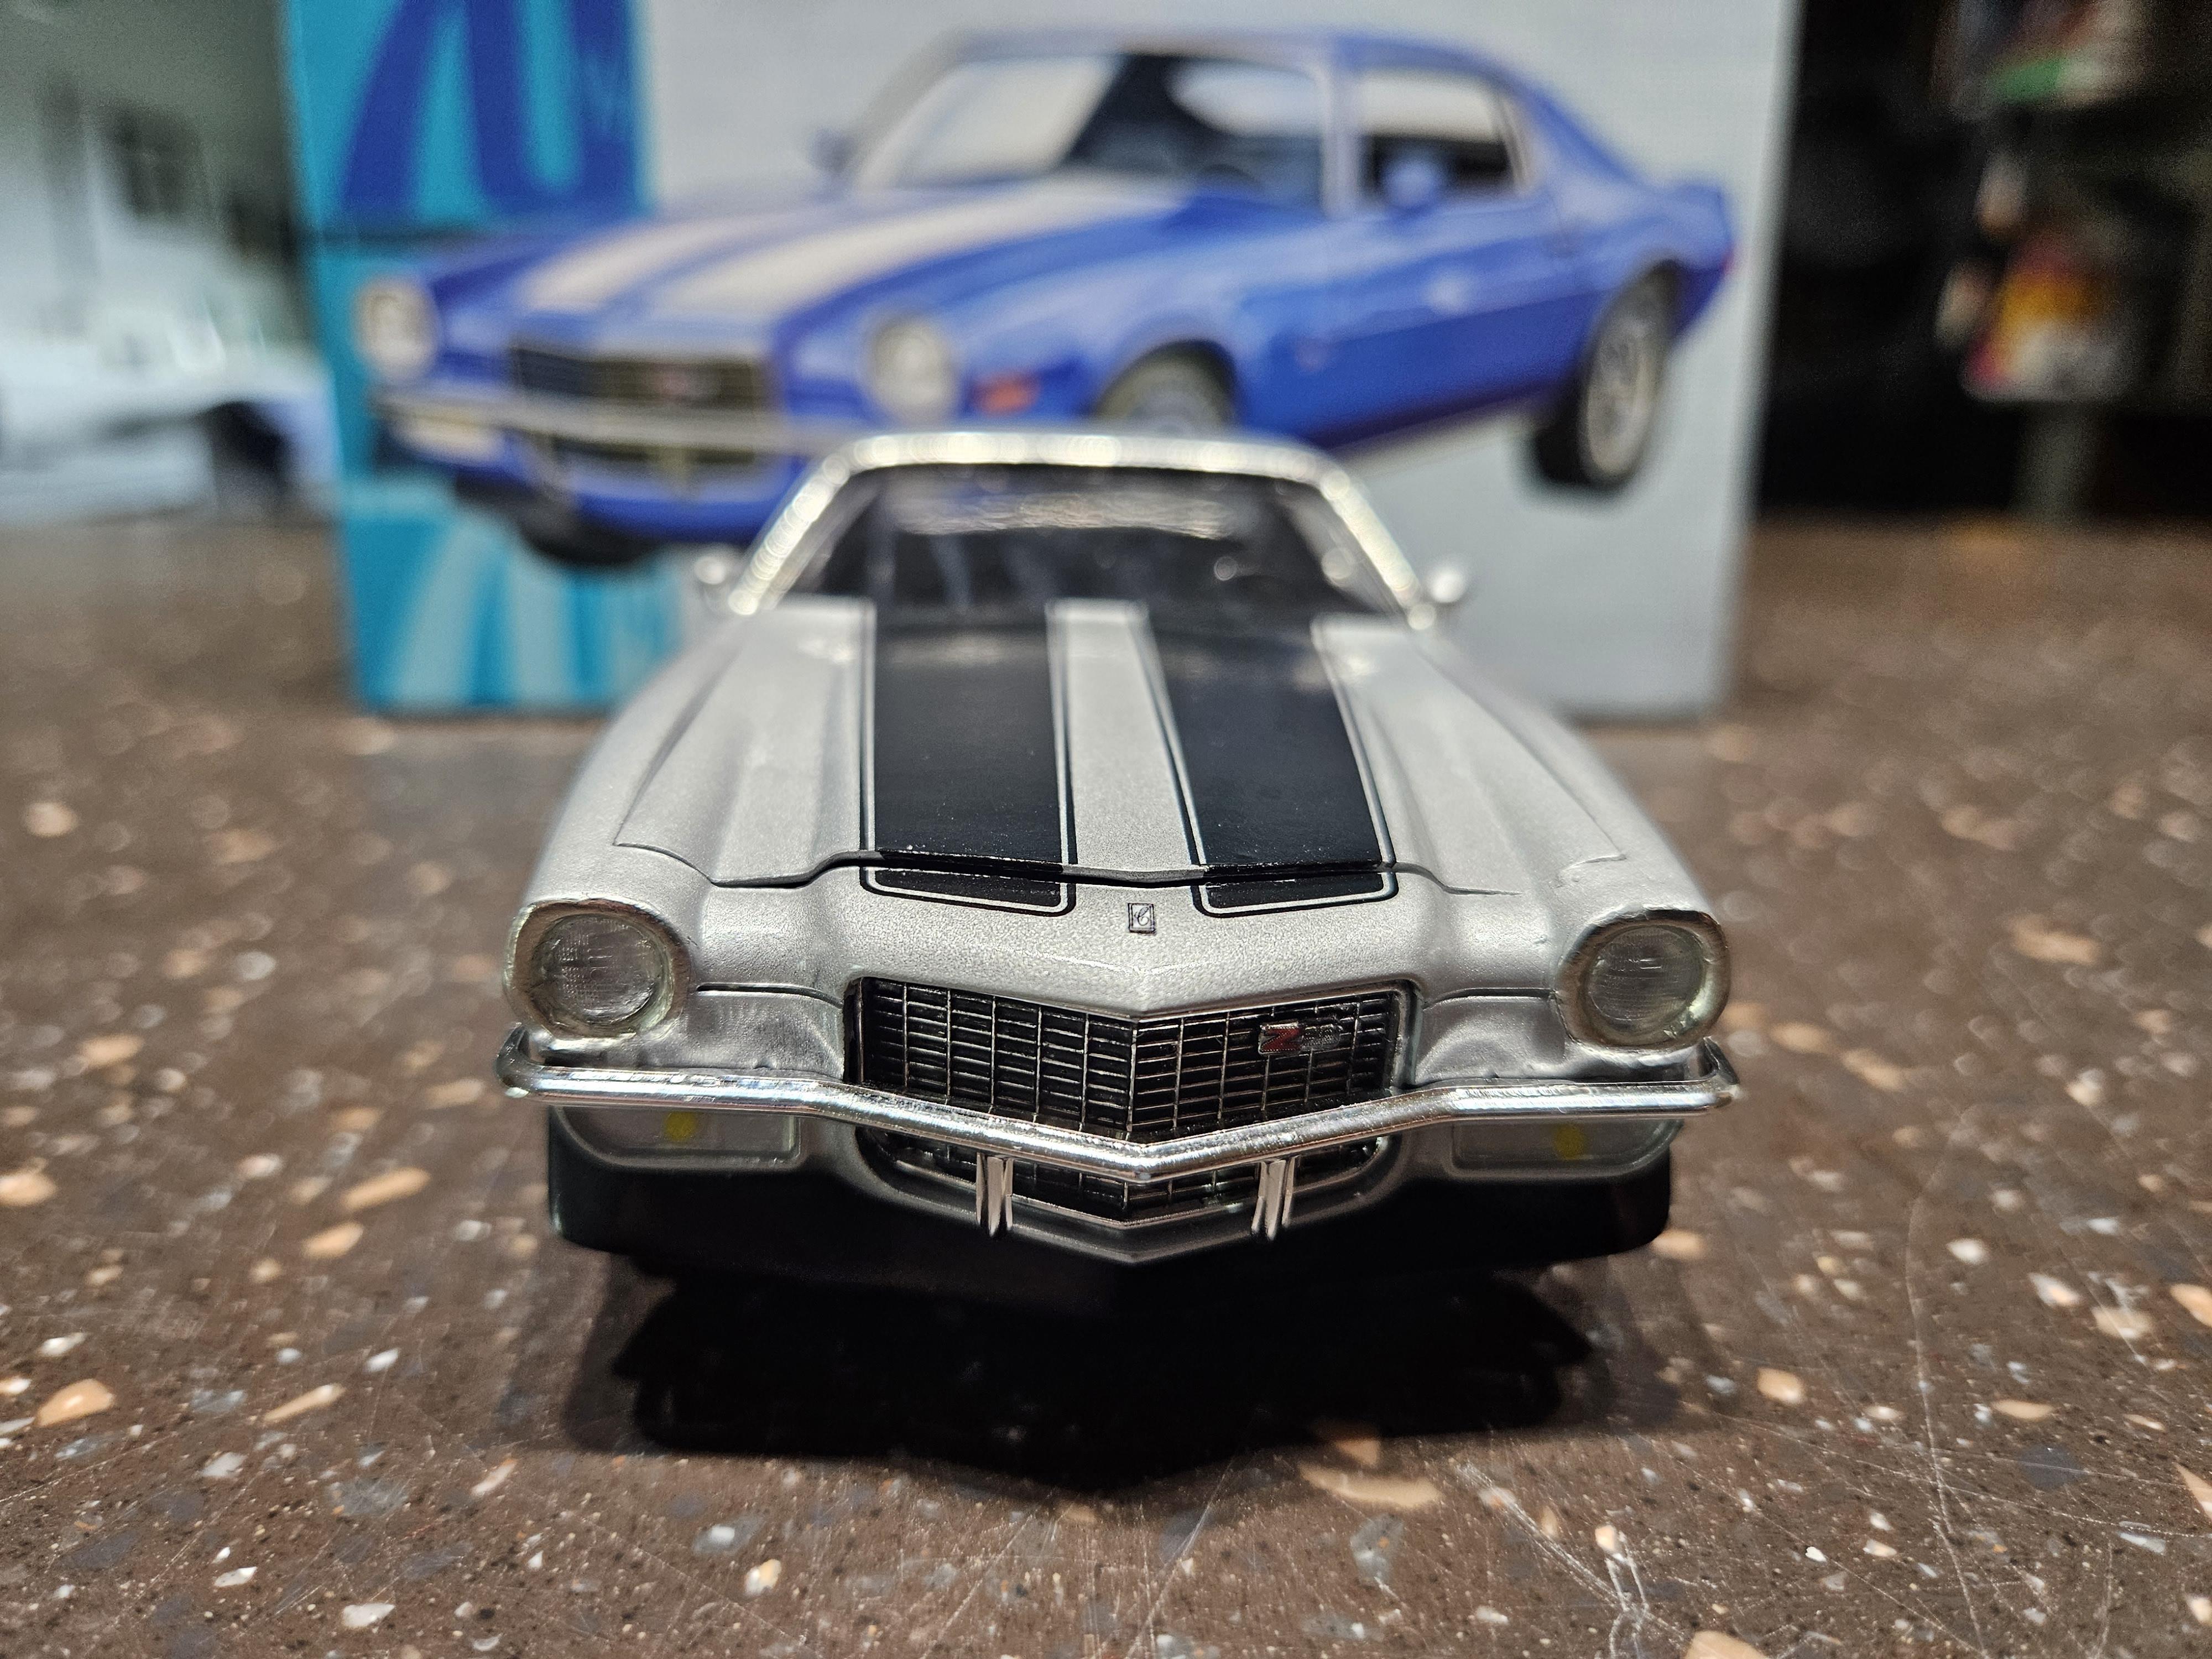
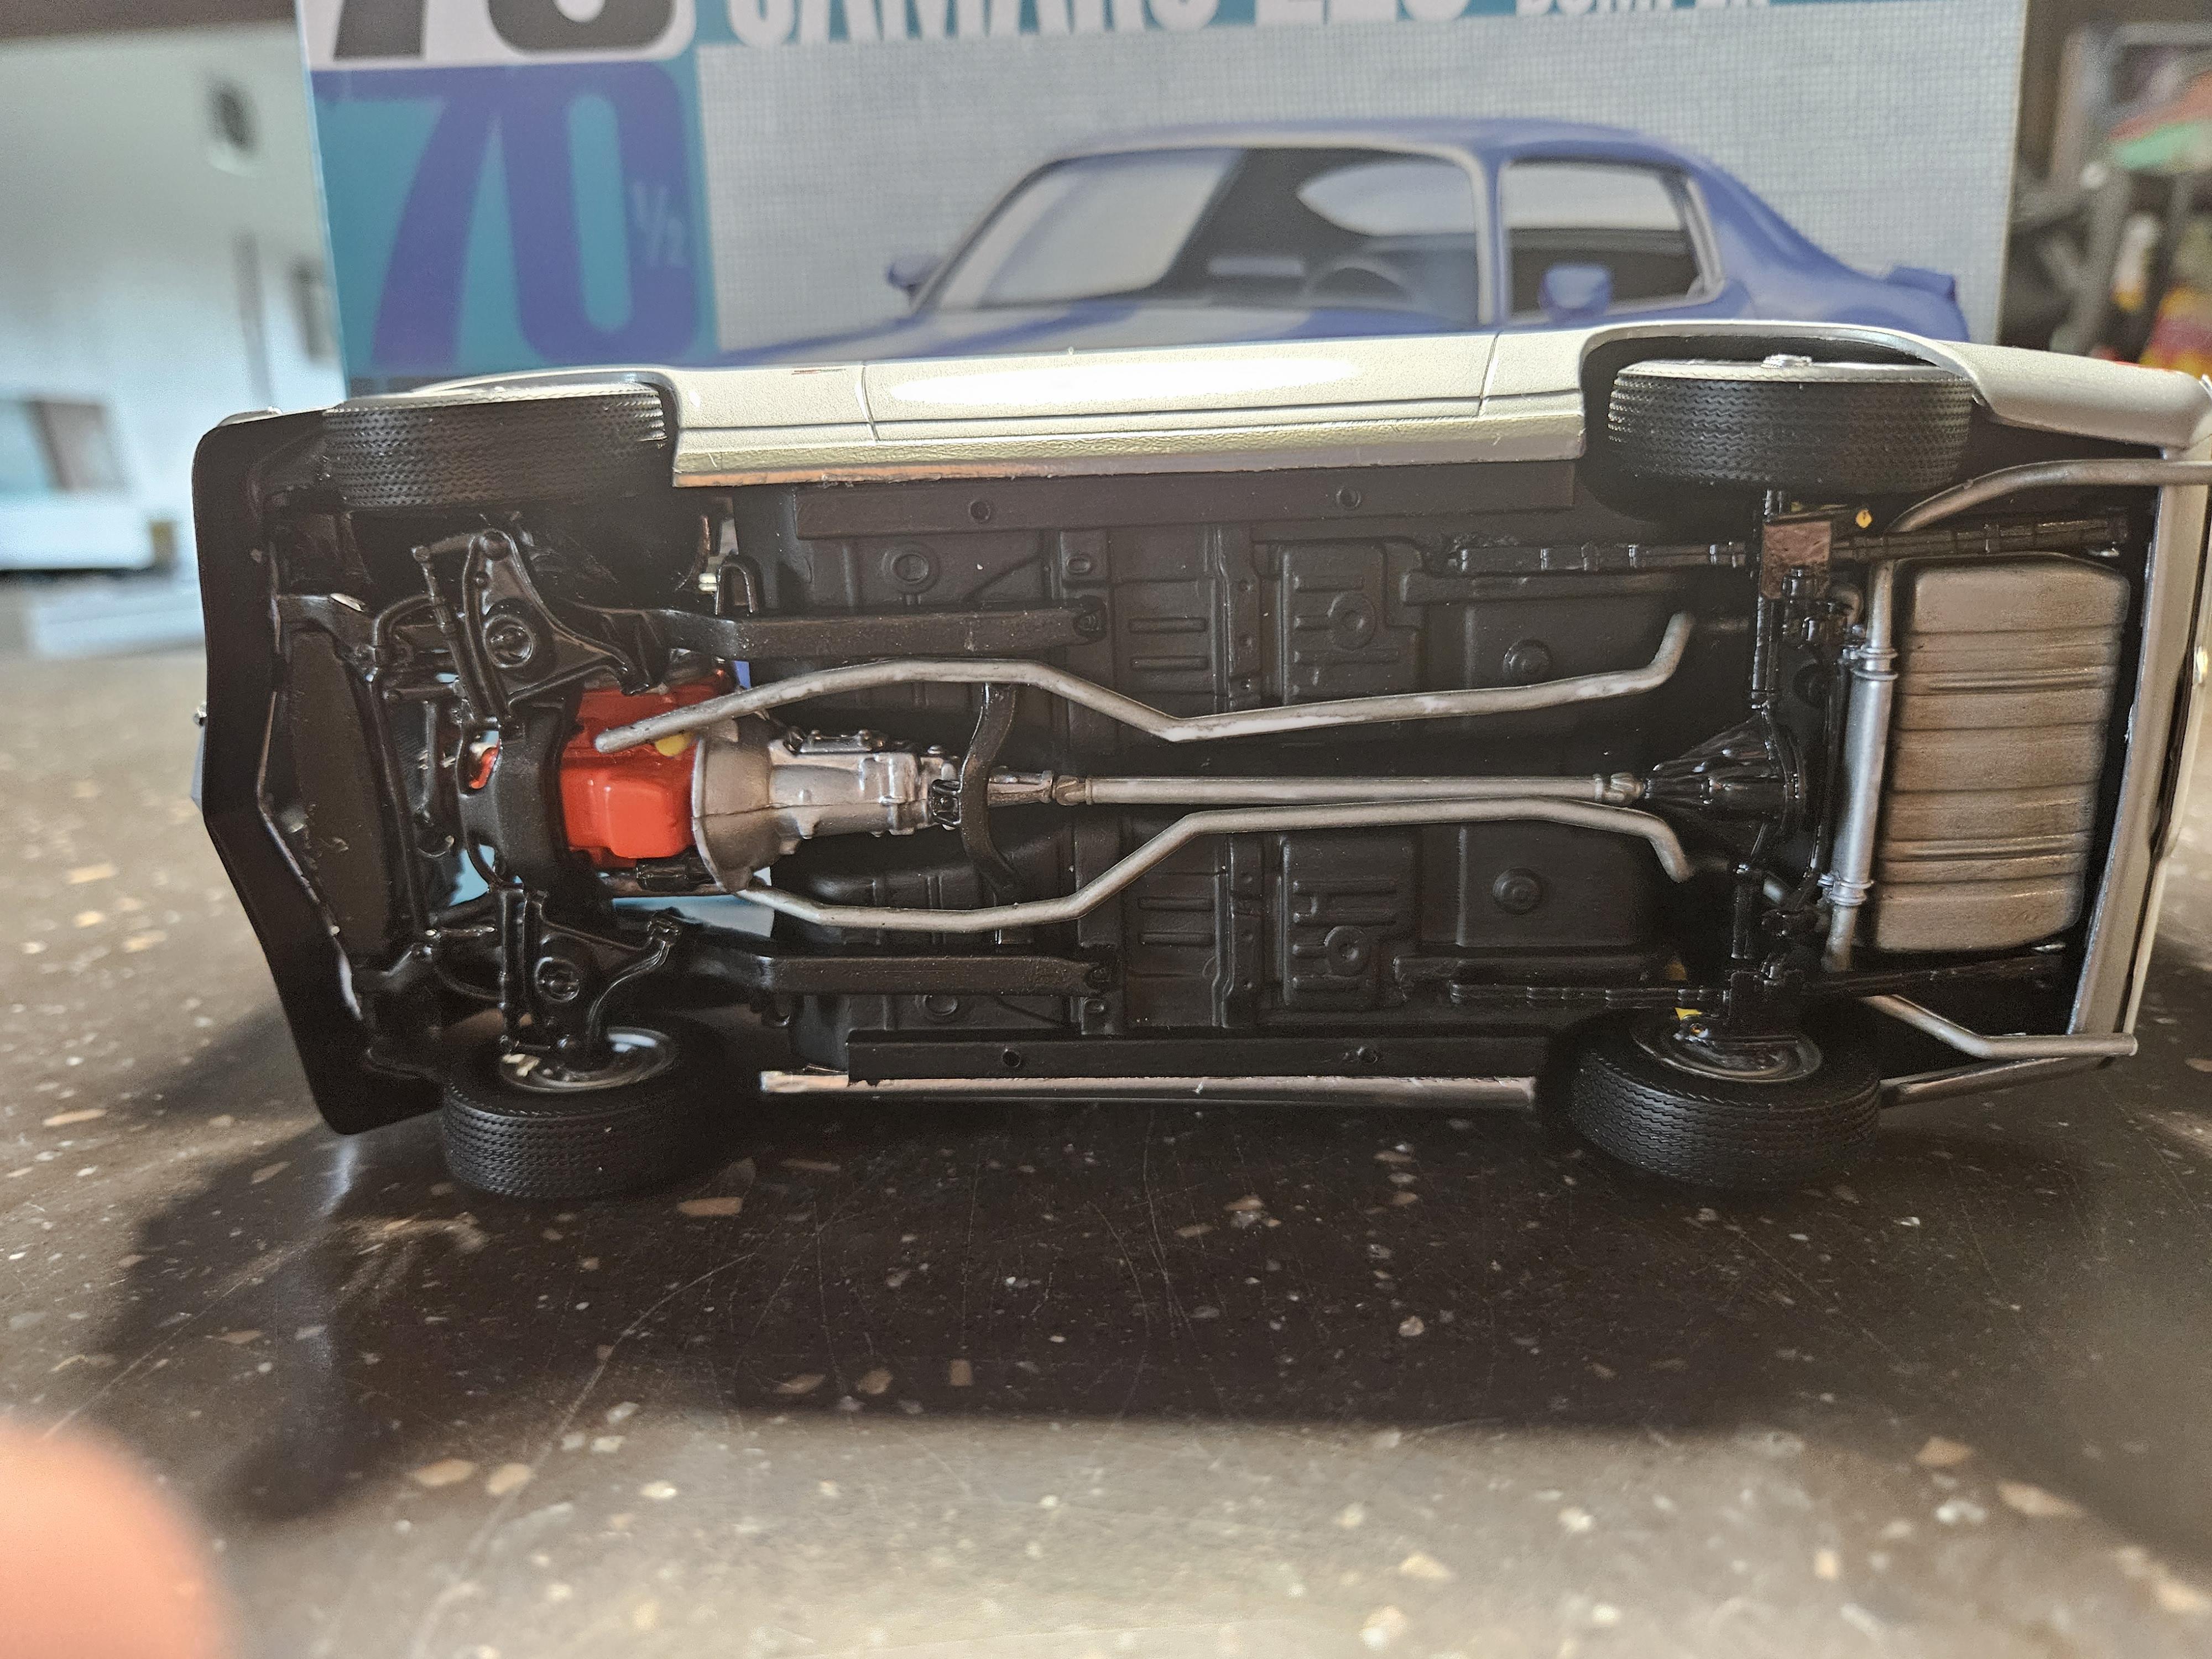
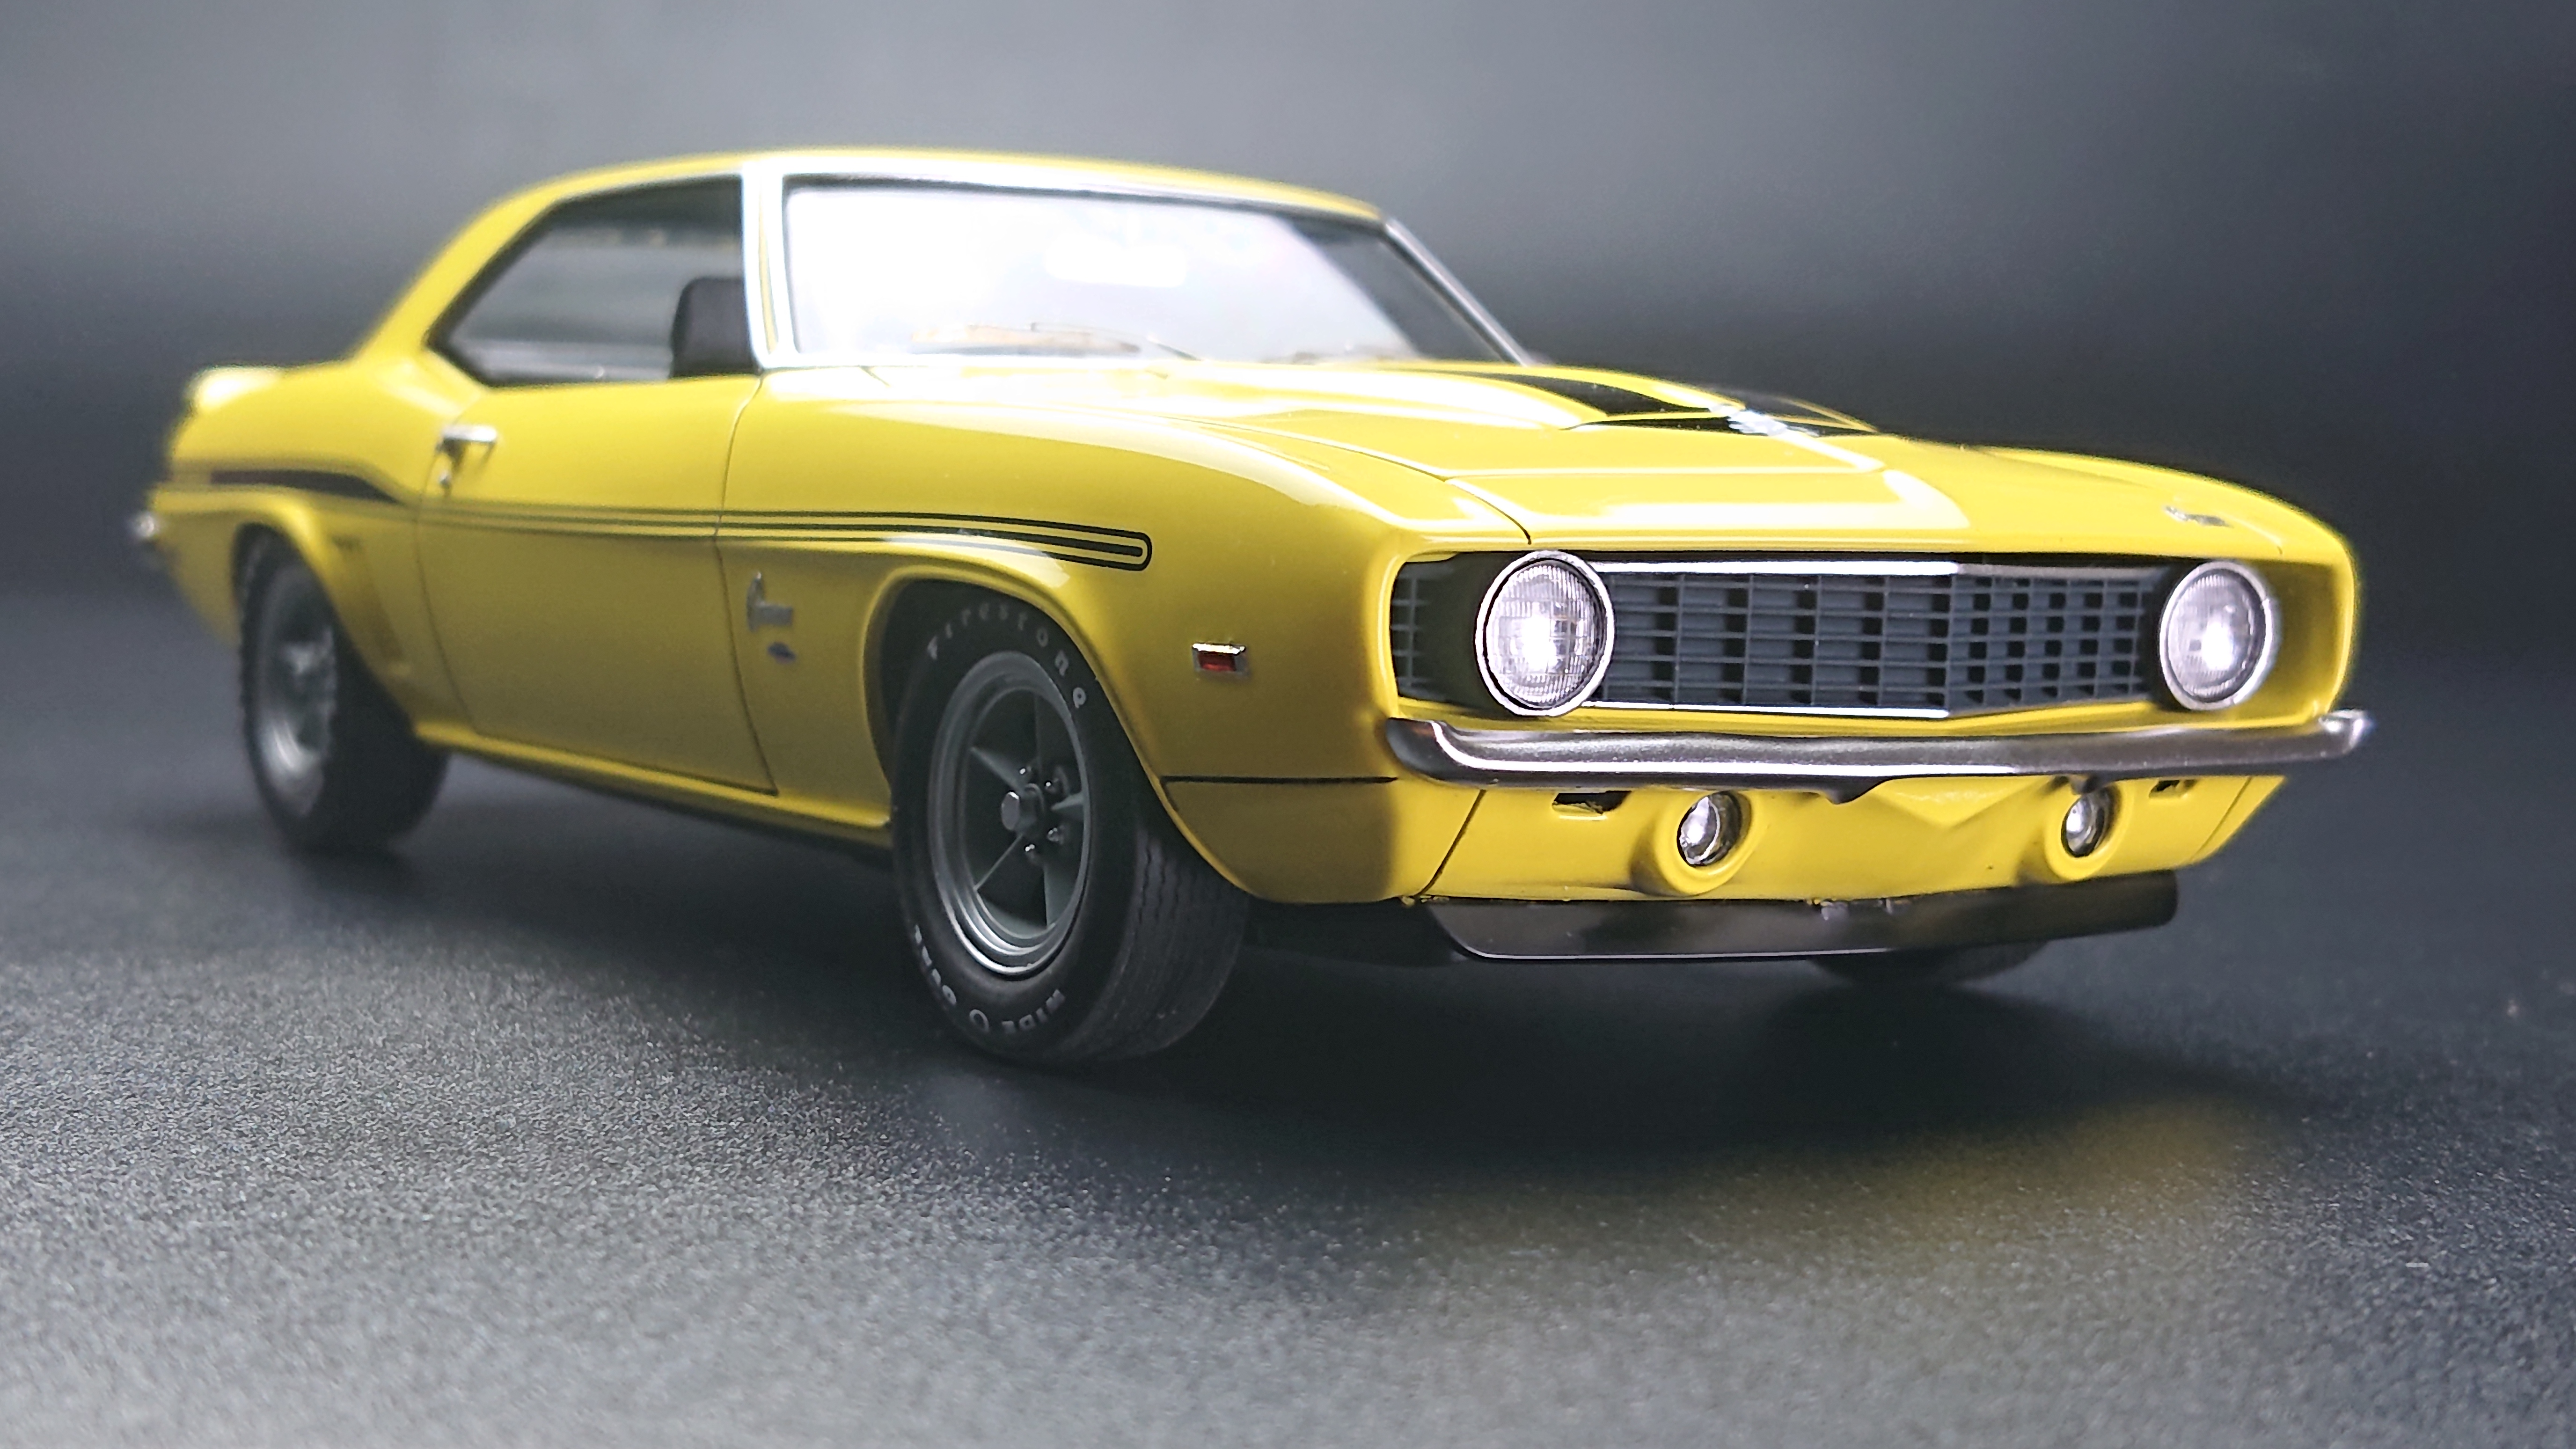
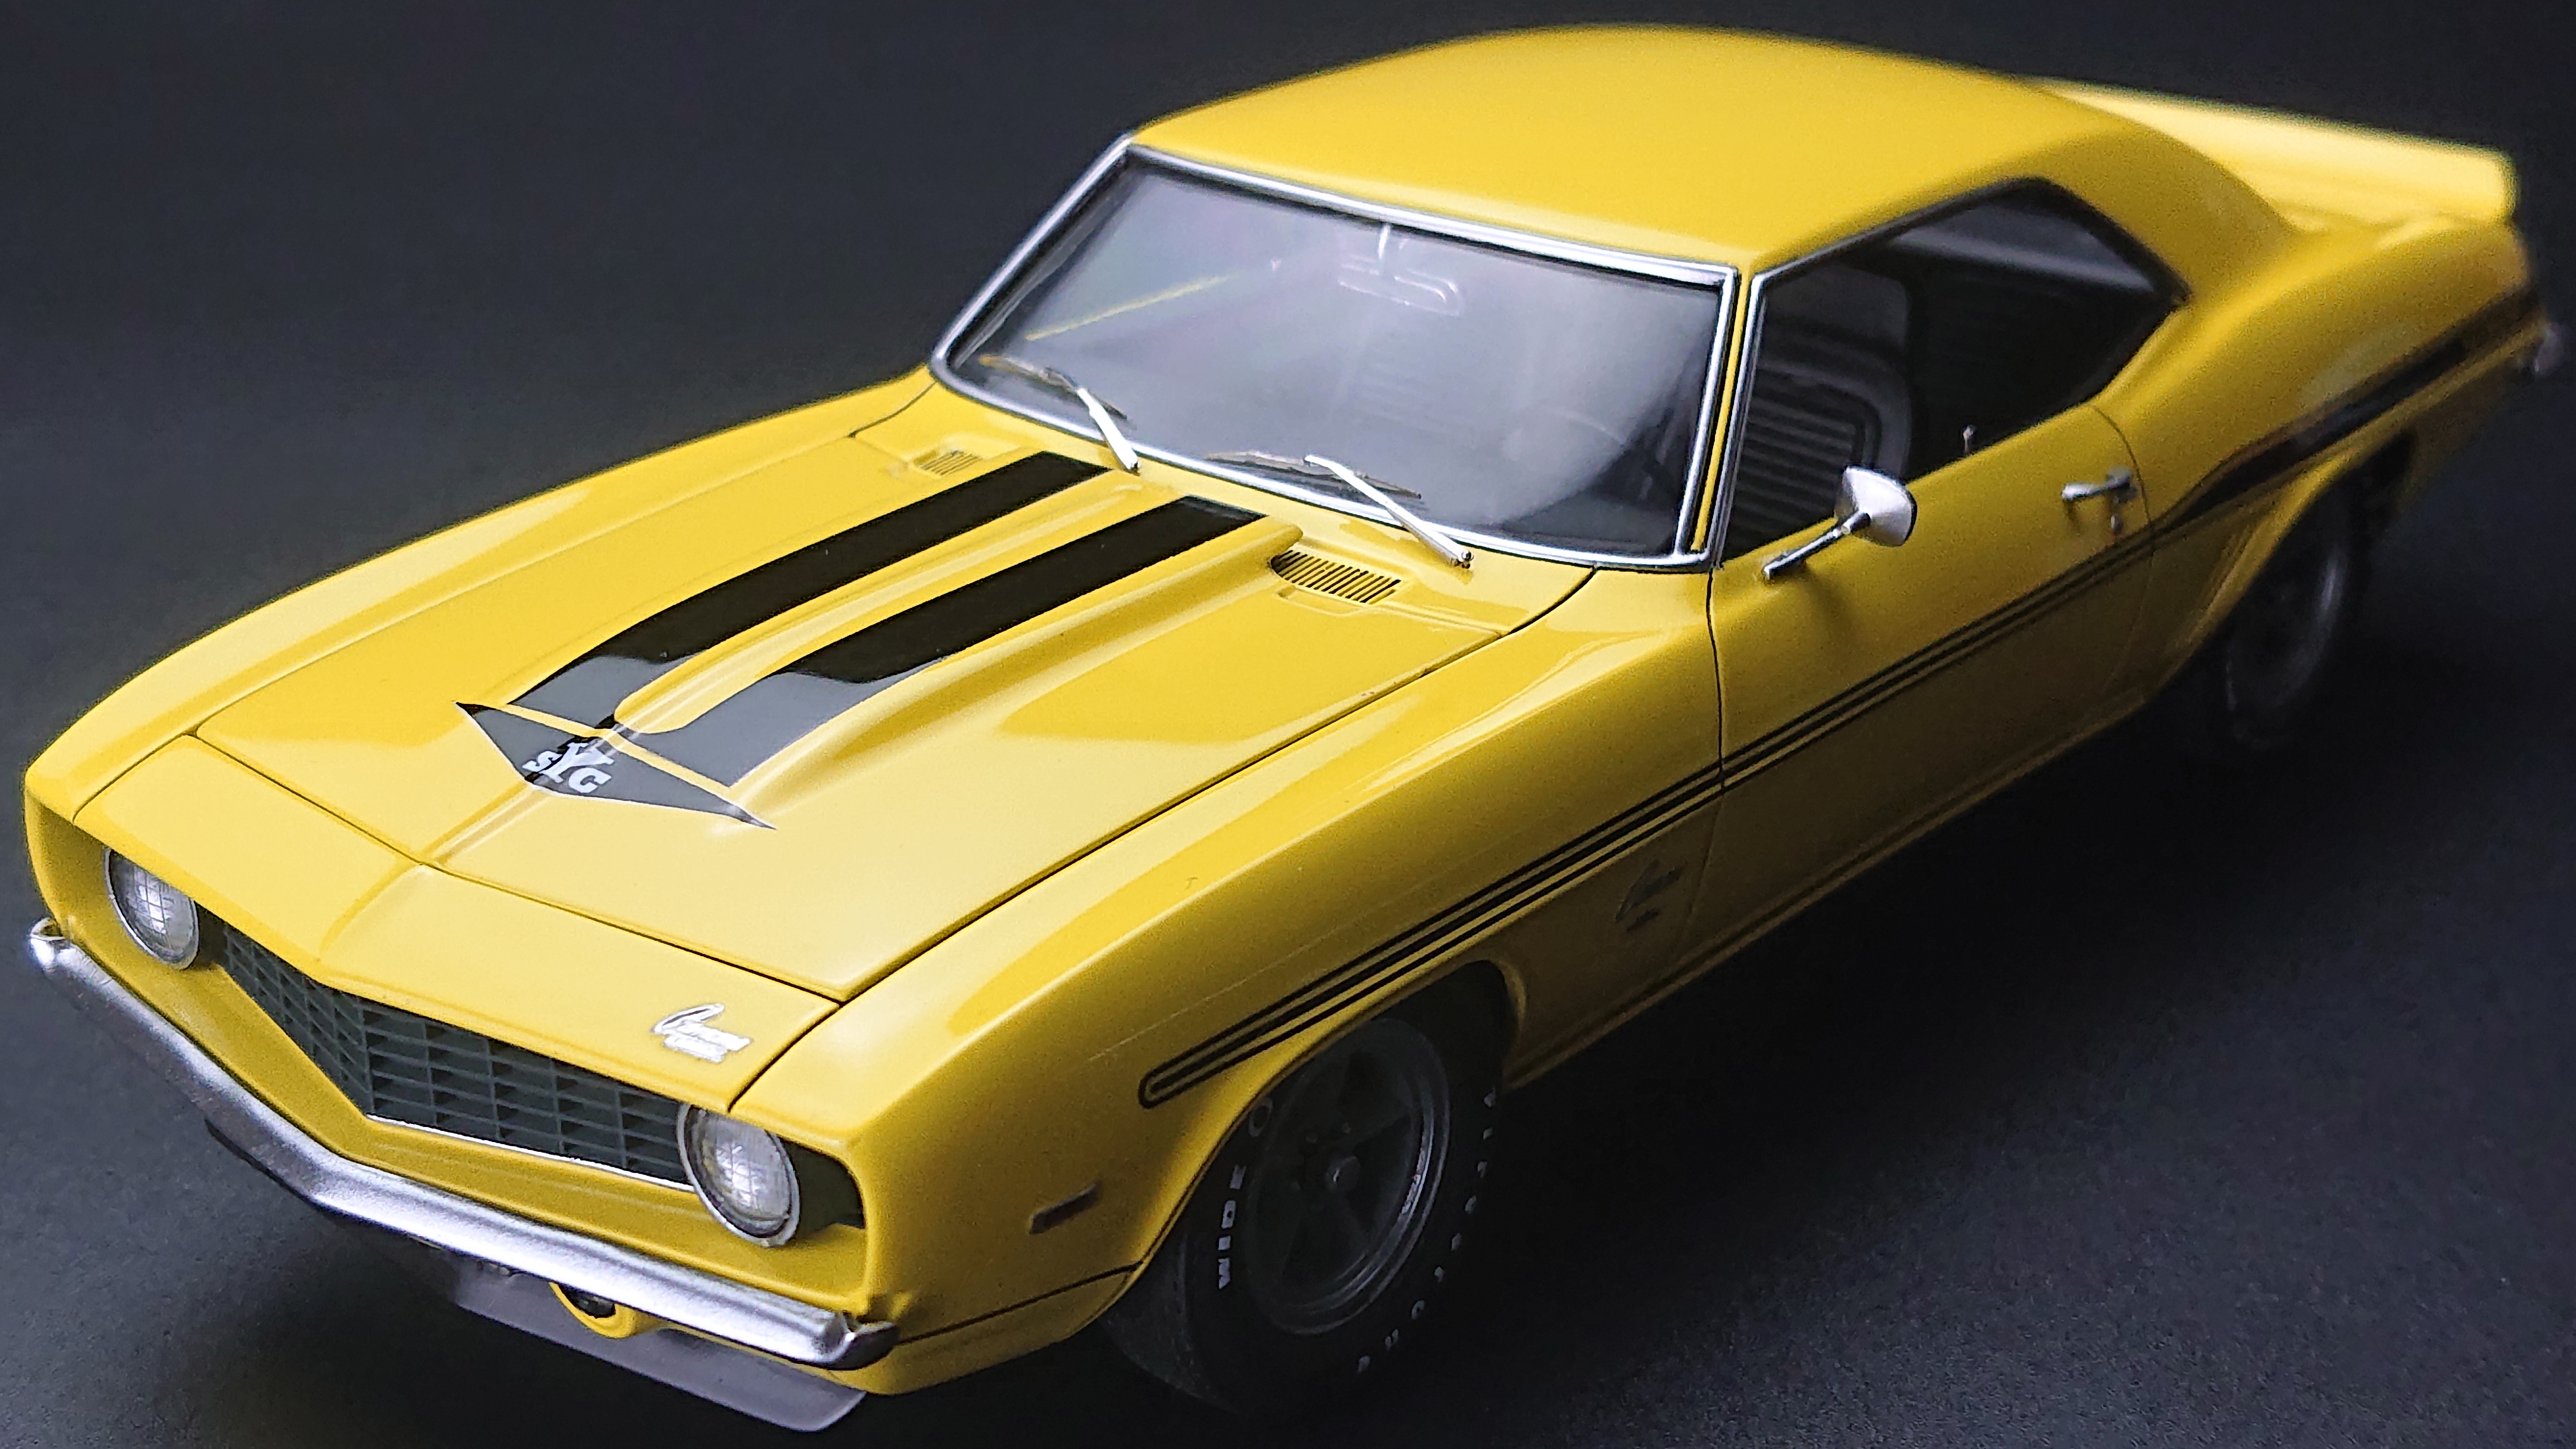
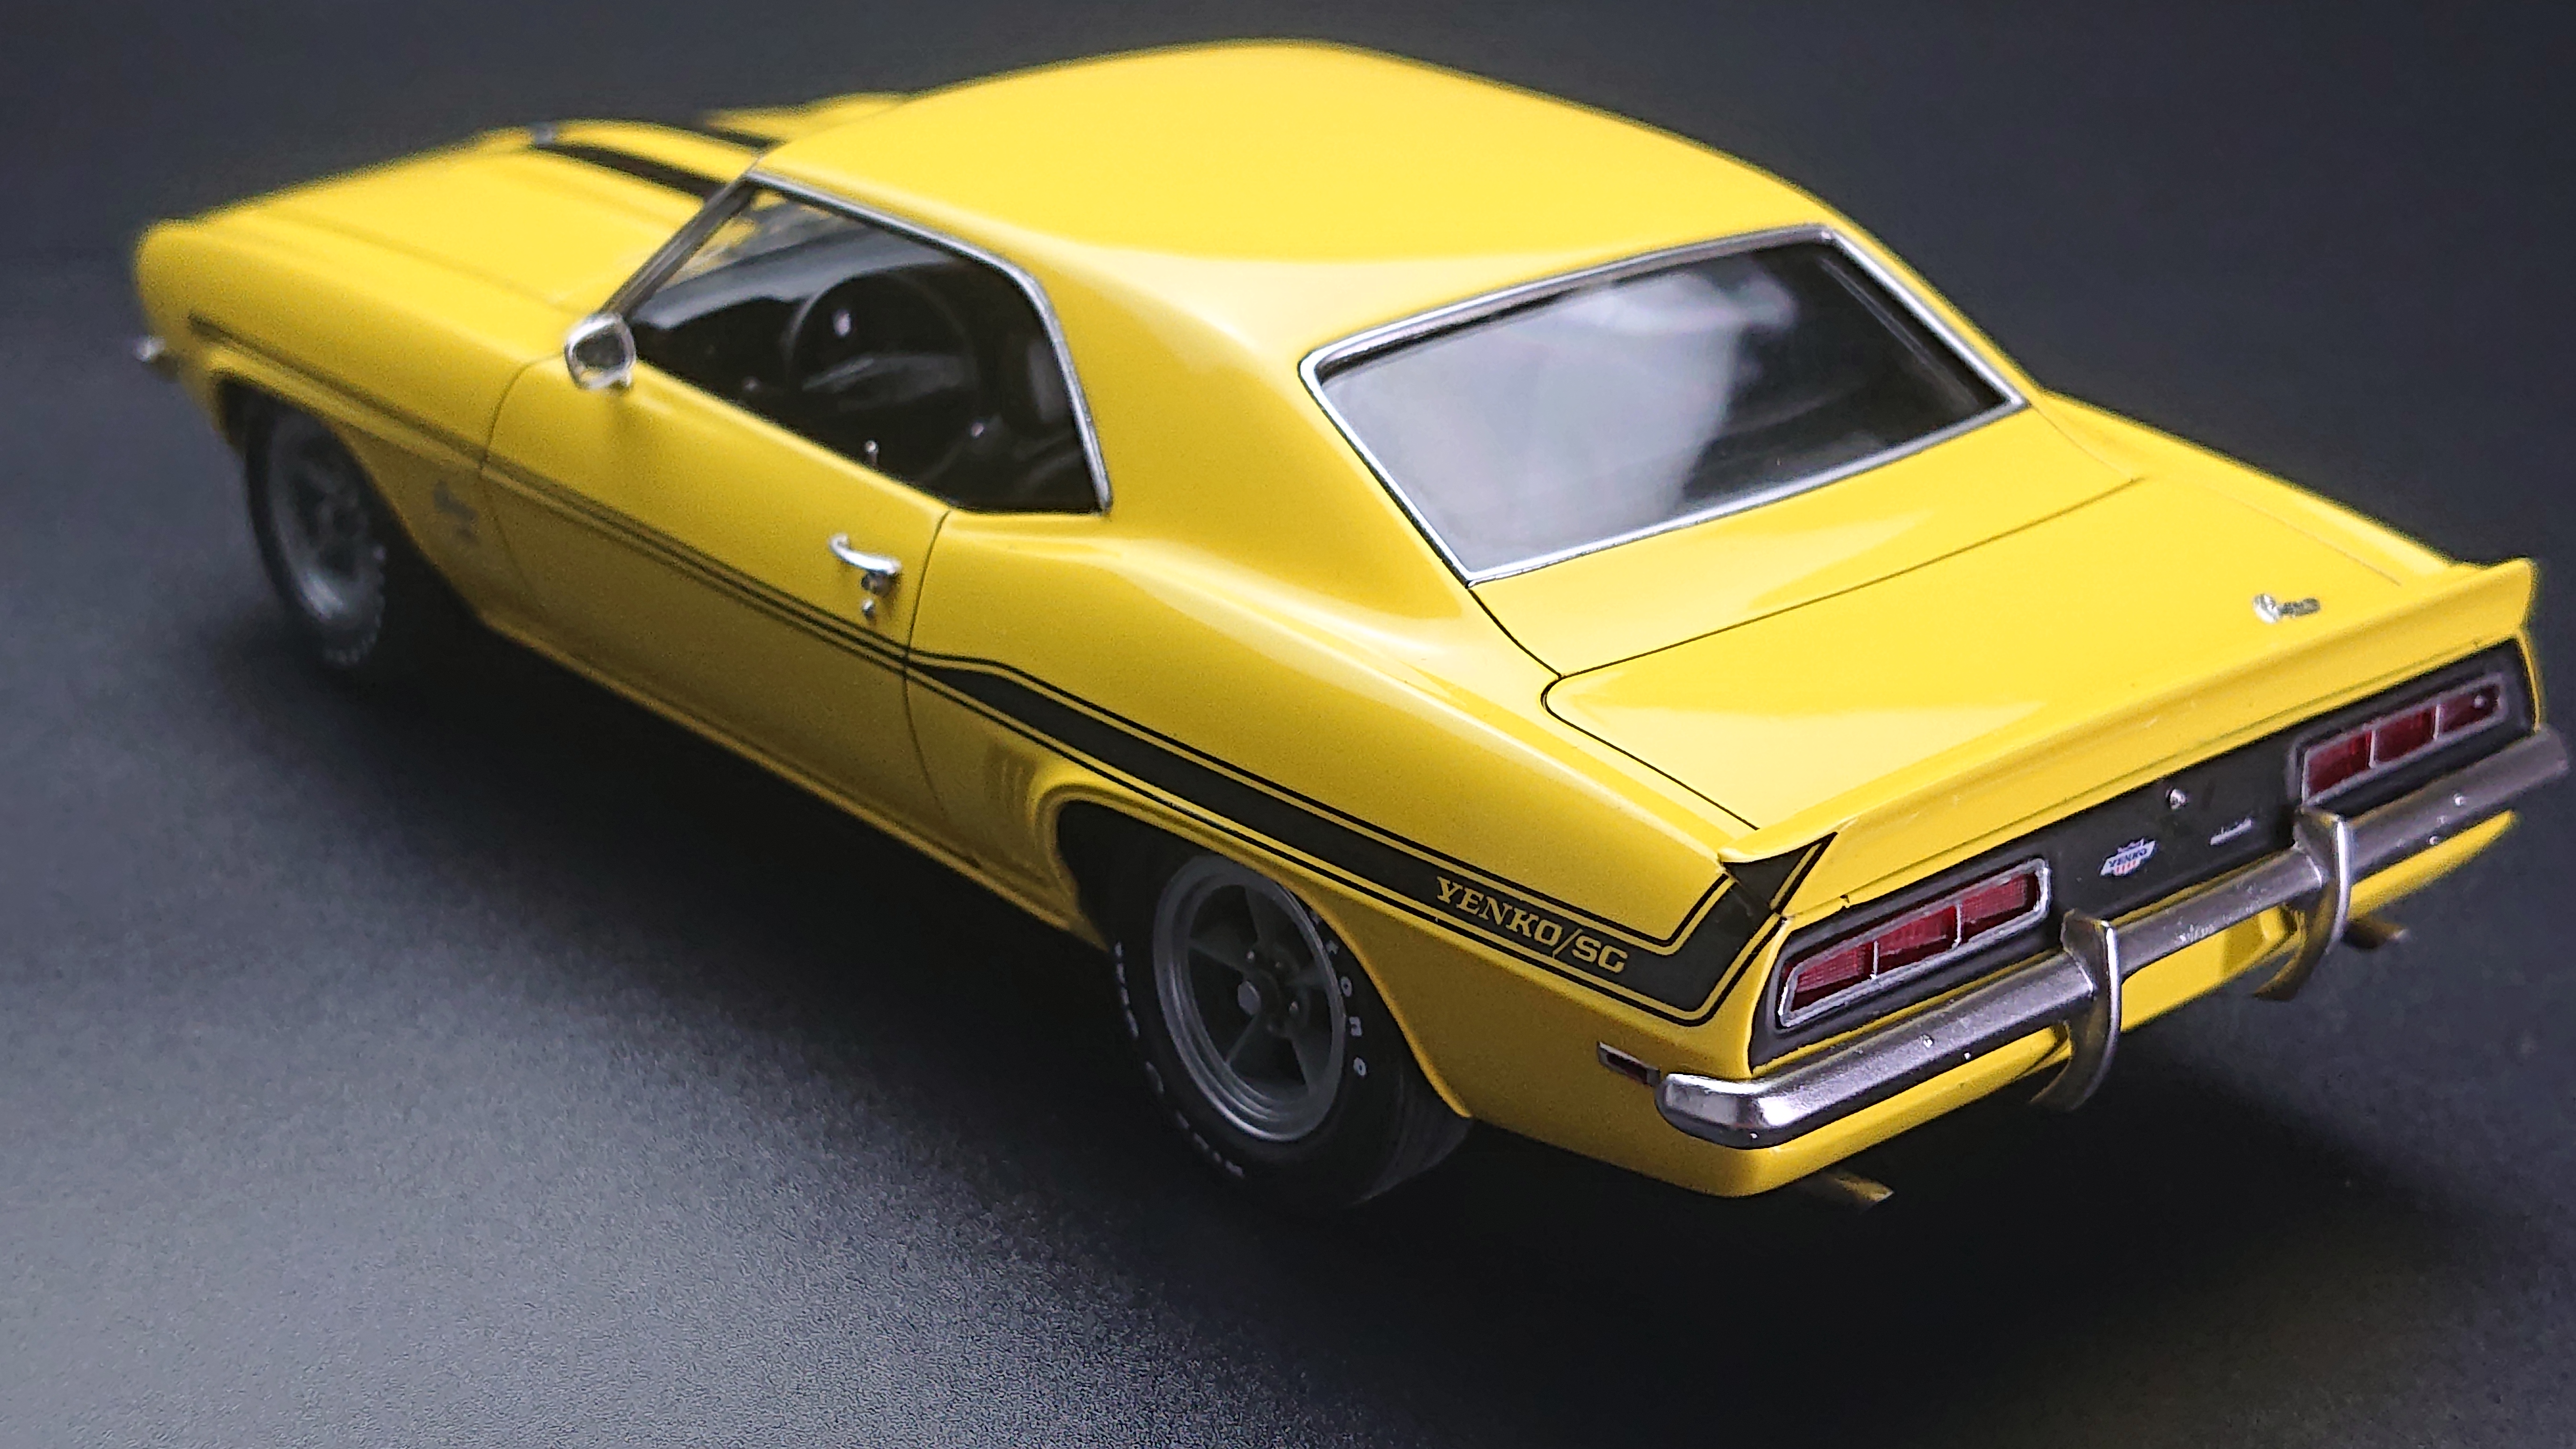
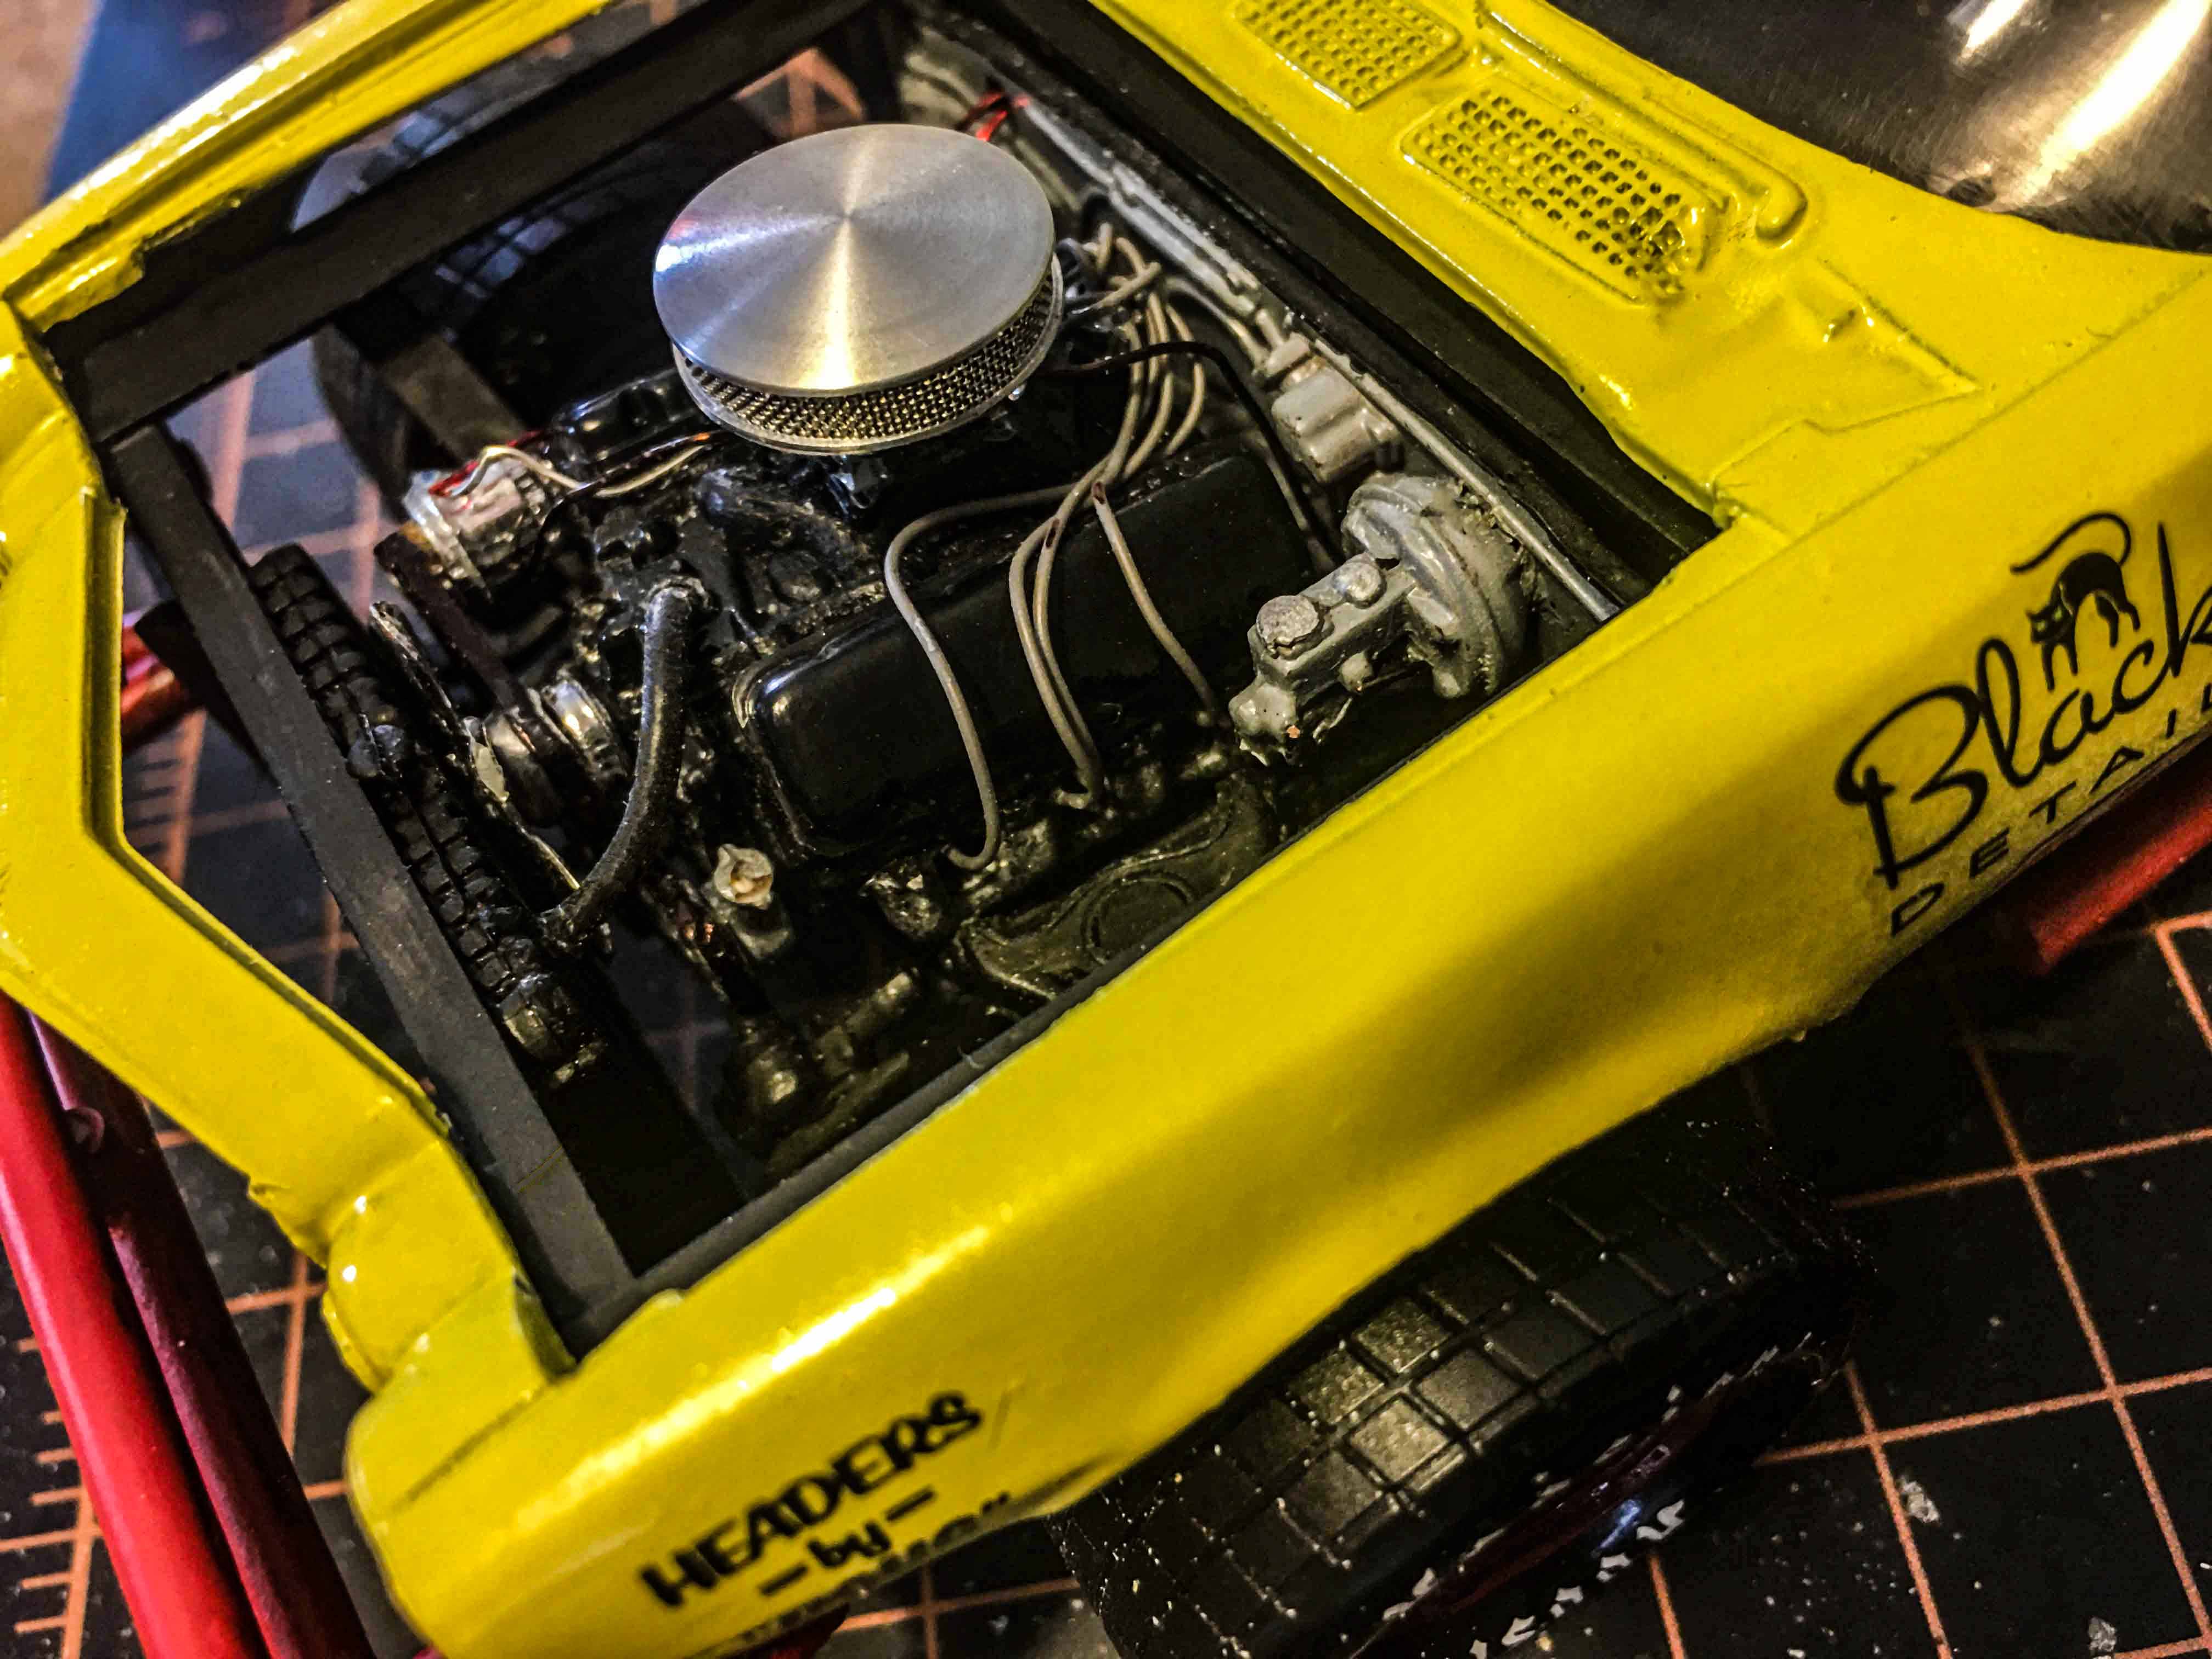
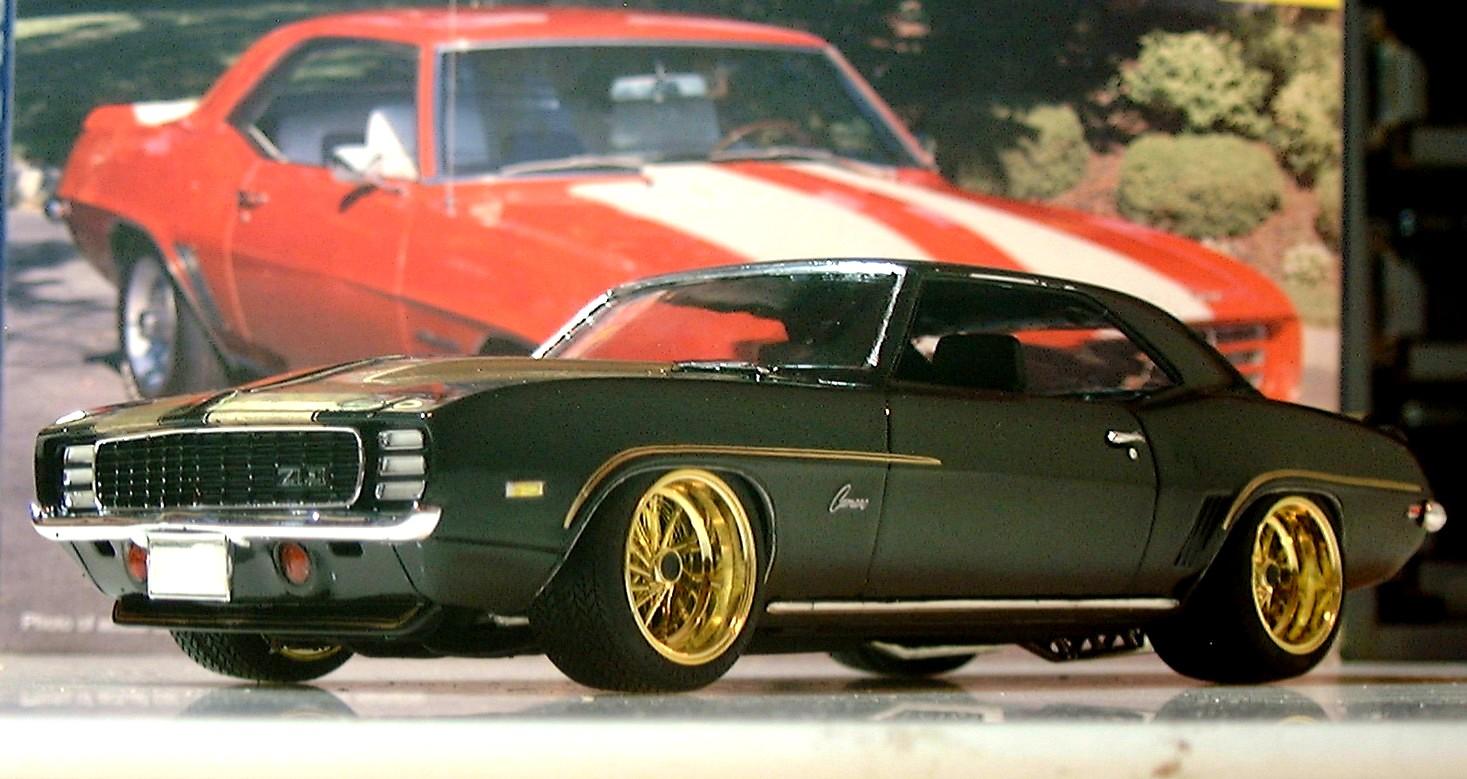
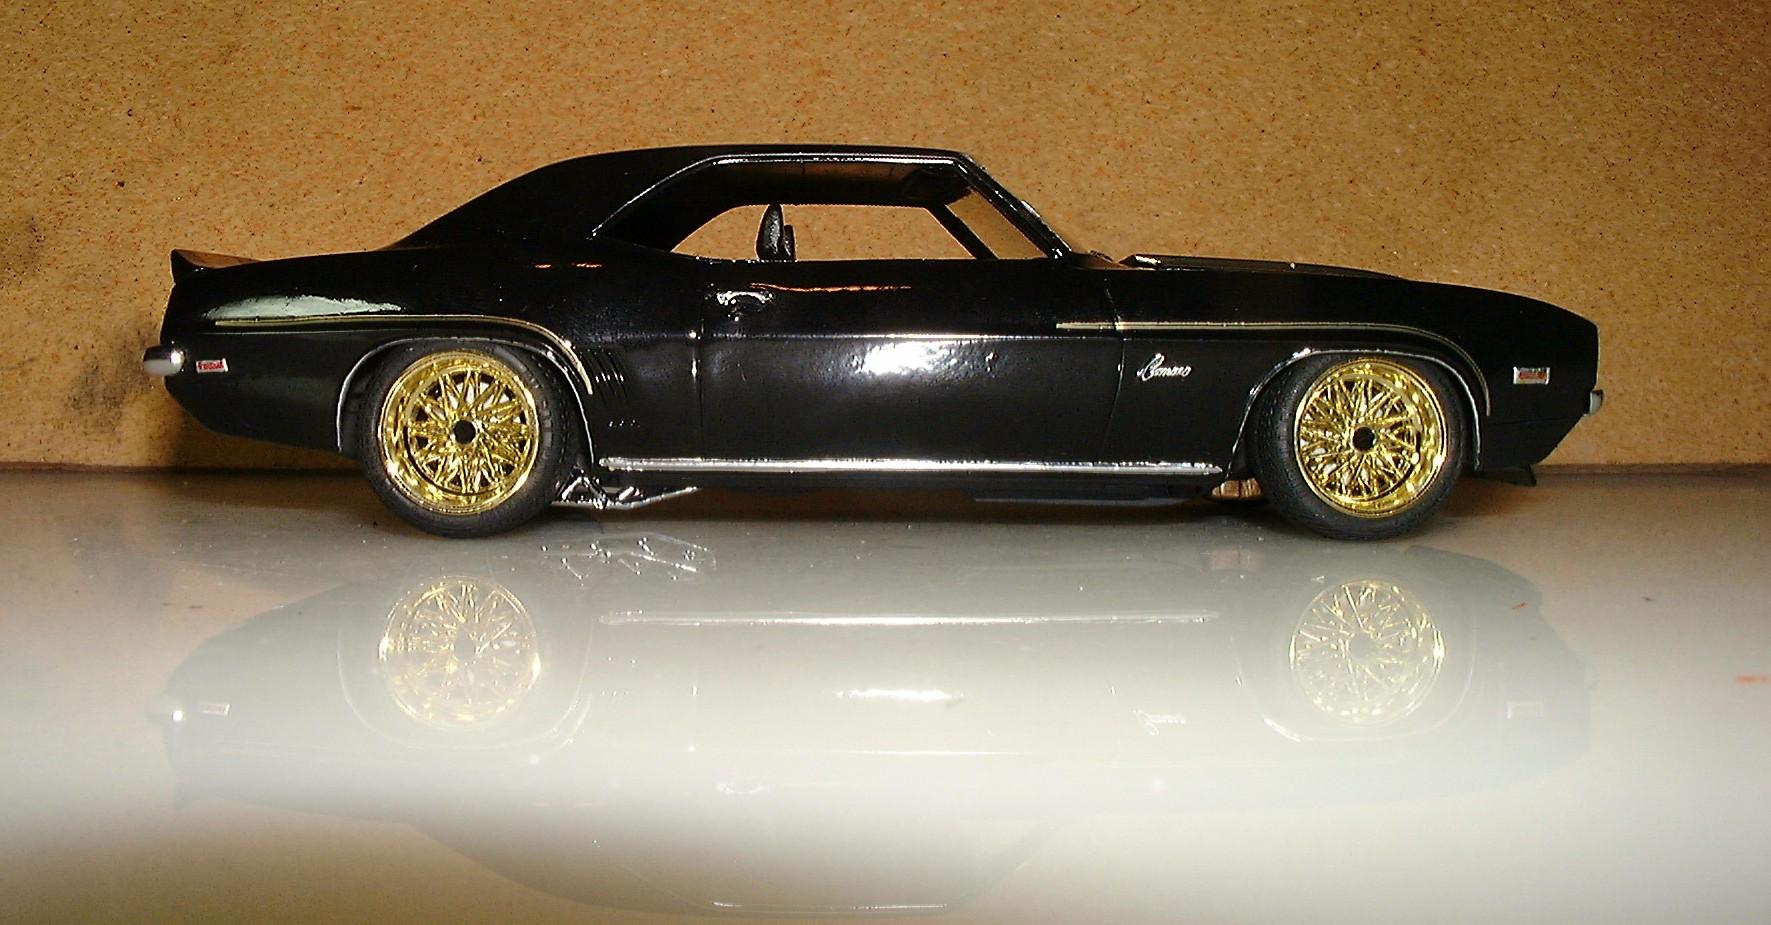
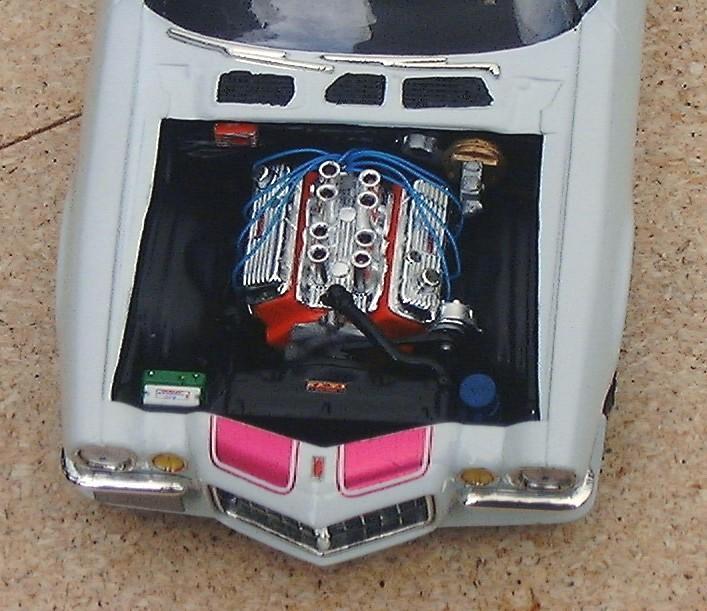
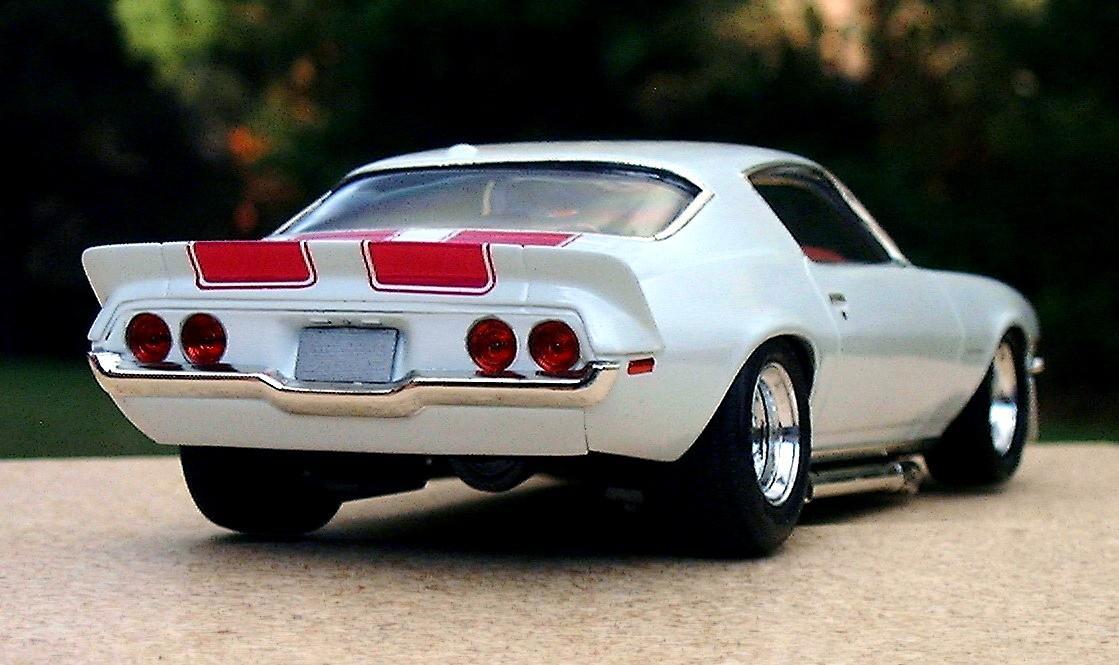
1969 Rally Sport Camaros are one of my favorite cars and black and gold is my favorite color combination. I started with a Revell Z28 Camaro RS kit. As you know, a Z28 is a 302 small block and a ZL-1 is a 427 big block. I got the big block from an AMT 68 El Camino kit. For something different I used the Electronic Fuel Injection option from a 70 Chevelle SS kit. The gold SS stripes made by Keith Marks. http://public.fotki.com/mofobow/ During final assembly I found the hood would not close. I had to trim the motor mounts to set the engine a little lower, shave the throttle bodies and the EFI engine cover but even all of that was not enough. I then took a Dremel to the underside of the hood which was already painted and decaled. I ground down as much as I dared, and fortunately it was just enough. I got the Fujimi wheels & tires from ebay as I wanted the Pro-touring look. Wire wheels were not my first choice but it was the best I could do to get the 285/40 and 345/35 tires. In order to fit these wide tires, chassis modifications were necessary. First I cut away the inner fender wells in preparation for mini-tubbing. I used the rear wheel tubs hacked from a 71 GTX chassis I had left over from an eBay lot purchase. The stock leaf spring suspended axle could no longer work so I snagged the ladder bar rear from a 72 Nova kit. The front suspension and inner fender wells required serious grinding and trimming as well. Since the wheels were open enough, I added disc brake rotors from my parts bin. Other details include filling four of the rectangles in the grille for the ZL-1 emblem decal, adding back up lights from the parts bin, and meticulously painting the hidden headlight frames. Overall I am quite pleased with the result. If I had to do it over, I would NOT have used Testors clear coat over Keith’s decals. They wrinkled a bit due to some kind of reaction.
-
Hey, everyone!, I recently had an old friend move here from Santa Cruz, California. We use to build together over a decade ago, and now he wants to start it up again! I asked him which car he wanted to build, and he chose AMT's 1970 Baldwin Motion Camaro, so that's what we're doing. I mostly build exotics, but I do have a TON of muscle car kits, this however, will be my very first GM build.....i'm pretty stoked!! The 1970 Camaro is my favorite year for that car, in fact, 1970 was the BEST year for muscle cars from ALL the manufacturers! If you are familiar with how I build, this will come as no surprise....its almost imposable for me to NOT change things. This is no exception, lol. He will build his in a more traditional Hot rod way, which I will also post here as we go. Heres a riddle for mine; what do you get when mix the following cars, and styles together?...
-
I'm in search of a set of black SS stripes for a '68 Camaro Z/28 that fit a cowl induction hood I purchased(pictured). I'm building this for a friend & want the hood & stripes to match his 1:1 car as close as possible.
-
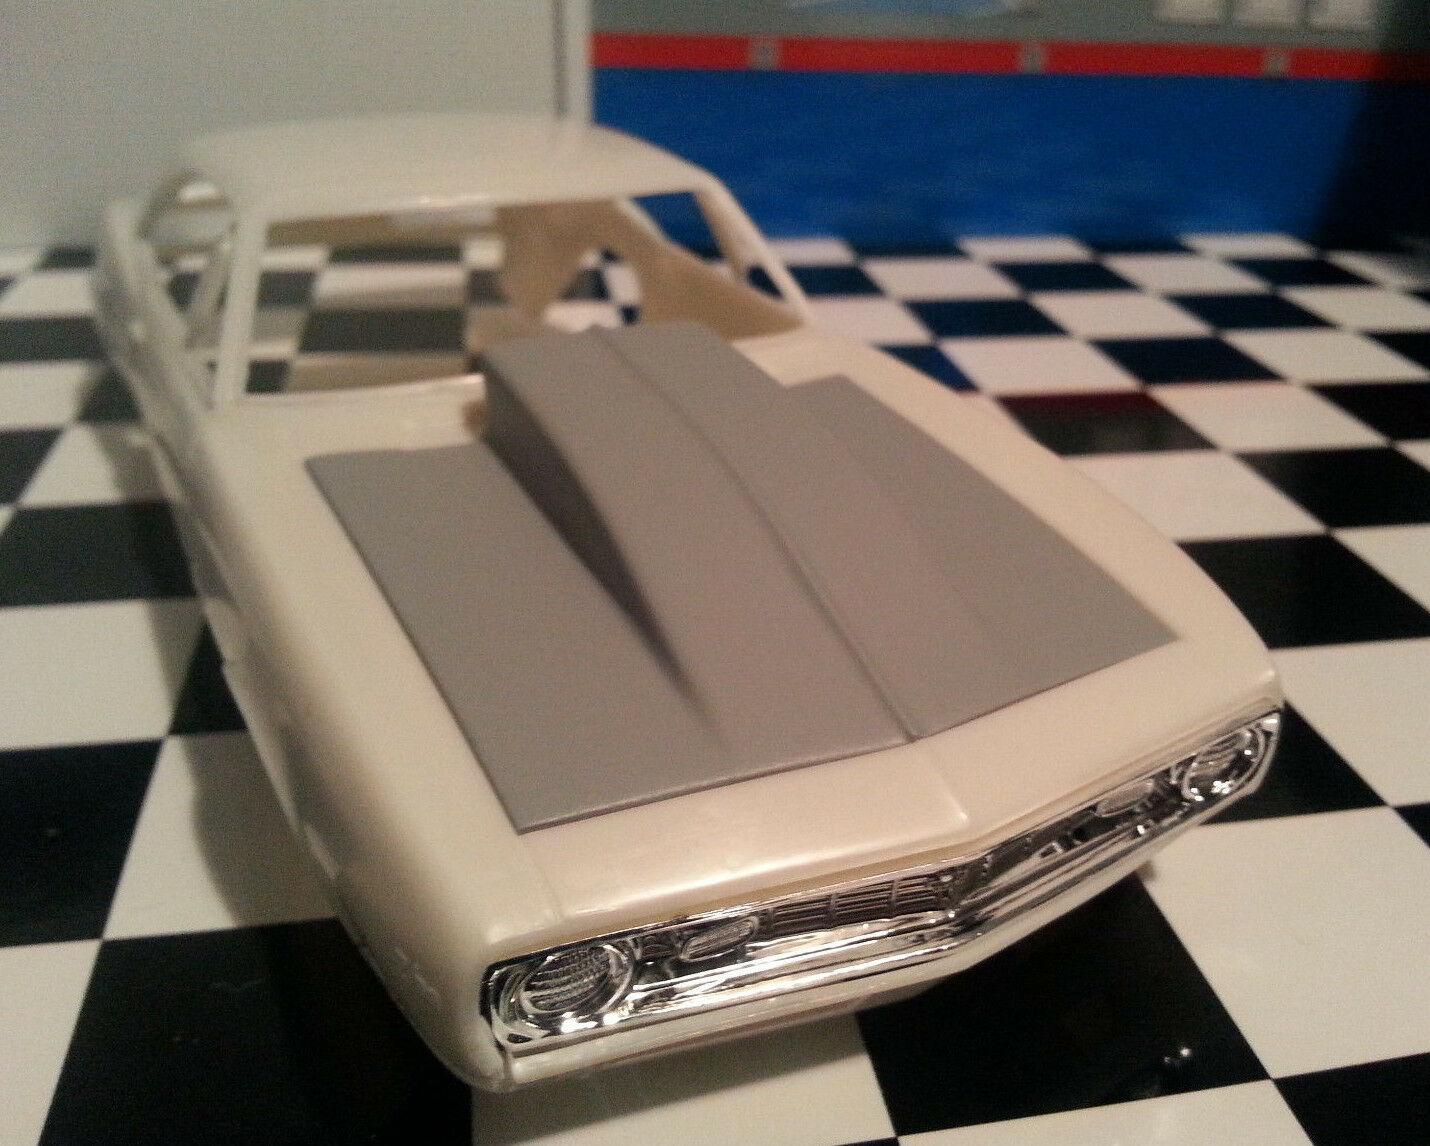
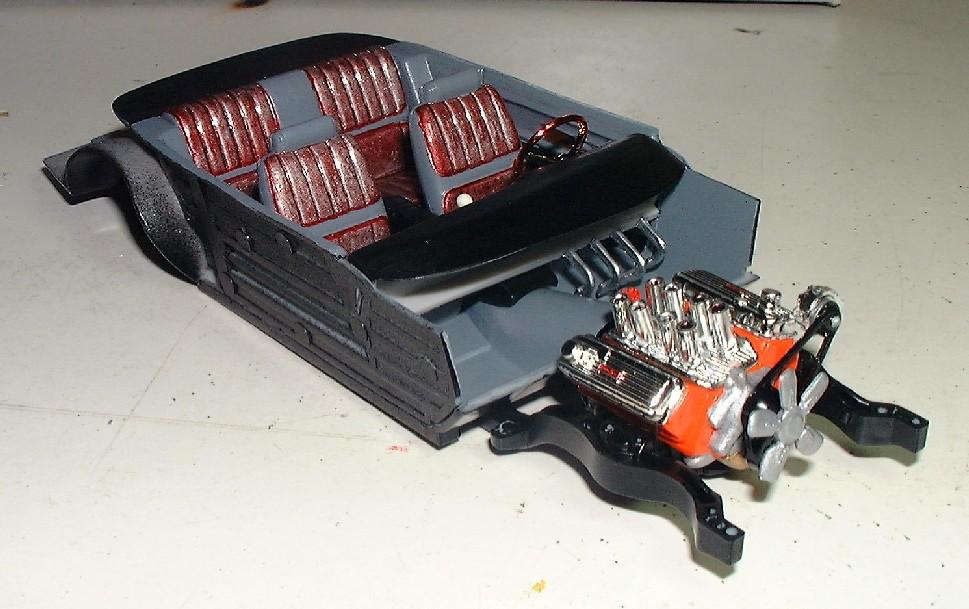
This is a model of a car I thought a lot about of years ago. It was what I dreamt of giving my daughter if I had one. (I didn’t. I have 3 boys) Anyway, The kit was AMT’s 70 ½ Baldwin-Motion Camaro. I loved the L-88 style hood and spoilers but didn’t like the graphics. To replace them, I had Keith Marks make me up a set of metallic magenta SS stripes. A few of them got rubbed through in the mail so he kindly made me two more sets (for free no less!) As it turned out I’m glad I had all the spares. I had a hell of a time laying them on the curvaceous hood bulge. I ended up using 8-10 pieces to get it fairly decent. The rear stripes were just as bad. It took 5 stripes to get two right. I am really pleased how all the lights turned out especially the front turn signals. I BMF’d the buckets, then yellow Sharpie’d the clear lenses. I knew they would be too yellow, so I orange markered the BMF inside the buckets. That gave me that amber color I was shooting for. I then silver dotted the nipples. The headlight buckets were also BMF’d then, I blue dotted the lenses before gluing them in with Testor’s clear window maker. The interior was a challenge. Most all of my model’s interiors, are basic black. This time I wanted to try something different. I thought gray would be good but by itself it was too plain. I started painting the inserts with metallic burgundy but it wasn’t covering very well. I stopped and painted a silver base coat then applied the burgundy. I used a red Ultra-fine point Sharpie to draw the piping. The dash and package tray in gray still did not look right, so I changed them to semi gloss black. I also did the console and the armrests to tie it all together. As much as I dread doing interiors, at least it turned out halfway decent. I was going to put gauge water slide decals on, but after the 3 hour ordeal with the hood, I just wasn’t up for it. At least the glove box got a “Camaro” script.
-
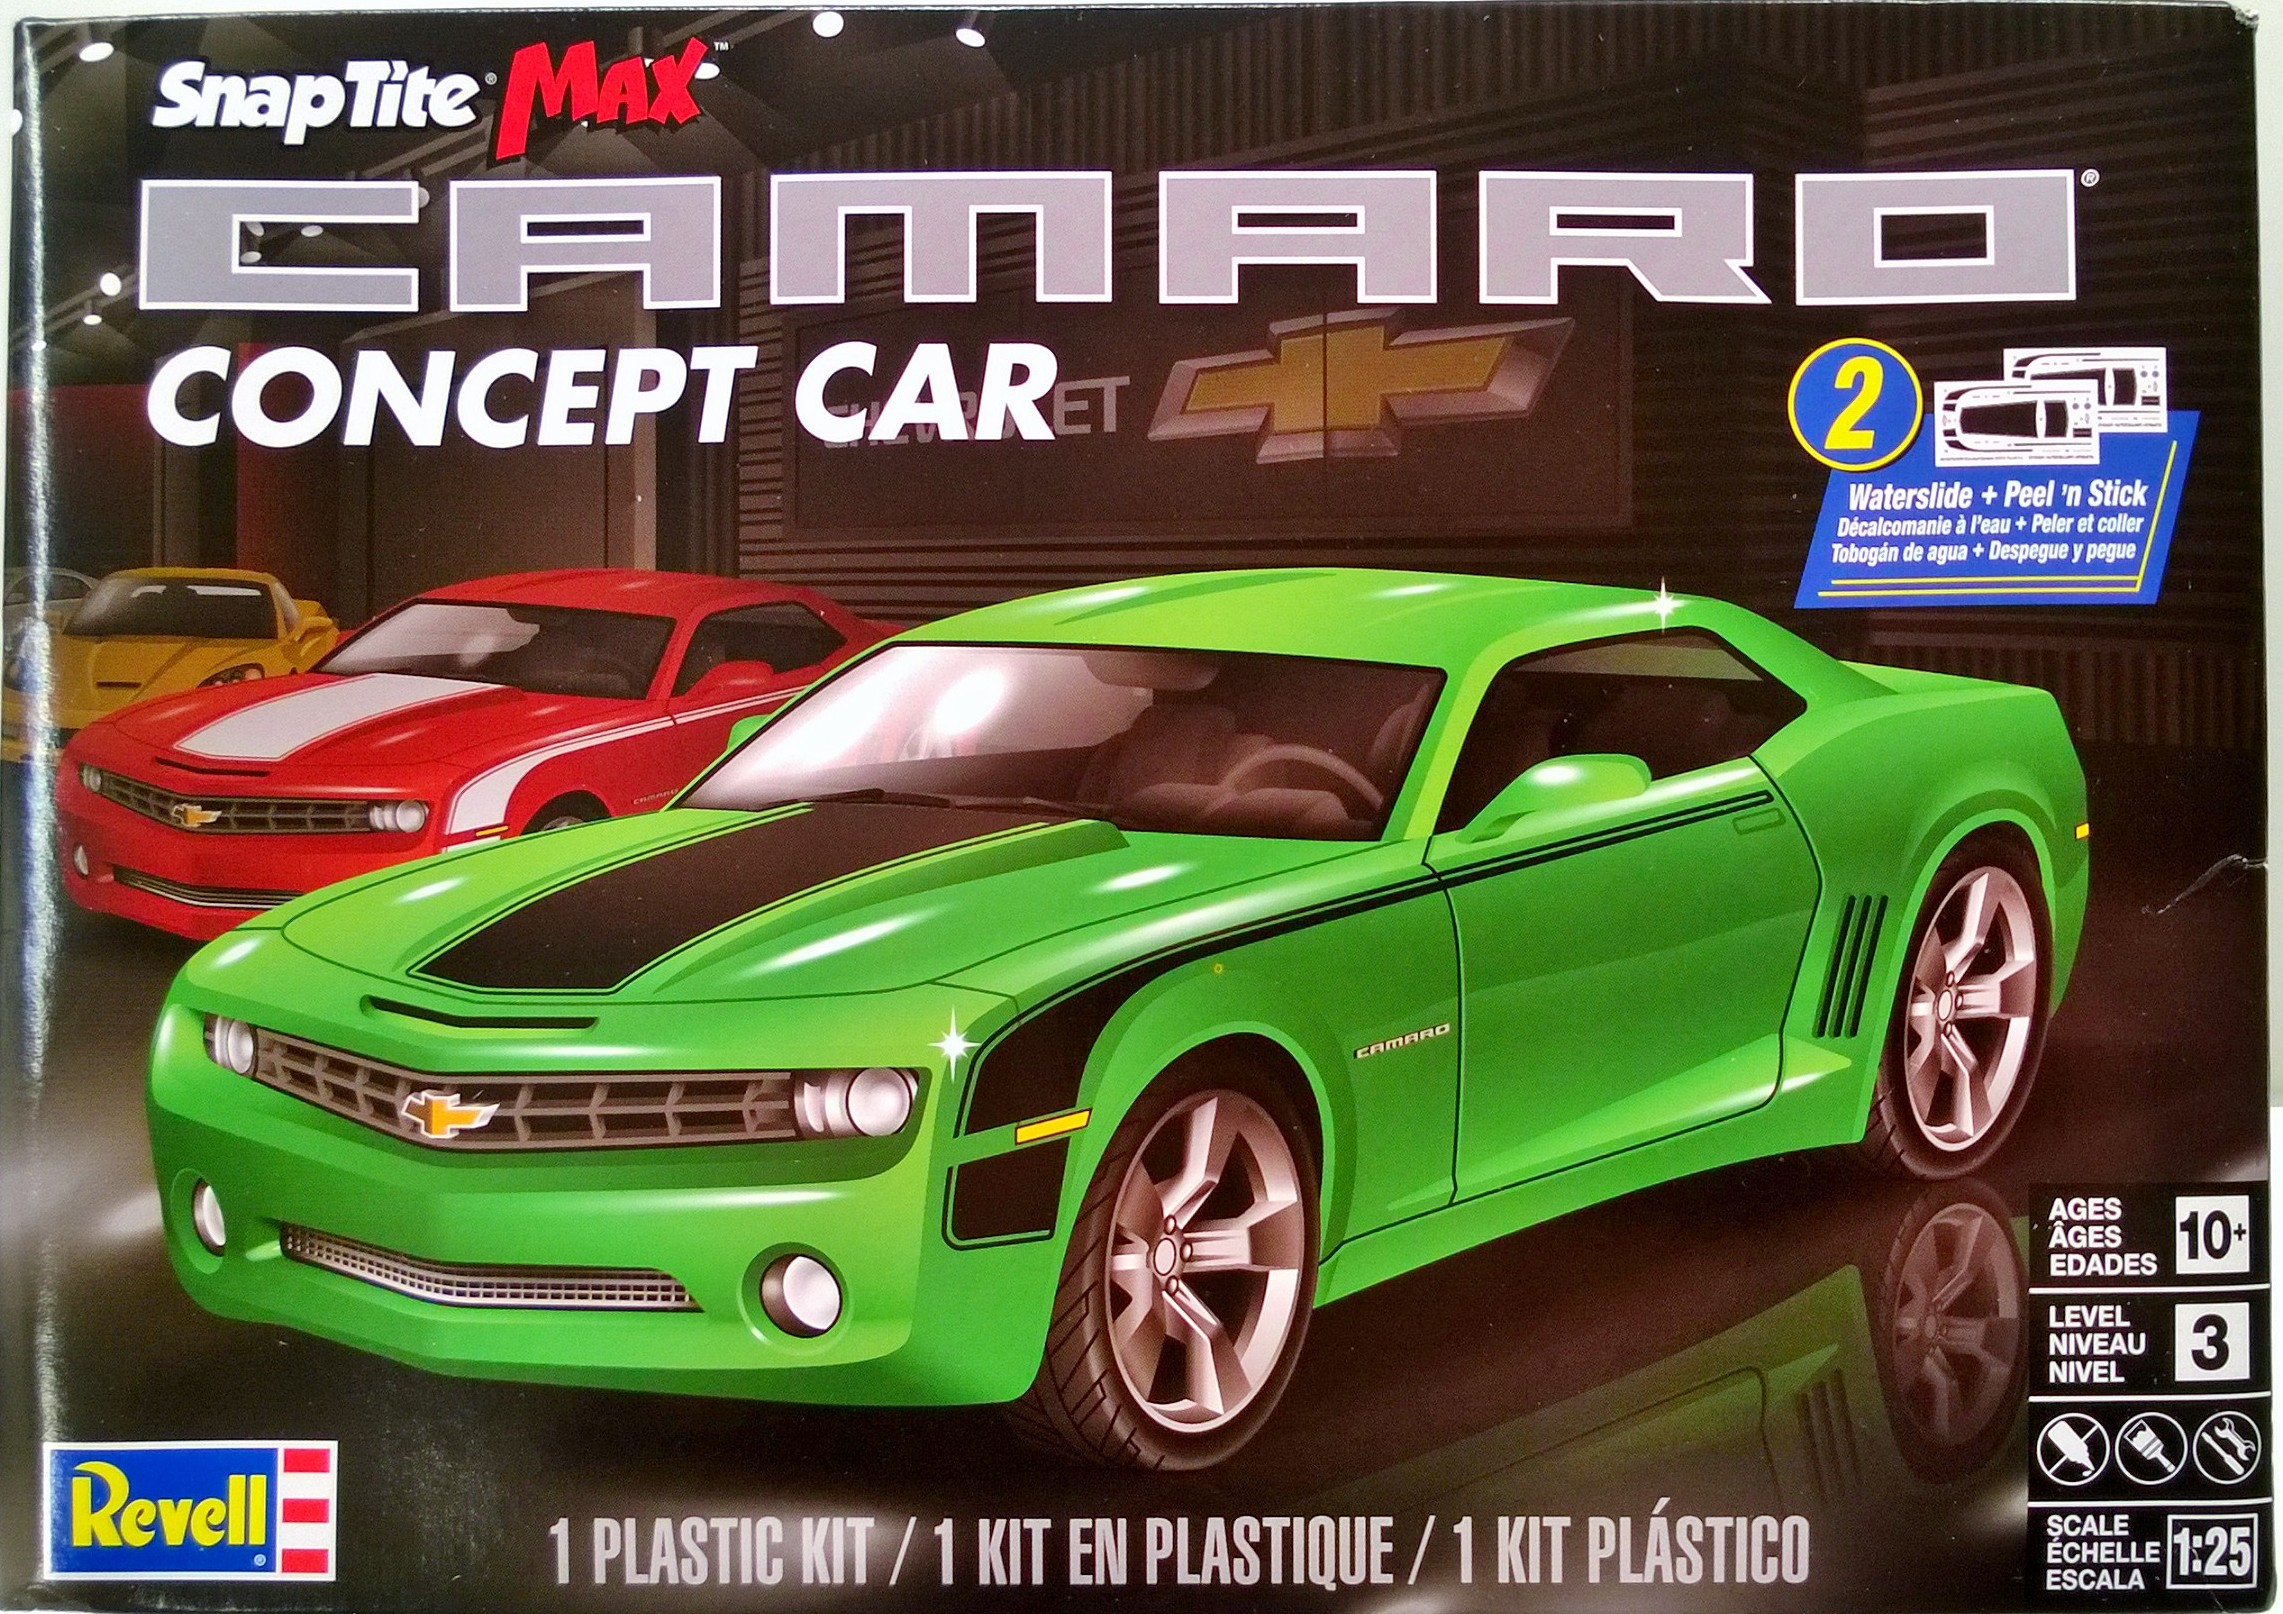
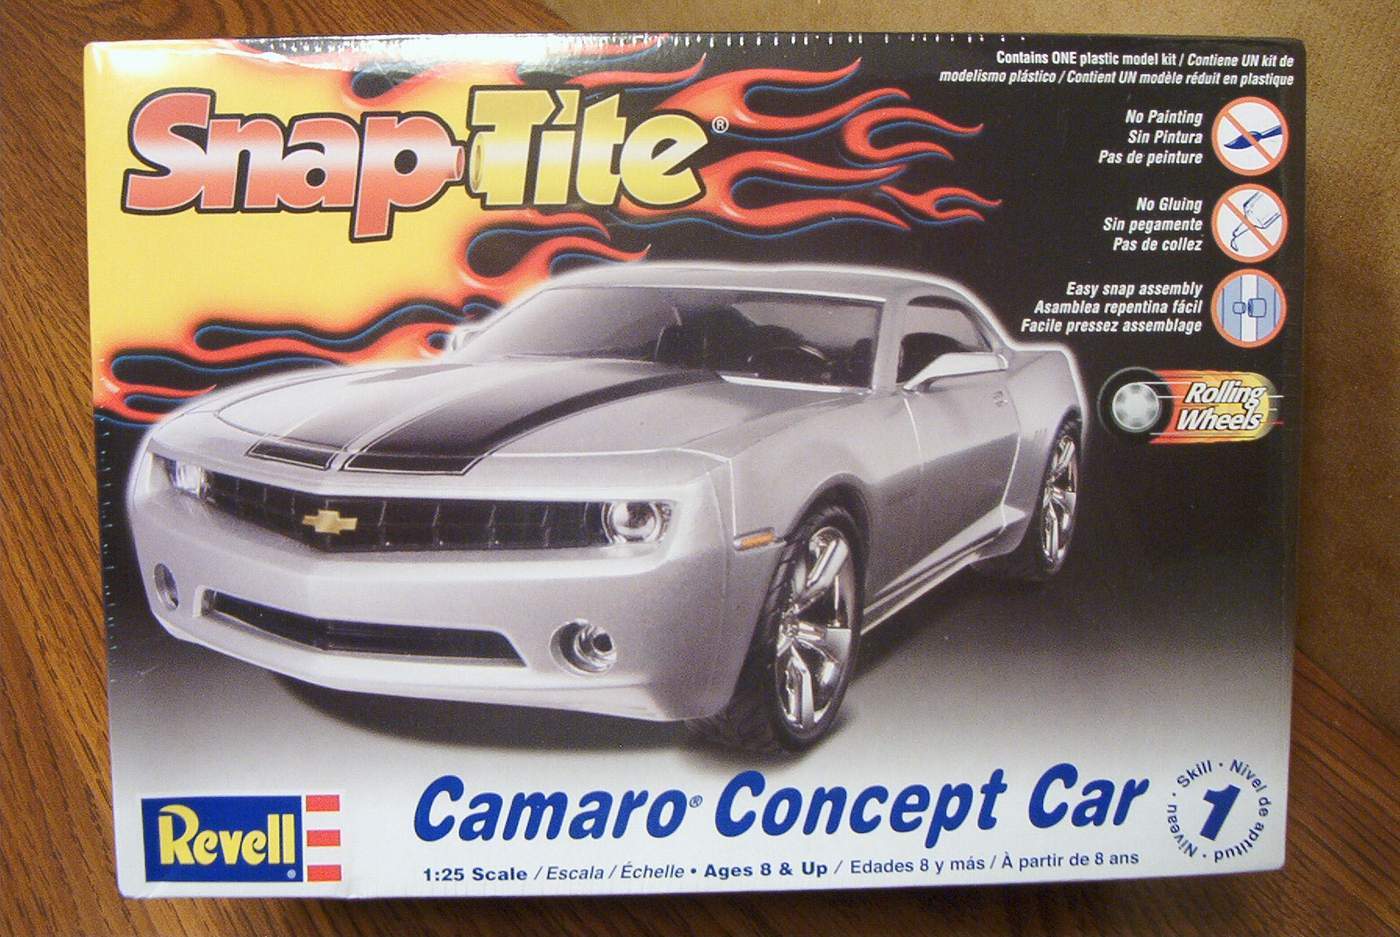
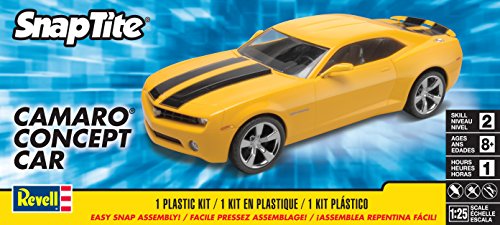
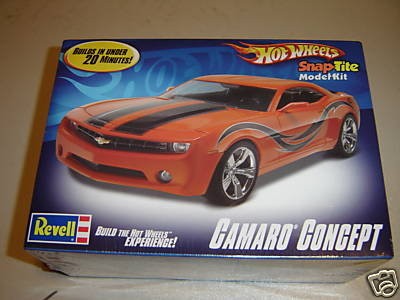
Here's a look at what's inside the 1/25 Revell Camaro Concept SnapTite Max, kit 85-1527, this time molded in lime green, and with both water slide decals and stickers included: http://modelkitreviews.proboards.com/thread/957/revell-1527-camaro-concept-snaptite This is pretty much the same Revell Camaro Concept kit first released back in 2006, with some minor changes as noted above. Previous kit versions were molded with silver, orange, and yellow bodies, and I believe the silver version was also offered in Revell's Build & Play program, too:
-
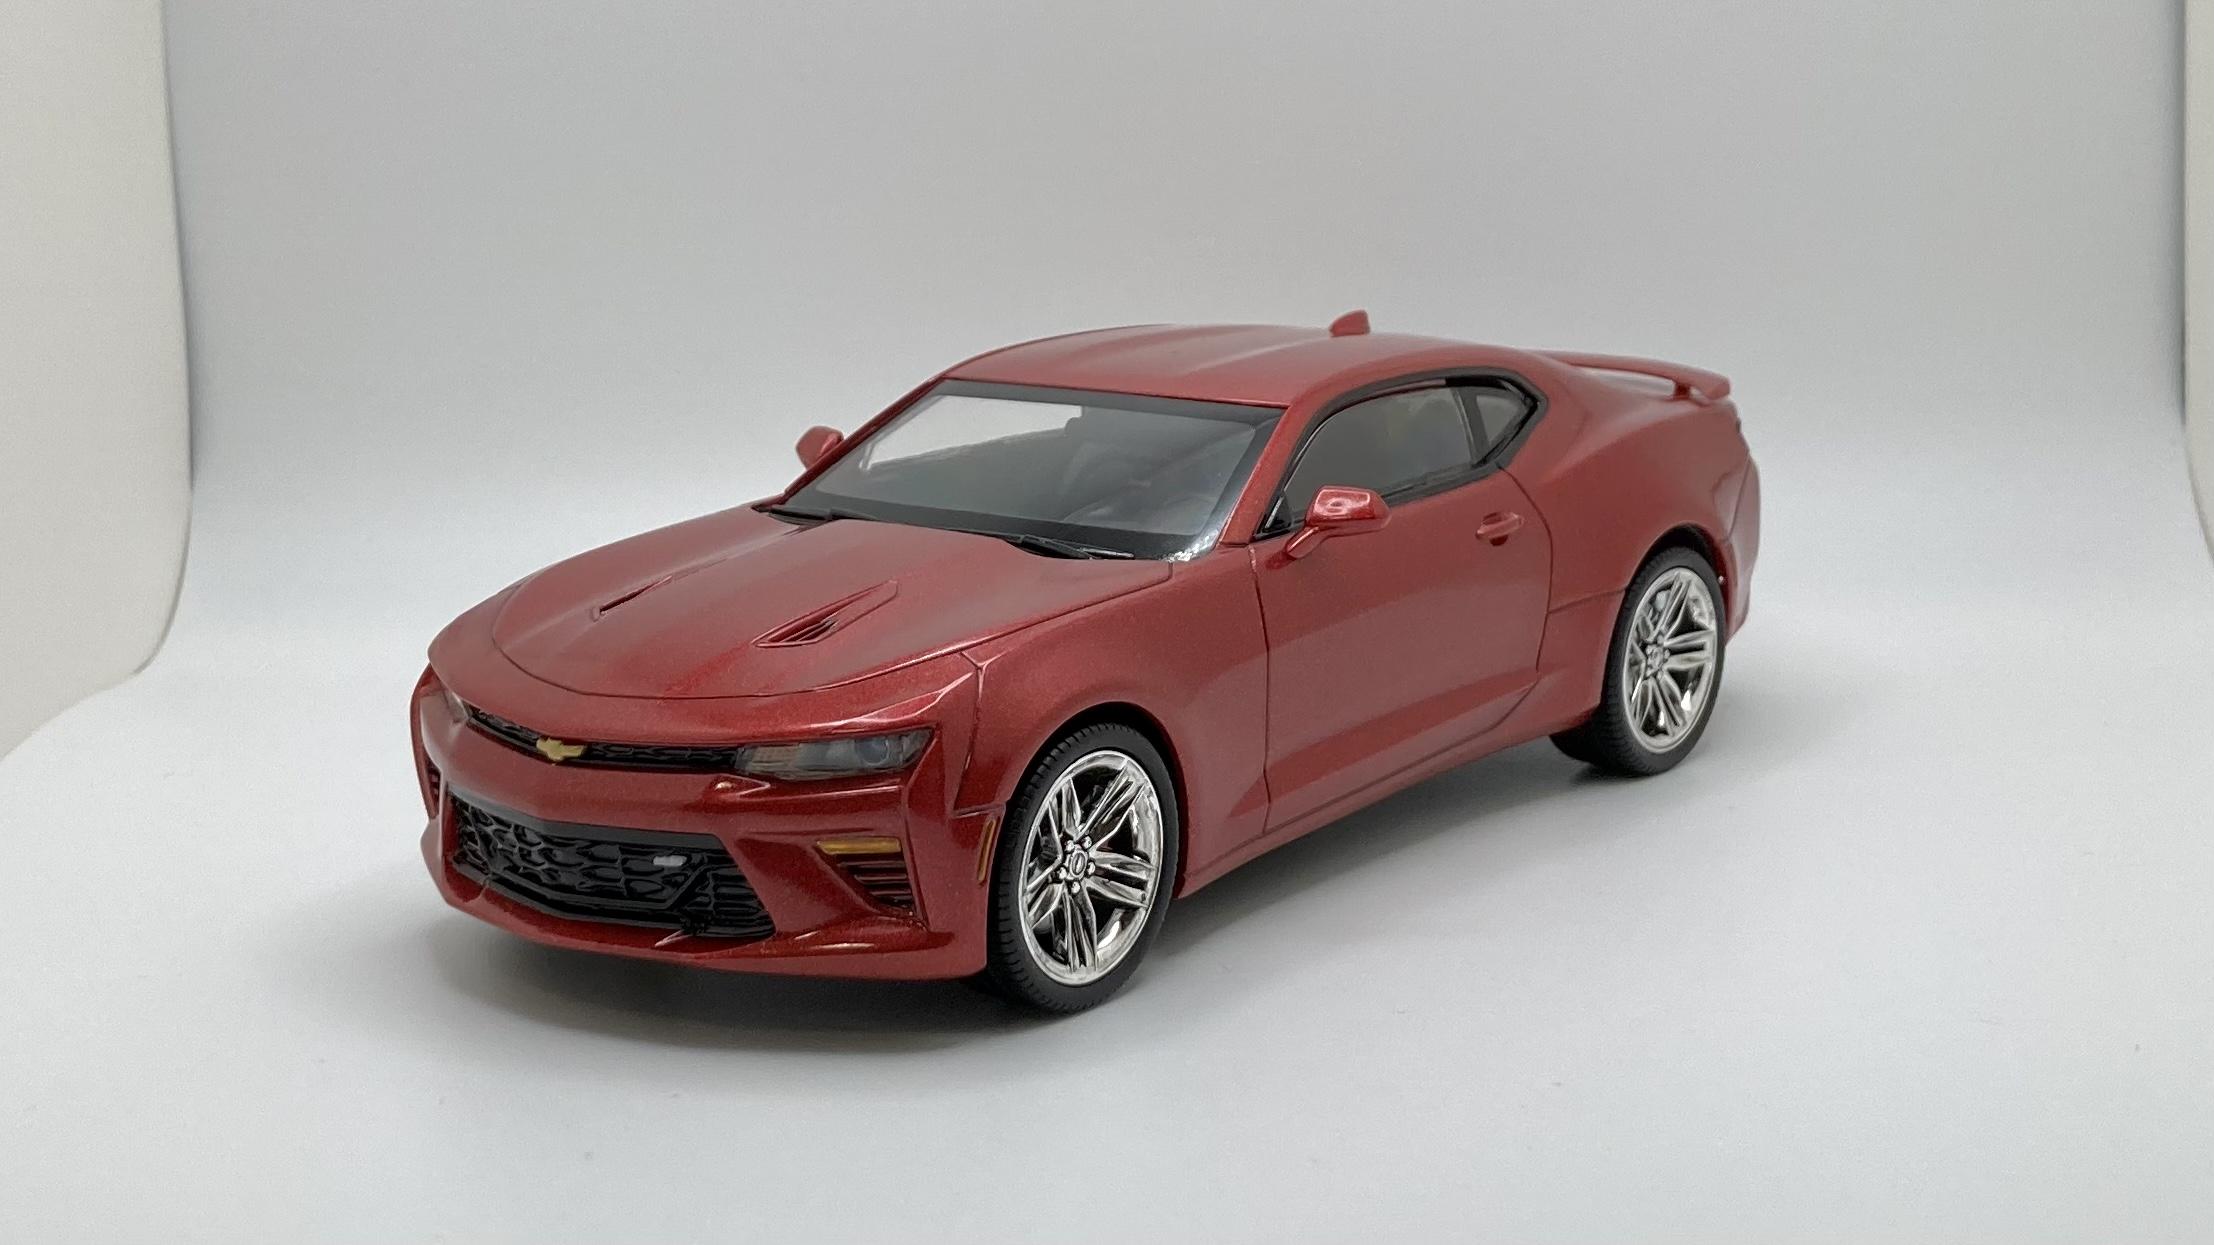
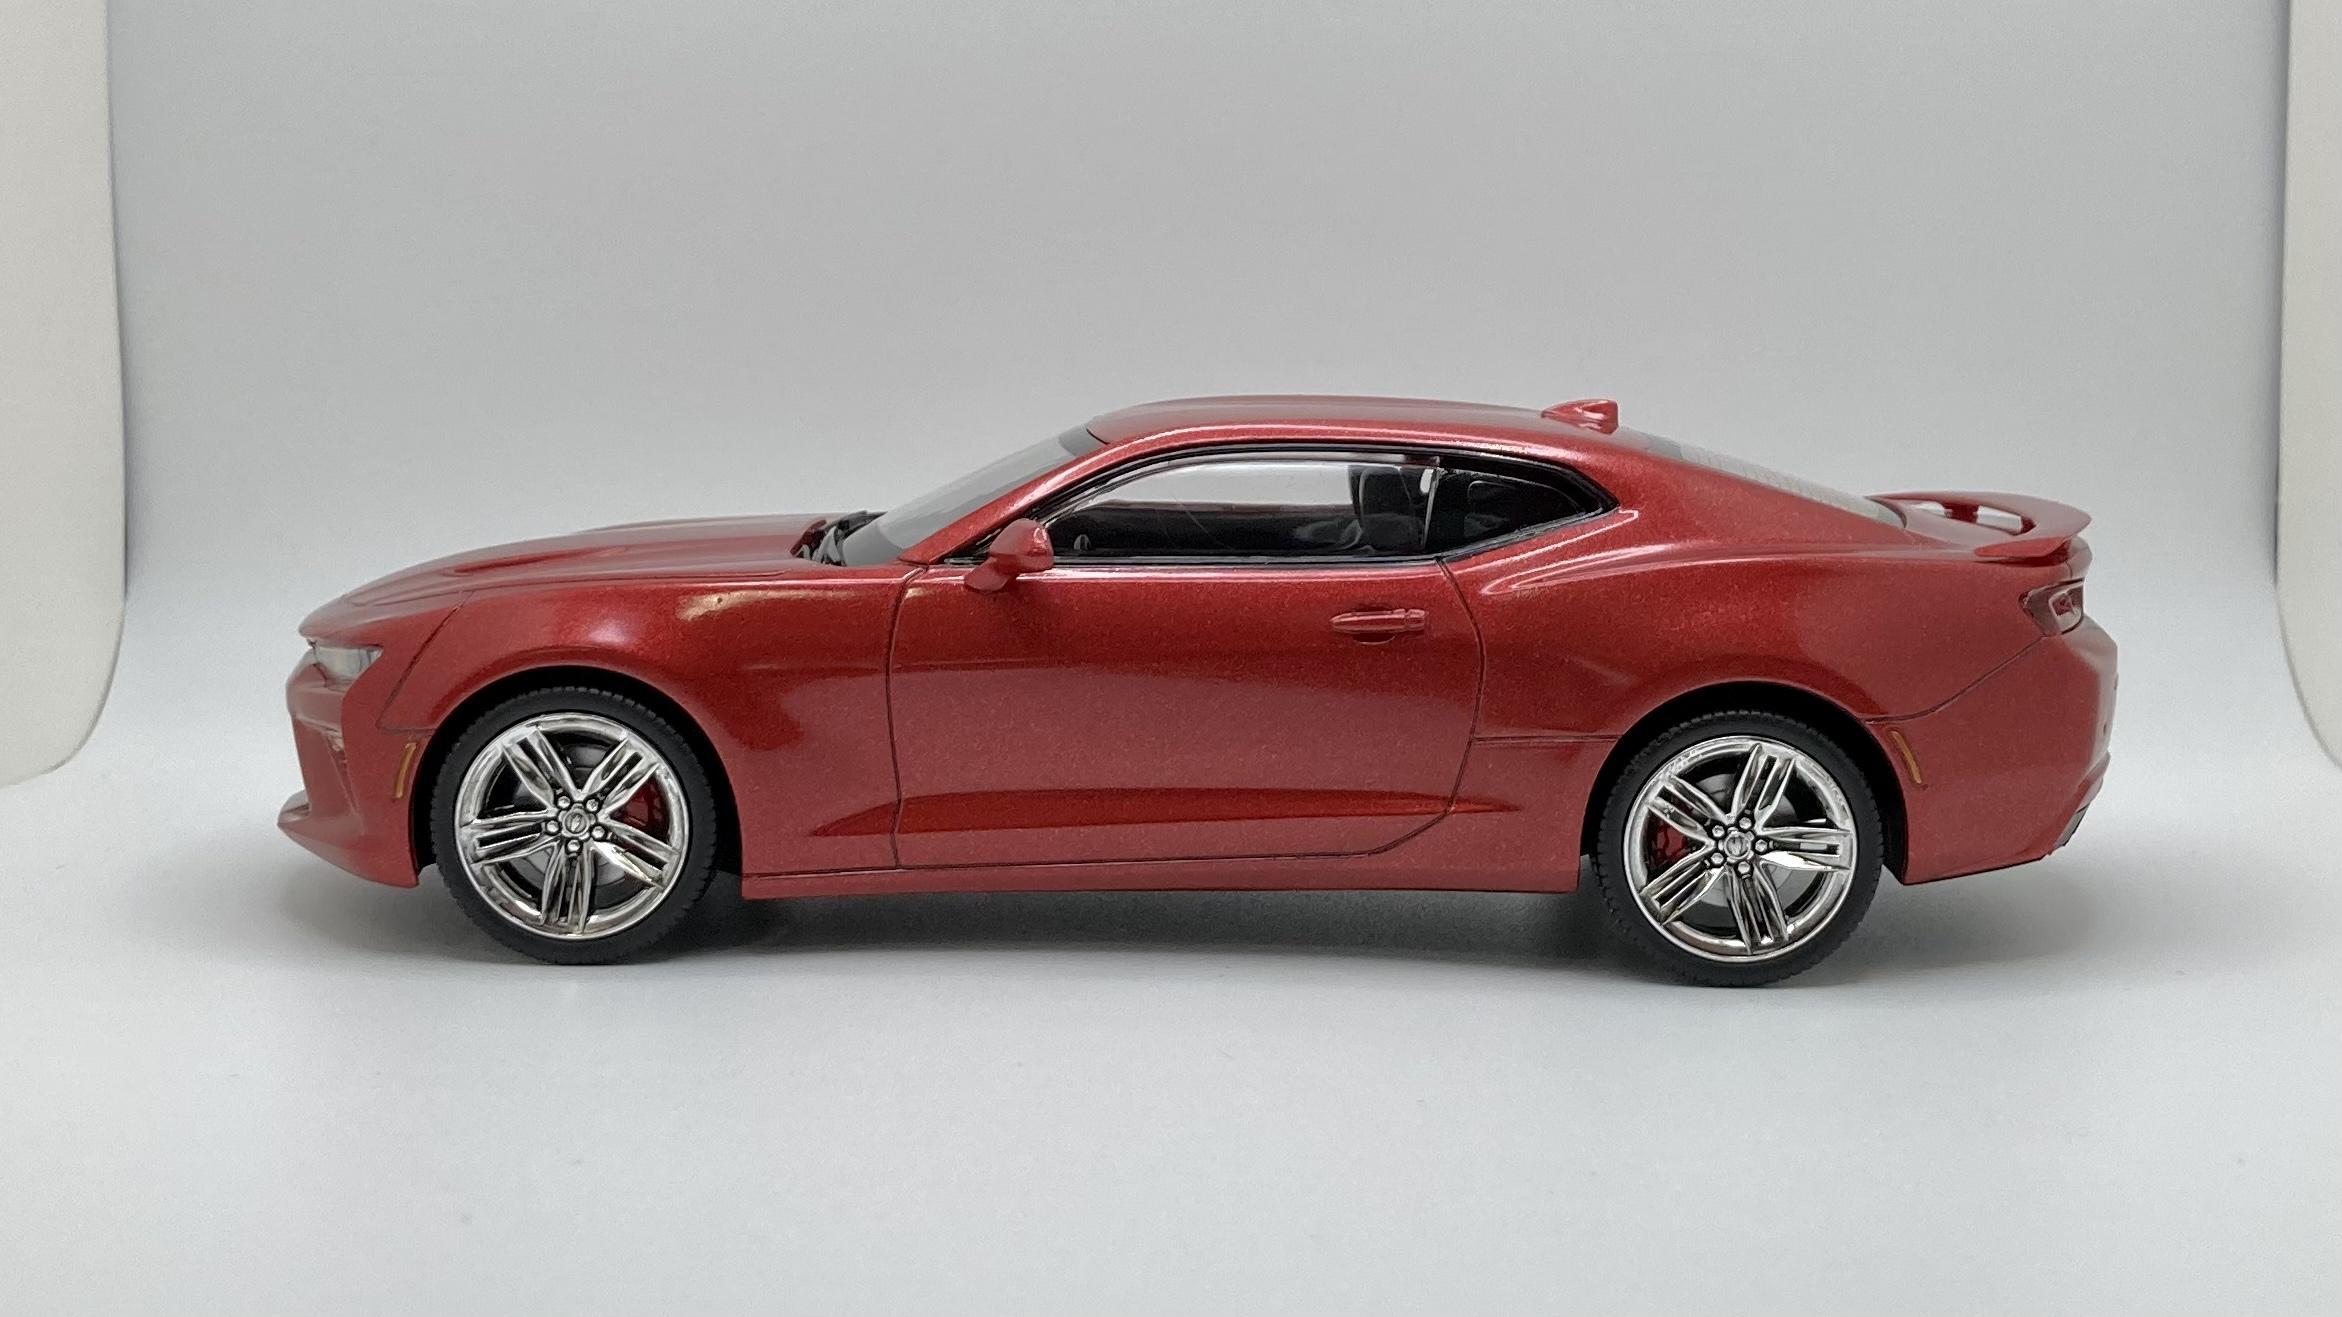
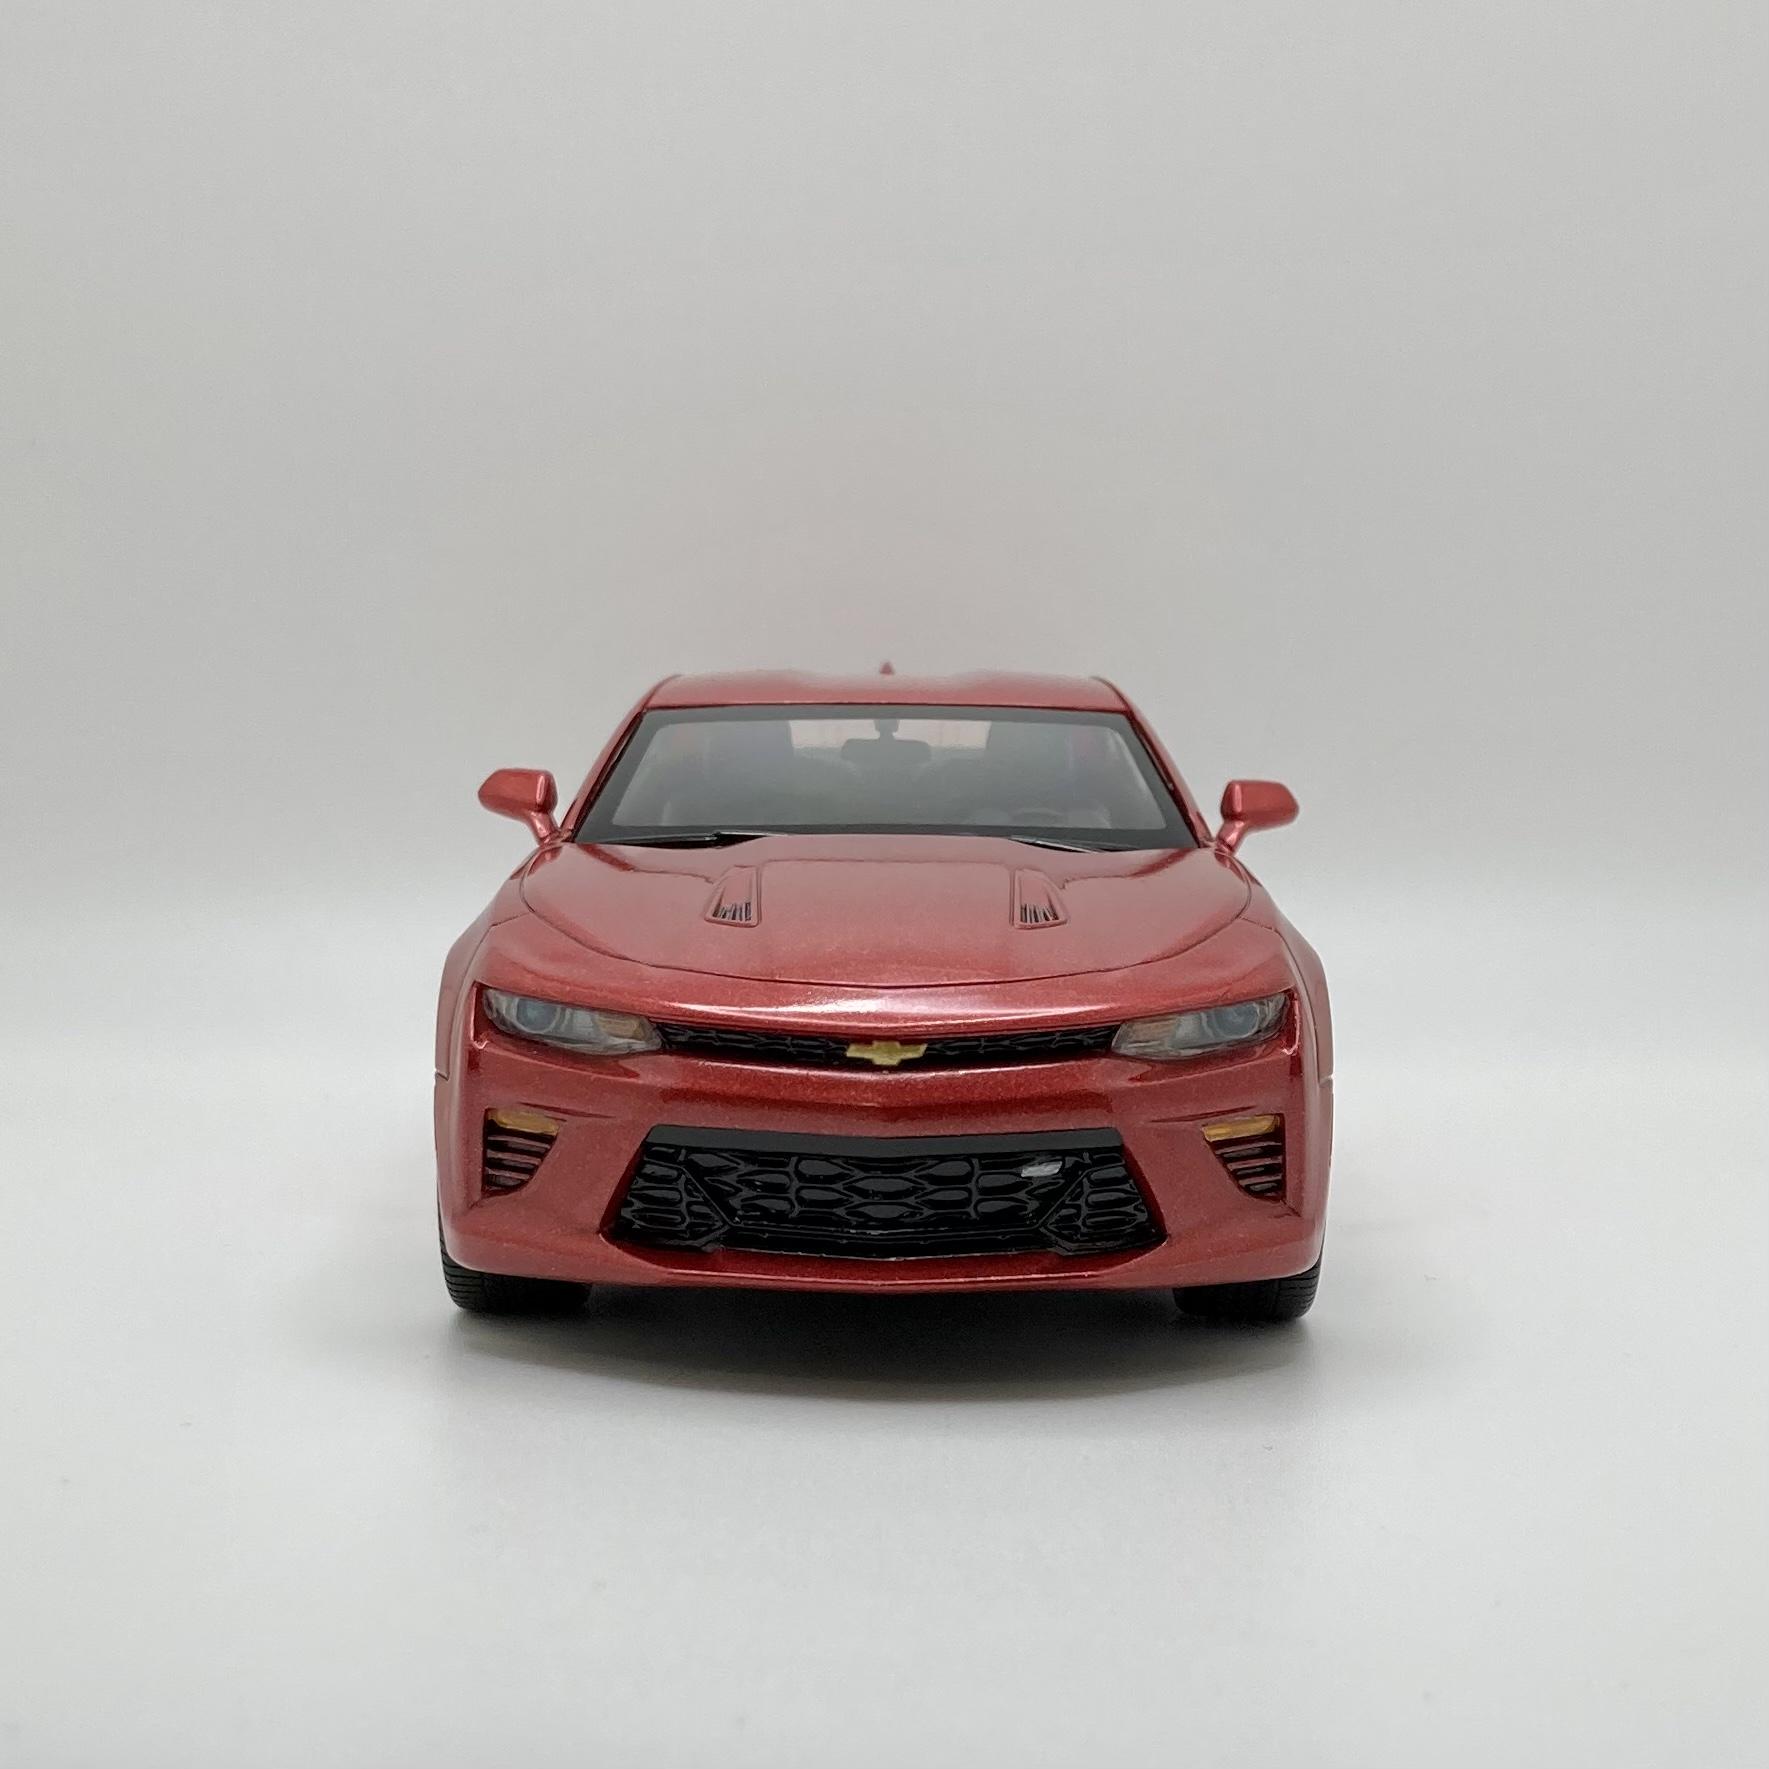
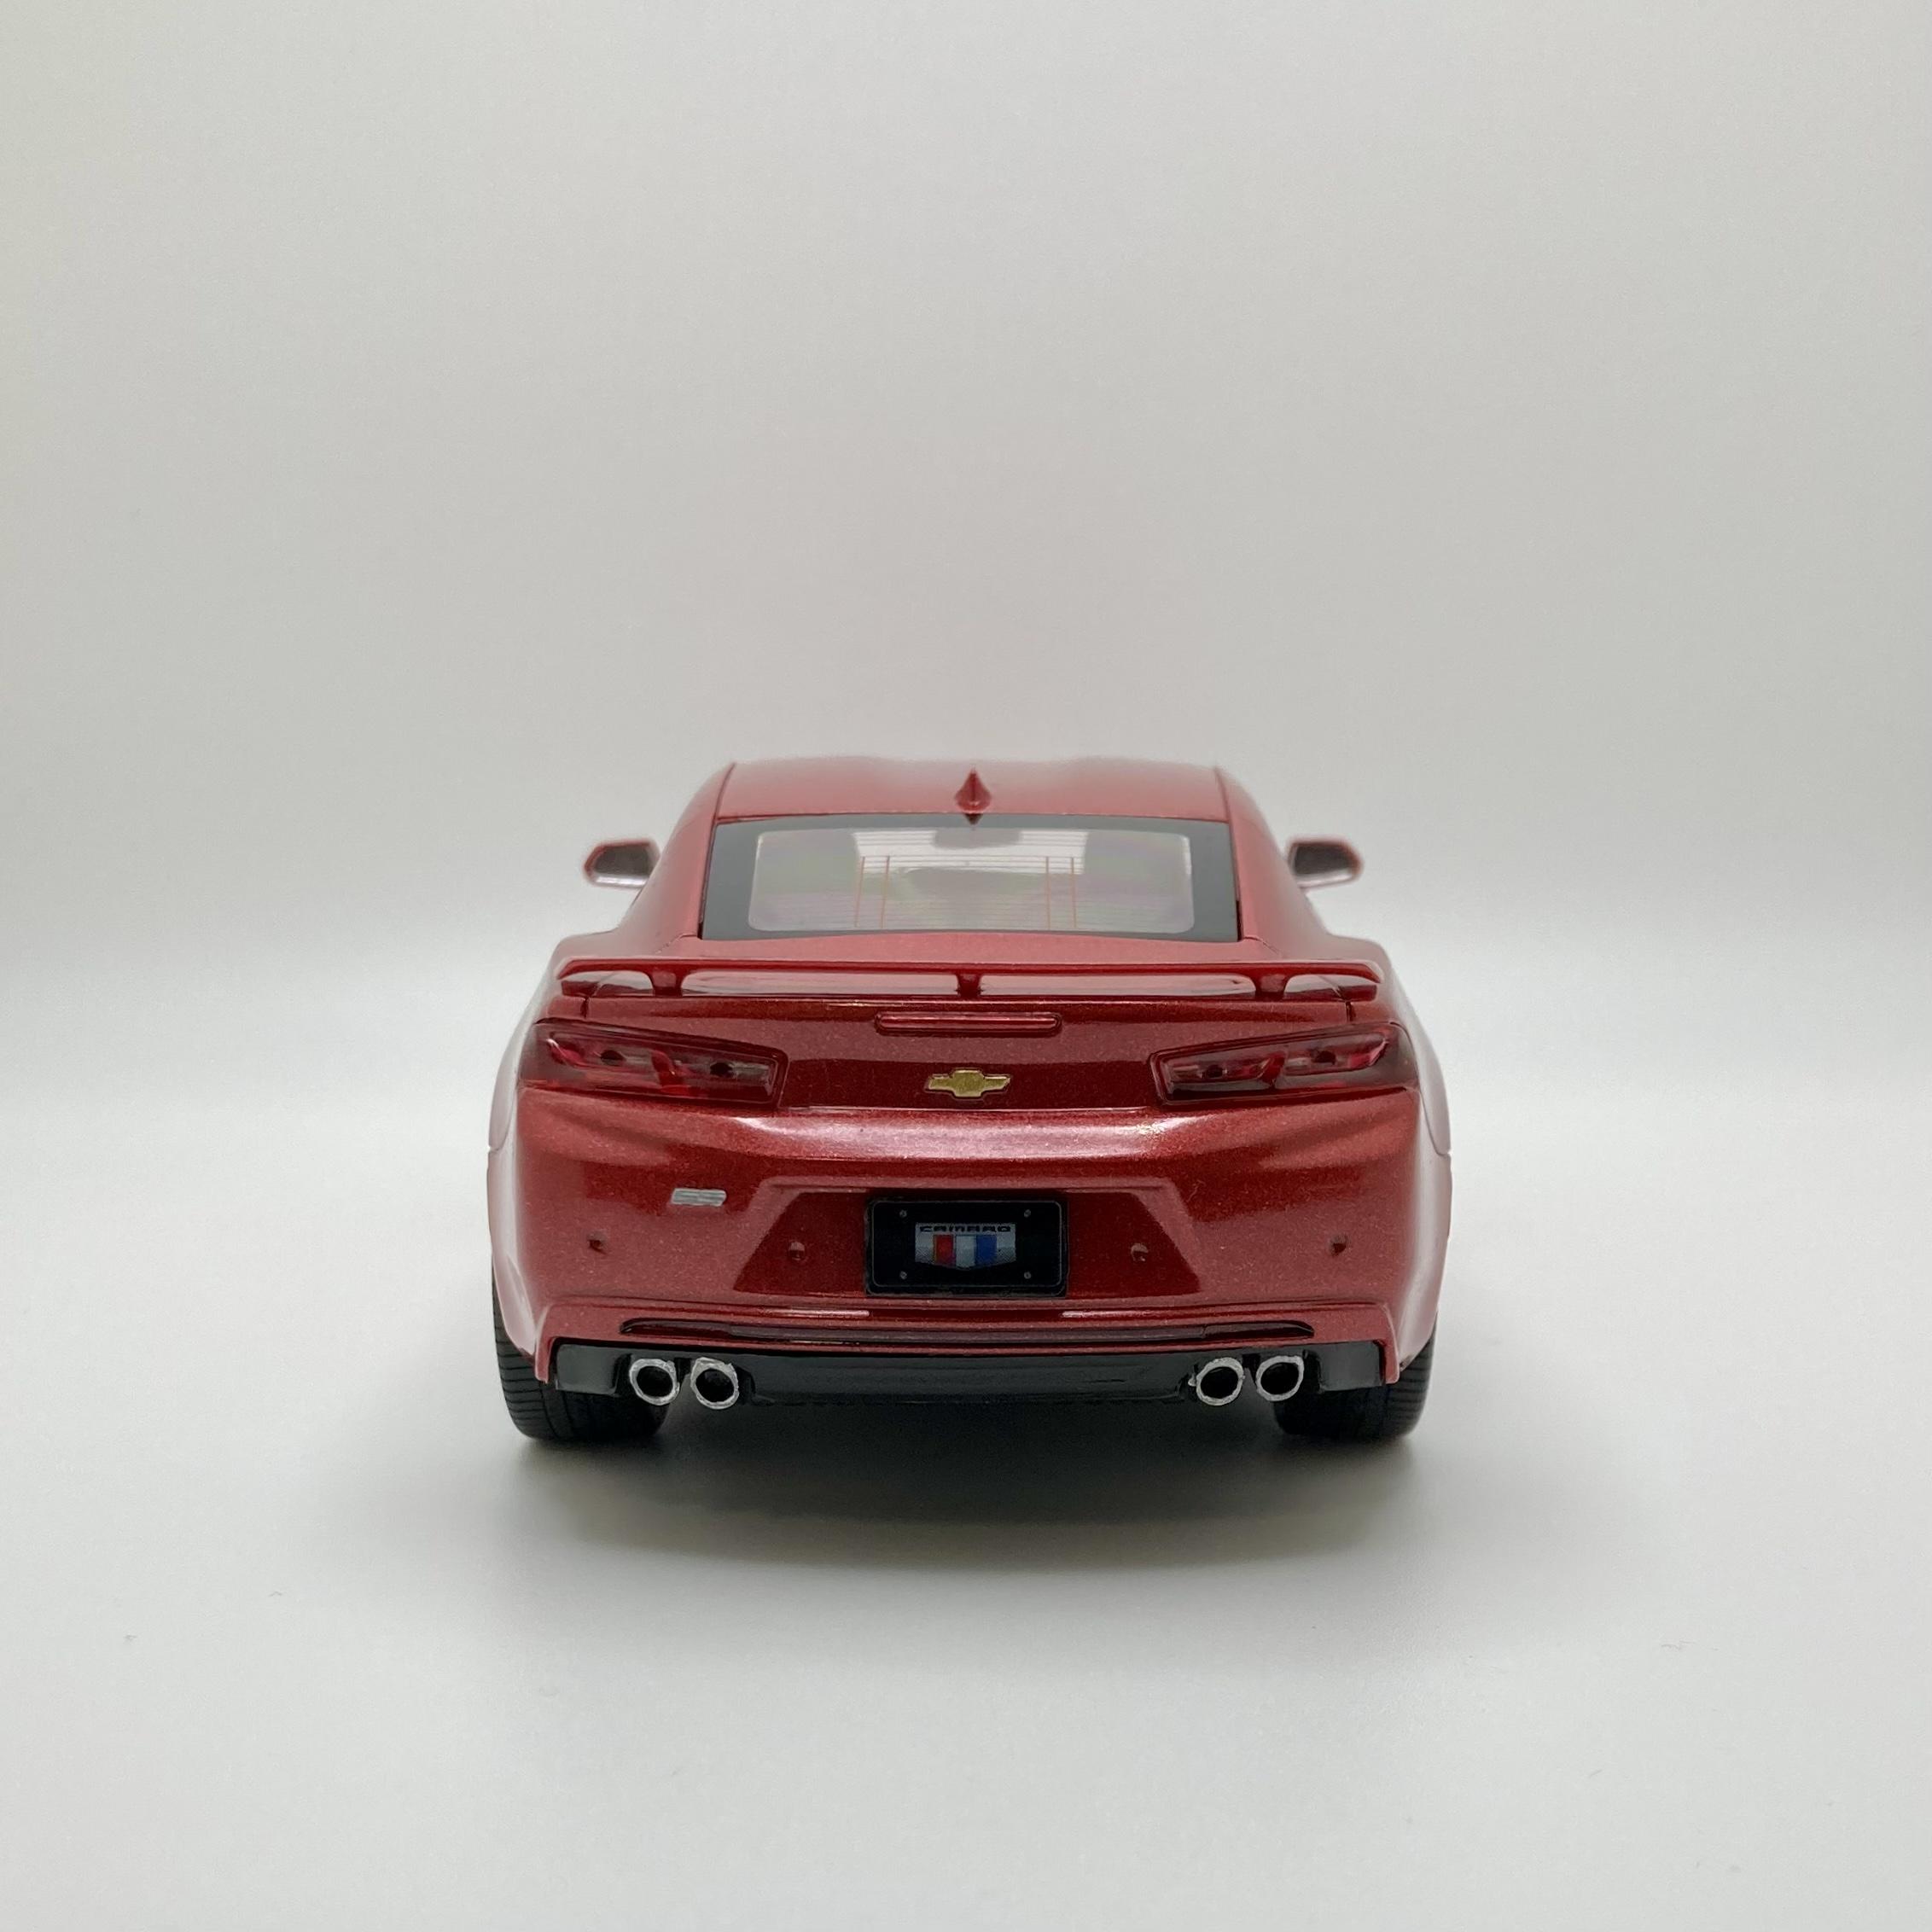
This is a Danbury Mint Camaro SS 350 which I won last week. Technically it is not the Indy pace car because Franklin Mint licensed the rights to that I believe and made a fine model of it with the Indy decals. That is why I am calling it a replica because the interior, hood, engine etc. differ from the actual pace car. Left to right are the Welly Z28, M2 Z28, and the DM SS. These will be the last of the Gen 1 Camaros I plan to collect unless a Donohue Sunoco Camaro should drop into my lap.


.thumb.jpg.e0420fe52e683c60d19e843462316523.jpg)


.jpg.9907e32ff79708637dc268dce7641c79.jpg)
.jpg.719691c775bc61061dd2b9e7f46400a2.jpg)
.jpg.eaa1fa66351b89f787aa7f3c091e2d4c.jpg)
.jpg.9da09b1d90c9ad98e23bef346c140946.jpg)
.jpg.4a56374b0b494b1bcaa4d958c8036b9a.jpg)