Steve Osbourne Posted April 13, 2018 Posted April 13, 2018 Here is how I do my custom wood dashes in large scale. I won't do a wood dash unless I use actual wood. I also cover the wood with EnviroTex (decopauge) as I feel it closely replicates an "automotive finish" as opposed to varnish. I'll explain things and answer any questions as I proceed. I started with a piece of .030 Evergree sheet cut slightly larger than the cigar box wood (about 5 x 6" here).
Steve Osbourne Posted April 13, 2018 Author Posted April 13, 2018 Cover the back of the plastic with masking tape. This will prevent the decopauge from sticking to the plastic. Turn the plastic over and tape it as close to the edges to a piece of cardboard or card stock. Mix 2-part epoxy and spread evenly over the plastic and then lay the wood down. I then cover everything with another piece of card stock and use a veneer roller to smooth things out and get a good bond. You can just use a rolled up rag.
Steve Osbourne Posted April 13, 2018 Author Posted April 13, 2018 (edited) This is the template I made showing the layout of the gauges. It is printed on adhesive backed label paper. I cut out enough to do 4 sets and stuck them to the wood and then cut out the individual pieces. Edited April 13, 2018 by Steve Osbourne added photo
Steve Osbourne Posted April 13, 2018 Author Posted April 13, 2018 I highly recommend using a nibbler tool as pictured to trim the pieces to size. If you attempt to cut them out any other way you risk splitting the wood. The nibbler tool makes a perfect downward slice. Hobbylinc sells them I think.
Steve Osbourne Posted April 13, 2018 Author Posted April 13, 2018 (edited) A little clean up around the edges and then use a pointed tool to locate each of the gauge holes you will be drilling later. Use a 1/16" bit to then drill out each hold location prior to decopauge. Check the masking tape on the backs and fix if needed. Edited April 13, 2018 by Steve Osbourne modified text
Steve Osbourne Posted April 13, 2018 Author Posted April 13, 2018 (edited) I used Old English furniture polish to stain. Edited April 13, 2018 by Steve Osbourne correct text
Steve Osbourne Posted April 13, 2018 Author Posted April 13, 2018 Here are the pieces cut out, trimmed, stained and holes located. Ready for decopauge...
Steve Osbourne Posted April 13, 2018 Author Posted April 13, 2018 You need to elevate each item you decopauge so I made this little jig. Try and make sure everything stays as level as possible when positioning everything.
Steve Osbourne Posted April 13, 2018 Author Posted April 13, 2018 24 hours later here is what we have...
Steve Osbourne Posted April 13, 2018 Author Posted April 13, 2018 (edited) Now we need to drill through and locate every hole. I'm using 3 nominal sizes of K & S Aluminum for the gauge bezels - 3/16", 1/4" and 5/16". You must drill slowly by hand starting with around a 1/16" bit and working up bit by bit until you reach 3/16" which is the minimum that all holes will be. From here continue drilling the Tach & Speedo and clock holes. The clock is the large hole at the top of the center section. It gets drilled out to 1/4". I found the larger holes easier to drill using a hand held chuck. Edited April 13, 2018 by Steve Osbourne added text
Steve Osbourne Posted April 13, 2018 Author Posted April 13, 2018 And here are the results. If you wonder why I make so many it's mostly because of the set-up time involved. You also might want a few extras and some turn out to be seconds (including some of these). Worst case you have extras for future builds. Eventually I will carefully peel off the .030 plastic sheet from the back of each wood piece. Once everything has been drilled you can do so. I'll explain this later. Next I will cut and fit the aluminum tube.
Steve Osbourne Posted April 13, 2018 Author Posted April 13, 2018 Here are a few pictures with the pieces mocked up on the kit dash. From here you can visualize buttons, knobs, etc. to be added later. I've got a few other ideas too.
Steve Osbourne Posted April 13, 2018 Author Posted April 13, 2018 Thanks Trevor. Here's what it looks like with the aluminum tube. These need to be individually fit now due to the convex shape of the dash pieces. The tubes near the outside need to be shallower than the speed & tach. The aluminum tubes are easy to work with.
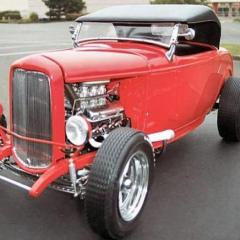
Steve Osbourne Posted April 17, 2018 Author Posted April 17, 2018 Thanks Todd...Is that your 1:1 Camaro? I like the color. I built this one about ten years ago and did the wood dash thing then but it was before I developed my current process. It started to rain when I started taking pictures but I decided to just keep shooting. The effect worked I think.
abelaxe Posted April 17, 2018 Posted April 17, 2018 14 hours ago, Steve Osbourne said: Thanks Todd...Is that your 1:1 Camaro? I like the color. I built this one about ten years ago and did the wood dash thing then but it was before I developed my current process. It started to rain when I started taking pictures but I decided to just keep shooting. The effect worked I think. Yes that is my 1:1 Camaro.....Your dash technique is absolutely amazing.....The paint on this 69 looks awesome....Im working on a 68 Camaro to look like my 1:1.
Recommended Posts
Create an account or sign in to comment
You need to be a member in order to leave a comment
Create an account
Sign up for a new account in our community. It's easy!
Register a new accountSign in
Already have an account? Sign in here.
Sign In Now