Railfreak78 Posted February 23, 2010 Posted February 23, 2010 (edited) This is one I picked up recently. I have never built one of these newer kits due to the appeal is not there for me yet. No chrome, half the style, etc feeling of the new pony cars. So I did come up with an idea after looking at many in magazines and online. I fell back on an old Hot Wheel series for inspiration that did not have a stang. I have to fix some mold lines and go back and touch up the engine paint. So here is the start... Edited March 6, 2010 by Railfreak78
Railfreak78 Posted February 25, 2010 Author Posted February 25, 2010 An update on some minor chassis work. I tried some detailing on the lines and and fuel pump area. I have found some Model Master "air brush only" metalizer leaves a fantastic newer "soft" metal look applied by brush. Anyone will know what I mean if you do your own work on your car. Old alternators were like a cast iron block, now they look like spray painted metal and half the weight. I still have a lot to do but I hope you like so far.
whale392 Posted February 25, 2010 Posted February 25, 2010 Looking good so far Brian. Take a gold and drybrush the heatshields under the exhaust for some more added realism. Also, the gas tank shroud could be washed and drybrushed with various grays and blacks to give it the plastic look the real one has. Rims in Yellow? What have you got planned for the rest of the car (almost has a Penske Camaro vibe to it!)?
Railfreak78 Posted February 25, 2010 Author Posted February 25, 2010 (edited) With the dry brush are you talking like a chalk? I'm not so familiar on it yet but have been more than interested so advice is more than welcome And the yellow wheels.... hmmm.... It will tie in with decals of Mustang that has wheels but it is a much different breed and thats the only hint lol Edited February 25, 2010 by Railfreak78
whale392 Posted February 25, 2010 Posted February 25, 2010 Drybrush is when you dip your paintbrush into the color of paint you want, then wipe most of it off the brush (leaving just a little 'film' on the brush), then brushing across the part; it will deposit just a tint of the color you are applying. Doing this will allow you to vary the intensity and variety of shading applied to a piece, as well as pick out subtle details.
Railfreak78 Posted February 25, 2010 Author Posted February 25, 2010 Thanks for the tip! For a while I worked in an oil change place and have wondered how to get the look of these new fangled cars. I know the view lol
Railfreak78 Posted February 25, 2010 Author Posted February 25, 2010 You get a guess of the different breed?
Jared Roach Posted February 25, 2010 Posted February 25, 2010 Looks awesome so far! Here is the heat sheilds I did on a 06 charger. I bmf them and then I dull coated them, just another option they look pretty convicing in person. Can't wait to see more progress on the mustang!
whale392 Posted February 25, 2010 Posted February 25, 2010 We talking Fightertown or two-wheeled type Brian?
Railfreak78 Posted March 2, 2010 Author Posted March 2, 2010 Here is an update. I did a little bit more of the chassis. Front and rear suspension. I had to cut out part of the heat shield panels where the transmission goes through. It wouldn't fit. I also did a wash on my wheels to rid any chrome and make the face stand out. More to come soon...
Railfreak78 Posted March 4, 2010 Author Posted March 4, 2010 So here is an update. I still need to do some touch up and clean up. I did a greasy grimey wash on purpose. Hopefully when it's done it will tie in with the exterior a bit and make sense
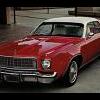
Railfreak78 Posted March 6, 2010 Author Posted March 6, 2010 Ok so here is the body done on the car minus touch up, some more detail and the decals. Enjoy!
Recommended Posts
Create an account or sign in to comment
You need to be a member in order to leave a comment
Create an account
Sign up for a new account in our community. It's easy!
Register a new accountSign in
Already have an account? Sign in here.
Sign In Now