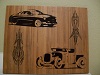
sobpinstriping Posted November 5, 2010 Posted November 5, 2010 Hello again. I just finished this last night. I flocked the interior, and filled in the seam on the taillight surround. the color is tamyia racing blue which i polished and covered with future (It is much shiner in real life). After I took the pics I noticed that their is a gap at the grill. Right after I finished it I went to show it to my girlfriend and didn't realize I had some glue on my hand and I put a couple of glue smudges on the driver side:angry: I had a lot of fun with this kit even though I messed up on a few things. comments are always welcomed cheers mat
Lownslow Posted November 5, 2010 Posted November 5, 2010 awesome i cant wait to snatch one of those up in the near future
scummy Posted November 5, 2010 Posted November 5, 2010 G,day mate , that is sooooo cool and an old vintage kit too that you didnt see finished many times when it was available all those years ago. I like the flock interior it looks great . it looks like theres a build up of glue inside of the headlights ? next time use a little of wood glue as it dries clear or a small wipe of silastic as it dries clear also . But all up thats a great example of this old vintage kit you did a good job of it ,cheers
charlzrocks Posted November 5, 2010 Posted November 5, 2010 Looks pretty good Matt! Nice job on the back end fill...that part makes it look much smoother than not filling that seam! I Love the flocking! What did you use for it? For the bubble tops, try dipping the canopy in Future and letting it dry. It makes the glass look thinner and clearer!
sobpinstriping Posted November 6, 2010 Author Posted November 6, 2010 (edited) G,day mate , that is sooooo cool and an old vintage kit too that you didnt see finished many times when it was available all those years ago. I like the flock interior it looks great . it looks like theres a build up of glue inside of the headlights ? next time use a little of wood glue as it dries clear or a small wipe of silastic as it dries clear also . But all up thats a great example of this old vintage kit you did a good job of it ,cheers The glue in the headlights is the testors canopy glue, it just didn't have time to dry all the way yet, with time it will look right. Looks pretty good Matt! Nice job on the back end fill...that part makes it look much smoother than not filling that seam! I Love the flocking! What did you use for it? For the bubble tops, try dipping the canopy in Future and letting it dry. It makes the glass look thinner and clearer! Thanks for the tip, that makes a bunch of sense. I have gone back and fixed a few things that I saw from the pics, I will try to get around to taking new pics. I can't remember the brand of flocking, next time I'm at the hobby shop I will look. thanks guys! cheers mat P.S. it's Mat with one T Edited November 6, 2010 by sobpinstriping
Harry P. Posted November 6, 2010 Posted November 6, 2010 P.S. it's Mat with one T And it's Predicta. P-R-E-D-I-C-T-A, not "pridictca."
sobpinstriping Posted November 6, 2010 Author Posted November 6, 2010 And it's Predicta. P-R-E-D-I-C-T-A, not "pridictca." Where do you see that? I had to go and grab the box to make sure I spelled it right, and I did. cheers mat
Harry P. Posted November 6, 2010 Posted November 6, 2010 Where do you see that? I had to go and grab the box to make sure I spelled it right, and I did. cheers mat You had "Pridictca." I corrected it.
sobpinstriping Posted November 6, 2010 Author Posted November 6, 2010 You had "Pridictca." I corrected it. ohhh, I can't believe I misspelled it, I just looked at the box before I typed it, I think I was some where else. Or I could of went a different route and said; You are messin with my creativity mannnn. cheers mat
Harry P. Posted November 6, 2010 Posted November 6, 2010 ohhh, I can't believe I misspelled it, I just looked at the box before I typed it, I think I was some where else. Or I could of went a different route and said; You are messin with my creativity mannnn. cheers mat I don't know where your head was at when you typed it, but you typed Pridictca... I would never have known it because I didn't see your post, but whenever anyone reports a post, I get an automatic email telling me that someone reported a post. Most of the time people report a post because somebody said something they shouldn't have, but in this case a very "spelling aware" forum member called you out!
sobpinstriping Posted November 6, 2010 Author Posted November 6, 2010 Wow, I guess a misspelled name can offend some people, I'm sure I would of noticed it at some point, thanks for fixing it for me. cheers mat
Recommended Posts
Create an account or sign in to comment
You need to be a member in order to leave a comment
Create an account
Sign up for a new account in our community. It's easy!
Register a new accountSign in
Already have an account? Sign in here.
Sign In Now