diymirage Posted January 11, 2011 Posted January 11, 2011 hey guys this is where i will be showcasing the build of my 74 GTX roadrunner i remember the first time i bought this kit i wasnt very impressed with the boxart but for 7.50 i couldnt leave it there so i took her home as soon as i opened the box i was pleasantly surprised, not only did this kit include some awesome rear rubbers (threaded but clearly marked "for race use only") and a superbird wing it also has some of the nicest chrome engine dress-up im aware of at any rate... i had a set of steel wheels in my parts box and i wanted to build a no-nonsence muscle car based on those rims i found a matching set of from and rears (well, actually rears and deeper rears) and will be using the racing tires from the kit the front tires came out of the 442 kit power will be through a dressep up 440 with a sixpack setup and custom exhaust im order to run a custom exhaust on the MPC frame i had to remove the molded in piping and i will have to fill in the holes and smooth it out paint will be turnsignal orange, with a black hood ,black engine bay and white strobe stripes im planning on using the lowered front mounting points for the kingpins and raising the rear end up just a little then i will also try my hand at making a set of slapper bars the interior will be bone stock with the exception of some gauges and a pro shifter (remember, if it doesnt make it faster were not waiting money on it) this should be a relative quick build with all parts coming from the kit, the partsox or scratchbuild from stock (seeing how i got several builds waiting on parts) i should be able to have some pick up tonight as always, comments and suggestions are welcome
Keef Posted January 12, 2011 Posted January 12, 2011 the interior/chassis pan from the amt 71 charger kit is alot more detailed and more accurate as well and only requires minor modding to make it work with this kit http://s12.photobucket.com/albums/a221/BeeMopar/74%20GTX/#!cpZZ1QQtppZZ24
diymirage Posted January 12, 2011 Author Posted January 12, 2011 that dash looks nice to bad i dont have an extra tub laying around iether way, im going to have to reconsider where im going with this i laid down the paint last night and it didnt come out as i wanted it at all it looks more like a aqua green them turnsignal amber and with as glossy as it is i cant pull off the theme i wanted so im thinking of finding some more baller rims and going showcar with it
diymirage Posted January 13, 2011 Author Posted January 13, 2011 barely started and allready i ran into some major complications i botched up the paintjob to the point of it not looking anywhere like my origenal vision for the build so instead of doing the bare bones deal i changed it all over to a touring type car interior will now be updated with bucket seats, maybe a roll cage rolling stock will be saved for a later build (maybe a fairlane) and is replaced by a set of rims from a lambo diecast i got in on trade the striping will now need to be done in black (if anyone has an extra set please PM me) here are some shots of the body and the wheels (mocked up at the right ride height) clearly there is now way i can call this a factory paintjob wanna guess what that rear axle is made out of ?
71datsun1200 Posted January 13, 2011 Posted January 13, 2011 Q-tip ? what's the name of the color you sprayed and what brand is it. The wheels fit pretty good under there. did you have to tub it?
diymirage Posted January 14, 2011 Author Posted January 14, 2011 Q-tip ? what's the name of the color you sprayed and what brand is it. The wheels fit pretty good under there. did you have to tub it? the paint started of with two coats of no name grey sandable primer then i shot two coats of model masters german silver (its a mettalic paint) out of a rattle can followed by 5 coats of model masters turn signal amber thinned down about 1:1 with laquer thinner the paint did gain a little more of a golden hue overnight (looked more green when it was wet) but this is what the paint looks like in the bottle as for the rims, they are just about as wide as the racing tires that came with the car so no tub was needed but i had to make sure i cut down the mounting pins because it is a tight fit (i really do like those old MPC chassis)
diymirage Posted January 15, 2011 Author Posted January 15, 2011 THANKS ! dont mention it i do like the way it came out but it wasnt what i had invisioned but ill get over it i painted the hood, splitter and rear wing (kitbashed) gloss black spend the last 3 days looking for some decals and got zip so i figured, forget it, ill make my own i found a picture of a set of strobe stripes on the webs and a cool "GTX" graphic that im gonna ad to it the stripes will run over the roof and come down behind the doors then at the bottom they will sit on top of the GTX decal on the rear quarter panels printed them of this morning, should have some shots tonight
diymirage Posted January 15, 2011 Author Posted January 15, 2011 here is a shot of the decals in place im pretty pleased with it so far, but they will look better cleared and with the edges sanded down
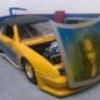
diymirage Posted January 31, 2011 Author Posted January 31, 2011 got a little work done to the GTX over the weekend BMFed, detailed, cleared and polished the body afixed all for wheels and started work on the engine here are some shots of where she sits (should be able to put everything minus the engine together tomorrow after the glass dries i wanted the engine to look new, but not factory, like it was rebuild by a speedshop, so i went with a nice racy (non factory) red
vaughn Posted February 1, 2011 Posted February 1, 2011 I think she's lookin pretty good. I hope to get back to building soon.
Recommended Posts
Create an account or sign in to comment
You need to be a member in order to leave a comment
Create an account
Sign up for a new account in our community. It's easy!
Register a new accountSign in
Already have an account? Sign in here.
Sign In Now