tyrone Posted February 20, 2013 Posted February 20, 2013 I have to agree with Jeff, I dont think they look bad at all.. If it were me I would just mist on some different shades of metalizer burnt steel, exhaust,and aluminum like Jeff said , that way they look like some heat has run through them... Don't let this stop you Joe... they look fine.. We want to see this bad boy done....lol...
Mooneyzs Posted February 20, 2013 Posted February 20, 2013 I am agreeing with Jeff and Tyrone. I think they look great Joe. Tyrone has a great idea about misting some other shades of metalizer on them. Keep going with them man they are looking great.
Prostreet Posted February 20, 2013 Author Posted February 20, 2013 Thx. for the help guys. I do have some hot metal blue, I was thinking i could hit the welds and radius's lightly with that. I also have some Pale Burnt Metal coming, Not sure what that looks like yet, and i have some semi-matte clear also. I only use a single action brush and it's crappy, Any recomendations?
vintagedragfan Posted February 20, 2013 Posted February 20, 2013 hey Joe , don't get discouraged now bro, you can tone them any way you want with different hughes like transparent blue and amber, do some testing on scrap first to get the desired look, not a big deal man
chris coller Posted February 21, 2013 Posted February 21, 2013 You might want to try titanium gold by Tamiya. It has almost the same hue as the header of the real car. Might have to shoot it real fine. I use Model Masters brass to achieve the heat stained look and the come back and hit the weld seams with some silver paint. The build looks awesome.
Prostreet Posted February 21, 2013 Author Posted February 21, 2013 Thx. for all the help and info guy, Clay Kemp was checking out my thread and seen the problem i had and was kind enough to email me an offer ways to fix it and i can't thank him enough for that. I ended up going back over the headers with a light mist oh the Alclad high polish and went darker in some areas. They look way better now and exactly like i wanted them to look, I wanna go back and hit a couple of the radius's and make them a little darker tint of the yellow and hit the welds with a little more of the high polish. Not sure what i wanna do about the black that are around the welds like in the 1:1 picture. I will get some better pictures of the header on the engine this weekend, they look way better in person. Very happy now and back on track.
tyrone Posted February 21, 2013 Posted February 21, 2013 They look great Joe... glad everything worked out for you...
Mooneyzs Posted February 21, 2013 Posted February 21, 2013 Joe.... Headers look killer man. That's awesome that Clay emailed you on how to fix. You sure knocked the headers out of the park and glad you were able to fix them. Looking forward to your next update.
vintagedragfan Posted February 21, 2013 Posted February 21, 2013 see no problem Joe, they look killer allready!!
ScrappyJ Posted February 22, 2013 Posted February 22, 2013 Looking good, Joe! Have you decided what you're going to do on the fuel pump? I think you mentioned a resin piece, but I know you also wanted to get it in billet.
Prostreet Posted February 22, 2013 Author Posted February 22, 2013 Looking good, Joe! Have you decided what you're going to do on the fuel pump? I think you mentioned a resin piece, but I know you also wanted to get it in billet. Thx. Dirk, I seen Jim posted on facebook he is going back in the shop and he has the pump programed and will make one next week. I hope to have the headers mounted this weekend and try and build a throttle body.
Prostreet Posted February 27, 2013 Author Posted February 27, 2013 Little update, Been doing some work here and there on the intake and assembled the wheelie bars. I did the bars Matte black and used RB motion rod ends for the connections and i'm using a Micro Nitro wheel. I built a throttle body and added linkage and some detail bolts, Still need to paint the TPS on the top of it and add wire. I also made the Main connection to the throttle body and very happy with the way it turned out, It to will receive weld decals. I plumbed the fuel rails with RB motion fittings and ProTech line and made the fuel log at the front of the intake that will get connected to the pump. I still have to make 6 V-band clamps for all the connections. I should have the headers mounted this weekend and maybe even have the turbos connected to the intake.
Mooneyzs Posted February 27, 2013 Posted February 27, 2013 Joe....super impressive work bud! Those wheelie bars look awesome and I am digging them in the matte black. All of the detail work to the intake looks killer. The fuel lines are awesome man. This is coming along great and giving me some motivation to get back to my funny car build and get more work done on my engine. Keep up the great work on this one
tyrone Posted February 27, 2013 Posted February 27, 2013 COME ON DUDE...... I'll respond later.... dont know what else to say....lol..
vintagedragfan Posted February 27, 2013 Posted February 27, 2013 very impressive Joe, don't see how it could look any better!! keep after it bro
Magic Photos Posted February 27, 2013 Posted February 27, 2013 Wow great work on this build Joe, the detail is just wild.
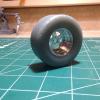
Red rocket 10 Posted February 27, 2013 Posted February 27, 2013 Mighty fine work Joe ! Love the wheelie bar , what did you use for the wheel? Leonard
doomcrew Posted February 28, 2013 Posted February 28, 2013 Awesome build there mate. the headers look great, and love the induction system. Top stuff. Steve
Prostreet Posted February 28, 2013 Author Posted February 28, 2013 Thx. For the kind words guys, It's turning out way better than I thought it would.
comp1839 Posted March 2, 2013 Posted March 2, 2013 that looks fantastic joe! sorry i haven't responded earlier but, i couldn't log on to this site or my photobucket account for the past month. all of sudden it started working today........go figure. any way, super job.
Prostreet Posted March 4, 2013 Author Posted March 4, 2013 (edited) Thx. Dave. Ok i was able to get alot done this weekend. The headers and supports are on for good, When i was Doing the decal's for the headers i left a tube loose on the passenger side and when i reglued it i didn't get it exactly where it was before so now that turbo is a little further away from the firewall then the driver side, no biggie just buggs me lol , I also got the intake with the throttle cable installed. I got the cold side for the turbos all roughed in, Where you see the aluminum tube that will be where the V-band clamps go and i will also have some down where the tubes connect to the turbo's. I was also able to get the wheelie bar installed for good. Just waiting on the Mag and fuel pump from Jim. Edited March 4, 2013 by Prostreet
Mooneyzs Posted March 4, 2013 Posted March 4, 2013 Joe... Killer work bud. Man that engine is awesome and the details are coming together. I love this build. Headers look great installed and so does wheelie bars. I need to purchase some of those wheelie bar wheels from Jim. And the start of the cold side to the turbo looks great. Can't wait to see how you make the vband clamps. I can't wait to see the next update.
TedsModeling Posted March 4, 2013 Posted March 4, 2013 Just wanted to put my two-cents in - AWESOME BUILD and attention to detail.
tyrone Posted March 4, 2013 Posted March 4, 2013 Just wanted to put my two-cents in - AWESOME BUILD and attention to detail. X1000
Magic Photos Posted March 4, 2013 Posted March 4, 2013 Joe this build is coming out so cool, great detail work.
Recommended Posts
Create an account or sign in to comment
You need to be a member in order to leave a comment
Create an account
Sign up for a new account in our community. It's easy!
Register a new accountSign in
Already have an account? Sign in here.
Sign In Now