philo426 Posted November 22, 2011 Posted November 22, 2011 AS I mentioned in the General section, I found this Hubley Packard for 2 bucks at a local flea market and decided to paint and add the missing parts.
philo426 Posted November 22, 2011 Author Posted November 22, 2011 After disassembly I noticed that the 2-piece body does not align perfectly and it would be necessary to grind the step down to correct the problem.
philo426 Posted November 22, 2011 Author Posted November 22, 2011 It has pretty nasty ejector pin marks on the underside of the running boards and spare tire well that required grinding and puttying.thus
GTMust Posted November 22, 2011 Posted November 22, 2011 (edited) Interesting to see a diecast build up/resto. I also have a glue(?)bomb version of this Packard in phaeton body style. I'm going to be watching with interest... maybe I'll be inspired to do something with mine? Edited November 22, 2011 by GTMust
philo426 Posted November 22, 2011 Author Posted November 22, 2011 Yes the Dual Cowl Phaeton is a nice body style also!
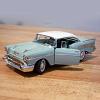
philo426 Posted November 27, 2011 Author Posted November 27, 2011 Here it is after a few coats of paint(Don't worry about the flat sheen,it will receive several gloss coats after the paint has cured and been polished).
philo426 Posted November 27, 2011 Author Posted November 27, 2011 Will do!I plan on adding silver trim around the body to match the fenders!
philo426 Posted December 17, 2011 Author Posted December 17, 2011 Here are the fenders after the first coat of silver.
GTMust Posted December 17, 2011 Posted December 17, 2011 One thing I hated about these Hubley/Gabriel metal kits, was the use of paper, stick on interior panels. Do you have plans to fabricate a more realistic interior? Tony
philo426 Posted December 17, 2011 Author Posted December 17, 2011 Yes indeed!I plan on making interior panels and painting them tan to match the seats.I decided not to remove the wheels/tires from the front axle and rear differential.I suspect they may be epoxied on and don't want to damage them.I wrapped them in plastic to avoid getting paint on them.
philo426 Posted December 17, 2011 Author Posted December 17, 2011 The frame,rear diff and front axle have been primered and painted.
philo426 Posted December 20, 2011 Author Posted December 20, 2011 Here is the body and fenders after BMF.
GTMust Posted December 20, 2011 Posted December 20, 2011 I don't mean to be rude..... but, if it were me....... I'd eliminate the green trim around the edges of the fenders. It's difficult to do cleanly and (I think) it looks better without it. Otherwise, looking great! Just a suggestion. Tony
philo426 Posted December 20, 2011 Author Posted December 20, 2011 I like the green trim so it stays!Next up:I have to fabricate an interior out of sheet styrene and then get ready to disassemble the engine and paint it!
philo426 Posted December 31, 2011 Author Posted December 31, 2011 Installed the muffler.The diecast unit required no finishing.
philo426 Posted December 31, 2011 Author Posted December 31, 2011 Mounted up the fenders and radiator core.
philo426 Posted January 2, 2012 Author Posted January 2, 2012 Mounted up the grille,lightbar and headlights.The headlights from the Monogram Caddy kit look just right.
Recommended Posts
Create an account or sign in to comment
You need to be a member in order to leave a comment
Create an account
Sign up for a new account in our community. It's easy!
Register a new accountSign in
Already have an account? Sign in here.
Sign In Now