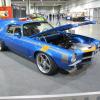
Chas SCR Posted October 18, 2012 Author Posted October 18, 2012 Pic 1 This shows how smooth the black and epoxy looks after being clearcoated. Now i can paint it mid black and will not hurt either the clear coat or the rubber and still have the depth and thickness i need when the window is put in. Pic 2 Now look at what the tape does on top of the door gard the textur is show'n even more and when it's flat black it will be the same as the real car and not smooth like the window rubber or the paint job Pic 3 Runt what it looks like under normal light and in a clean paint booth! Shows the bronz to the red real nice.
Chas SCR Posted October 18, 2012 Author Posted October 18, 2012 Thank you Bryan, ya it's coming along good right now, About another day on the body and that part will be done and I can get to the fine detail of the interior and chassis. This still has a long way to go before being done.
Scalper Posted October 18, 2012 Posted October 18, 2012 looking pretty nice so far.. like the 2 tone paint .
Chas SCR Posted October 20, 2012 Author Posted October 20, 2012 pic 1 Did the flocking today to the interior "Runt" now getting this done and the rest will be a breaze if it works out. Pic 2 and 3 In the next two pics you will see the front and back side of the rim. The rim in the front has all 3 colors and the back is all done in flat black. This gives the shading in the front more 3d affect and helps with the brakes. Pic 4 Better shot of the door with the door gard and how the flat black shows up to the red on the paint job. last pic Here is the door's done, It has the arm gard in black that will be two shades, The closer part to the window edge will be in mid gloss black and the inner part will be flat black. This will give it the look of the rubber that is between the door and window frame and then the inner arm gard that is in place.
Chas SCR Posted October 22, 2012 Author Posted October 22, 2012 Getting the 5 way harness built today!
dimebolt Posted October 22, 2012 Posted October 22, 2012 Looks even better everytime I see it. Great job Chas Corey
Chas SCR Posted October 23, 2012 Author Posted October 23, 2012 Belts are now done and have to connect them to the roll bar.
Chas SCR Posted October 24, 2012 Author Posted October 24, 2012 Pic 1 Seat belts and seats are now in. So is the rollcage connected to the floor mounts and the betls are connected to the rear grab bar. Pic 2 Here is the back showing the belts are hooked up to the grab bar. Pic 3 and 4 together. This photo here shows the floor detail the padding under the center consel and also the padding up by the feet area. The pic after will show the real car. There is the tan padding.
Chas SCR Posted October 24, 2012 Author Posted October 24, 2012 Putting the door strap in. Real rubber and bolted in place
Chas SCR Posted October 25, 2012 Author Posted October 25, 2012 Pic 1 Rear window crank machine and press fitted in place. The rear's are diffrent then the front ones Pic 2 Showing the front window crank part, Also you can see the secound leather strap on the door just under it. Pic 3 Showing the back side where the rear window crank was press fitted in so it will hold right.
Chas SCR Posted October 26, 2012 Author Posted October 26, 2012 Did the window crank arms today and will do the nobs tomorrow. The front one has also the center cut out of them. This is showing that the crank arms are off the door padding.
nate47 Posted October 28, 2012 Posted October 28, 2012 Where did you get the 62 body from I've been looking for one for a long time!
Chas SCR Posted October 28, 2012 Author Posted October 28, 2012 Found it on ebay, It was the only 2nd one I seen and the first sold for 160 and I got this one for 140.
Chas SCR Posted October 31, 2012 Author Posted October 31, 2012 getting the dash work done last night!
Chas SCR Posted November 1, 2012 Author Posted November 1, 2012 Getting the hood parts made tonight for the hood hings. The hood will be display'ed with out the hood on but will have full detail to where it can be bolted up at any time. This is the inner fender boss that will hold the hood hings in place.
Chas SCR Posted November 5, 2012 Author Posted November 5, 2012 Put the hood pads on tonight so I can put the bolts in place and start putting the hinges on. This part here is how small the hood hinge tabe that bolts on to the hood. And every thing has to fit in this little hole, When it is done i'm not sure if it will be a full working part or in the up right spot so you can see the detail or not. The hood will not be on the parts but will have every thing in place to be bolted on if I elect to.
Chas SCR Posted November 5, 2012 Author Posted November 5, 2012 Thanks, I am doing a lot of work today so there will be a lot of updates tonight and tomorrow on this.
Chas SCR Posted November 6, 2012 Author Posted November 6, 2012 Putting in the exhaust tonight, I have every part made and painted and drying, Tomorrow will have the full exhaust ran I hope.
Recommended Posts
Create an account or sign in to comment
You need to be a member in order to leave a comment
Create an account
Sign up for a new account in our community. It's easy!
Register a new accountSign in
Already have an account? Sign in here.
Sign In Now