Chas SCR Posted January 29, 2013 Author Posted January 29, 2013 Was able to put the front tires and brakes on it today and run the lines to the firewall. About another 20 other things need to be done before it's done and ready to go.
Chas SCR Posted January 30, 2013 Author Posted January 30, 2013 Filling in the sides and seam fitting them together. I use 5min epoxy on this so it will fill in nice and smooth and flows even. The last two pics showing some thing special as I did get the rear bumper connected and put on tonight.
Chas SCR Posted February 4, 2013 Author Posted February 4, 2013 (edited) The winch connecter on the bumper as I was doing little detail left. The new air intake tube that still needs to be wired and texture and the last little one is part of the fuel injecting. Edited February 4, 2013 by Chas SCR
Scale-Master Posted February 4, 2013 Posted February 4, 2013 What happened to the bottom of the door? It is really noticable. Do you think you might have enough clear on it to rescribe and buff it out?
Chas SCR Posted February 4, 2013 Author Posted February 4, 2013 I'm not very good at scribing in the new door lines. Not sure if I fill it in and move the door line up a little and get it off the top of the rocker that it will not bleed through.
Chas SCR Posted February 4, 2013 Author Posted February 4, 2013 @Mark, Ok I try'ed and did not feel positive about doing this and I know where I need to get better at that part. How about I buy dinner at the hotel thur or friday and you walk me through on how to scribe lines in putty after it drys?
Guest Posted February 4, 2013 Posted February 4, 2013 Why did you move the door line up? It doesn't look like it had been done to the real car. It looks like you removed the lip at the top of the rocker which wasn't done on the real car either. Also, why was the chrome strip that runs the length of the body not removed? Just wondering if you're doing a replica or just a loose representation of the real car?
Scale-Master Posted February 4, 2013 Posted February 4, 2013 After looking at some of the other pictures and reading Roger's post, I am seeing other issues with the rocker area and the door line. At this stage I don't have an answer that would fix one problem without making another issue more prominent. As for scribing, it is easy, when done before painting... I use an X-Acto knife and a scriber along with a straight edge. Just go slow and make light passes, too much pressure can lead to deviation from the desired line, or worse, a slip.
Chas SCR Posted February 4, 2013 Author Posted February 4, 2013 Roger, yes the rocker had to be moved flush from the top of the lip down and filled in smooth level with the same thickness as the rear part of the lower quarter panel. In the resin body the rocker was really moved in more then ..020. Also they flow the rocker panel down about another 1/8th inch to be level with the bottom of the frame rail that is even with. If you look the door line is in the middle of the rocker panel that I had to fill in and I had trouble with it chipping the putty when I did it. This is one issue I have had trouble before and have not really figur it out yet. This is why I was ask Mark on that issue as he has help me in the past with the paint work and I know he is one of the best at it.
Chas SCR Posted February 4, 2013 Author Posted February 4, 2013 also that is the pic of the body before I did any thing to it. I did not do the resin cast of this body as it's an very old one. Nothing from Model Car World on parts ie grill, head lights or bumpers on either trempter or rat packer kit lines up with this body.
Chas SCR Posted February 5, 2013 Author Posted February 5, 2013 Now that I have the air intake tube put in also you can see the two sliver strips on it and because of the scale only could get one of the others on. Also the red,white and black wire are coming from a plug in to the air senser in located in the tube. Then the last is the hood hinges are now bolted in place.
Guest Posted February 5, 2013 Posted February 5, 2013 Roger, yes the rocker had to be moved flush from the top of the lip down and filled in smooth level with the same thickness as the rear part of the lower quarter panel. In the resin body the rocker was really moved in more then ..020. Also they flow the rocker panel down about another 1/8th inch to be level with the bottom of the frame rail that is even with. If you look the door line is in the middle of the rocker panel that I had to fill in and I had trouble with it chipping the putty when I did it. This is one issue I have had trouble before and have not really figur it out yet. This is why I was ask Mark on that issue as he has help me in the past with the paint work and I know he is one of the best at it. That still doesn't explain why you moved the bottom door line up when it was in the correct position to begin with. That's why I posted the two photos together. The real "Runt" has the lip at the top of the rockers where your model now doesn't. It also doesn't explain why you left the chrome strip on the model when it clearly isn't on the real car. I'm just trying to understand if you're doing an exact replica of "Runt" or just a model loosely based on the "Runt".
Chas SCR Posted February 5, 2013 Author Posted February 5, 2013 What chrome strip do you see? There is a lip that is on the door and all they way down the side from the front fender to the rear fender line. The door line was move up just a little was having trouble scribing it in to the putty. There is no chrome on the side of the car.
Scale-Master Posted February 5, 2013 Posted February 5, 2013 Chas, you don’t see that the real car has no raised body trim molding where the kit body had it molded onto the body? See where the white arrows are indicating where a stock Chevy II had the chrome trim strip (like you still have on your model just painted not chromed) and on the Runt it was removed completely?
Chas SCR Posted February 5, 2013 Author Posted February 5, 2013 ok, see i thought he was still taking about the rocker panel. Never realy cought that and thanks for pointing that out. I may have understood him better if he didn't use a pic of the body with nothing done to it at that point.
vintagedragfan Posted February 6, 2013 Posted February 6, 2013 looking good Chas, looks like you are getting close!!
Chas SCR Posted February 6, 2013 Author Posted February 6, 2013 (edited) Want to thank Mark D Jones for talking to me off list and helping me with a lot. I did take this photo and sent it to Curtis Ukasik and Gerry (the owner) with all the pics that they have of this car being built up (more then i have show'n here) they said the same thing that Mark told me and that was to just let it go as this far into it, I would take a big chance of ruin the project. You learn and Gerry was so understanding that she side from all the pics that she would have never even know'n with out me pointing it out. This is why this hobbie is so great and filled with good friends that you can talk to and see what your options are to save some thing. Edited February 6, 2013 by Chas SCR
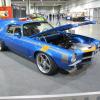
Chas SCR Posted February 7, 2013 Author Posted February 7, 2013 This has been a great learning build as I never have done a full 90%+ scratch built car before, as you can see the last few details was added as there is only a couple things left but after 9 month of about 4 to 6 days a week on this thing it's coming to an end. The plates I made and also machine up the fuel psi gauge, wire up to the fuel body and put the valve stems in place. Thank every one that has helped along the way and also have enjoy watching this build.
Recommended Posts
Create an account or sign in to comment
You need to be a member in order to leave a comment
Create an account
Sign up for a new account in our community. It's easy!
Register a new accountSign in
Already have an account? Sign in here.
Sign In Now