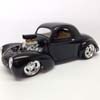
Dinky Posted September 24, 2013 Posted September 24, 2013 (edited) Some time ago I made a start with this box. This is the second monster truck and the idea is to add some details I made a fuel rails with pipes on the blower. Original version: Here with my creation I added some "hydraulic lines" to the front axle, the rear will look the same. The body is painted black and clear is on. The engine now looks like this. Edited November 13, 2013 by Dinky
Dinky Posted September 24, 2013 Author Posted September 24, 2013 Last weekend I decided to move on with this one and made some progress. The decals are on the body, I had to cut them in the body corners because they don't melt with the Micro SOL and SET. There is now a tiny edge horizontal and vertical but i will fill this with paint and then it will get the final clear. Made some hydraulic lines in the driver compartment. First layer of paint on the wheels, I ordered 1:25 air valve's but i will not use them on this one, They are so small they look like dust Start with the rest off the parts. Seatbelts for the driver
hjracing Posted September 24, 2013 Posted September 24, 2013 Awesome attension to the details! Keep it coming!
Dinky Posted September 29, 2013 Author Posted September 29, 2013 Just a short update on this one, I made the start on the chassis. For the ones that know this box, I don't follow the manual to assemble the chassis.
PappyD340 Posted September 30, 2013 Posted September 30, 2013 Yes very NICE start Arno, love the detail!!
Dinky Posted October 12, 2013 Author Posted October 12, 2013 Yeah, some progress on this big one! - Added fuel connectors on the tank and hydraulic lines on the master steering cilinder - Wheels are completed - Final clearcoat is one the body Pictures tomorrow :-)
Dinky Posted October 13, 2013 Author Posted October 13, 2013 As promised some pictures. Before: After Just a comparison with the Willys to see the difference in size.
crazyrichard Posted October 13, 2013 Posted October 13, 2013 awsome and always impressed with your clean builds .. so clean
Dinky Posted October 15, 2013 Author Posted October 15, 2013 What was I thinking when buying the seatbelts........ These photo-etched parts are so tiny and I never used it before, tips and suggestions are very welcome. Making the holes in the seat was the easy part
Dinky Posted October 18, 2013 Author Posted October 18, 2013 (edited) It is, its making me crazy First I ordered the red seat-belts (second post), when received I found out they are to short because the seat is on a frame. Ok,that can happen so I ordered others from Hobby Design. Now I got the next challenge First you have cut piece A than bend the corners at the dotted line, so far so good Next thing is cut piece B and bend the ends, then move it in the tiny holes at C in piece A....... this does not fit, even without bending it does not fit. My smallest drill is 0,5mm and this is even bigger than the bend corner part. Then I found the other problem, the belts does not fit the clips D.... the belts are to wide, I tried sanding them but its very difficult to hold them I seriously don't understand why they sell this stuff if it doesn't fit at all Might skip this idea and use the belts for the another detail in the truck. Edited October 18, 2013 by Dinky
crazyrichard Posted October 22, 2013 Posted October 22, 2013 hmm thats sad .. but whell now you know never to buy them anymore ..they do look quit handy to me , would be great to use as like industrial looking things on rod bodys or like hinges (non working)the other parts can be like vents or .. maybe you can even use them on a engine in some sort ..just trow them in the partsbox they may come in handy some day
Dinky Posted October 23, 2013 Author Posted October 23, 2013 That's true Richard, will never buy those again ;-) I could not stand it that they didn't fit, and I wanted to use them for sure. With some helpful tips from members on this great forum they are in!
Dinky Posted October 26, 2013 Author Posted October 26, 2013 Think the pictures say enough about the progress on this one Questions just ask.
Dinky Posted November 2, 2013 Author Posted November 2, 2013 (edited) Just a little progress this week, still a lot of small things to do. Anyone with a good tip to get a crooked front window in the correct shape?? Edited November 2, 2013 by Dinky
Mr mopar Posted November 2, 2013 Posted November 2, 2013 Nice work so far ,just the right amount of added detail Awesome.
Dinky Posted November 8, 2013 Author Posted November 8, 2013 The body is done, i'm not completely happy with the gloss layer but I will keep it like this.
Dinky Posted November 11, 2013 Author Posted November 11, 2013 Almost there, final pics in daytime later this week.
Dinky Posted November 13, 2013 Author Posted November 13, 2013 So this one is finished and posted Under glass. http://www.modelcarsmag.com/forums/index.php?showtopic=81576
Recommended Posts
Create an account or sign in to comment
You need to be a member in order to leave a comment
Create an account
Sign up for a new account in our community. It's easy!
Register a new accountSign in
Already have an account? Sign in here.
Sign In Now