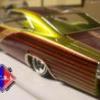
rollinoldskoo Posted January 7, 2008 Posted January 7, 2008 shaved door handles and vent windows made door panels.... minitubs..... first mockup.....
Raul_Perez Posted January 7, 2008 Posted January 7, 2008 it looks like you're off to a good start!! Those big meats look right at home on that truck!!
JAFFA Posted January 7, 2008 Posted January 7, 2008 FAT. really FAT. looks good! U gonna go oldschool (xcept for the wheels...) or u gonna make it a bit newer style?
rollinoldskoo Posted January 7, 2008 Author Posted January 7, 2008 here's what's going in it anyone know how the fuel lines setup on this???
rollinoldskoo Posted January 9, 2008 Author Posted January 9, 2008 here's what's going in it anyone know how the fuel lines setup on this??? anyone???
Uncle Mike Posted January 10, 2008 Posted January 10, 2008 anyone??? The fuel line on Stromberg carburetors enter the right hand side, at the top of the float bowl. Some models enter the float bowl from the center-right-side wall of the carb. Others have a casting that accepts the hose nipple at the top of the upper top part of the float bowl, at the front corner... All the Stromberg carbs' fuel lines enter the carb bowl straight-in from passenger side, at a horizontal angle. Hope this helps. One more thing: These Strombergs were notorious for leaks, hence our nickname for them: "Fire Pots". I wouldn't put it past these things to LEAK in 1/25th! (just kidding) These 4-carb pieces are sharp. Where did they come from???
rollinoldskoo Posted January 10, 2008 Author Posted January 10, 2008 this is the optional motor from the older AMT 53 ford kit... i got this one in a classic trucks 3 pack a few years back.... comes with a load of extras to make a work truck and has 2 motors.... stock flathead and a desoto motor... this is the desoto... even has 2 different intakes available for this motor.... the carbs are molded in pairs.... 4 sets of 2... i don't know for sure but the model king repop of this truck that has the trailer may have these parts too.. if anyone knows for certain i'd like to know.....
62rebel Posted January 12, 2008 Posted January 12, 2008 my second favorite kit of all time! i must have a dozen built in various styles, even one on a '57 Ford chassis. IMHO this one is SO much better than the POS flip front MPC kit, although i like the chrome bumpers and grille from the MPC kit better on my AMT 53. the MPC also has minitubs already molded on. the flathead from the truck is one of the best made, but unfortunately AMT didn't add hopup parts for it. i believe the kit was once labeled as "Goldenrod" and loosely copies a famous real-life custom.
theflame Posted January 12, 2008 Posted January 12, 2008 Great work - love the scratchbuilt parts on the chassis!
atenzapower Posted January 12, 2008 Posted January 12, 2008 Nice work on the chassis and car of course.
James Flowers Posted January 12, 2008 Posted January 12, 2008 The work on the chassis is a nice touch. Keep the pictures coming.
Jared Posted January 12, 2008 Posted January 12, 2008 nice work so far! i really like the "bags". are they just o-rings or are they something else?
rollinoldskoo Posted January 13, 2008 Author Posted January 13, 2008 nice work so far! i really like the "bags". are they just o-rings or are they something else? yup... just some small o-rings stacked in some eyelet things..... here's some pics of today's progress....
Raul_Perez Posted January 13, 2008 Posted January 13, 2008 Nothing like the smell of fresh paint in the morning!! Keep up the good work! This one is coming along nicely!! The chassis work looks GREAT!!
rollinoldskoo Posted January 13, 2008 Author Posted January 13, 2008 i wasn't happy with how the inner fenderwells looked after i had notched them for the upper control arms so i chopped them out and started workin on making my own.... i'll cover them with come chrome tape when i'm done so it looks like stainless
RatRod Posted January 13, 2008 Posted January 13, 2008 Here's a pic I found, it's rough, but should give you an idea on the fuel lines....
OLDERGUY Posted January 13, 2008 Posted January 13, 2008 (edited) Your scratch building skills are fantastic. Though I really don't like big wheels, I guess I'm just to old school. I've seen quite a few of your builds your work is real good, I couldn't begin to build like you do. Edited February 14, 2008 by OLDERGUY
rollinoldskoo Posted January 13, 2008 Author Posted January 13, 2008 here's some of them cups for the bags.... here's some of them o-rings for the bags.... and here they are assembled... you need to shave down the cups to be flush with the o-rings so u don't got a gap between the bags.... i need to find a cheaper source for the o-rings tho....
rollinoldskoo Posted February 11, 2008 Author Posted February 11, 2008 any more updates will be in this thread.... http://www.modelcarsmag.com/forums/index.php?showtopic=9631
Recommended Posts
Create an account or sign in to comment
You need to be a member in order to leave a comment
Create an account
Sign up for a new account in our community. It's easy!
Register a new accountSign in
Already have an account? Sign in here.
Sign In Now