diymirage Posted December 5, 2008 Share Posted December 5, 2008 (edited) hey guys, im going to keep track of progress on my 1970 challenger here. the kit is the johny lightning challenger R/T (thanks be to those who helped me pick it) the premise of the kit is simple, a few years ago i bought my father in law a die cast model of the (then) concept challenger the car im building him for Christmass this year will be the "inspiration" for that particular concept car. this will be an interesting build for me because i will be using many (to me) new techniques such as flocking and wiring the distributor. i havent really gotten started on the kit yet but a few of the costum peices are done (or close to) the seats came out of the F&F eclipse and the 426 hemi was part of the 69 charger kit as you can tell i still need to ad the dizzy to the hemi. right now my 4 biggest problems are these: * getting the vinyl top from the kit smoothed out to look like its regulat steel * finding the same decals as the concept has * finding a tranny to mate to the 426 * finding rims that look enough like the concept rim to have inspired them but still be acurate aftermarket for the era of the car. i will be posting progress as i move along (hoping to have it done before Christmass) if you have any suggestions or might know an anwser to the problems/needs i still have for this build please feel free to post here Edited December 18, 2008 by diymirage Quote Link to comment Share on other sites More sharing options...
ddonaca351 Posted December 6, 2008 Share Posted December 6, 2008 * finding the same decals as the concept has if you have any suggestions or might know an anwser to the problems/needs i still have for this build please feel free to post here I might have a set of old T/A challenger decals in my parts box...(1:24/5), they'll be for an "old school" challenger not the new one... but if I have em' you're welcome to them. I'll look in the morning, when I get home from work and I can drop them in the mail if you think they'll help. Dave Quote Link to comment Share on other sites More sharing options...
diymirage Posted December 6, 2008 Author Share Posted December 6, 2008 I might have a set of old T/A challenger decals in my parts box...(1:24/5), they'll be for an "old school" challenger not the new one... but if I have em' you're welcome to them. I'll look in the morning, when I get home from work and I can drop them in the mail if you think they'll help. Dave sounds good, i'm looking for these: the seem to be the closest to what is on the concept and pretty acurate for the era im building. i also have a massive brain movement today, i decided that since i am building my 68 charger with the 440 anyway i can take the entire drivetrain out of the challengers kit and put it in the charger. this will free up the tranny i need to mount the 426 hemi in the challenger so between that and your decals all that is left are the rims and little "hemi 426" badges Quote Link to comment Share on other sites More sharing options...
Spike Posted December 6, 2008 Share Posted December 6, 2008 i got the decals in a box for ya, and im lookin for some rims for ya as we speak. i even found a mopar decal that goes on the oil filter Quote Link to comment Share on other sites More sharing options...
Spike Posted December 6, 2008 Share Posted December 6, 2008 will these hurst rims work for ya? Quote Link to comment Share on other sites More sharing options...
diymirage Posted December 6, 2008 Author Share Posted December 6, 2008 will these hurst rims work for ya? those will work AWESOME do you happen to tires with them? (i dont think my parts box has them that size so here is my day one progress i have done a tiny bit of work to the body, i put the firewall on, primered the vinyl top for sanding and removed the "challenger" badges from the front fenders (they looked awesome but wont work with the T/A striping i also worked over the motor mounts to shoehorn the 426 in. the seats were scavenged from my F&F eclipse and i had ready painted Quote Link to comment Share on other sites More sharing options...
Spike Posted December 6, 2008 Share Posted December 6, 2008 ill see what i can find Quote Link to comment Share on other sites More sharing options...
ddonaca351 Posted December 7, 2008 Share Posted December 7, 2008 lol... man ya gotta be quick to help out around here. I also have a ta hood for it if you need one. Dave Quote Link to comment Share on other sites More sharing options...
diymirage Posted December 7, 2008 Author Share Posted December 7, 2008 lol... man ya gotta be quick to help out around here. I also have a ta hood for it if you need one. Dave thanks alot but im all set (eccept for the "426 hemi" badges) im pretty sure i have a revell T/A hood laying around aswell and it wouldnt fit but i was very set on using this perticular hood because it matches the concept but once again, thanks for offering Quote Link to comment Share on other sites More sharing options...
diymirage Posted December 10, 2008 Author Share Posted December 10, 2008 made some progress over the last days friends. i maneged to get the roof smoothed out to a satifectory level and just now glued it on. i will need to do some bondo and more sanding to make it look like a complete shell but the worst part is over (i hope) i also finished my very first wired dizzy im not sure of im proud of it yet but i guess for a first time it is acceptable. the only other big progress is the main body of the roll bar the concept has a roll bar with a complete cross in the center so i think i need to ad one more bar but again, the worst os over sorry for the louzy pic, and as always, remarks and suggestion are always welcome (so are those two missing "426 hemi" badges) Quote Link to comment Share on other sites More sharing options...
Spike Posted December 10, 2008 Share Posted December 10, 2008 your box o' goodies went out today Quote Link to comment Share on other sites More sharing options...
diymirage Posted December 10, 2008 Author Share Posted December 10, 2008 your box o' goodies went out today needed a whole box for it huh thanks alot bro i just might get this baby done in time for Christmas Quote Link to comment Share on other sites More sharing options...
Spike Posted December 11, 2008 Share Posted December 11, 2008 no prob man Quote Link to comment Share on other sites More sharing options...
diymirage Posted December 11, 2008 Author Share Posted December 11, 2008 got some decent progress again last night i painted and flocked the interior, that was a first for me but i didnt think it went too bad its not as nice and smooth as i want it to be but i guess i cant really expect that the first try right? i also ran into some problems with the bondo, it seems my hardner didnt work so i had goo all over the top, had to scrape it off with a knife and start all over right now the top is attached again and the whole body primered im guessing tommorow night ill be able to start bondoing again Quote Link to comment Share on other sites More sharing options...
Spike Posted December 12, 2008 Share Posted December 12, 2008 now wheres the update?? Quote Link to comment Share on other sites More sharing options...
GOTH KUSTOMS Posted December 13, 2008 Share Posted December 13, 2008 The picture's of you're wireing look real fuzzy but I'm say they look a lil long from what I can tell, try if you can to trim them a lil closer to the block, yea if you can just pull the wire's out of the valve cover, and trim them just a lil more, it will give a nice tight look, not that I'm a pro at the wireing thing I'm not, but none the less for you're first time you did a good job, and you took the step's to do it.... Quote Link to comment Share on other sites More sharing options...
diymirage Posted December 13, 2008 Author Share Posted December 13, 2008 The picture's of you're wireing look real fuzzy but I'm say they look a lil long from what I can tell, try if you can to trim them a lil closer to the block, yea if you can just pull the wire's out of the valve cover, and trim them just a lil more, it will give a nice tight look, not that I'm a pro at the wireing thing I'm not, but none the less for you're first time you did a good job, and you took the step's to do it.... practice makes perfect i guess ill have some decent pictures when the wifes forwards them from her storm (early Christmass present) i should also me able to ad some pics of the top attached to the body before the day is over. im not sure if i trimmed those wires anymore since that first pic or not but i agree, they were way to long to start with it looked like i bought 4 sets of plug wires and only used the ones for cylender 7 and 8 Quote Link to comment Share on other sites More sharing options...
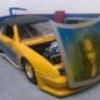
diymirage Posted December 13, 2008 Author Share Posted December 13, 2008 here is a little mock up guys, just to get the flavor of it as you can tell the engine is done (minus fanblade) and the wiring did not come out too terrible for a first try after all i attached the top and ill pick up a can of sandable primer later on today to make sure it all gets smoothed out. i also smoothed out the seam of the front bumper, the gap was too big imho. (well i aplied the putty, ill smooth it out before clearcoat, i promise) love the way these wheels look on there (thanks spike) they will sit a tiny bit further back behind the wheelwells during final assembly once every thing comes back apart ill snap some shots of the interior (snatched the wifeys blackberry storm, cant believe the camera on this thing) let me know of you have any suggestions or questions and dont forget i still need the "342 hemi" badges Quote Link to comment Share on other sites More sharing options...
diymirage Posted December 14, 2008 Author Share Posted December 14, 2008 added the first coat of colour to her today i used a spraycan i've had for several years now and the nozzle was a little bit clogged up so it will need a decent sanding once it dries but no biggy so this is just a preview of the colour Quote Link to comment Share on other sites More sharing options...
Spike Posted December 14, 2008 Share Posted December 14, 2008 lookin good those rims look sweet on there Quote Link to comment Share on other sites More sharing options...
diymirage Posted December 14, 2008 Author Share Posted December 14, 2008 lookin good those rims look sweet on there yeah they do. i ran into a little problem mounting them, it seems the rear tires sit to close to the differential and they were rubbing the inner wheel wells so i used the risers from the yankee challenger (im guessin this kit uses the same tooling since i found some extra parts with it) to raise the rearend of the car up it has a wicked cool stance now and the wheels spin freely Quote Link to comment Share on other sites More sharing options...
diymirage Posted December 17, 2008 Author Share Posted December 17, 2008 ran into a few more problems one of them was in the spray can so i bought different paint this is called painters touch deep blue i think it is pretty close to the concepts colour my biggest problem however came when i went to aplly the decals , they fell apart im guessing they were too old or i tried to slide them off to fast , either way, they are toast so if anyone has a set of T/A challenger decals ...pretty please anyways, here is a quick mock up picture Quote Link to comment Share on other sites More sharing options...
Spike Posted December 17, 2008 Share Posted December 17, 2008 looks good, sorry bout the decals, thought they were good, at least i tried Quote Link to comment Share on other sites More sharing options...
GOTH KUSTOMS Posted December 17, 2008 Share Posted December 17, 2008 Nice, looking real good man, the kolor set's it off real nice, wish my camra phone took those kinda picture's lucky dog Quote Link to comment Share on other sites More sharing options...
gregbbear Posted December 18, 2008 Share Posted December 18, 2008 If you still need the decals, I have a set of the stock Revell Challenger T/A that I have extra. If you want them, just let me know. Cheers, Greg Quote Link to comment Share on other sites More sharing options...
Recommended Posts
Join the conversation
You can post now and register later. If you have an account, sign in now to post with your account.
Note: Your post will require moderator approval before it will be visible.