AaronM
-
Posts
74 -
Joined
-
Last visited
AaronM's Achievements
MCM Regular (3/6)
-
body fits are good!

-
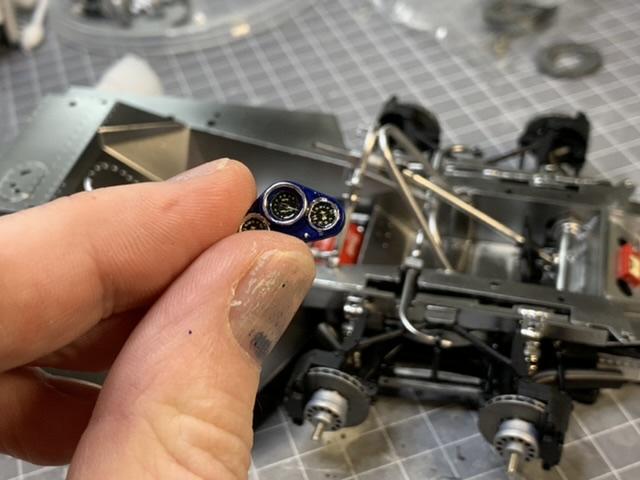
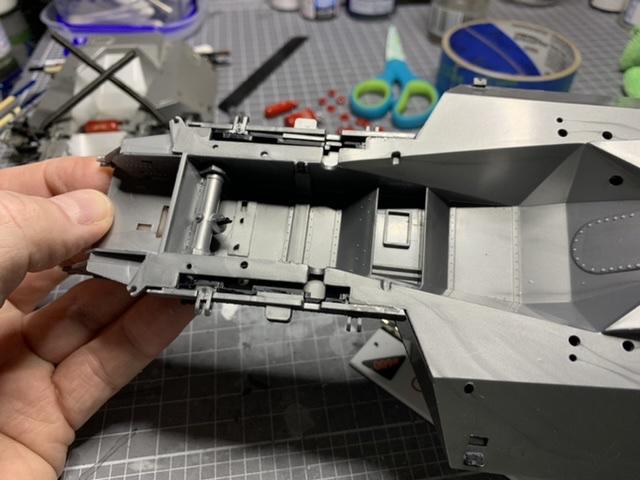
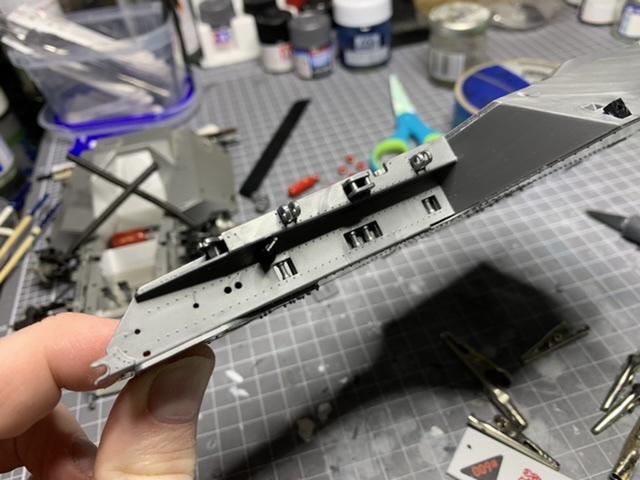
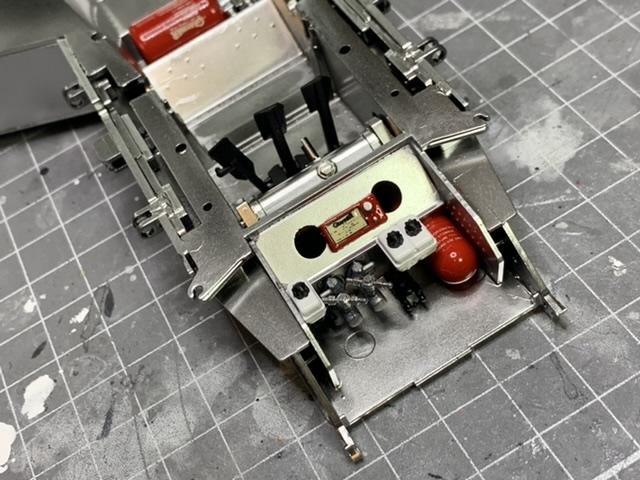
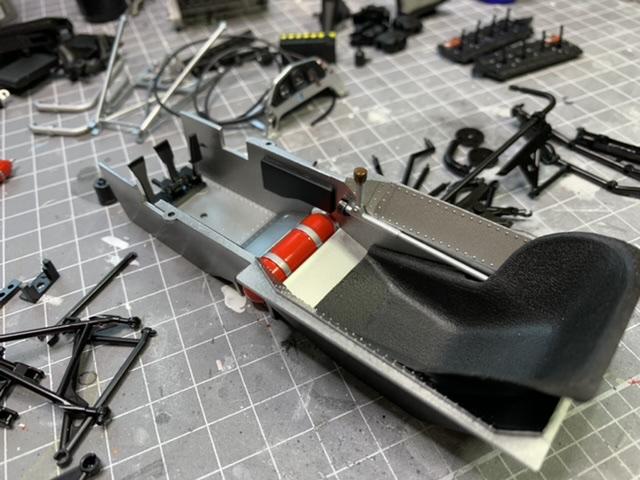
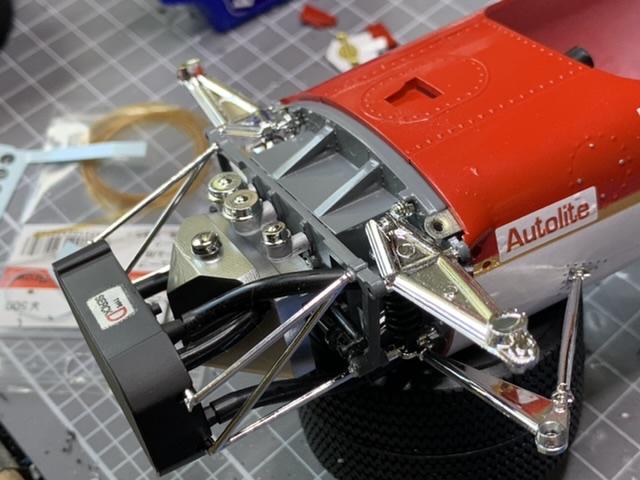
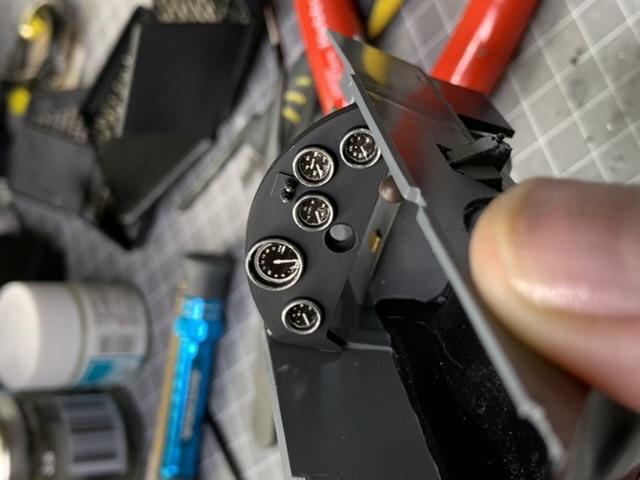
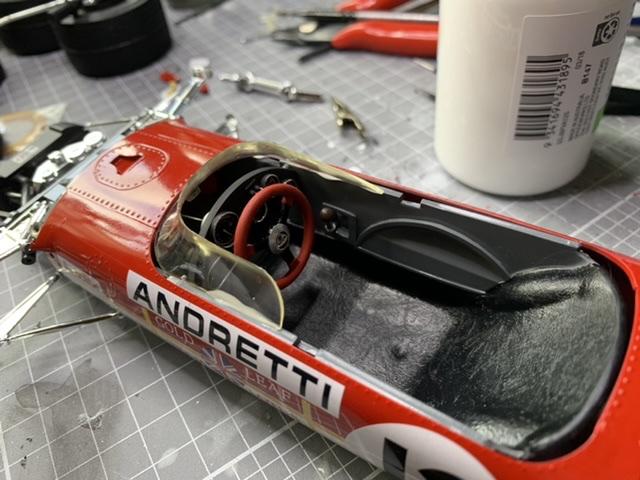
I then jumped back to building the “from scratch” kit a bit further along the process. I am mostly happy with the instruments. Not perfect but OK. Adding on the steering column and supporting structure, noting the barely sufficient clearance of the couple against the brake pedal. opening up the holes through the clear and decals. A nerve twitching process! Hope that everything is level and in place. Dry fit was good but it’s all “just fits” needing careful clipping down. it’s down and nothing mucked up! suddenly I feel the car/chassis is actually becoming a race car! Test fitted the cockpit cowl. Lovely! It’s going to look nice on the shelf!
-
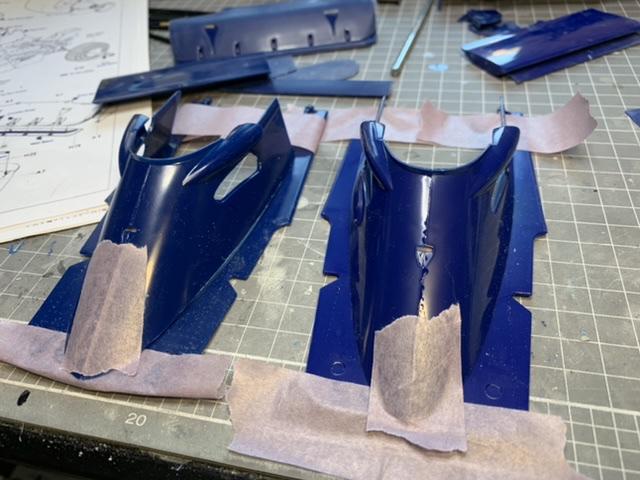
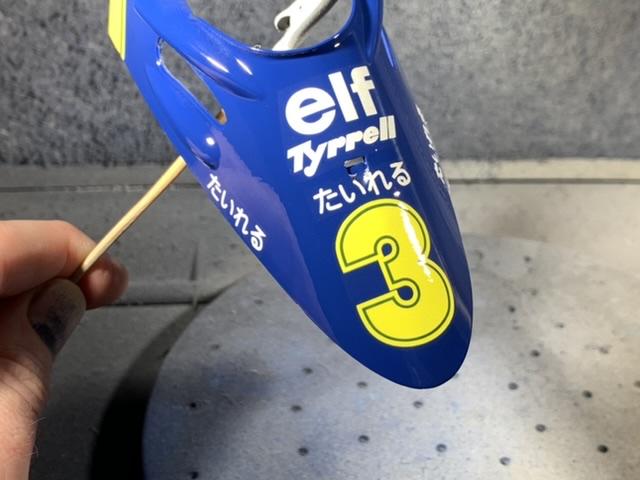
From all the pictures I’ve looked at the colour is very “on this day it looked like this” and the mix I have does exactly the same. So at that level I’m pretty happy, I do feel the OOB X3 Blue is too light by default, and the Royal Blue darkens it slightly and introduces that broad tone change as the light changes.
-
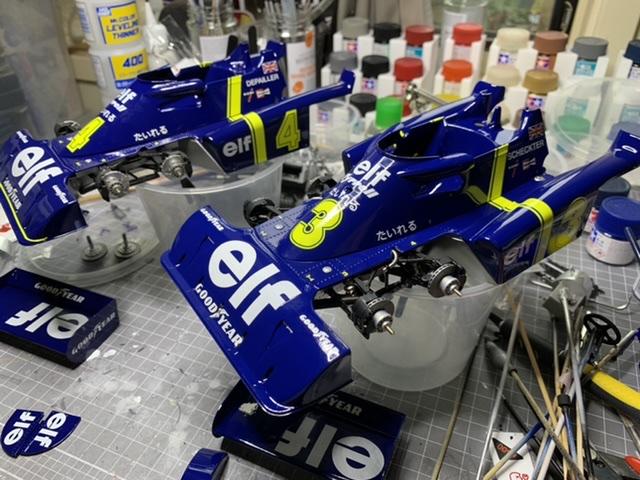
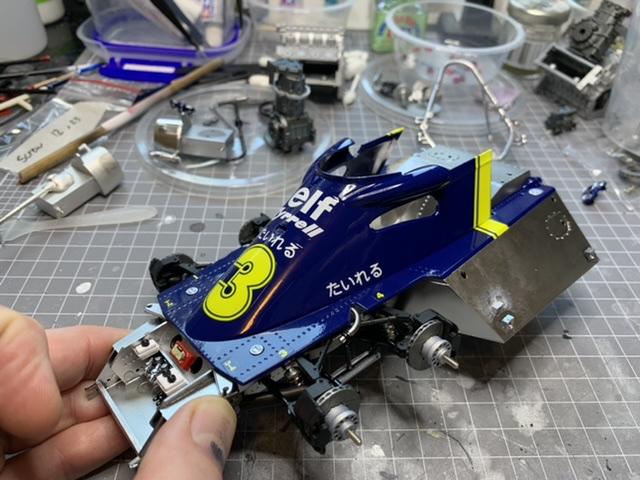
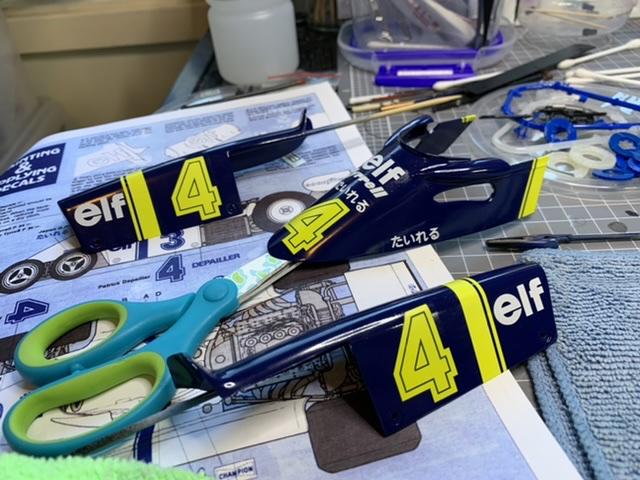
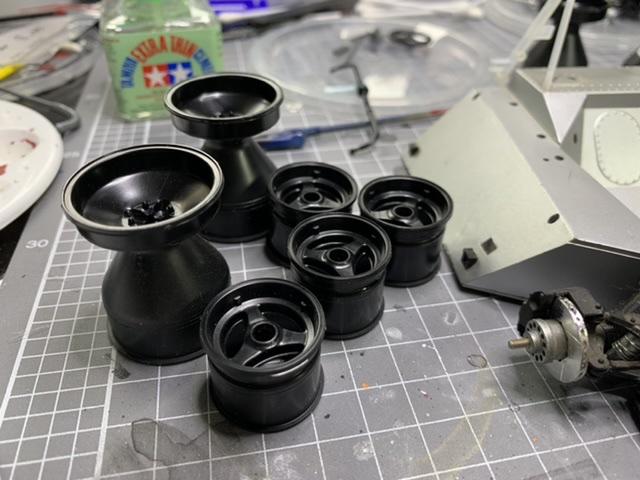
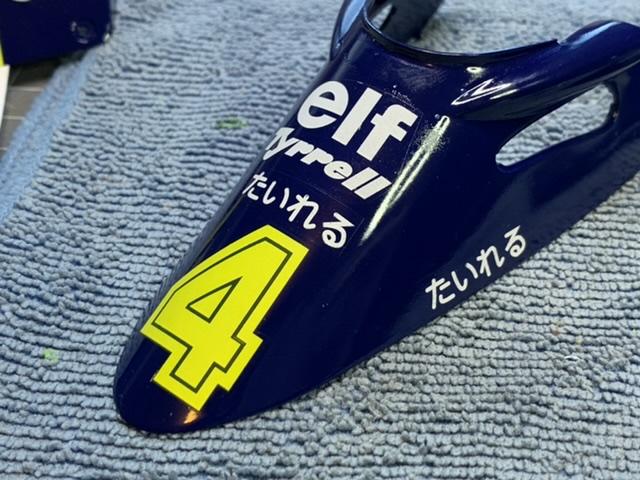
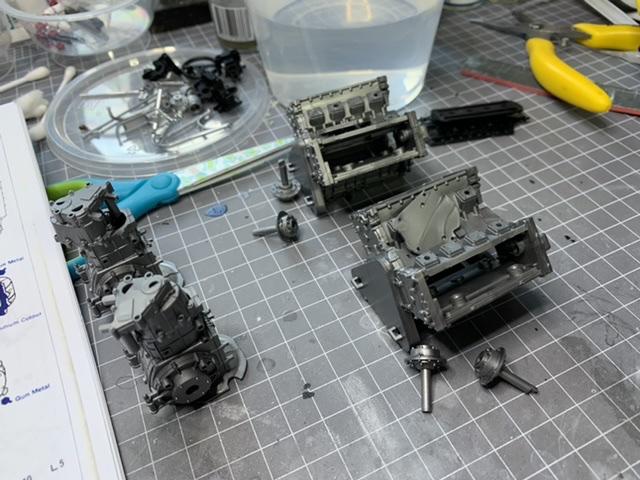
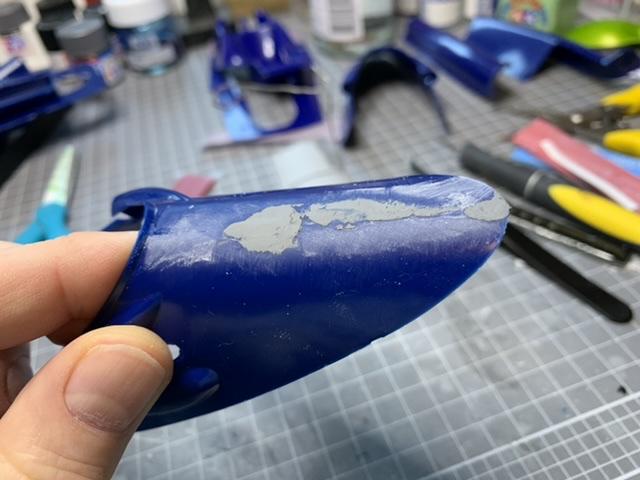
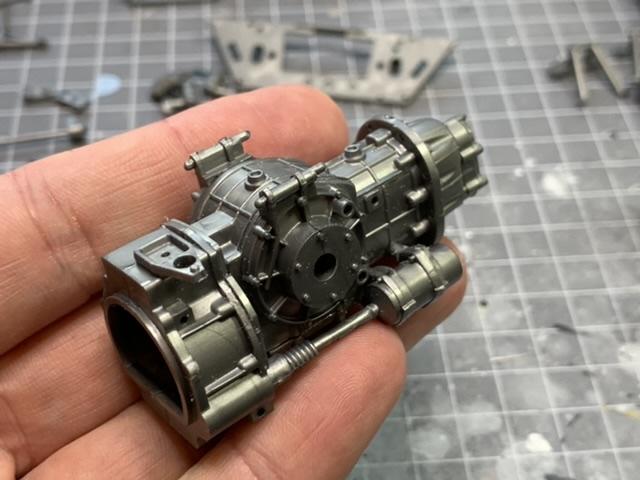
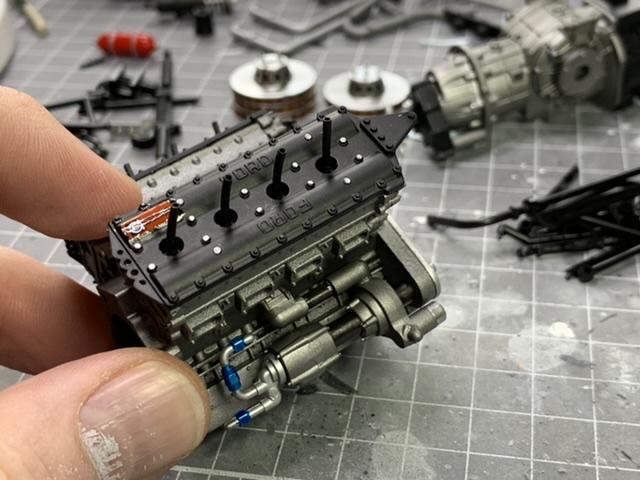
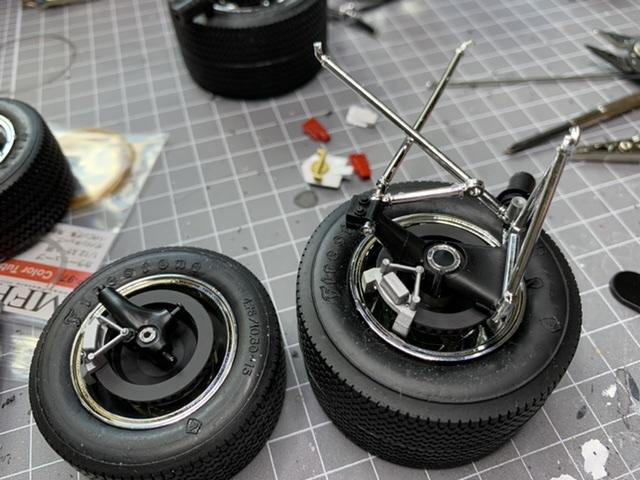
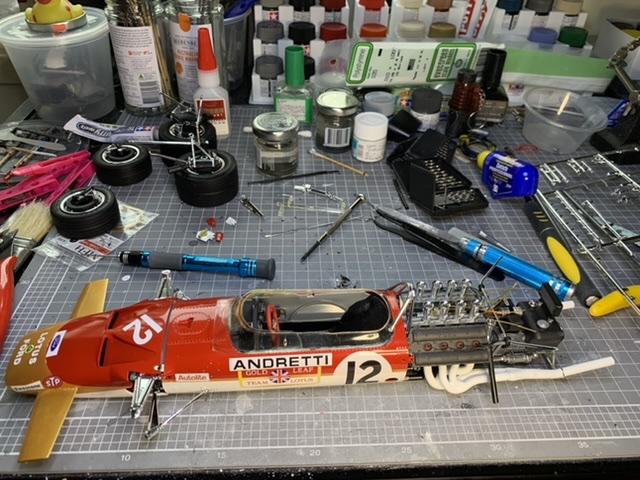
The clear cured on the first (#3) body set very nicely. That’s freed up the space to do the decals for the #4 car which is the auction will part built kit. They look ok but definitely for some reason or another having come together as well as the set on the #3. The no vent cockpit cowl is much nicer though. For an array of reasons it’s taken a week to finish the decals, but the parts I started on have dried up nicely so I was able to clear coat them. I used Zurc Mirror Gloss which is an amazingly forgiving clear and builds a really smooth hard finish with almost no effort. Recently I started stripping the chrome off chromed parts and spraying them with a more realistic silver-chrome finish. With the two chassis now up to much the same stage I’m struggling with the sheer volume of parts at play for each page of build. Wheels.. Even something simple like painting wheels becomes a wrangle! Today I built up the engines and gearboxes. Yet another variation of the DFV. I had presumed wrongly that Tamiya pretty much reused the engine sprues, they do look much the same, but every single build I have had with them there’s enough subtle changes to say they’re unique. I’m not 100% sold on the paint scheme but have followed it - the flat aluminium Tamiya LP38 (lacquer) seems just that touch too bright. Pics to come when the paint dries
-
Magnifier 1/12 Ford GT 40
AaronM replied to cobraman's topic in WIP: Other Racing: Road Racing, Land Speed Racers
I think sometimes we also forget that race cars in that era were never as cohesively prepped and painted and metal treated as race cars are today. A lot of period F1 cars had wonky signage, or one part painted neatly while it’s opposite number on the other side looked like it had gone backwards through a hedge. Engines and engine bay detailing would have moments of that, couple that with the very American practice of painting an engine post assembly with a single colour and having the paint burn off various bits and you could very well have a patchwork of colours by the time cars are running on the Continent. -
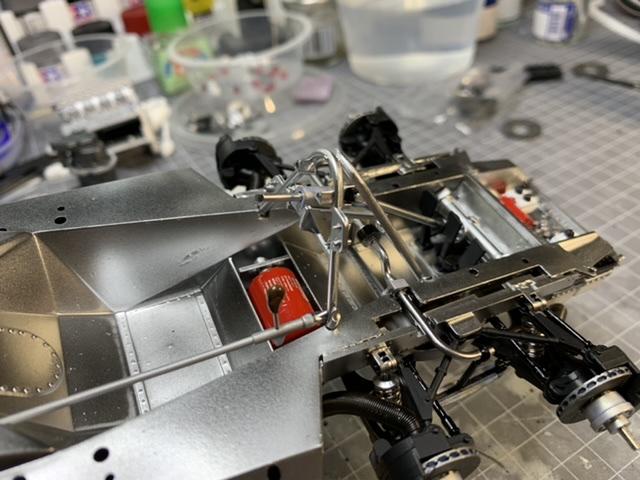
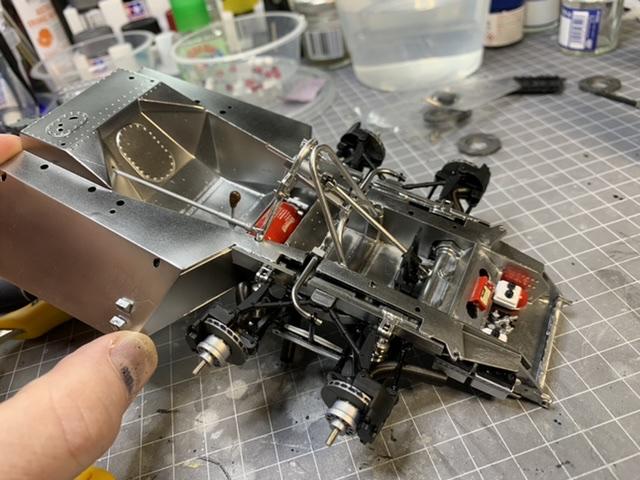
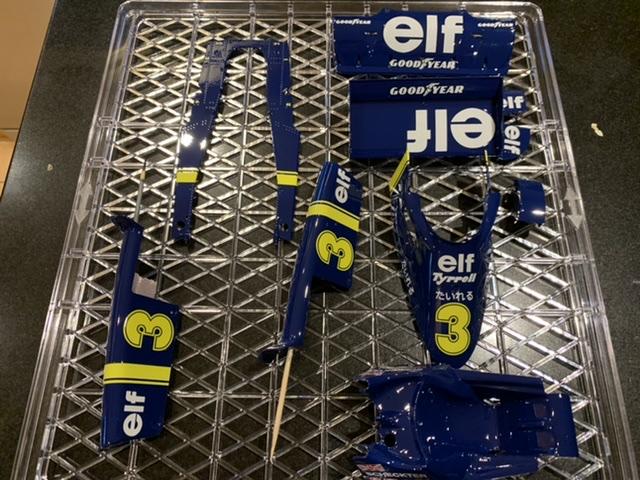
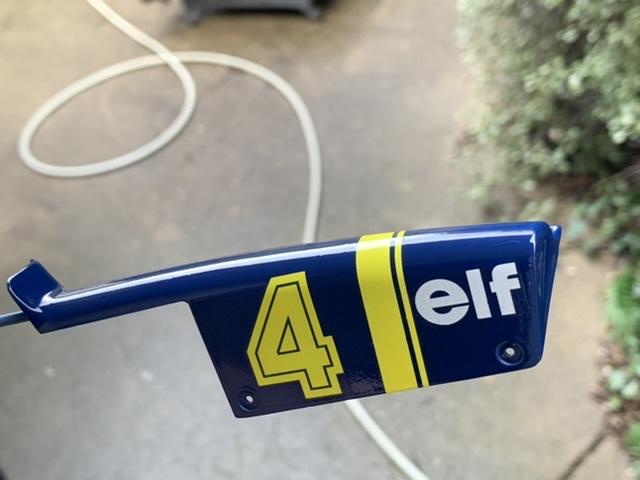
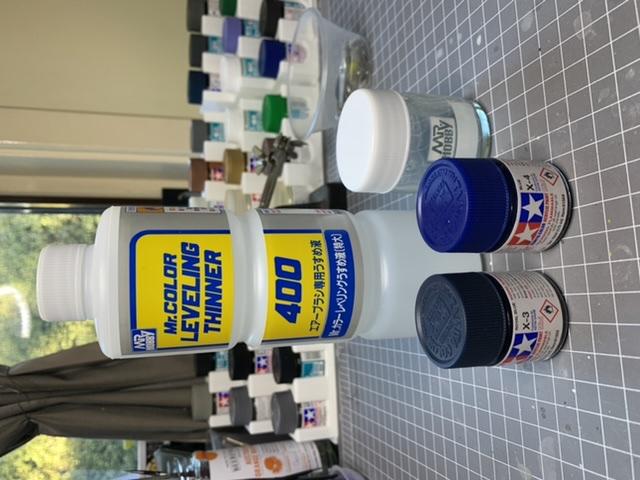
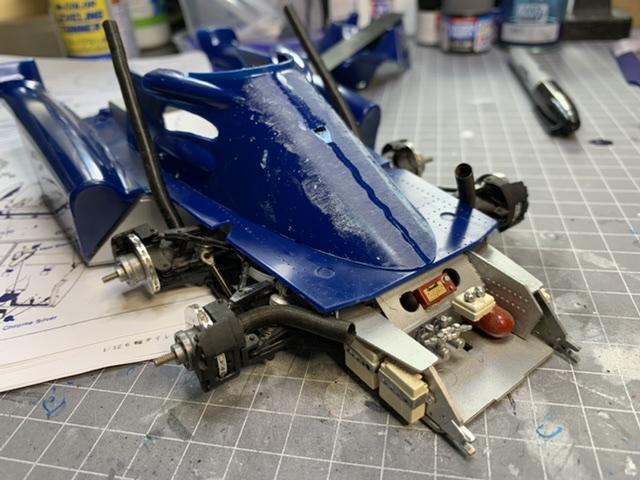
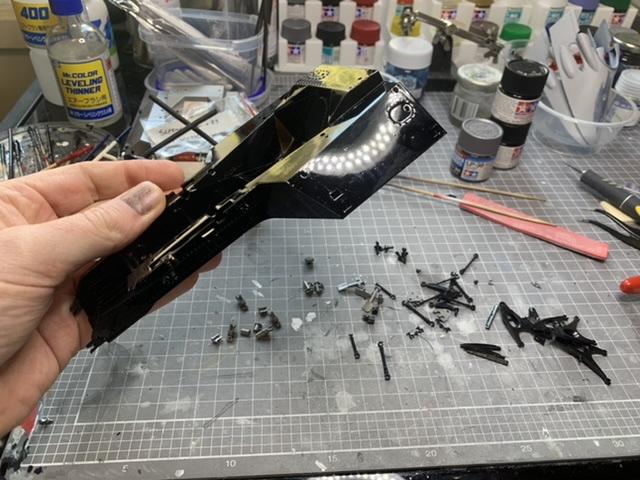
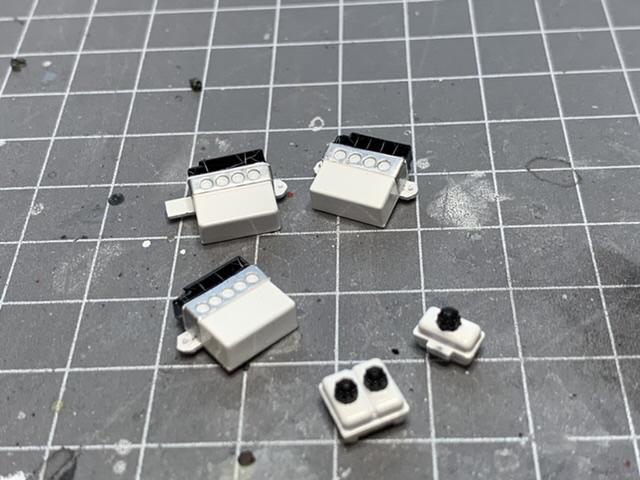
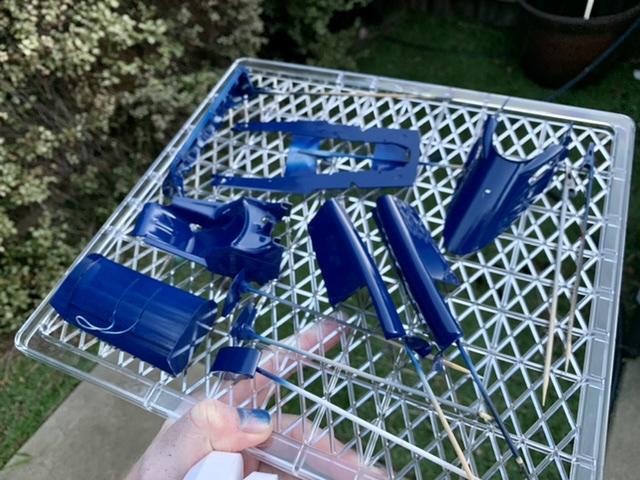
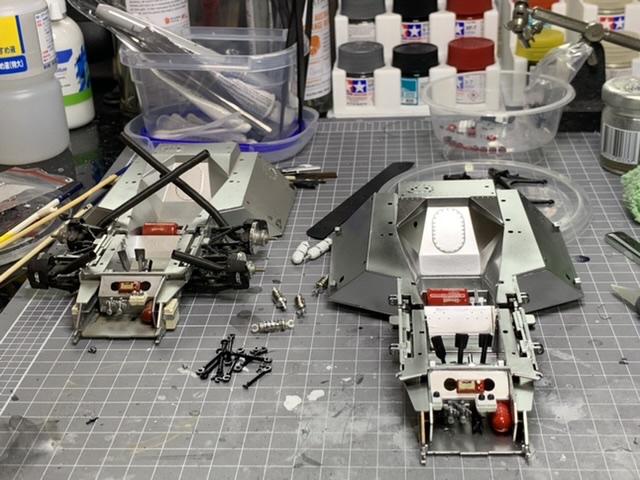
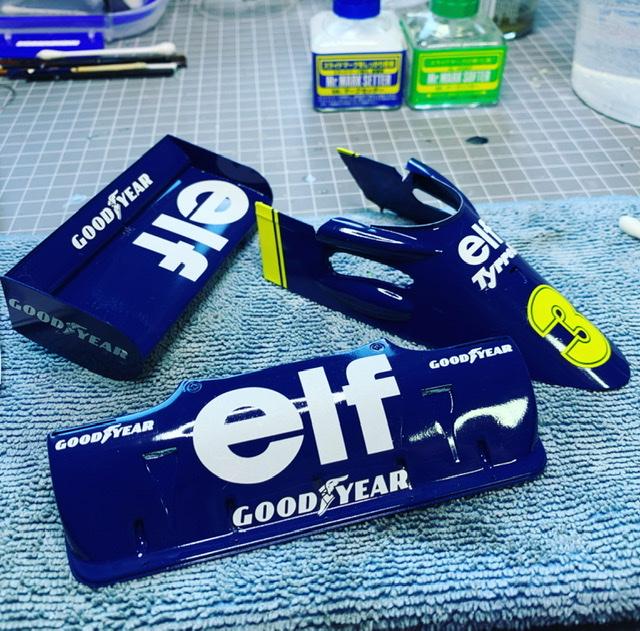
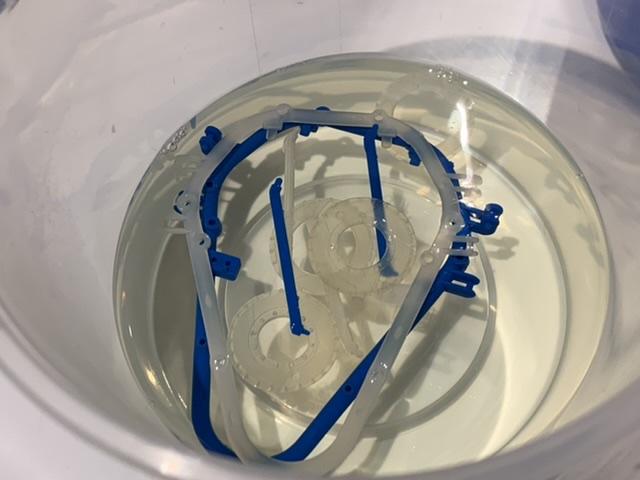
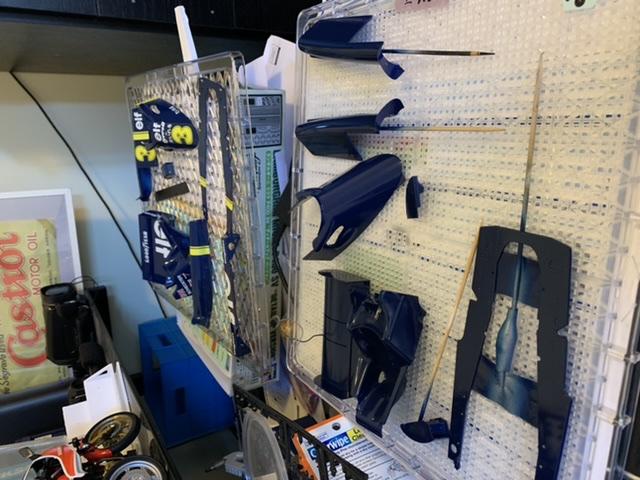
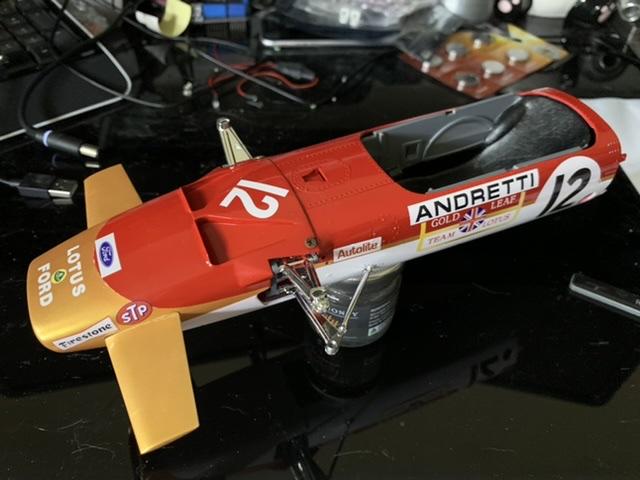
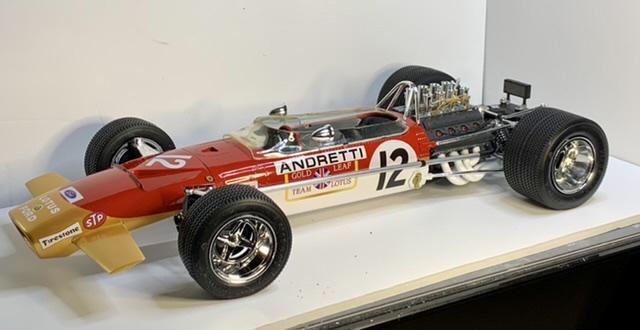
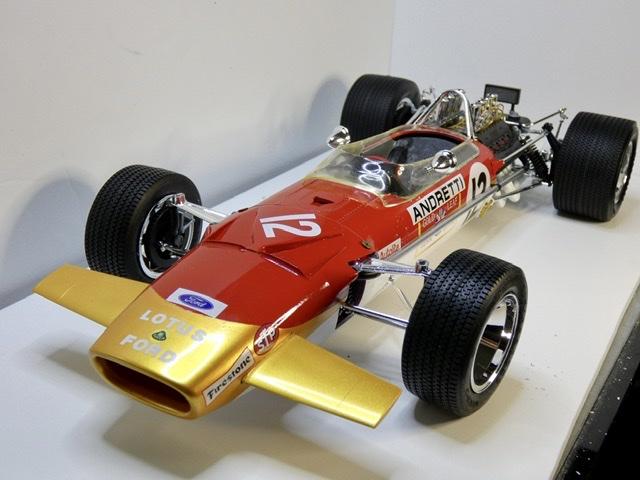
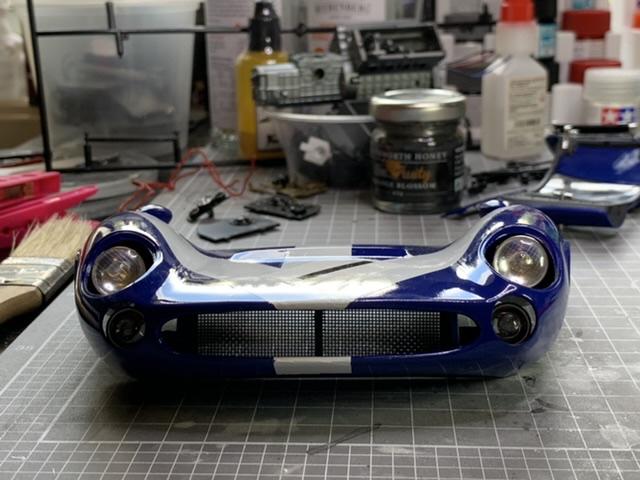
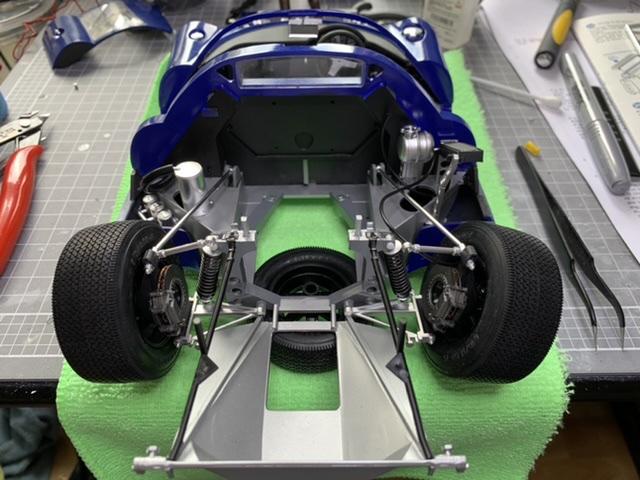
I’d seen a ModellerSite break down of colours and the mixing ratios for a lot of classic F1 cars. Noting that Tamiya colours are generally “close enough” I thought I’d use the mix and see how it came out. Tyrrell Blue is described as a 50:50 of X3 and X4 blues, and I mixed that then thinned with Mr Levelling Thinner for airbrushing. Time to start body prep. It’s moments like this where doing two at once is great. I may be making mistakes, but I’m doing the same mistake twice not making new ones Having a pet built chassis from the auction kit has allowed for testing fit and so on. One thing came up when I posted about the build elsewhere was the cowl vent. Depending on the research material the vent never existed or came and went from race to race and Tamiya simply amalgamated all the variations into a single model. I figured why not do one with and one without! While the various body parts were drying and curing their primer I started work on the chassis. I used the part built one as a key to working out what could be combined before paint and what would be done after. It then got sprayed gloss black in prep for my Zurc Hyper Silver top coat. Small parts for my chassis got prepped and painted up. Meanwhile removing the chrome plating from the next stage of build parts for both chassis revealed that the auction kit had clear plastic under the chrome and my kit was blue! Small things. I sprayed all the body parts of my kit first, aiming to get them well into the curing process before painting the next set. The juggle of trays and parts through this was consuming space, patience and painting clips. While the first body parts cured I started to add the suspension and small parts to the front of my chassis. I’m getting close to both being built to the same stage - just have to paint the brake rotors and assemble the front uprights and we will be then doing the builds fully in parallel. Im ignoring some of the missing parts. I applied the IndyCals decals to my bodywork, and while they dried out over the weekend I finished curing the auction kit bodywork. This morning I started the clear coating of all the bodywork. I’m doing two batches of painting per set, this will make it easier to manage the parts, and importantly reduces the risk of my bumping any before they’re dry enough to handle. I’m back to using Zurc Mirror Gloss Clear with an airbrush over the Mr Super Gloss rattle cans I have used for the last couple of builds. I feel the Zurc is tougher and Glossier - I can pretty much put these directly in the shelf without buffing and they’re “stunning” to most observers.
-
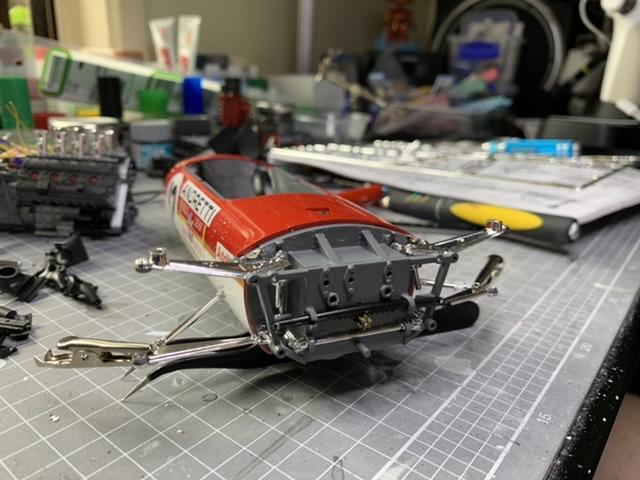
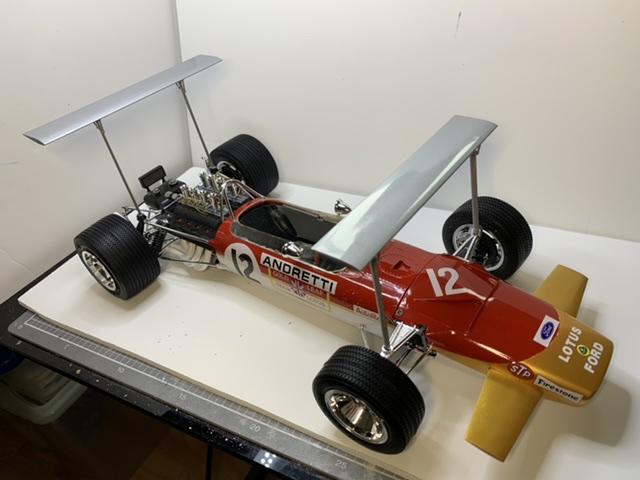
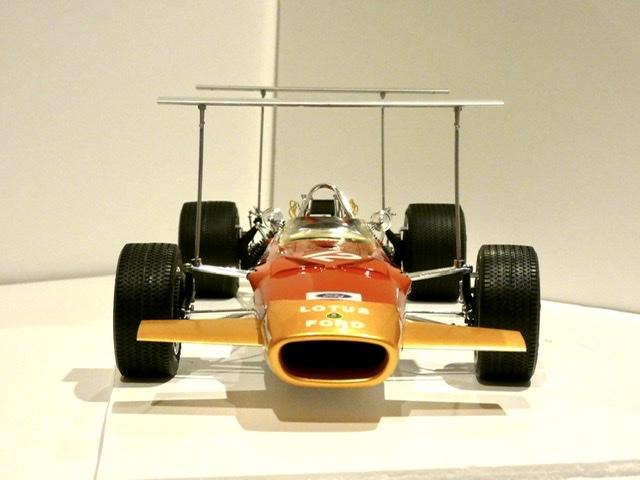
This build needs to start with a bit of a throw back to 2021 story to explain why I’m doing what I’m doing. My return to the hobby was fuelled by the memory of the 1/12 Renault RE20 Turbo on the LHS shelves as a kid. A friend sent a link to an estate auction bundle that included the Renault, a Lotus JPS Mk3 and a P34. The P34 notes were that it was started but the pictures looked complete enough. So I bid and bought the bundle, then had it delivered. The “started” P34 was covered in dirt/dust and up to about page 3 of the instructions with the chassis and front suspension completed. It was also missing a bunch of parts. I put it aside and built the Lotus. Meanwhile I hunted for the D Sprue to continue the build. Eventually my wife bought me another P34 kit, (and subsequently Tamiya has rereleased it! which I have also ordered). Anyway about a month ago I pulled the two boxes from the stash. At first my goal was to build my complete kit up and use the bodywork and engine of the auction kit to make a bit of a pit diorama. That’s now escalated into building up both cars to display side by side as cars 3 and 4. I had already ordered new decals from IndyCals for each car number. So mid July I started. This is my 5th & 6th 1/12 F1 build so I have come to understand the value of building bodywork and the chassis/engine in parallel so that there’s always “something” to do. Building two of the same kit in parallel is also a learning experience. Probably won’t bite of this much in one go again! Anyway, pics of progress in the next post!
-
Magnifier 1/12 Ford GT 40
AaronM replied to cobraman's topic in WIP: Other Racing: Road Racing, Land Speed Racers
I have the same kit and the same decal set (#8, Yellow) - What I did was spend close to double the kit price on a KA Models Super Upgrade set. That has come with a mass of parts including the seats. https://www.bnamodelworld.com/index.php?route=product/search&search=trumpeter gt40 - there's stock of the Super set and also just the seats set! Happy to assist with re-shipping if needed. Like you my goal (when I start) is to build a nice display car. Can't wait to see progress! -
Magnifier 1/12 Ford GT 40
AaronM replied to cobraman's topic in WIP: Other Racing: Road Racing, Land Speed Racers
I have this in the stash along with the full KA Models detail-up kit (seats, metal parts and PE). Also have the decals for the Yellow/Black car campaigned by Frank Gardiner. -
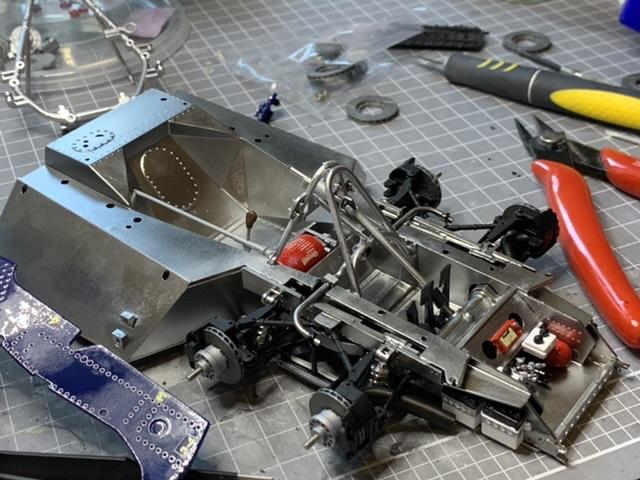
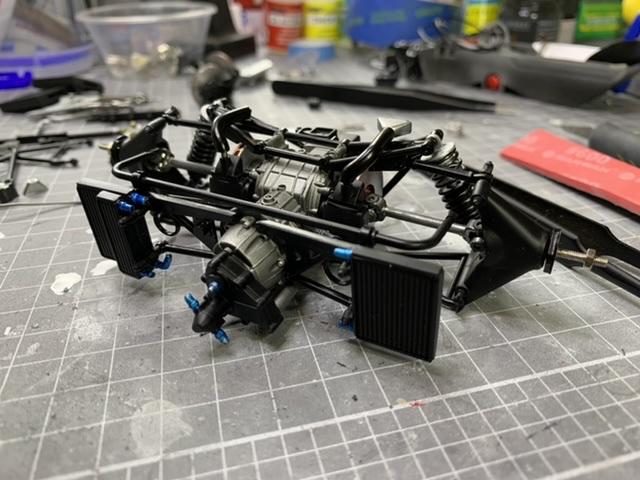
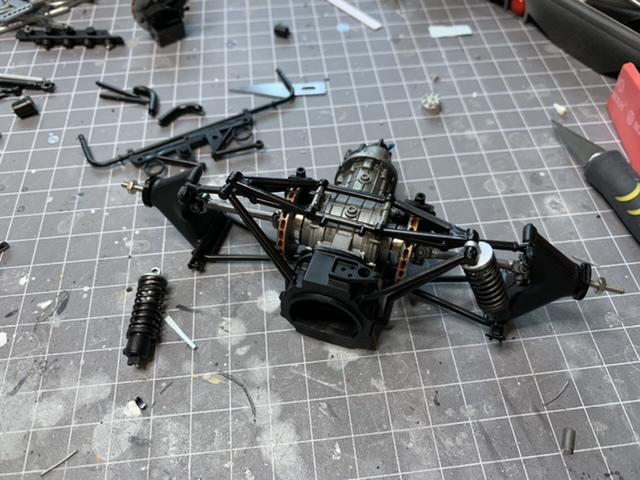
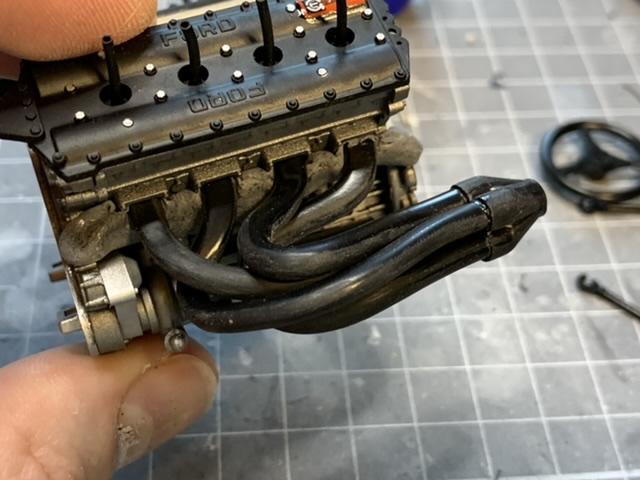
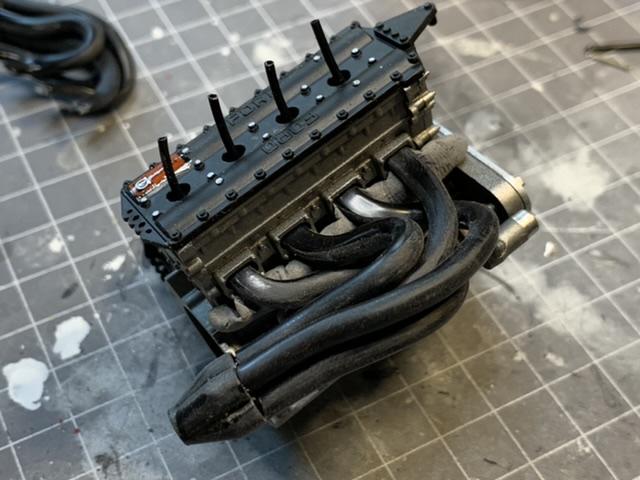
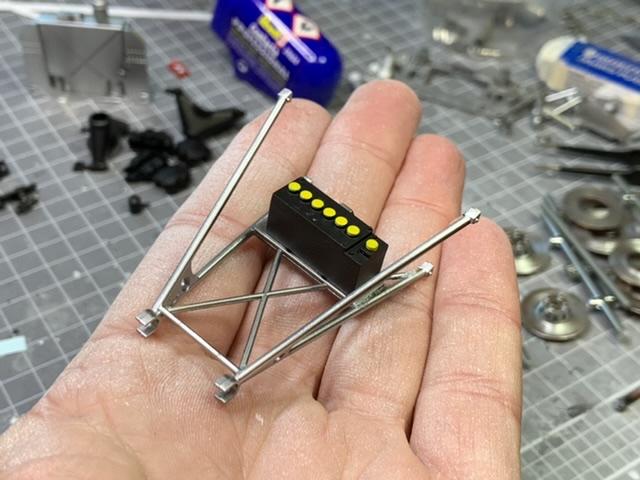
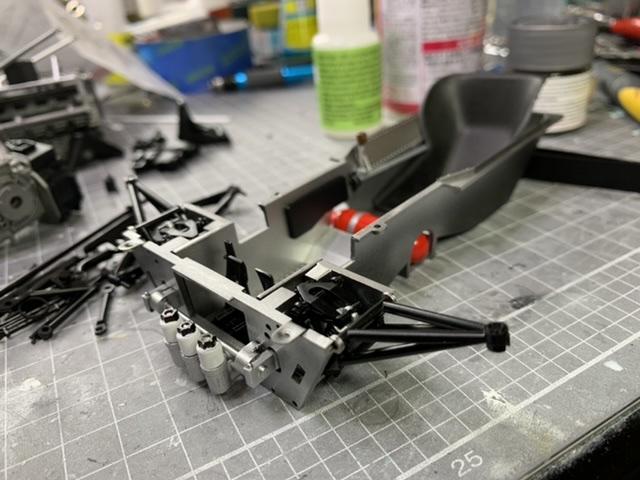
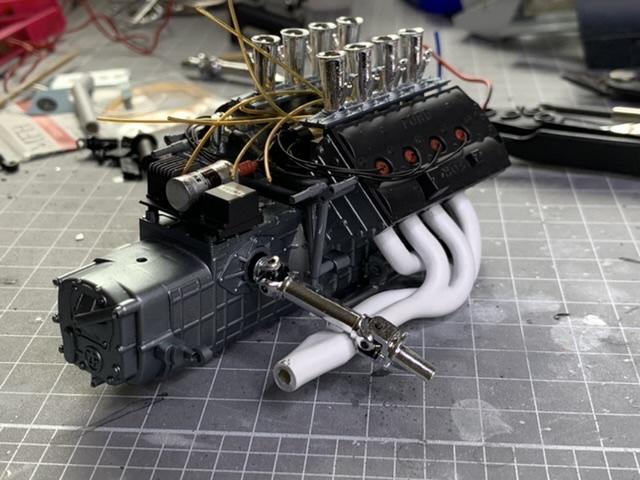
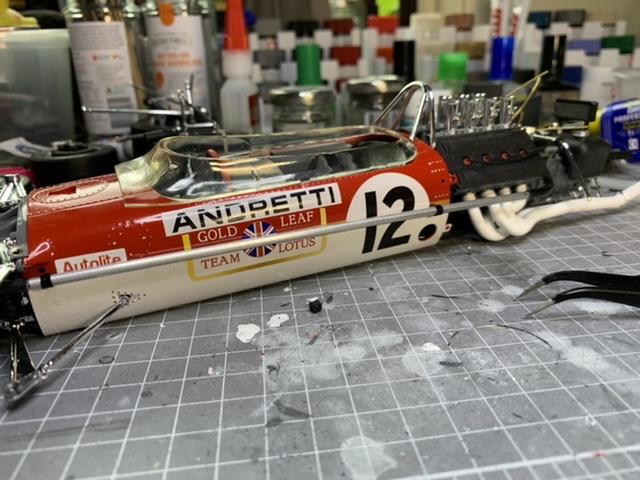
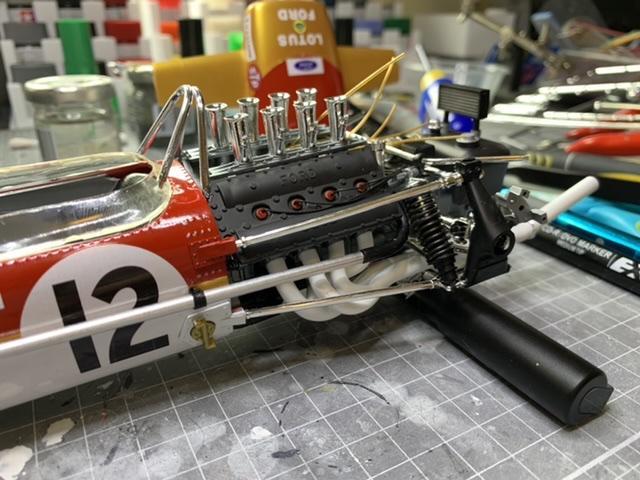
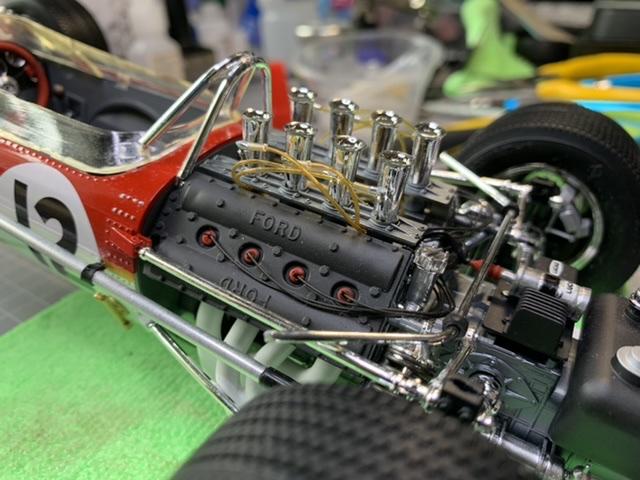
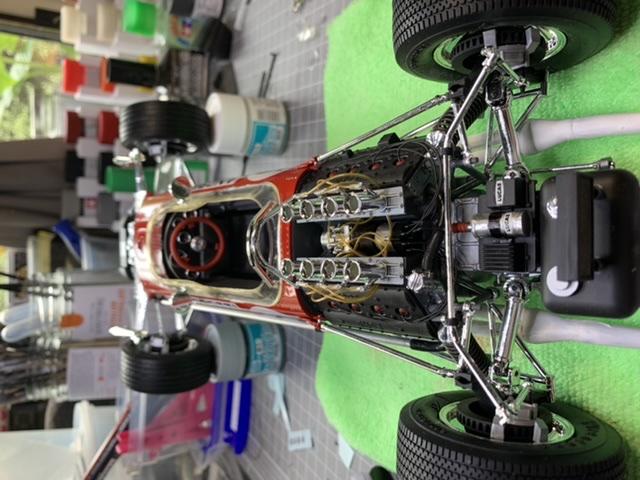
building up the gearbox. with the oil coolers mounted and anti-roll bar in place it’s nearly complete. the E.Jan alloy trumpets and matching injectors assembled and test fitting on the motor. build up the headers. Once cured they will get linked to the rest of the exhaust and then painted before being glued to the DFV radiators and rear bulkhead in place (and cockpit) loose test fit of the upper and lower monocoque, the cockpit cowl and airbox. Very happy that it all lines up.
-
WDC - World Drivers Champion, aka F1 World Champion. The 1/12 F1’s are great to build, and you don’t need to go crazy with detailing for a great result.
-
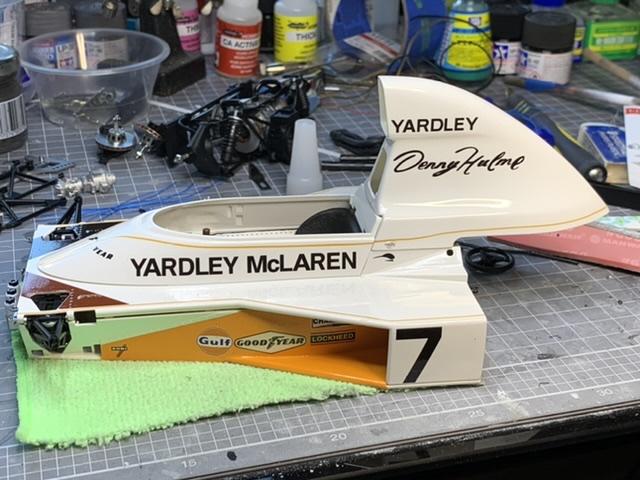
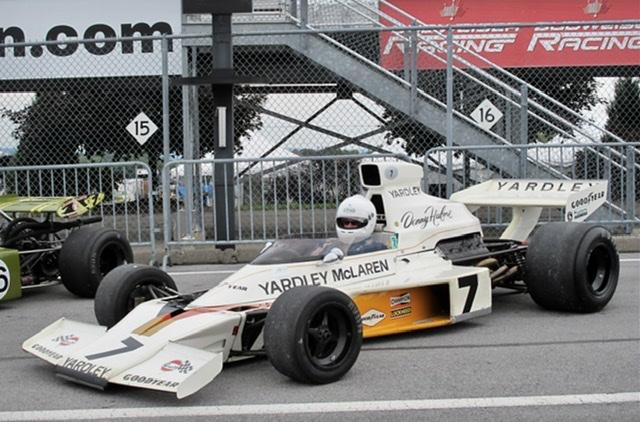
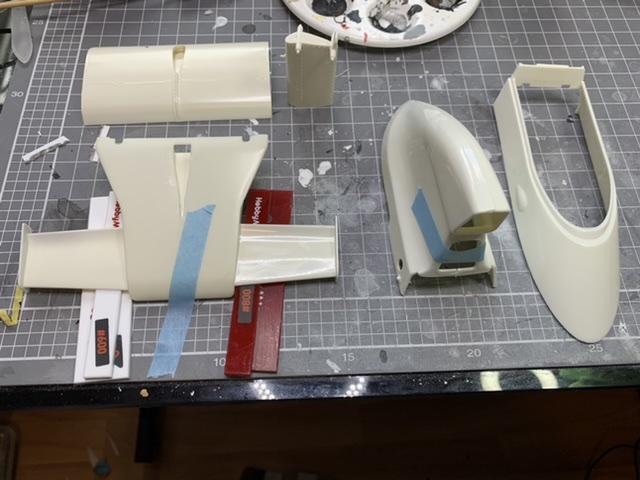
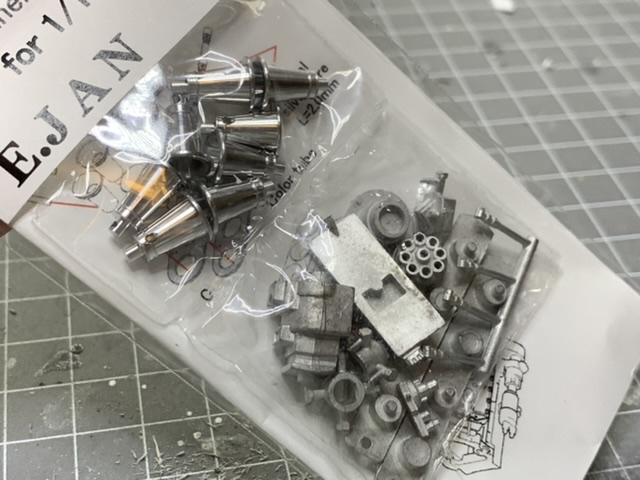
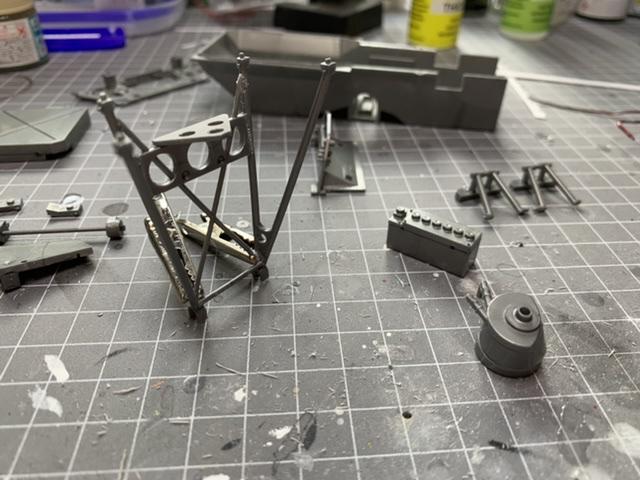
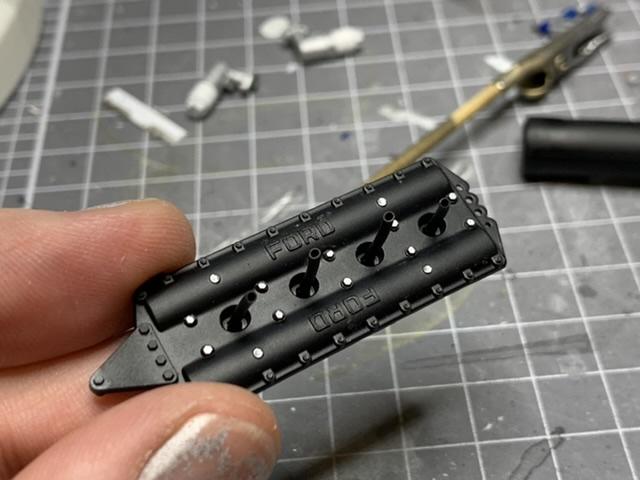
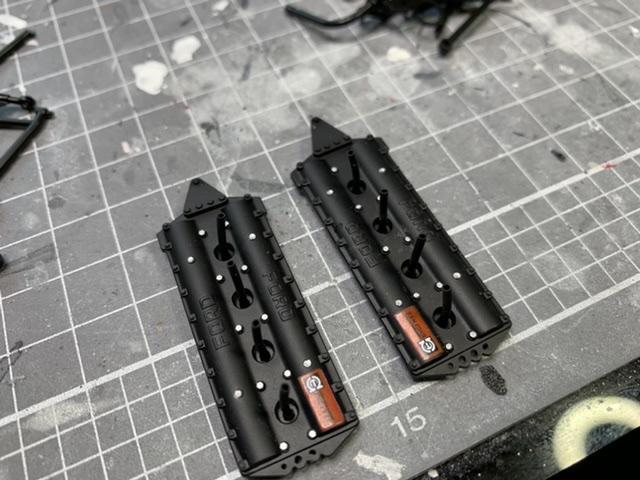
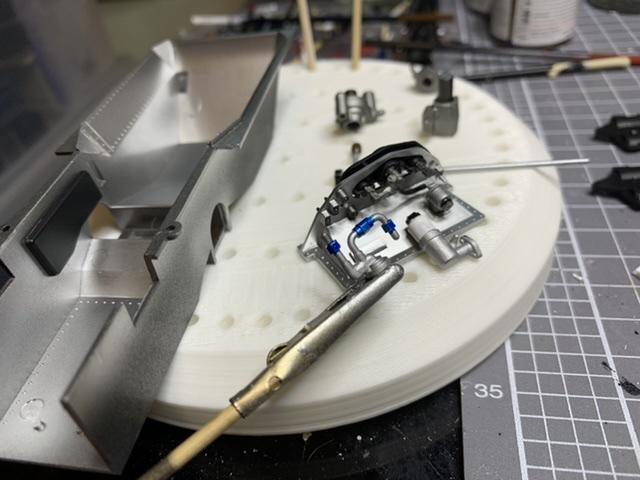
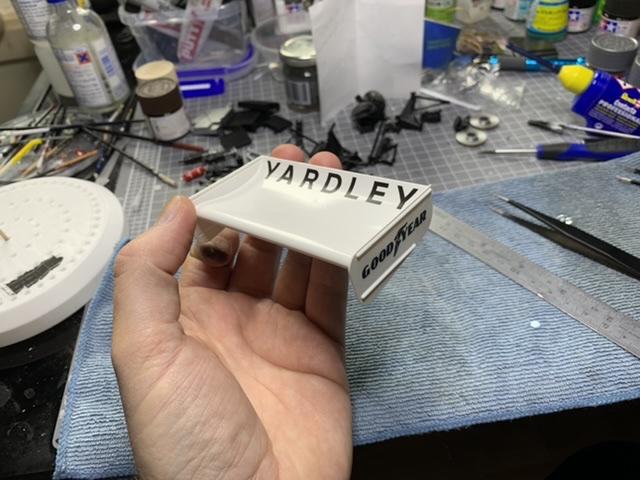
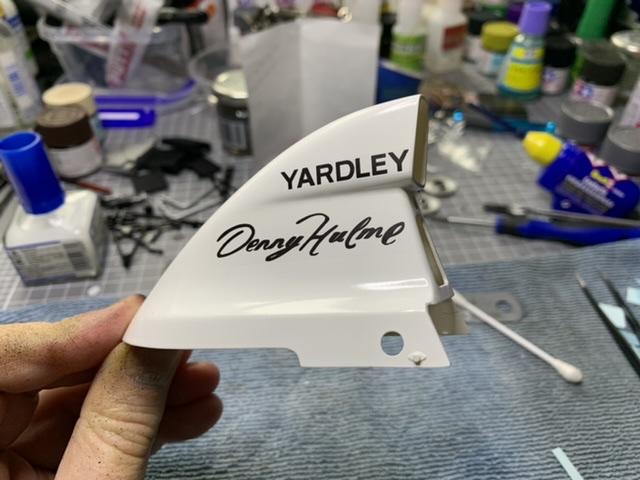
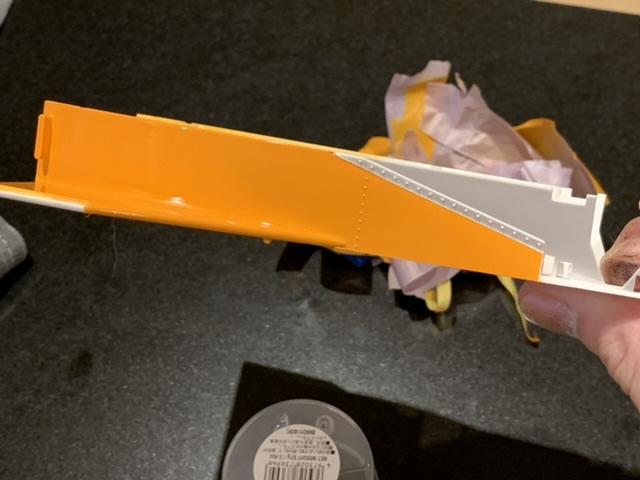
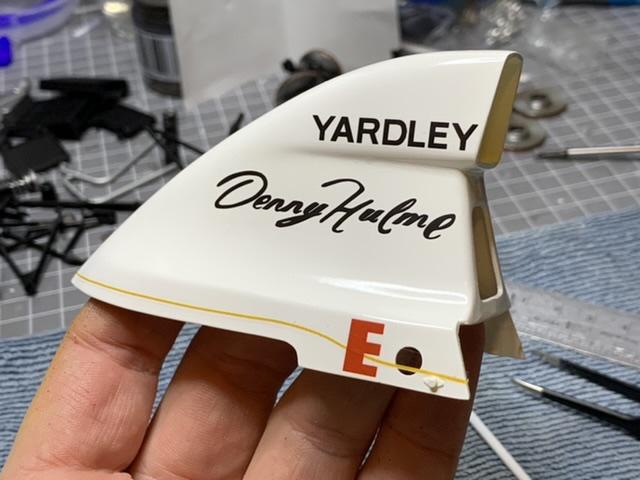
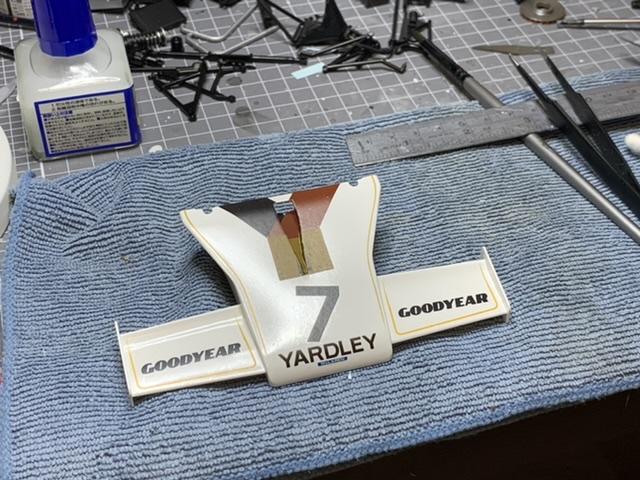
I acquired the kit (it’s a circa 1975/76 produced version) last year with a tatty box and decals but otherwise complete. So I jumped onto IndyCals and was a little amazed that I could get a decal set for Denny Hulme who raced the M23 in 1973 and 1974. Hulme was a WDC from New Zealand and was still racing in the 1990’s ultimately passing during the Bathurst 1000 touring car race in Australia 1992. This also earned the morbid title of being the first WDC to die of natural causes. The chassis is in a private collection and maintained for competition in historic racing. The Tamiya kit is a bit of a hybrid of the various body/wing/cowls from the 1973/74 seasons and races. Body parts came together very quickly I picked up an E.Jan detail kit for the engine. A few assemblies coming together So many pieces to paint. valve covers and plug wire boots (to be shortened) Cockpit tub assembled Cosworth decals applied front structure, battery and tray assembled and painted. small bits! Back of the instrument cluster Front suspension structure test fit to the cockpit tub. Engine water pump detail. Starting the rear suspension assembly Laying out the significant structures Laying down the IndyCals. Nose structure. The Papaya elements, painted in TS56 some trimming to come and then clear coat time! Nose completed with the jaunty angled race number as per the M23/1 raced by Denny. Doing the anodised pipe fittings which always make the details pop a bit.
-
Will do. Haven’t checked it for a while. This will come together OK, but there are many frustrations with the instructions versus the actual parts etc. I do want to source and build a Lotus 49 (aka wingless) version as it will also mean having each of the Tamiya Lotus F1’s in Big Scale.
-
1/12 Tamiya Lola T70-MkIII
AaronM replied to AaronM's topic in WIP: Other Racing: Road Racing, Land Speed Racers
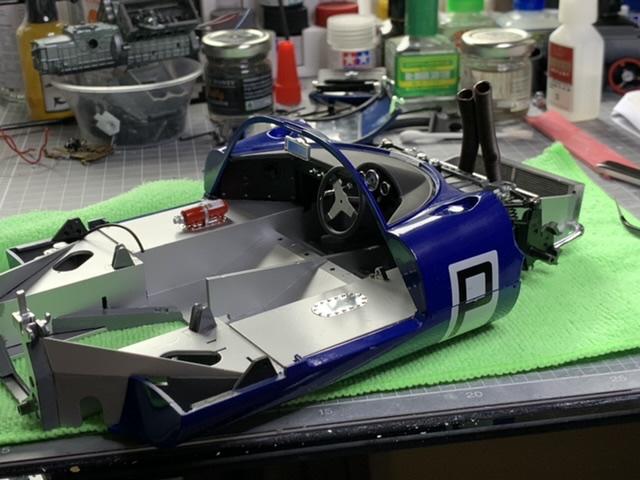
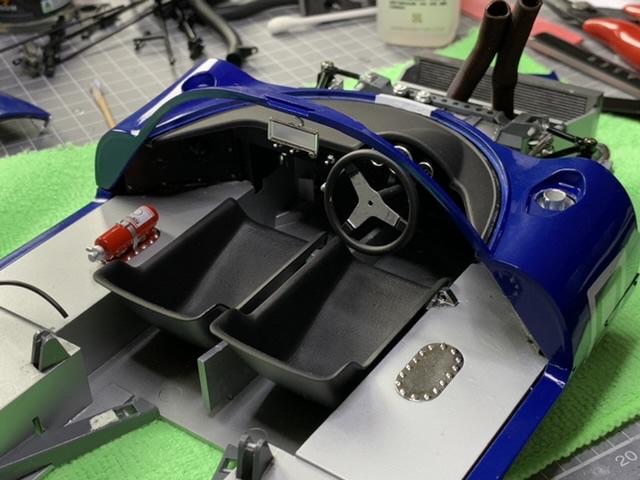
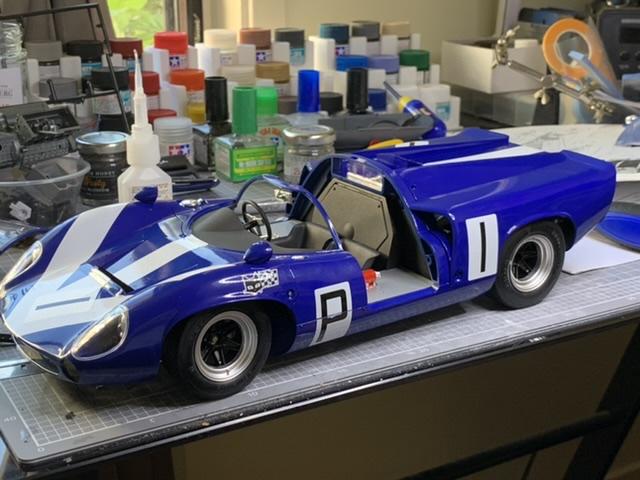
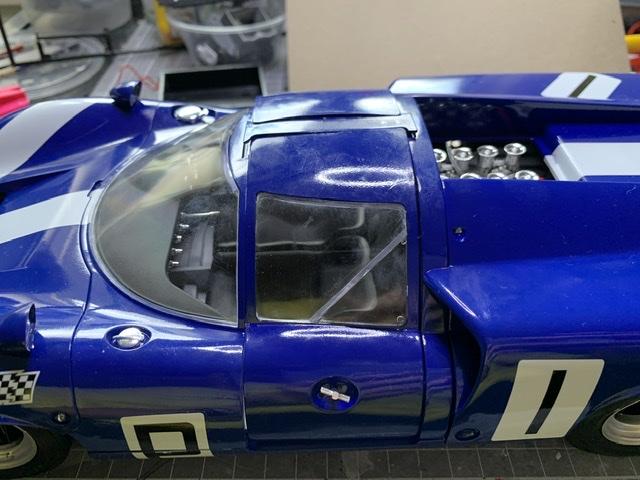
I’ve done a huge portion of the final assembly…. But… Assembly went pretty well for the core body components, and then when I started trying to tie together things like the doors, bonnet and so on it went south like most discover with this kit. Ive had to push it aside for a while as I need to approach the problems with a clear mind and deal with them progressively. For example the bonding of the inner and out door skins distorts the doors so the outer skins which aligned fine now don’t. The inner radiator grille and undertray on the bonnet foul on the font chassis structure. I won’t mention the bad luck of a few minor bits of damage trying to get some things lined up too.