

Greg Pugh
-
Posts
2,718 -
Joined
-
Last visited
Content Type
Profiles
Forums
Events
Gallery
Posts posted by Greg Pugh
-
-
-
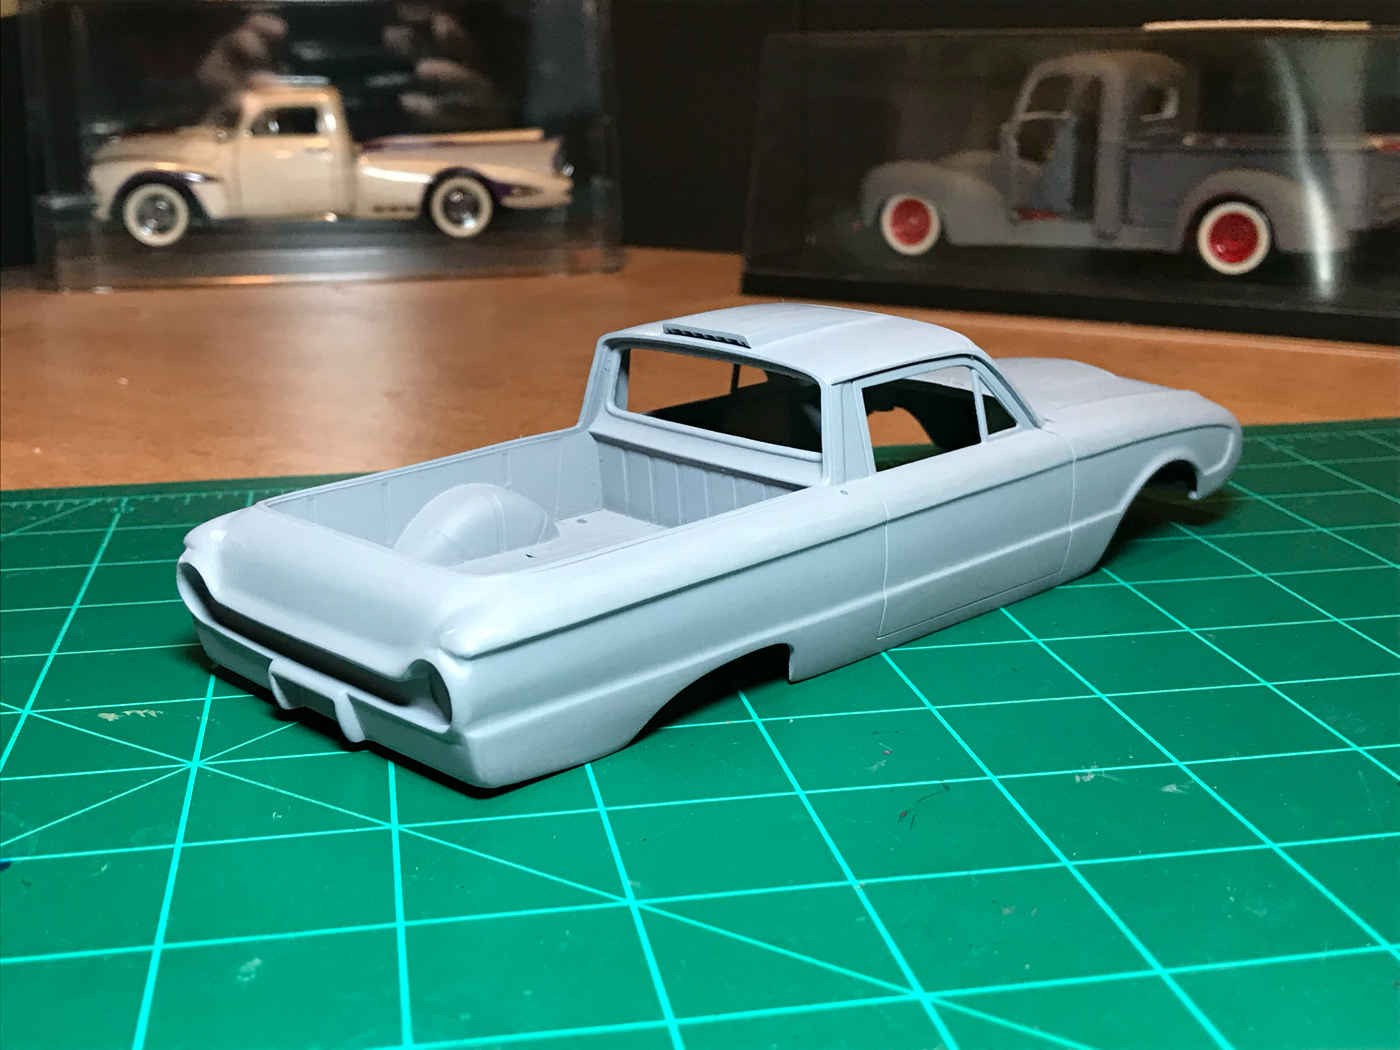
Now, it's time to chop the top...
-
Once back home, I got started on sectioning the hood. Geez! Who would've thought that sectioning the hood would be more work than sectioning the body!?? I made my cut line in the same spot as I did the body, right under the body line/side stainless. The cut went easily, mating the top half and the bottom half back together went easily. Then...when I placed the hood on the car, all of a sudden it was too wide for the body. By like a 1/32" on each side! I have no idea why either! I didn't make any modifications to the top of the hood! So I ended up cutting the hood down the center-line and removing 1/16" of material, then pulling the backside of the hood together. I reinforced the underside with sheet styrene and covered up my mess on the top side. It's done now at least!

-
Eager to get started, I took it with me on my trip down to NNL West. In the hotel room, I got started by doing a scale 2" section on the body. I didn't want to hack the you-know-what out of it as I wanted something that was super subtle. I started by removing the firewall which I will reattach later. All in all, it went really well.
-
Enter "Operation Clean Slate"...
-
This is what I pulled out. Now I'm generally dumb enough to tackle just about any project, but I think this one might be a bit too far gone. The more I looked at it, the more I thought more along the lines of a "Recreation" of the original build, rather than a "Restoration". The paint and putty came off really well but I think the body is shot. She is ROUGH!
-
First step was to get 'er stripped down. I've always used whitewall cleaner with great results. So in the tank she goes...
After about a week, this is what we had. Now, the process didn't necessarily take a week, that's just how long I left it in there.
And pay attention to the gold in there. It's relevance will come up later.
-
I really didn't want to take on another project until I got some of the current ones cleared off the bench and onto the shelf BUT....Lol. I am getting close on several of those and this online build challenge popped up and it was just meant to be. The build challenge is to basically build either a race car, custom, hot rod, or street car in the traditional manner. Nothing (including style) is to post-date 1965. I had just the project!
For those not familiar with my '61 Ranchero build, I bought a collection of vintage kits this last spring. Along with my Ranchero, came this '40 Ford Coupe. And much like my Ranchero, this poor thing was an abandoned (and WAY over puttied) project. I briefly entertained the idea of tossing the poor old thing but it's almost mint original box is probably what saved it's life. In addition to that, there was just something about the vision the original builder had that spoke to me. Then, after the success of stripping my Ranchero of all of it's putty, this found it's way into the "Keeper Pile".
When the contest kicked up, my immediate thought went to this car. So, much like my Ranchero, I will be building this car following the original builder's vision but to do it up right this time and add a couple of things here and there. I'll post pictures as I bump along.
-
Ooohhh!! There’s one of my problems! I must have the Micro Sol as it turned my decal into mush when I was trying to move it. Good to know!
-
I’m needing a decal guru! I’m trying to apply a very thin and delicate (but long and having many zigzags) decal. I’m trying to figure out the best method for installing it successfully. I attempted to cut it into more manageable, smaller pieces and then tried to seamlessly splice them back together on the car (as I’ve done that before with great results) but that didn’t work very well so I’m going to have to put them on in their entirety. I ended up having to source another sheet to make a second attempt. A friend of mine suggested that I put the car under water, along with the decal and do the initial placement of the decal with the car submerged. Any thoughts on that?
Also, when using decal setting solution, can it be used after the decal is completely dry? Or does it have to be applied when everything is still wet? -
-
See you there!
-
Wow! That's gorgeous!!
-
I own a 1:1 '53 Chevy 210 Club Coupe so I have plans of building that body as well!
-
Got the blue on this afternoon. I've got a couple very minor touch ups to do and then it's time for some clear.
-
Wow!! Just...wow!!
-
Ya got my attention!
-
-
No unfortunately. I've got a couple I need to get knocked out and then I'm back at this one. Soon, I'm hoping!
-
Bodywork is officially DONE!! She's ready for some color! This is the last time you will see her in primer!
-
GEEEEEEEEEZZZZZZ.....
-
Wow! Did you spray a lock down coat after applying the mask?
-
I appreciate the input guys. I think I'll stick with the quad headlight setup.
-
1 hour ago, ChrisBcritter said:
How about a real '60s touch - use the Cibie lights from the Fireball 500? They're one-piece chrome but could be recast in clear (I could be persuaded to make a set!
)
Any thought about taillights? The custom units from the '64 Falcon kit come to mind:
I wish I would've know about that! Although I ended up with something very similar.


Traditional '40 Ford Coupe Custom
in WIP: Model Cars
Posted
Thank you everyone! I'm hoping to get started on the top this weekend.