SpreadAxle Posted January 12, 2009 Share Posted January 12, 2009 (edited) This is the 1991 re-issue of the AMT R Model Mack, and is the very first truck model I ever built. I snatched it up as soon as it hit the shelves. Having recieved a copy of Phil Jensen's now infamous book, I remember wanting to try everything in it. I did add some trailer air lines. A few days after buying the Mack, I bought AMT's Amoco Tanker trailer to put behind it. All went well until it was time to use my airbrush. It worked well on the truck's frame, but malfunctioned afterwards. With that, I ended up brush painting the cab and hood. The color is Testors dark blue on the original. This rebuild has been long overdue, so here's some b4 and during shots. After the purple bath, I concentrated on painting the cab and hood. This was a nightmare, too. I couldn't seem to find a white paint that would cooperate. So two repaints later, here it is with just the white. It's DupliColor Gloss White. The truck is going to be white and blue when finished. The blue areas will be the cab roof, and the fenders. I did modify it just a little. I shortened the frame to give it more of an east coast look. I'm just going to make this a typical fleet truck, as I originally intended. In the foreground is a full-length AMT Mack R frame for comparison. I changed the wheels out to 2 hole Budd wheels from AITM. They fit the AMT tires perfectly. I did use the smaller 10:00x20s for this build, instead of the 11:00x20s in the kit. The other modification I made this time around was to go with the shortened bumper. As to the trailer, it's long gone, but I do have the suspension for it, which will be going under an incomplete AMT tanker I got on ebay. Thanks for looking. Edited May 23, 2009 by FlatbedKW Quote Link to comment Share on other sites More sharing options...
Turbo590 Posted January 12, 2009 Share Posted January 12, 2009 (edited) Ray... Looks like a special build..and being "your" first...WELL Also looks like you are in your mobile office? How are things going these days? Take care, Kurt Edited January 12, 2009 by Turbo590 Quote Link to comment Share on other sites More sharing options...
Semi Trailer Mechanic Posted January 12, 2009 Share Posted January 12, 2009 What's goin' on... Looks like you've got your work cut out for you!!! I know of a couple fellas that drives OTR that would build model trucks in the bunk. I sure how what ever you've got the CSC in stays sealed in the truck. That'd be a mess if ya hit a pot hole or hooking to a trailer and that stuff spilled all over the interior Quote Link to comment Share on other sites More sharing options...
mackinac359 Posted January 12, 2009 Share Posted January 12, 2009 Rebuilds can be enjoyable and frustrating at the same time. You're off to a good start. Tim Quote Link to comment Share on other sites More sharing options...
ABC Auto Industry Posted January 12, 2009 Share Posted January 12, 2009 Lookin' good so far. Quote Link to comment Share on other sites More sharing options...
SpreadAxle Posted January 12, 2009 Author Share Posted January 12, 2009 Thanks guys. So far it's been fun to rebuild minus the paintjob. Yes I'm in my "mobile office" . The pix where you see the cab in white, were taken on my upper bunk which was folded down. It only looks messy because I was working. Normally, everything is in boxes and bins, and packed very tightly. The way the top bunk folds in a Pete is into a sort of "L" shape, rather than flat against the back wall like in KWs and others. That makes for a great storage shelf, and where almost everything rides. The only bad thing is when I want to work on something, it's like trying to find something the first night you move into a new house. I try to keep things grouped together, so it helps. As for spills, I did have one jar of paint tip over and the cap unscrew, but it was contained in a box, so no mess thankfully. Quote Link to comment Share on other sites More sharing options...
Old Albion Posted January 17, 2009 Share Posted January 17, 2009 Ray, Interesting project. I have a restoration planned for my first truck build since I got back into building model trucks. One thing that I have not worked out yet. How do you seperate the parts (Once Glued) without damaging them? Good Luck with the project. Best Wishes Dave Bates Quote Link to comment Share on other sites More sharing options...
SpreadAxle Posted January 24, 2009 Author Share Posted January 24, 2009 Dave, the chemical we often refer to as the "Purple Bath" will usually weaken the bond between glued parts. If it soaks long enough, you can work them loose with minimal or no damage. Then again, that depends on the glue used, and whether or not the joined surfaces were kept free of paint. If painted surfaces were not scraped prior to gluing, the parts separate easier. If you(or the pervious modeler if restoring someone else's built-up model) cleaned the areas to be glued pror to cementing, there is a stronger bond. Often times, they will separate, but sometimes, they won't. Careful cutting near joints often helps to start, and then you can separate by hand. The bumper on this Mack and a few other parts gave me that very problem. The bumper wouldn't separate from the frame, so I got the idea to go with the shortened bumper since it was being painted anyway. Often times, this is more of a headache than removing the paint, as it will try your patience. Good luck on your restoration. Quote Link to comment Share on other sites More sharing options...
Old Albion Posted January 25, 2009 Share Posted January 25, 2009 Ray, Thanks for the reply. "The Purple Bath"??????? Best Wishes Dave Bates Quote Link to comment Share on other sites More sharing options...
SpreadAxle Posted January 25, 2009 Author Share Posted January 25, 2009 Ray, Thanks for the reply. "The Purple Bath"??????? Best Wishes Dave Bates Dave, I was stuck on that name for awhile. I read of many modelers using it on the forums, calling it the "purple bath", but never knew what it was for a long time. The "purple bath" is Castrol Super Clean, although another name for it that I've seen is Purple Power. It's an automotive parts cleaning agent(there's probably a better description 4 it) that a lot of modelers here use to strip paint from a model. It also softens glue bonds. It's pretty safe to use. I'm not sure what the equivalent would be where you live. It comes in a big plastic jug and the chemical is actually purple in color. It's one of those things you should wear gloves to use. Quote Link to comment Share on other sites More sharing options...
SpreadAxle Posted January 26, 2009 Author Share Posted January 26, 2009 :)Further progress has been made on this truck. I spent the weekend working on the chassis and engine. Most of the assembly is done. I still have to finish painting the cab and hood. I will probably shoot the blue areas b4 the end of the week. We'll start with the shortened driveshaft. It's the kit shaft cut with the ends stuffed into a snug fitting piece of K and S brass tube. I figured it might add a little strength rather than just cutting it and gluing the remaining ends. Just a neat idea I thought I would try. and the finished product.. Here's a shot from last night showing progress to that point. The tank support bar for these square tanks was broken on both ends. So I drilled the front of the tanks where the forward support mount goes. That seems to have helped. A mock up shot from the rear. You may notice 2 weathering attempts here, involving the tires. First, the mismatched brands of tires. The Firestones on the forward drive axle are shaved down and weathered for a well-worn look, including the left outer tire being cupped, while the rear axle tires are brand new GoodYears. I've often seen the rear drives wear down first, and many fleets will just replace the 4 on the rear axle first. Another mock up shot. The green on the radiator was from the original build. It was my attempt to replicate spliied antifreeze. I'll fix that. Thanks 4 looking. I hope to have this one done soon so I can take it home. I'll be starting the trailer soon, I just wanted to get the tractor further along first. Quote Link to comment Share on other sites More sharing options...
Jim B Posted January 26, 2009 Share Posted January 26, 2009 Looking really nice, Ray. Those filters sure are green! Quote Link to comment Share on other sites More sharing options...
oldstyle Posted January 26, 2009 Share Posted January 26, 2009 Looks Nice...specially the Shortened Frame Uwe Quote Link to comment Share on other sites More sharing options...
SpreadAxle Posted January 26, 2009 Author Share Posted January 26, 2009 Thanks everyone. Quote Link to comment Share on other sites More sharing options...
Twist67 Posted January 30, 2009 Share Posted January 30, 2009 Hi Ray, seems to be a good start.The shortened frame looking good on that mack as do the wheels. Made something like that to my old Mack R model which started as the junkyard kit.... My old Mack R-model Keep it going, Regards,Chris Quote Link to comment Share on other sites More sharing options...
SpreadAxle Posted January 31, 2009 Author Share Posted January 31, 2009 Thanks, Chris Quote Link to comment Share on other sites More sharing options...
SpreadAxle Posted February 1, 2009 Author Share Posted February 1, 2009 (edited) Over the last few days I've been working with the paintjob. Tonight is the first time I unmasked the white to see how it came out. I think it turned out well. I have some touch up 2 do, but I am pleased with the results. The masking was done with Parafilm M. This is my first time using it. I like it. Pretty crisp with not too much bleeding if you lay it down right. I didn't cut as straight as I thought on the hood. Here you see the first shot with the trailer. It's just the tank itself propped up. The color is Model Master Aluminum Plate buffing laquer. I need to buff it some more, but I thought I would show the eventual direction I'm going with this mock up. Note:Since these pix were taken, I'm doing one more coat of blue on the hood, thanks to a screw up I made . Hopefully I can have it finished as far as painting it tomorrow. Thanks 4 looking. Edited February 1, 2009 by FlatbedKW Quote Link to comment Share on other sites More sharing options...
SpreadAxle Posted February 16, 2009 Author Share Posted February 16, 2009 (edited) Since I'm carrying an oversize load, and not allowed to drive across New Mexico on Sunday, I spent today working on the trailer. This meant chasing a lot of parts from the spare parts box, and a lot of sanding, but here is a mock up of the trailer on the truck. On the original, I made front fenders from Evergreen corrugated sheet. I constructed front fenders for this trailer using spare fenders that are from other AMT Fruehauf tanker kits. I still have to make the upper supports for these fenders. They are supported from below with stretched sprue supports like I did the first time. They go across the frame to both fenders. Here is a front shot. I still have some touch up and final detail painting to do to the cab. 8-) As to the trailer, the tank needs some sanding, and another coat, as well as a coat of paint on the frame. This was an ebay trailer, assembled with no paint, just far too much glue, resulting in broken parts during the tear-down. The suspension from the original trailer is under this frame now. Thanks for looking. Edited February 16, 2009 by FlatbedKW Quote Link to comment Share on other sites More sharing options...
SpreadAxle Posted February 19, 2009 Author Share Posted February 19, 2009 I did a little more on the trailer tonight. The frame is painted, as well as the tank. I used Model Master Aluminum Plate buffing laquer. Here it is b4 buffing: ...and after.... I still need to buff it some more, but it has a nice shine to it. Quote Link to comment Share on other sites More sharing options...
Old Albion Posted March 15, 2009 Share Posted March 15, 2009 Ray, Any progress on this one? The trailer looks good. I like the Aluminium paint you used on the tank. Should be a nice looking rig when its all done. Good Luck with the rest of the build. Best Wishes Dave Quote Link to comment Share on other sites More sharing options...
SpreadAxle Posted March 16, 2009 Author Share Posted March 16, 2009 Dave, my main progress since my last post has been all small details. I will have pix up again, soon. I haven't done anything major, though it isn't too far from being complete. Quote Link to comment Share on other sites More sharing options...
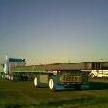
SpreadAxle Posted March 19, 2009 Author Share Posted March 19, 2009 (edited) made a little progress recently. Mostly just small detail items. It's not too far from completion. I decided to play with the camera the other day and replace the horrible pix that were here originally. Here is an overall view. The K broke off awhile ago, but we've all seen that Mack that was missing letters. I may redo this, but I had to add the raincap. It is a Mack after all. ;D My first use of baking soda as a "rusting agent". The shiny flex pipe is supposed to represent one recently changed. Here is the trailer from the rear. The placard holder was scratchbuilt. The blowout damage to the fender was done by heating it A little more of the trailer. Plaskit cones, and a holder from scrap plastic. A mix of worn and new tires are part of my weathering. I hated the 3 pix that were here, so I replaced them. Thanks 4 looking. Edited May 23, 2009 by FlatbedKW Quote Link to comment Share on other sites More sharing options...
airhorn Posted March 24, 2009 Share Posted March 24, 2009 (edited) Hi Ray, long time no talk to. You're doing a great job on the rebuild so hang in there. I've never done a rebuild but can imagine that they could be a hair puller. That's probably why I have never done one because I don't have much hair to pull out anymore.LOL Take care and be careful out there. Win Edited March 25, 2009 by airhorn Quote Link to comment Share on other sites More sharing options...
SpreadAxle Posted March 28, 2009 Author Share Posted March 28, 2009 Hi there Win. It's most of the way done. I'm wanting to finish it so I can leave it at home, and press on with my other projects. Rebuilding is actually quite fun, it's just annoying when those hard-2-find parts break or get lost. Then you have to make the decision as to whether or not you wish to raid a fresh kit. It's not so bad if you're modifying the truck, or using it as the platform for a conversion kit. Other than broken missing parts, I wish I had saved my old builds instead of dismantling them. It would be fun 2 rebuild them now. Quote Link to comment Share on other sites More sharing options...
SpreadAxle Posted May 23, 2009 Author Share Posted May 23, 2009 The last post that includes pix shows my most recent progress. Quote Link to comment Share on other sites More sharing options...
Recommended Posts
Join the conversation
You can post now and register later. If you have an account, sign in now to post with your account.
Note: Your post will require moderator approval before it will be visible.