bigbluesd
-
Posts
165 -
Joined
-
Last visited
Content Type
Profiles
Forums
Events
Gallery
Everything posted by bigbluesd
-
Now that you mention it that would make a really good painting... might have to find somebody to do that!
-
This is my four year old painting a model jet that we built together yesterday. It is an old Young Builder's Club kit that came in a lot of kits that I bought on eBay recently. Wasn't complete but the main parts were there and we scratch built what was missing. Came home from school today begging to paint it (told him I would prime it last night). Lots of fun. He has done a couple of snap kits with me, they make for great bonding time. Not sure about the authenticity of his color scheme but he loves it hanging from the ceiling in his bedroom!
-
Painting torque thrust rims
bigbluesd replied to HOLMES55's topic in Model Building Questions and Answers
Seems to me like silly putty would be a good method to use for masking this and spraying it. -
That printer pin is perfect! Very sharp....
-
Thanks for all the advice, it is currently sitting in the brake bath. I'll give it another shot this weekend.
-
What do you mean by "not to trap the thinners"?
-
No, I've always had good results shooting Duplicolor through the can. I'd do the same with this one but it's a custom color mix. What kind of thinner would dry slower? What about mineral spirits, would that help?
-
I tried thinning with lacquer thinner about 1 part thinner to 2 parts paint as well, not much change... I would think that adding thinner would make it dry quicker, an I wrong?
-
I know that you wait about 10 minutes when spray bombing it, but how long do you guys normally wait between coats when airbrushing Duplicolor? It seems to dry really fast... Which leads into my next question --- why would I be having a problem with Duplicolor clogging my Paasch VL after every coat? Is it because the paint is drying so quickly inside the airbrush? What can I do to stop this? And in top of that, I'm getting a really tough texture on the body after spraying it. I'm shooting decanted Duplicolor at about 18 psi, I dropped it to 15 psi and it didn't seem to help.
-
Do you know if the Plasti Kote plays nice with Duplicolor on top?
-
Who carries Plasti Kote?
-
Followup question, do you guys airbrush your primer or shoot it from a can? I have been using Duplicolor primer from a can because it goes on so well but it can get expensive priming everything and also I can't find it in a neutral gray (either white or black). I have also been using Rustoleum Sandable Primer from a can for all of the small parts that don't need a perfect finish but it does not go on well... lots of texture to it after spraying, I'm going to have to find something better and cheap.
-
Just curious if you guys prime every part before painting or only the major ones (leaving small parts alone)?
-
Lifted 97 Ford Explorer
bigbluesd replied to bogger44's topic in Model Trucks: Pickups, Vans, SUVs, Light Commercial
They don't get any cleaner than that! Love it! -
I've got to recess the area underneath the door handles, they are flush on the kit. Any suggestions on how to do this before I start mauling plastic with my dremel and knife?
-
Holy moly, that is so clean, can't tell if your photos are scale or 1:1. Absolutely beautiful...
-
Thanks!
-
This will be fun to watch, I have a feeling I would be jealous to see your collection!
-
It is but I am going to glue it in place so that I can make the panel lines look good, it doesn't fit very well. I'm sealing the hood too because the engine bay is just embarrassing.
-
I thought I stole this on eBay when I got it for like $12 with shipping but it quickly became apparent that the kit is a bit of a turd. So I'm going to use it to practice my body modification skills (nothing fancy, I've just never done ANY modification yet) and try to turn it into a halfway decent curbside shelf trophy based on this car: I've started cutting out some of the molded in foglights, etc. and cleaning up the massive and many sink marks on the body. The tires that came with it are beyond hope so I have no qualms about swapping them out for something more similar to that picture. I hit my small but growing stash of parts and came up with the following contenders: A set of tires from a Burago Ford Focus rally kit that I also "stole" on eBay the other night after a few glasses of wine while browsing on my smartphone. Only problem is that the smartphone app doesn't show the listing description by default and I was too drunk to give it much of a look. Realized the next day that there was no body with the kit at all. DOH! Oh well, spare parts I guess, I only paid $6 with shipping so I'm not heartbroken. On this kit though though they look too small I think. The good news however is that the Focus kit had some pretty nice racing seats, I think I will use those. A set of SVT wheels off of a Lightning gluebomb that I just snagged off of eBay. Not bad. Liking the look, definitely a contender, although I really wanted to build the Lightning box stock so this would be a bit of a sacrifice. A set of wheels from a prepainted NASCAR kit that I bought in the thrift shop the other day for $5 to use for parts.The slicks would look weird so I mounted them on the Focus tires just for the purpose of the picture. Meh. DING DING DING, I think we have a winner. I like these almost as much as the SVT wheels and they came out of a Boss 3'n'1 kit that I plan on using the other wheels in to build, so they aren't a sacrifice at all. Don't look too hot chromed but I think if I paint them aluminum they will look much better. Next up, I will waste a week or so staring at it pretending like I'm about to make progress and never really accomplishing anything. Then eventually I will cut out the side marker lights (going to back the hole with Evergreen and make new lenses) and try to recess the door handles (any tips?). I also need to find a way to thin down those stupid oversized window moldings, I'm guessing I'm going to have to shave them off completely and trim it out with new evergreen stock? I have some evergreen coming in the mail and once that gets here I'll start working on the hood scoop as well.
-
Thanks, I did that same kit and had massive problems with the stripes. There's a thread here somewhere detailing it. I ended up asking Revell for replacement decals and the second time around I managed to get them down a bit better but still had minor issues.
-
I received it a week or so ago and you were all right, this thing is a real turd. I decided though that I will use it as practice for body work, etc. I'm not even going to bother with anything under the hood, just gluing that shut and calling it a curbside model. Enough to worry about on the rest of the car! This is the car I'm more or less shooting for... Need to find a set of Cobra wheels but in the event I don't I've got some nice customs from a 3 in 1 kit that won't look half bad. Casey, even the box art builds are bad on these!
-
Yes, I am really tempted to do the green one but I may save it for a few years down the road when I am out of stash to build. Those metallic graphics on the side are really sexy.
-
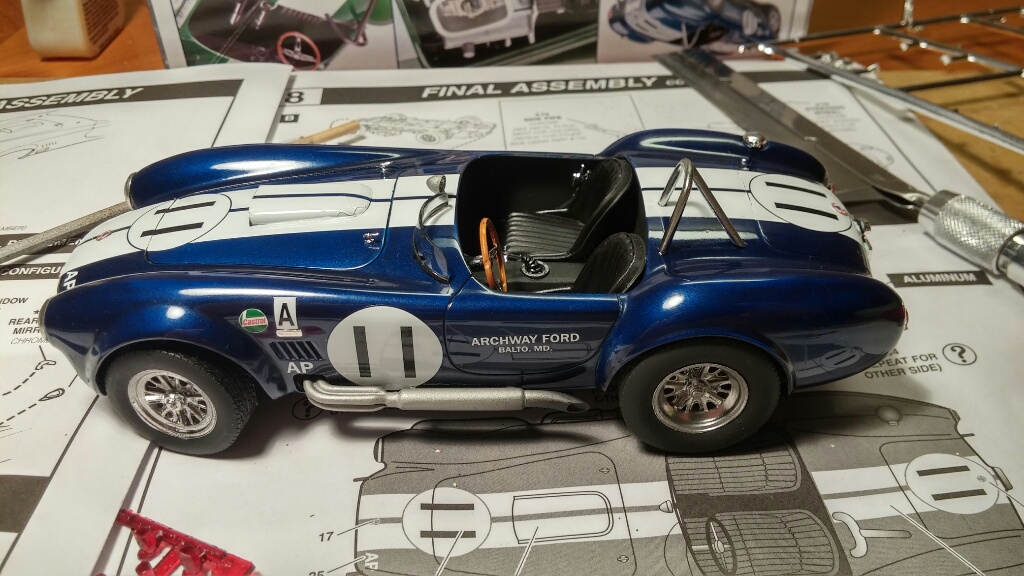
This is definitely one of the better models I've done so far, box stock except that I replaced the solid kit exhaust tips with some I made from aluminum tubing and turned the front wheels a tad (I always do if possible, a cabinet full of straight wheels drives me crazy!). Paint is Duplicolor (both color and clear) polished up to 12,000 grit and then hit with some scratch remover and Meguair's gold paste wax. Was not a perfect match to the original car, I knew it when I bought it, not sure why I didn't just use Testor's blue, it would have been perfect. Some of the chrome parts have been done in Alclad, some were too small too mess with and the badges were metal foiled. De-chroming this kit was a nightmare, took me weeks. As usual, the decal stripes on the hood went FUBAR on me, contemplated trying to sand out the creases and touch it up with white paint but concluded the end result would probably look worse and it was time to get it off my bench. From now on I'm painting stripes, period.

-
I did manage to find this, I guess it's a start