Plastheniker
-
Posts
880 -
Joined
-
Last visited
Content Type
Profiles
Forums
Events
Gallery
Everything posted by Plastheniker
-

Making real wire wheels in all scales
Plastheniker replied to Plastheniker's topic in Tips, Tricks, and Tutorials
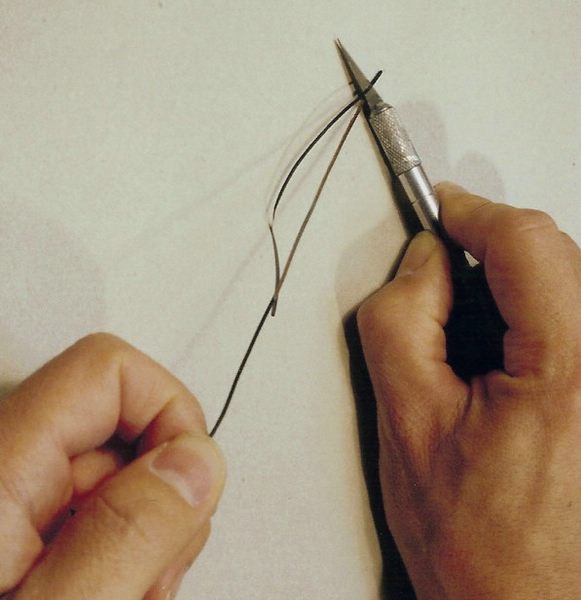
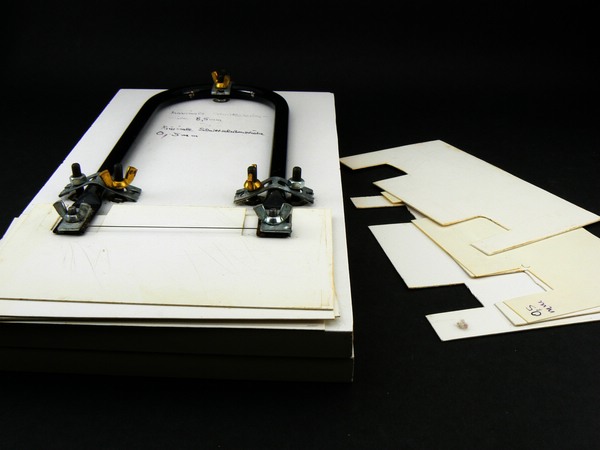
V. Material required A handy piece of white chipboard (or something similar) of 10x10cm up to 20x20cm as a base for a spoke jig. 2 telescoping plastic tubes. The small tube must have an inside diameter slightly larger than the smallest inside diameter of the kit rim. You find telescoping tubes f. e. at Plastruct. I prefer, however, inexpensive plastic tubes sold (in Germany) at house improvement stores or hardware stores in the electrical supply departments; they are meant to protect and to fix electric wirings if these are not covered by casting f. e. in garages and cellars. In English they should be called conduit. If you cannot obtain the suitable small tube you should buy a larger diameter and reduce its inside diameter with a strip of sheet plastic; this is much easier than enlarging a diameter too small. If you cannot obtain the large tube it may be replaced by a stopgap I will mention later. Approximately 50cm of scrap wire approximately 1mm thick If you want to keep the stubs at the ends of the kit axles (meant to bear the kit wheels) you need a piece of metal tube that fits exactly onto these stubs. If you cannot find a fitting tube or if these stubs are too thick simply cut them off, drill holes instead and insert a piece of sturdy wire. Material for your spokes. There are 3 alternatives: At first glance nylon monofilament (= fishing line) seems perfect. It is inexpensive, easy to obtain in many gauges and extremely strong - but it is very difficult to glue and requires additional measures. Therefore I cannot recommend it for my technique. Usually I use copper wire. You find it in various gauges in almost any scrap cable. For 1/24 scale 0.13mm is a convincing diameter. I take this diameter from inexpensive model railroad wiring. One spool at a few Dollars gives enough wires for a modeler's life. Simply strip the insulation this way: Spokes made of copper wire that thin are, however, bent very easily, so you have to touch your wheels with utmost caution. Once bent it is almost impossible to realign them properly. If you want to eliminate this risk buy a spool of stainless steel wire. VI. 4 golden rules for making wire wheels Check if the size of the kit wheels looks correct. If not look for replacement wheels from your spares box or another kit. After spending much time and effort it would be very frustrating to see that your nice wire wheels look odd fitted to the car. If you want to use the kit tyres your wire wheels must keep the original dimensions. Otherwise the tyres will not fit properly. Therefore note down all dimensions of the kit wheel before starting work. Always make a large ( f. e. 10/1) section scale drawing of the planned wire wheel including the hub first. Check your drawing and all calculations several times. This makes annoying planning mistakes very unlikely. Never use liquid super glue. By capillar attraction it wil be sucked into the gaps between the spokes near the hub and the rim well. You would realize the fact that your work is spoilt not before you spray the finished wheel. Only use gel type super glue and apply it with a pointed match. To be continued after 200 press-ups
-
Making real wire wheels in all scales
Plastheniker replied to Plastheniker's topic in Tips, Tricks, and Tutorials
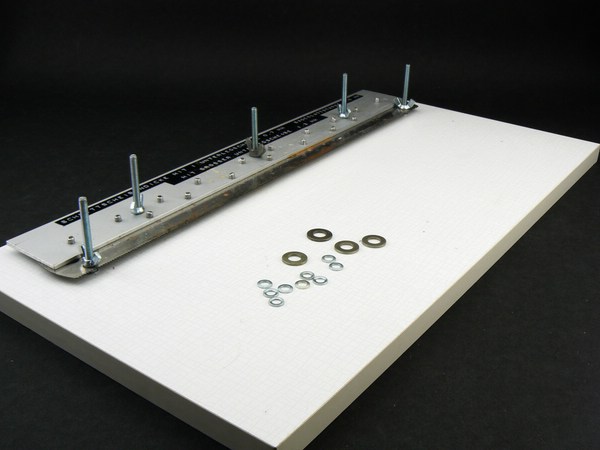
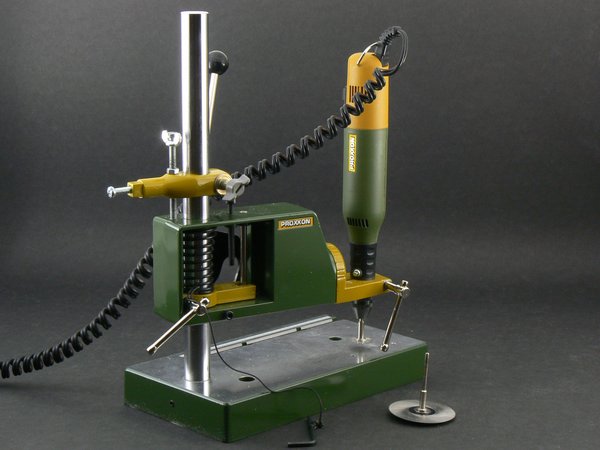
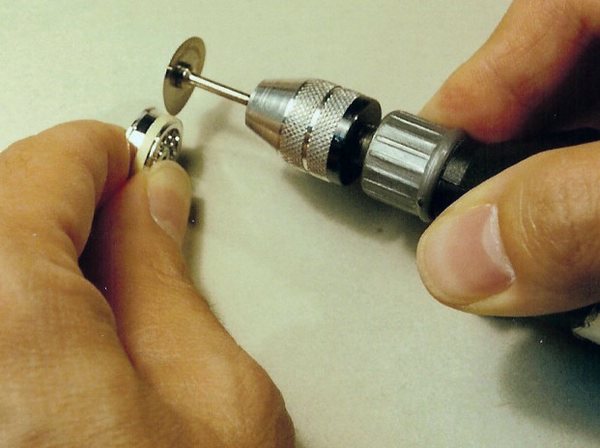
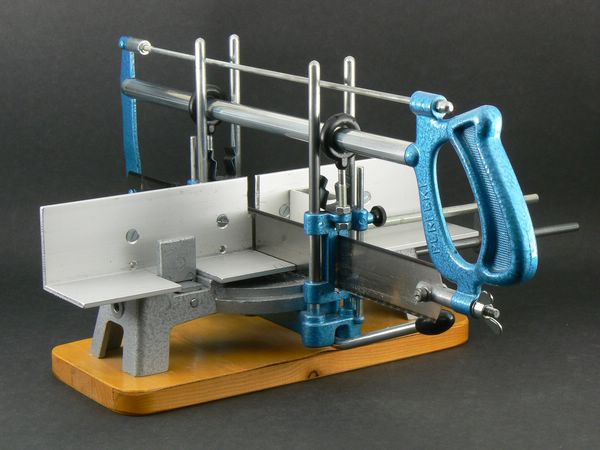
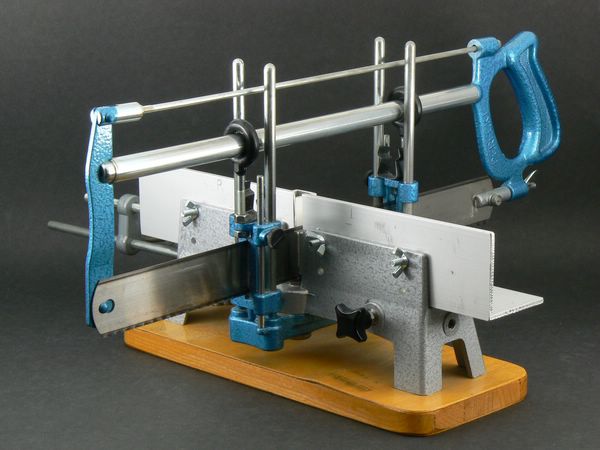
Yummy, yummy,yummy... IV. Tools required Indispensable is a caliper with electronic or mechanical dial because you have to take a lot of inside and outside diameters. You need a plastic drawing triangle (as you used it at school) for drawing exact angles and a compass. The final appearance of your spoke wheel depends a lot upon how exactly you divide the kit rim radially. You need either a rotary tool with circular saw blade if you have a very steady hand; mark the line on which you intend to cut with a narrow strip of tape (least recommended). or a self-made construction that could be called "lying fretsaw" You saw here by moving the rim and not the saw. You determine the thickness of the cut by adding or removing those plastic sheets seen on the right side. or a similar self-made construction you could call " lying saw blade" Here you determine the thickness of the cut by shimming the saw blade up with more or less washers. or a converted small drill press with rotary tool and circular saw bladeThis is the fastest and most exact way. By turning the vertical wing screw you can adjust the level of the saw blade by fractions of a millimeter. Last you need a manual full-size miter saw (stay away from the flimsy small plastic Dobson Miter Rite) for cutting absolutely vertical rings of equal width from a tube. Originally meant for large pieces of material the surface of the "table" is often ribbed. Simply bolt on a piece of angle as I did. You will have to spend about 50 $, but you get a most versatile tool. Besides making wire wheels I use mine almost daily. To be continued most probably tomorrow
-
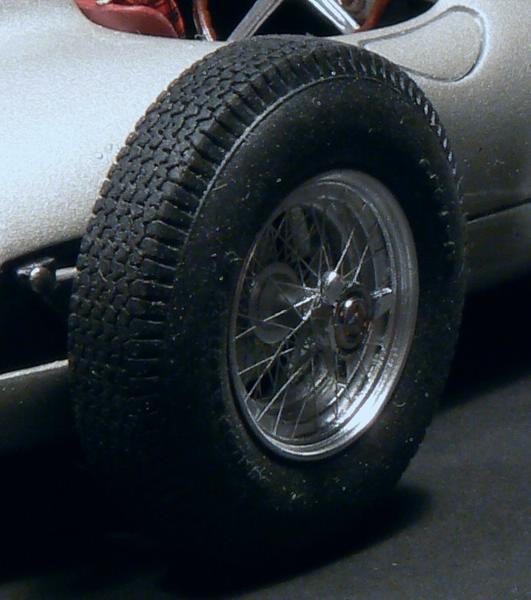
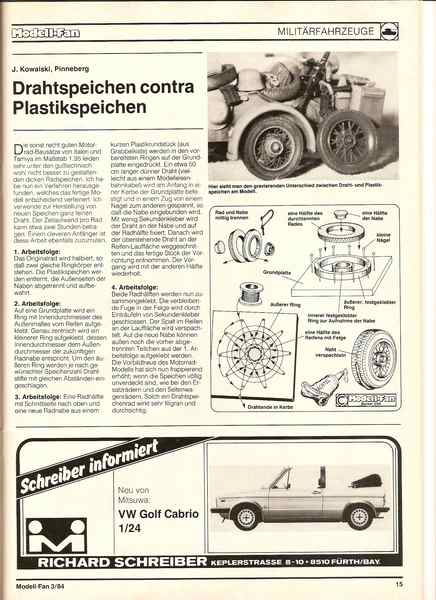
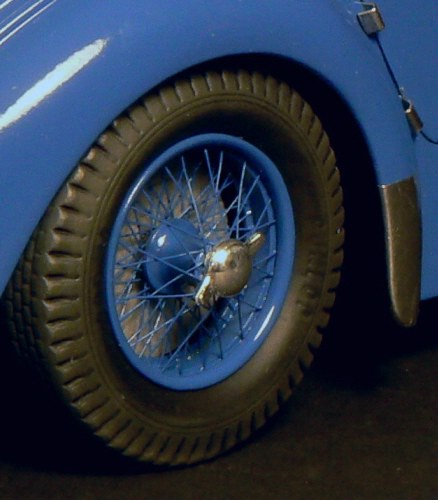
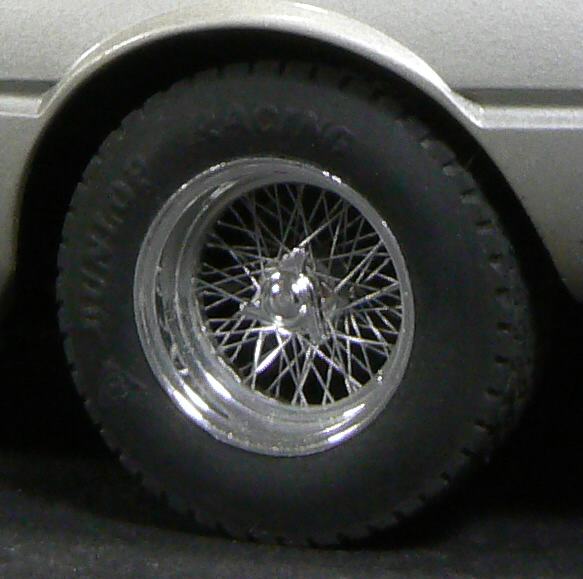
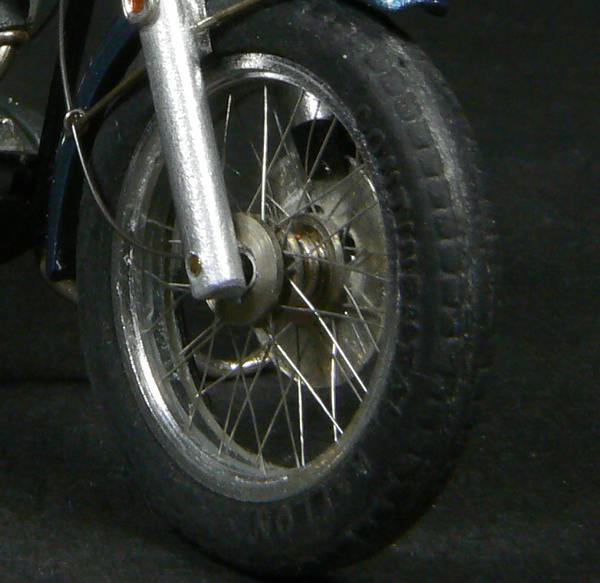
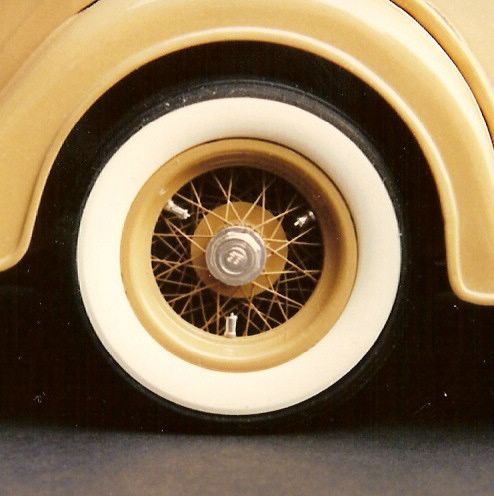
The appearance of otherwise outstanding builds in 1/12 or smaller is completely spoilt if modelers fit those plastic "wire" wheels of the kit. Even the best kit rims (in 1/24 Fujimi and, surprisingly, Protar) have thick spokes entirely out of scale. You could replace them by aftermarket photoetched parts if you happen to find the appropriate size for your project, if you are willing to pay a lot of money, and if you think that adding purchased parts to nowadays almost perfect kits can still be called modeling. Otherwise you might be interested in my following technique. I. What can my technique do? It is applicable to any scale between 1/16 and 1/43. I am sure it works in 1/12 too. The making is fast and, once understood, a routine job. The wheels are delicate but very sturdy. You can replicate any wheel design you need. A set of wheels will cost you almost nothing. Last but not least you can say you made them youself. You can expect results like these: 1/24 standard rim i. e. with spokes on 2 levels 1/24 racing rim with spokes on 3 levels 1/24 drop center rim 1/24 motor-cycle rim 1/20 standard rim 1/16 standard rim You can see complete vehicles here: http://www.modelcarsmag.com/forums/index.php?showtopic=75267 http://www.modelcarsmag.com/forums/index.php?showtopic=76128 http://www.modelcarsmag.com/forums/index.php?showtopic=77428 II.The basic principle of my technique When I was interested in 1/35 military modeling around 1980 there were some nice motor-cycle models. They were well-detailed but had spoke wheels that looked absurd. I found a fast and easy way to replace the thick plastic spokes by real wire spokes. I described it in this German magazine article that was published in 1984. You can see that here the spokes were applied directly to the plastic wheel halves. This technique is okay for very narrow rims as bikes, motor-cycles and and very few vintage cars, where all spokes are fixed very close to the centerline of the rim well , but on all other cars this looks completely unrealistic. This method is so obvious that it seems to be re-invented from time to time. The difference to my technique I use since the mid-eighties for cars is to remove a radial section of the kit rim including spokes and hub and to replace it by a self-made unit. I described this technique in an article that was published in April 1995 in FSM. I asked them for permission to show this old article in a German forum together with an update but never got any answer. That was not very polite, was it? This is why I write this complete new how-to-do here. III.What abilities are required? This is certainly nothing for the novice but if you are able to make simple conversions you will cope with all problems. Some knowledge in geometry is essential and if you tend to miscalculate you might have a problem. To be continued after supper Please give me some response. I would like to know how many users will follow this topic. If anything is incomprehensible, if any questions occur please let me know as soon as possible. This contribution will require more than one evening, so I want to be sure that everything is understandable. Thanks!
-
I do not post very often, but this is simply perfect in every regard!
-
Thanks to all for your interest and your kind comments. Curtis, John, Skip and who else may be interested in my technique of making wire wheels, I will try to start a detailed and hopefully easy to understand how-to-do contribution in the Tips, Tricks, and Tutorials subforum within the next days. Please keep an eye on it if you are interested. Thanks once again!
-
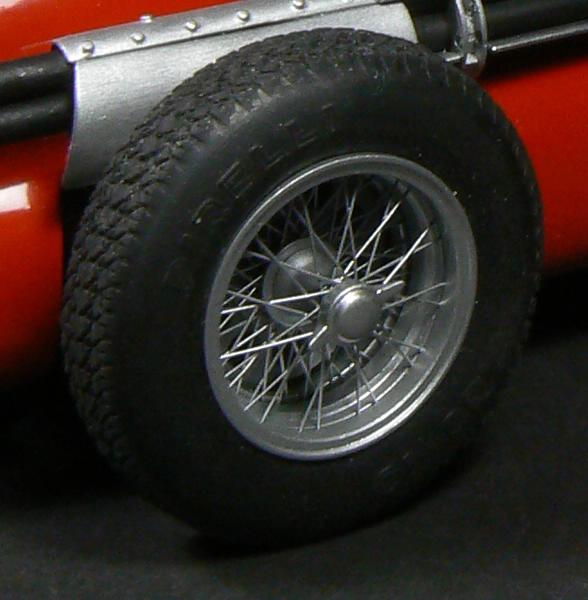
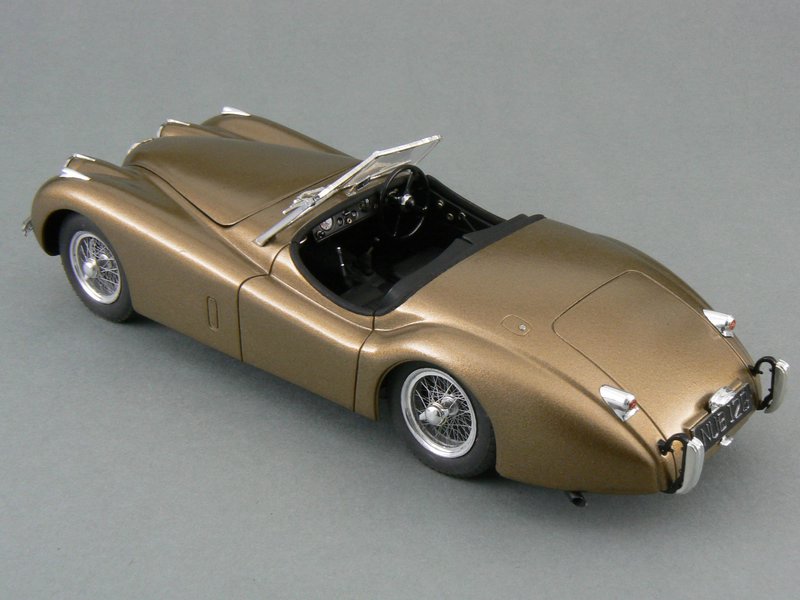
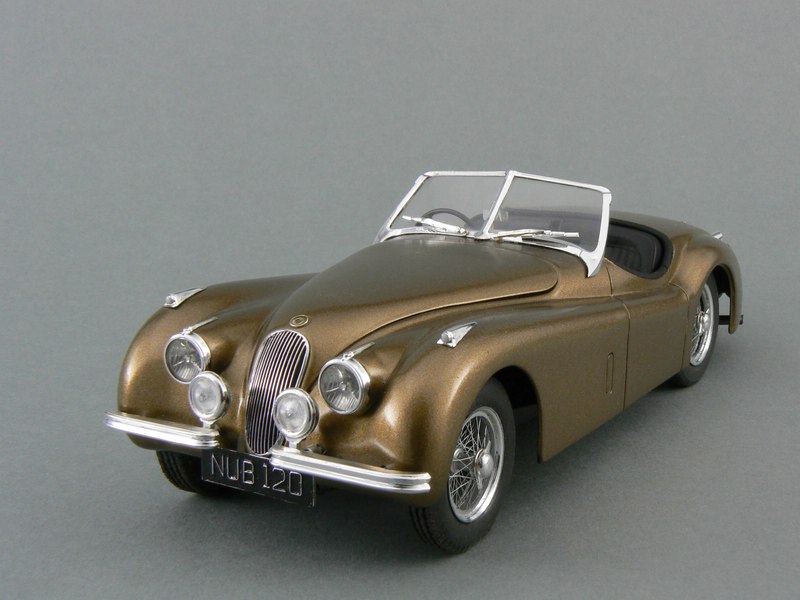
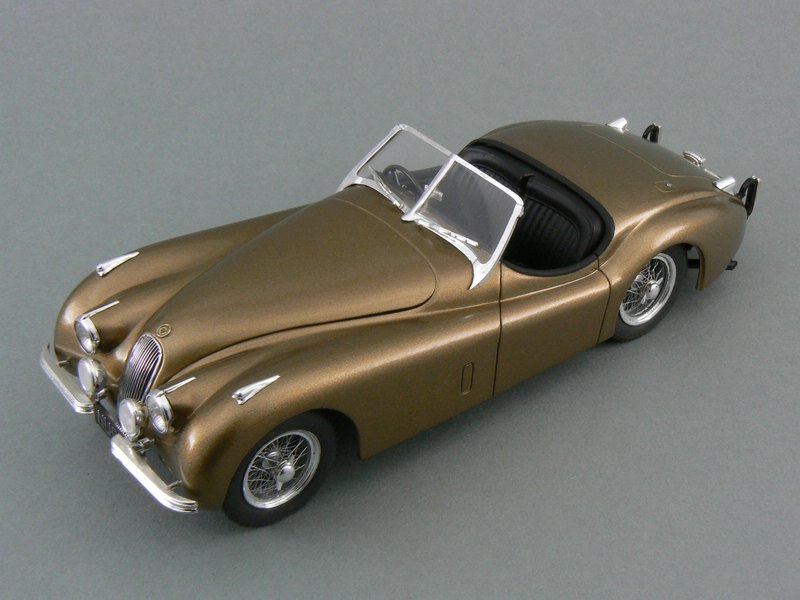
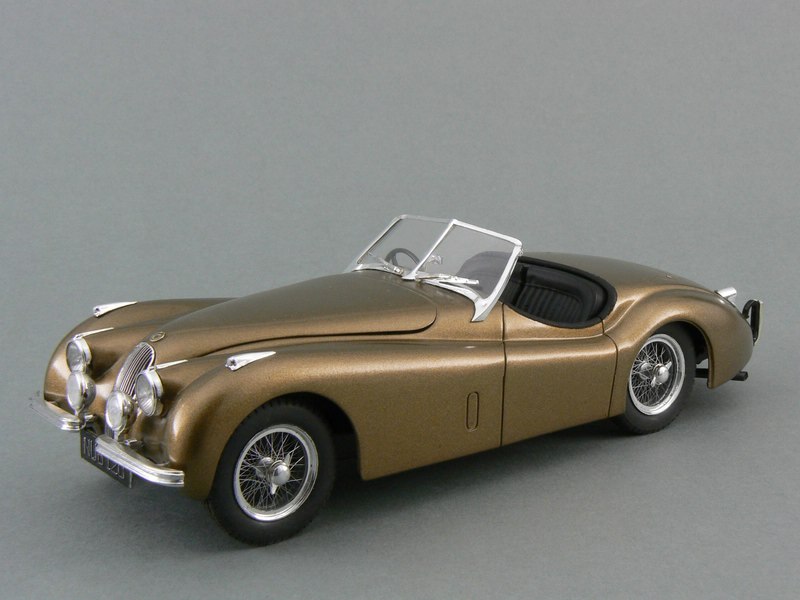
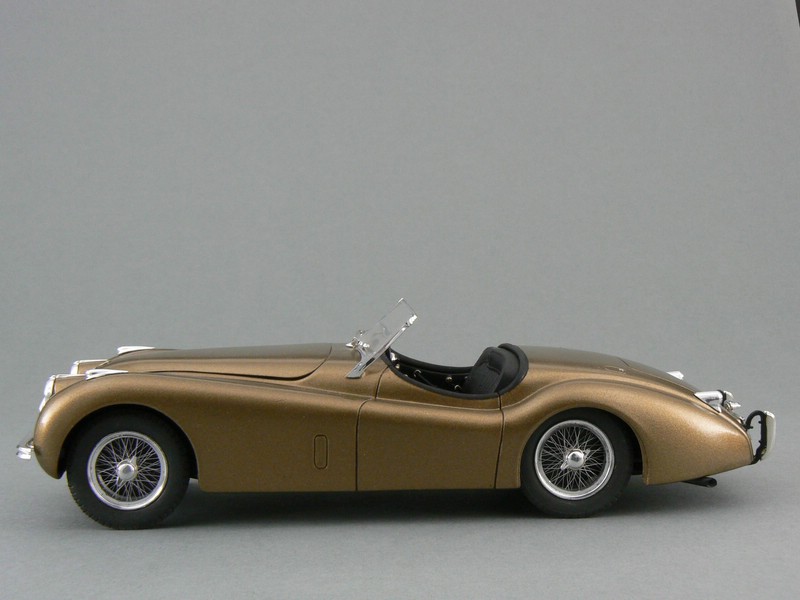
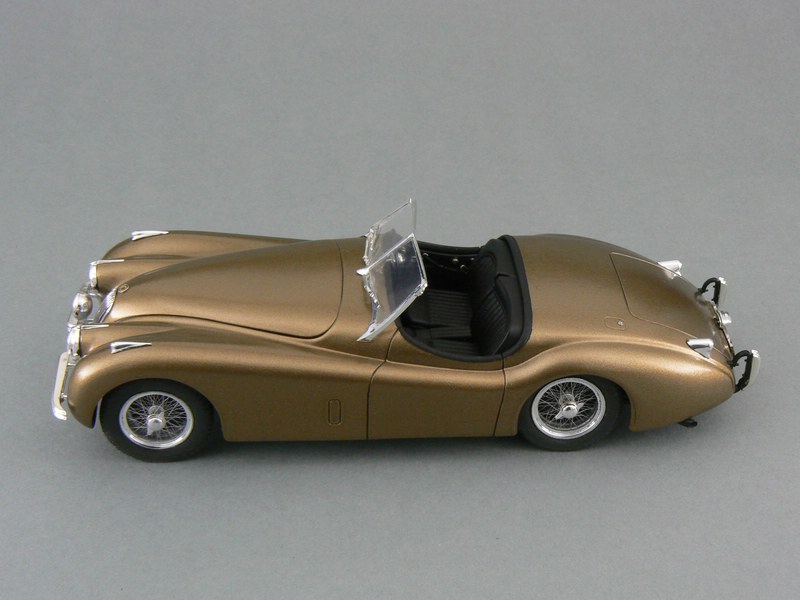
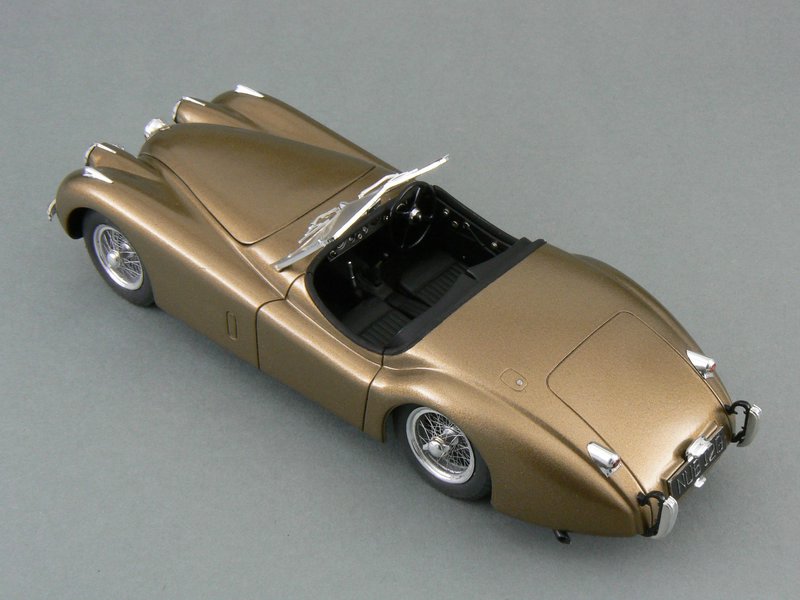
Hi, Revell Germany released this plastic kit approximately 20 years ago. Probably it was based on an older Monogram metal kit. I built my model 15 or 20 years ago. The Revell kit is rather simple and indeed it seems to be designed decades ago. Nevertheless details and fit are quite good and the surface of the chromed parts is outstanding. The designers of the kit were wise enough to avoid unrealistic plastic "wire" wheels but replicated solid steel wheels with chromed hub caps which were the standard wheels of the XK 120. Nevertheless I find real wire wheels more attractive so I made a set of real wire wheels myself. Wire wheels were an optional extra for the non-SE versions. I mixed a paint that (hopefully) matches the standard XK 120 colour "Bronze". Black interior trim was not standard but was available to special order. The Revell kit offers fair quality at a favourable price and last but not least it makes a nice model of a milestone in sports car history.
-
Auto Union Typ C - Grand Prix Champion 1936
Plastheniker replied to Plastheniker's topic in Model Cars
Chris, you managed to finish the worst kit I encountered in more than 50 years of modeling. Hat off! Building the Auto Union will be a pleasure by comparison. I am going to show the Mercedes next time. I hope you will be interested. -
OIL FIELD PAYSTAR 5000
Plastheniker replied to Swamp Dog's topic in Model Trucks: Big Rigs and Heavy Equipment
As your Ford: idea, workmanship and photography are outstanding. Jürgen's personal modeling rating agency says "Triple A"! -
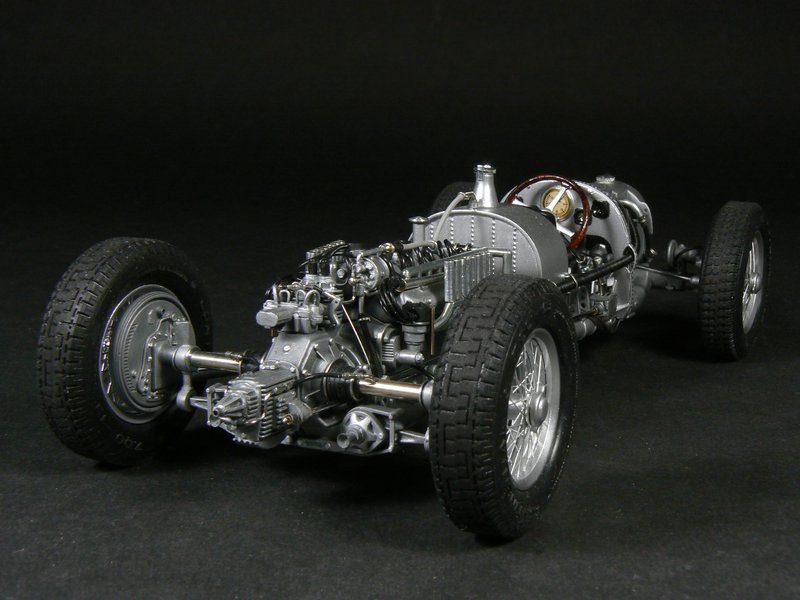
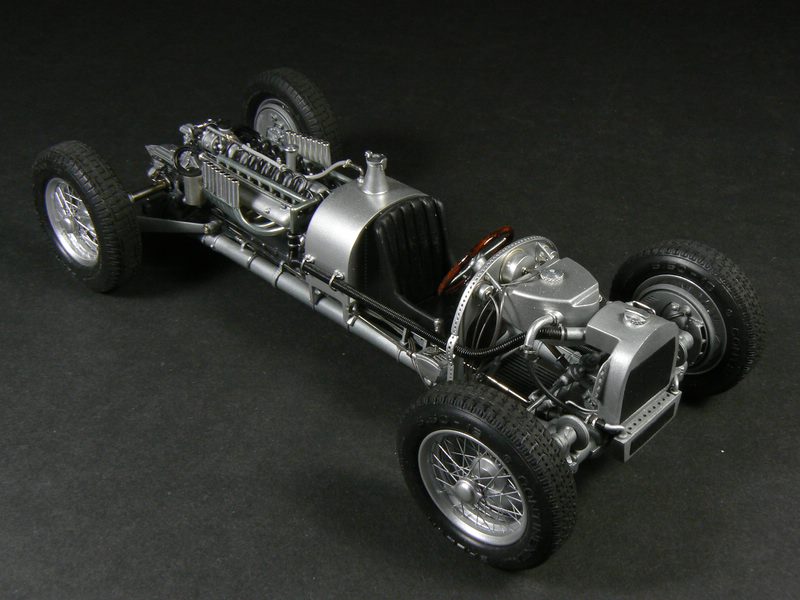
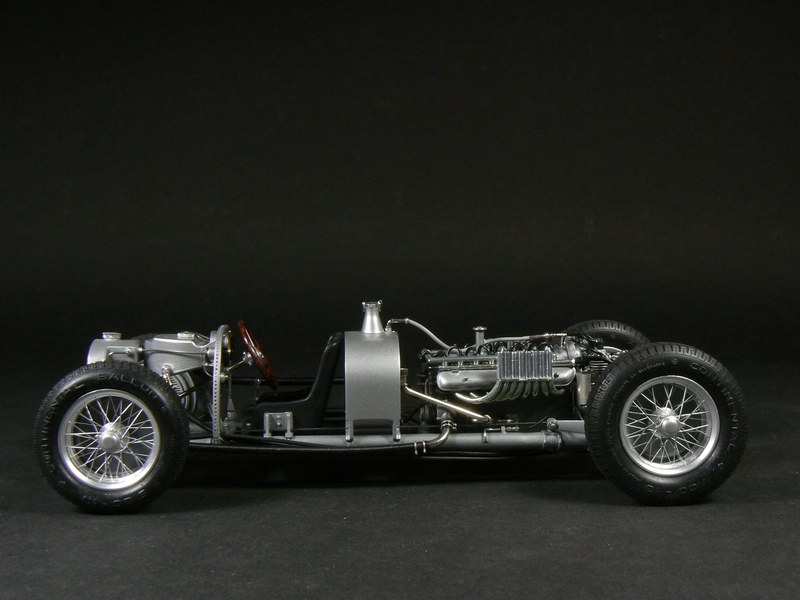
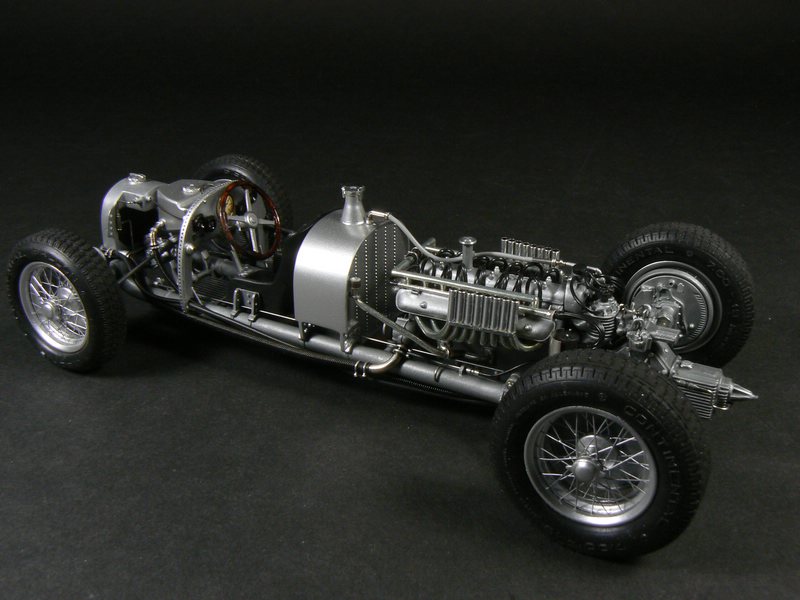
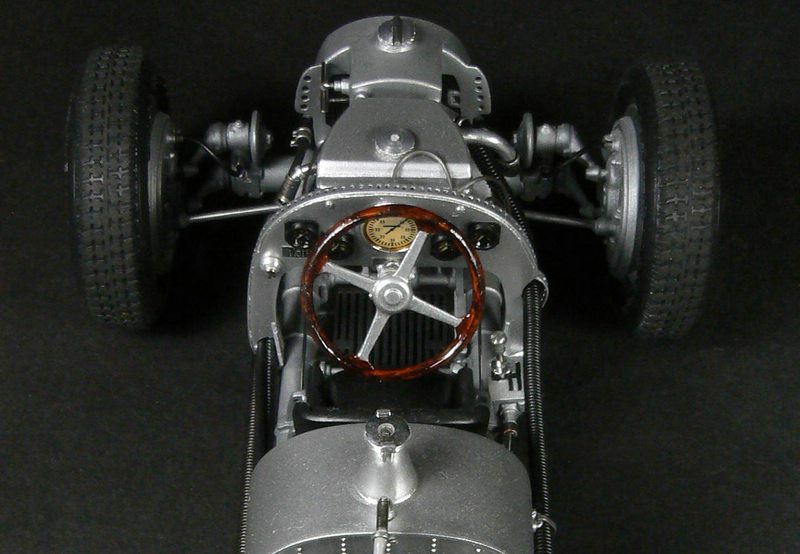
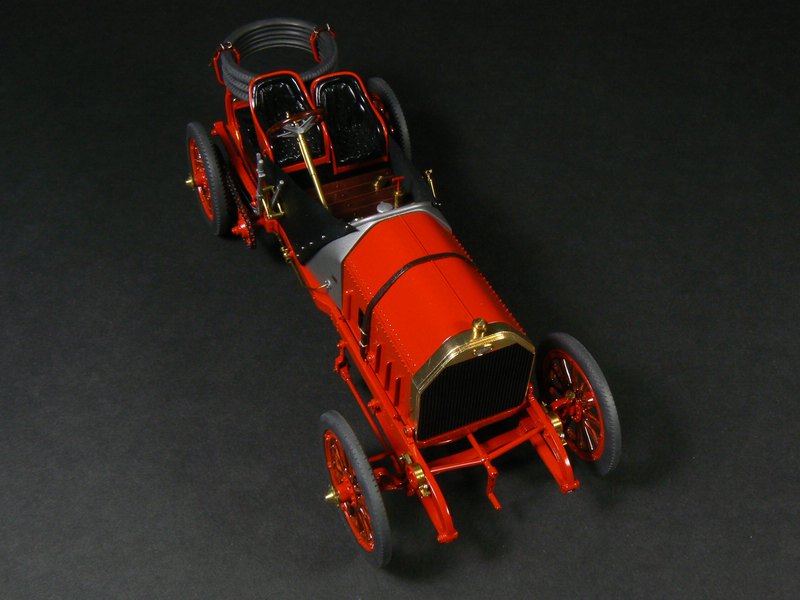
Hi, in the history of Grand Prix racing (since the late fifties called Formula One) no other manufacturer ever achieved such an overwhelming superiority as Mercedes did from 1934 to 1939. All renowned competitors (e. g. Alfa Romeo, Maserati, Bugatti) were not able to keep up technically. The only exception was the Porsche-designed P-Wagen of the German Auto Union, in its various stages of evolution called Typ A, Typ B and Typ C, that became the world's first successful mid-engined racing car - a quarter of a century before English manufacturers re-invented it. Especially the final Typ C was more than a match to the Mercedes cars. In 1936 it defeated Mercedes and became GP champion. In its time the Typ C featured the latest racing technology: a tubular chassis with independent suspension and torsion bars ( note the similarities to the also Porsche-designed Volkswagen) hydraulic brakes a supercharged 6 litre V16 with up to 600 PS (appr. 600 net hp) While the standard GP body enabled top speeds up to 320 kmph, Auto Union built streamline cars for the Berlin Avus high-speed circuit as Mercedes did. While 300.000 spectators watched the 1937 race these streamlined cars achieved speeds up to 380 kmph. With some minor aerodynamic improvements the streamlined Typ C reached more than 430 kmph on a straight Autobahn near Frankfurt. My models are based on the 1/20 Casadio/Revival kits. These are the best (if you can use this word) of all Casadio/Revival kits. Authenticity and detailing is good by comparison. The necessary corrections are not too difficult, but still an enormous amount of details must be added. Also the quality of the parts is good by comparison. I only remember problems with the fit of the wheel spats, an unusuable supercharger and overdone deburring of the pre-painted body parts. If you should ever feel inclined to build a Casadio/Revival kit, start with this one. A similar topic of mine: 1907 Fiat 130 HP Grand Prix Racer 1/20 http://www.modelcarsmag.com/forums/index.php?showtopic=75350
-
Thanks for the comments.
-
Thanks again and the Büssing 12000 U is on its way
-
for all further comments. I am going to show a similar model, a AITM early Mack F daycab, within the next weeks.
-
for your comments. More classic racing cars to follow ...
-
Thanks to the few who were interested. Nevertheless I will show one more scratchbuilt classic truck, a 1951 Büssing 12000 U, a highly interesting (at least German forum users think so) underfloor 6x4.
-
"Scrapper"1949 ford f8 big job
Plastheniker replied to blazefox's topic in Model Trucks: Big Rigs and Heavy Equipment
Steve, I made the same conversion for a milk tanker a few years ago. So I know that this conversion is not that easy. Well done! -
Skip, I am sorry, but I searched my oldest CDs and USB sticks without finding any further relevant file.
-
Cato, I took it for granted that the making of real wire wheels is well-known. Anyhow describing it would have gone beyond my presentation, but if you are interested I could PM you a copy of a 2-page illustrated article I wrote for another American modelling magazine in 1995 called "Making Real Wire Wheels". Since some months ago that magazine did not give me the permission to show this article in a German forum, I should not post it here in the public area either. The issue of the hypodermic needles is a misunderstanding obviously caused by my bad English. I halved those hypodermic needles with a cut-off wheel in a rotary tool in the sense that I modified their original O-section into a half-round U-section (I hope this is more understandable).
-
Skip, you are right, I built it as a curbside. Whenever I want superdetailed engines and chassis I use Casadio/Revival kits as a basis.
-
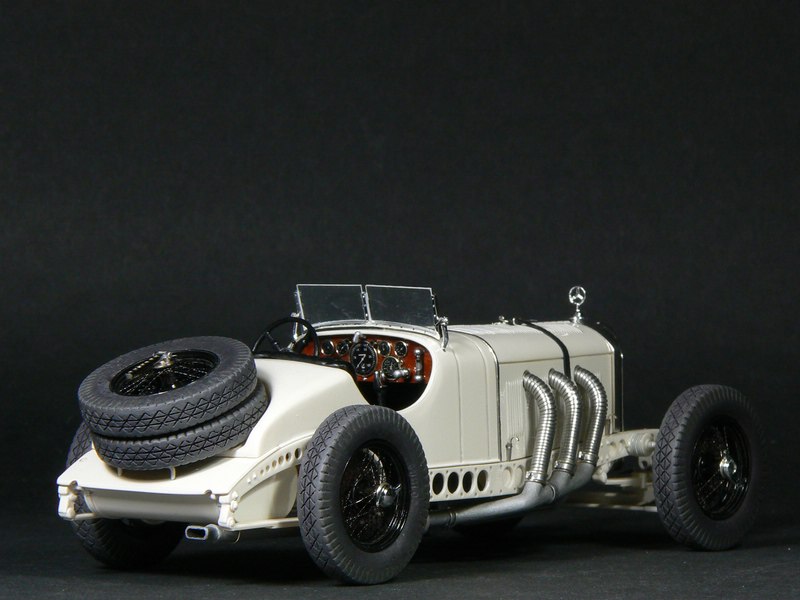
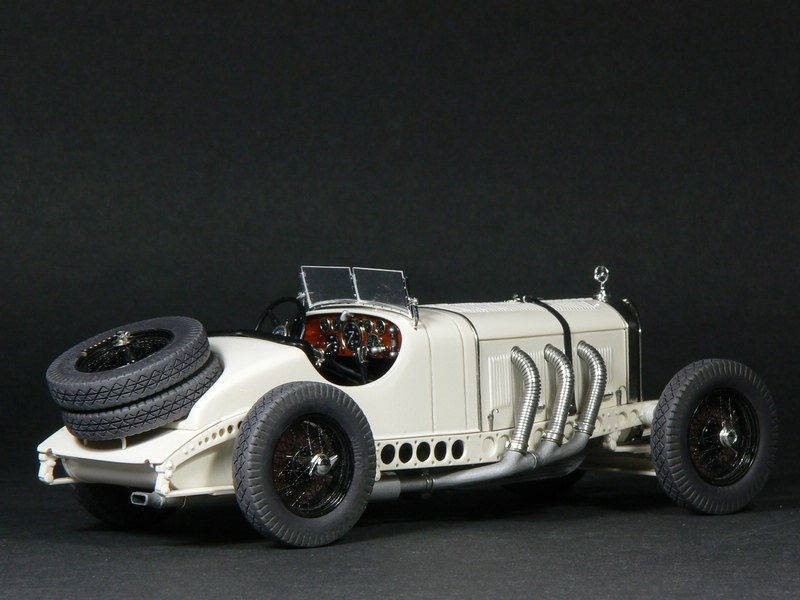
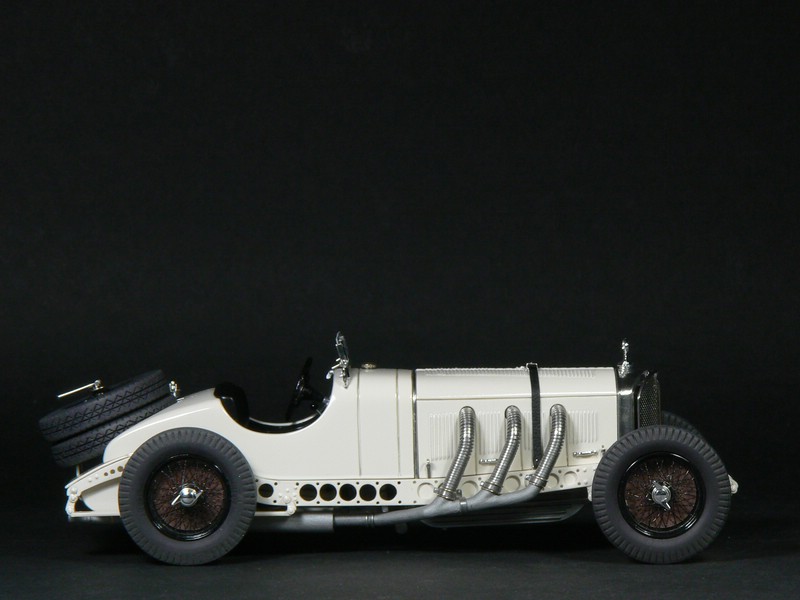
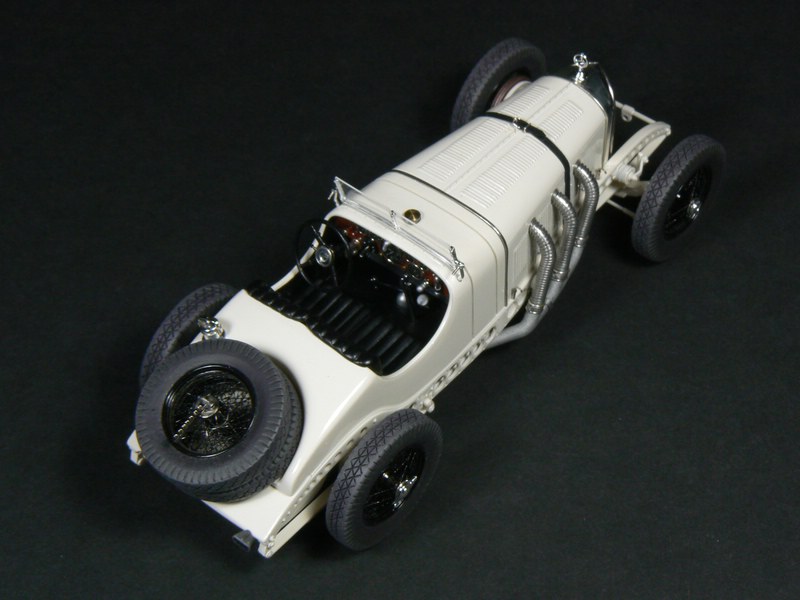
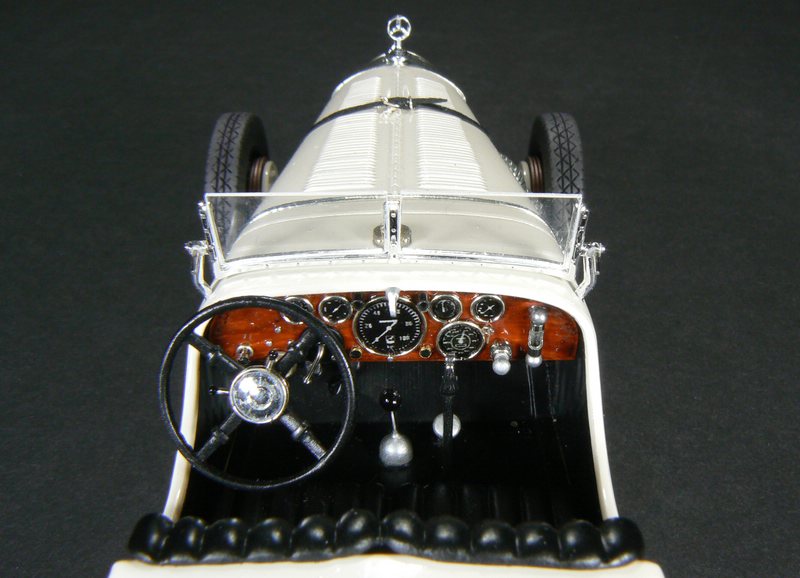
Hi, the Mercedes SSKL was one of the most versatile and successful racing cars. It is also one of the best-known cars of automobile history, even after six decades presumably every car enthusiast remembers its striking appearance. Nevertheless there was never any 1/24 or 1/25 plastic kit. The only way to get an SSKL is converting Lindberg's SSK. The essential difference between SSK and SSKL were numberless holes drilled into the chassis in order to lighten it. You can find information and pictures of SS/SSK/SSKL in this tread http://www.modelcarsmag.com/forums/index.php?showtopic=74925 The Lindberg kit of the sixties looks odd. Most finished models I have seen resemble this one: http://www.modellbau-jemb53.de/MB-SSK-1928.htm Nevertheless the Lindberg kit can be used for a conversion. Its odd appearance is mainly caused by the clumsy "wire" wheels, the absurd white wall tyres without tread and the fenders with running boards, which are atypical for a works coachwork. All measurements of the kit are correct, only the coachwork itself is some millimeters too low. Number and location of the characteristic drilled holes vary from car to car. I chose the one with the highest number of holes as Hans Stuck used it in 1929. I made these major modifications: I cut up the massive one-piece frame into crossmembers and two side rails. I milled these two side rails down to approximately 1 mm thickness. I made a sliding jig for marking the center of the holes to be drilled. I drilled these holes very cautiously in 0.1mm steps. This prevented the brittle styrene from cracking and secured that the original center of the holes was not left. After drilling all holes I added thin strips of styrene in order to get the authentic U-channel. Finally I reassemled the frame. I heightened coachwork and radiator. I made real wire wheels. As the tyres were unusuable I made new ones. Exaust and exhaust manifolds were incorrect, so I replaced them completely. The brake drums of the kit had no cooling fins. I made new ones. The front shock absorbers were simplified, so I made two detailed ones. I rebuilt the interior including the dashboard. The indispensible additional mesh radiator guard in front of the radiator grille was simulated with a clumsy plastic part in the kit. I replaced it with real mesh with a frame of halved (i. e. U-shaped) hypodermic needles. Many small parts had to be replaced. Since there was no Alclad when I built the model, I made e. g. the spare wheel retainer, the filler inlet and the hood latches from real metal. This is the result:
-
Hi, regarding their racers and road cars it often recedes into the background that Mercedes is the world's oldest and (still?) largest truck manufacturer. Among many of their interesting designs the 1937 L 10000 is outstanding. To my mind it is the most atractive and most impressive Mercedes truck ever made. In 1937 it looked like this (photos by courtesy of Daimler-Benz AG/ Daimler AG): Unfortunately no original vehicle has survived. Only a O 10000, i. e. a bus, equipped as a rolling post office of the pre-war German Reichspost, is displayed at the fantastic new Mercedes museum in Stuttgart since the museum opening. Compiling information for a scratchbuild was unsufficient for years, but the Mercedes museum archives were extremely helpful. They sent me lots of photos and photostats with most measurements absolutely free. However all original scale drawings had been lost during WW2, hence a lot of drawing, arithmetics and eyeballing was necessary. The model is completely scratchbuilt except the rims (modified Revell parts), the headlights and the Mercedes star on top of the radiator. In 2005 I spent more than 1000 hours building it. This is the result:
-
1907 Fiat 130 HP Grand Prix Racer 1/20 Scale
Plastheniker replied to Plastheniker's topic in Model Cars
Hi, thanks for your comments. I am very happy to see that more modellers are interested in vintage GP racers than I supposed. Next the 1937 Auto Union Typ C including the streamliner will follow. See you then
-
Hi, I started on 16 May in the sub-forum "Under Glass" with the 1907 Fiat. I will go on in the chronological order mentioned above because this shows a little bit how racing technology developped and became more and more complex. Each time I am going to post 10 to 15 photos. Indeed the Maserati chassis is particularly interesting.
-
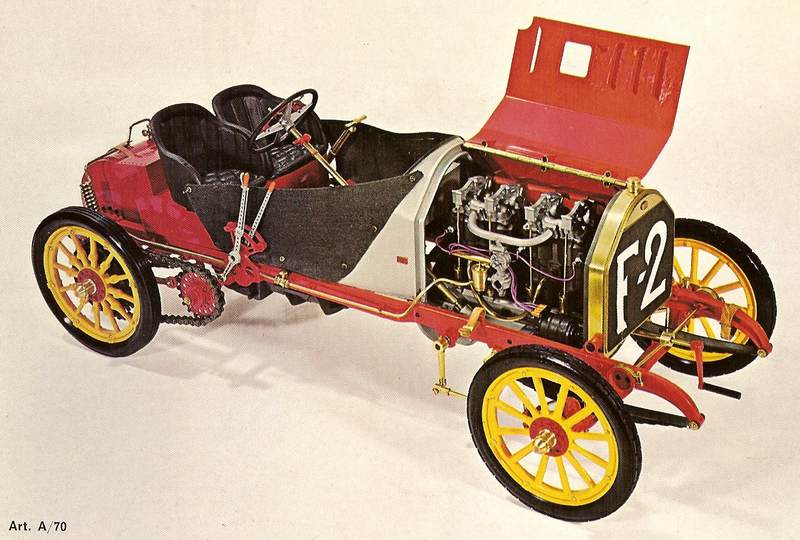
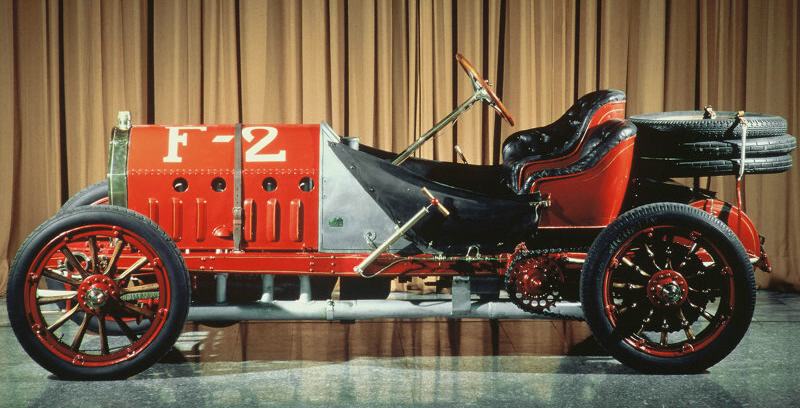
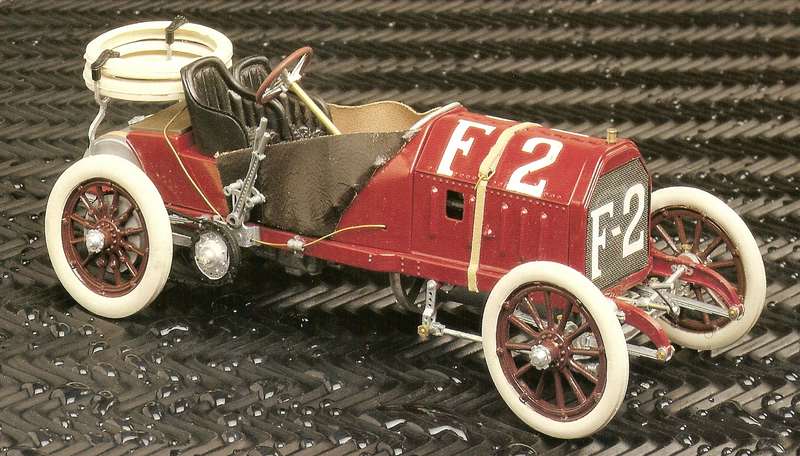
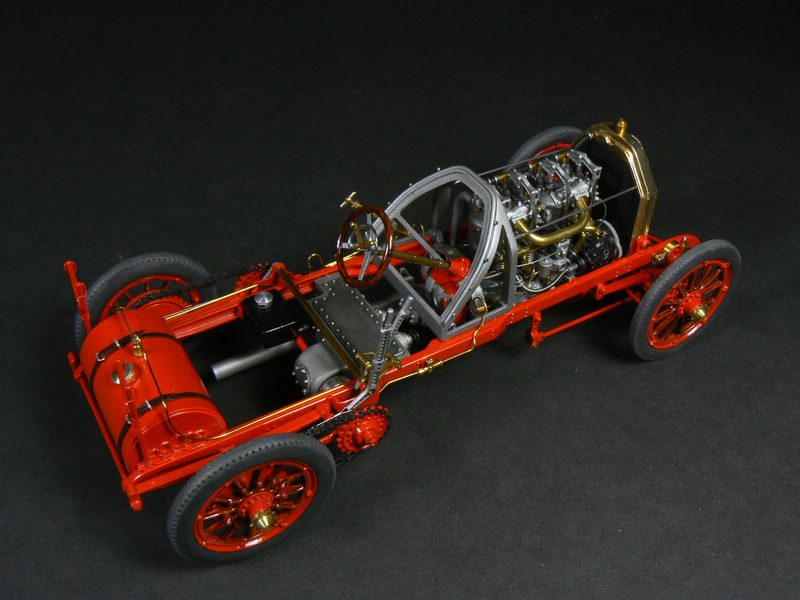
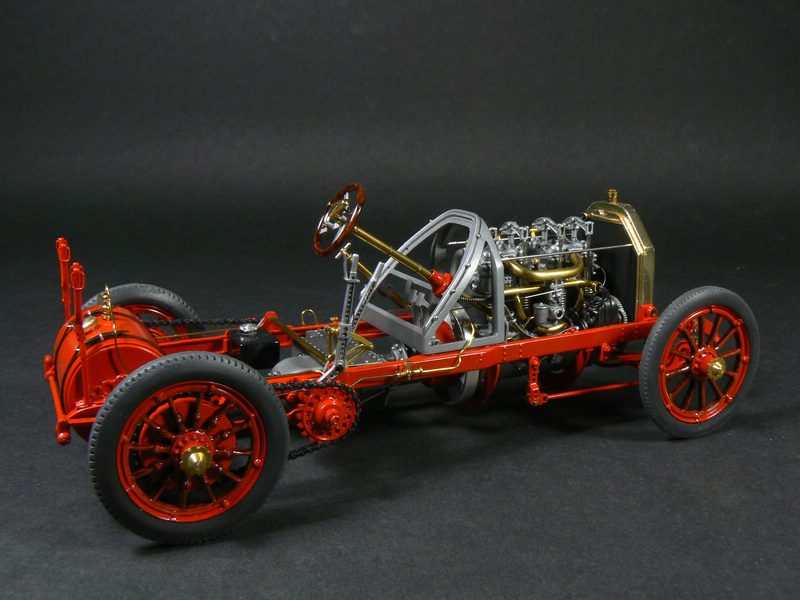
Hi, this is the first of six pairs of models I made from Casadio-Revival metal kits. I corrected and detailed them thoroughly. Each pair consists of a first model built as a superdetailed chassis and a second model built as a complete car with coachwork. The Fiat 130 HP (often called F-2) was a successful Grand Prix racer in the earliest days of racing. One vehicle has survived and is displayed at the Museo Nazionale dell' Automobile in Torino/Italy, shown here: Modellers know this car from the 1/8 Pocher model, shown here on a Pocher catalogue picture: Some years after Pocher Casadio released a 1/20 kit of the same car, shown here on a Casadio Revival catalogue picture: About Casadio Revival kits, especially about the general shortcomings and pros & cons, you can find some information in this topic: http://www.modelcarsmag.com/forums/index.php?showtopic=75275 This Fiat 130 HP is one of two or three Casadio Revival kits that are less difficult to build than most others. Authenticity and fit are rather good by comparison. I built these models about 10 or 15 years ago. I still remember some specific problems: I made a new bonnet, because the bonnet of the kit did not match the real one and fit was not satisfactory. I reworked the radiator that did not look convincing. The white tyres (sometimes really used on the real car) did not fit the rims and looked rather toy-like. I made new black tyres. The ready-painted coachwork had been deburred unsufficiently and the paintwork itself was poor. The real car had many brass parts, the kit contained almost none. Except the radiator (BMF) I made all brass parts from real brass - today Alclad would make make it easier. The rest was a lot of detailing and replacing. The result looks like this (please click the catalogue picture for a comparison): I know that my enthusiasm for vintage racers is a bit exotic. Nevertheless I hope you are interested too.
-
Hi, I will present the following Casadio/Revival classic Grand Prix cars as corrected and detailed 1/20 models in the next weeks and months. I am going to show two models of each car, i. e. the first one as a superdetailed chassis and the second one as a complete racing car: 1907 Fiat F-2 130HP 1924 Bugatti 35 1937 Auto Union Typ C completed by the 1937 Streamline Avuswagen 1939 Mercedes-Benz W154 M163 1951 Alfa Romeo Tipo 159 Alfetta 1957 Maserati 250F 1961 Ferrari 156 Sharknose Since most modellers are supposedly not familiar with those kits, the following words might be useful. In order to avoid repeating the same remarks in each presentation I will include a link to this topic here. A. The Manufacturer Roughly spoken the kits were released in the seventies originally by Casadio. Later on the name was Casadio-Revival, today the manufacturer is Revival International http://www.revivalinternational.com/template.php?pag=35952 . Residents of countries without importer can order directly. The price is approximately € 125,00 plus p&p per kit. All statements in C. Pros and Cons refer to kits manufactured by Casadio-Revival in the nineties. In the meantime quality may have improved. B. The Make Of The Kits Chassis including drivetrain, coachwork and many further parts are made of cast metal. The rest is plastic, presumably ABS. If an original vehicle has spoke wheels the kit contains ready-made real wire wheels. The coachwork parts come already painted. For a limited time (in the nineties?) there were considerably cheaper versions with unpainted plastic coachwork and simple plastic spoke wheels. Many parts must be assembled with tiny screws, the rest has to be glued. C. Most Important Pros and Cons C.1. Cons Authenticity and details of my kits varied extremly from rather good to really annoying. In any case a lot of correcting and detailing had to be done. I will give some relating information about each kit in my presentations. My average sacrifice of time for each pair was approximately between 1000 and 1300 hours. Fit was generally mediocre to abysmal. Almost every part had to be reworked. The manufacturer's paintwork of all coachworks was poor and had to be removed. Before the manufacturer's paintwork some of the coachwork parts had been deburred so thoroughly that complete edges of the painted parts were missing. Restoring these edges on metal parts is rather difficult. The working of metal was very messy and required much more effort and time than plastic. Without that the use of metal for the coachworks makes absolutely no sense to me. Tightening the tiny self-tapping screws a bit too much makes them break. In this case it is almost impossible to remove the broken screw from the boring. Since metal bodies are not flexible (as plastic bodies are) they have to be fixed to the chassis in (at least) one upper and one lower half. Therefore a model built OOB would have shown striking gaps where the 1:1 vehicle has a smooth surface. It required some pondering to eliminate this problem. Estimating the overall OOB quality of the a. m. kits by one star (very poor quality like the ex-Pyro Lindberg kits) to five stars ( excellent quality like Tamiya) would show this result: 1907 Fiat F-2 130HP * * 1924 Bugatti 35 * 1937 Auto Union Typ C * * * 1937 Auto Union Typ C Streamline Avuswagen * 1939 Mercedes-Benz W154 M163 * 1951 Alfa Romeo Tipo 159 Alfetta * * 1957 Maserati 250F * * 1961 Ferrari 156 Sharknose * C.2. Pros In the most popular scale 1/20 there are no alternate kits of Grand Prix cars older than the 1963 Lotus 25. Only MFH offers three or four outstanding kits of this (post-war) era, however rather pricey, often temporarily OOP and sometimes including generic(?) wheels of questionable dimensions. The use of metal for the chassis gives enormous strength. Even such corrections and detailings are possible that plastic would never sustain. The mostly enclosed real wire wheels are not perfect but superior to any plastic spoke wheel. These kits offer the almost unique opportunity to display a fully detailed chassis without coachwork showing extremely different, interesting and comprehensible historic racing technology. Presumably because building these kits is so difficult you see only few finished models (but an enormous number of unbuilt kits on ebay). A pair with and without coachwork, carefully built and displayed on a mirror, is an attraction that most likely none of your fellow-modellers has got. D. Result These are kits you can only hate or love. Are you a most experienced modeller with strong nerves and a special interest in the classic era of GP/F1 racing, who is willing to spend a lot of effort and time? Build them and you will be delighted! All others should really refrain. I hope you will be interested in my upcoming presentations.
-
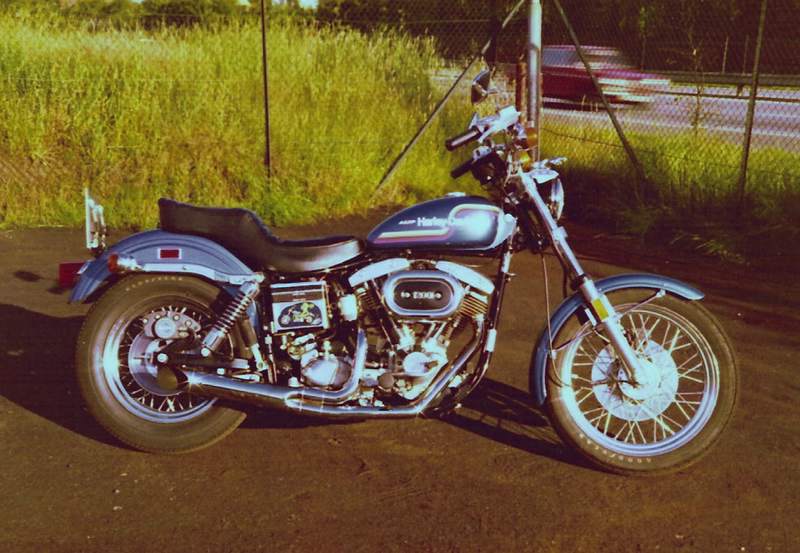
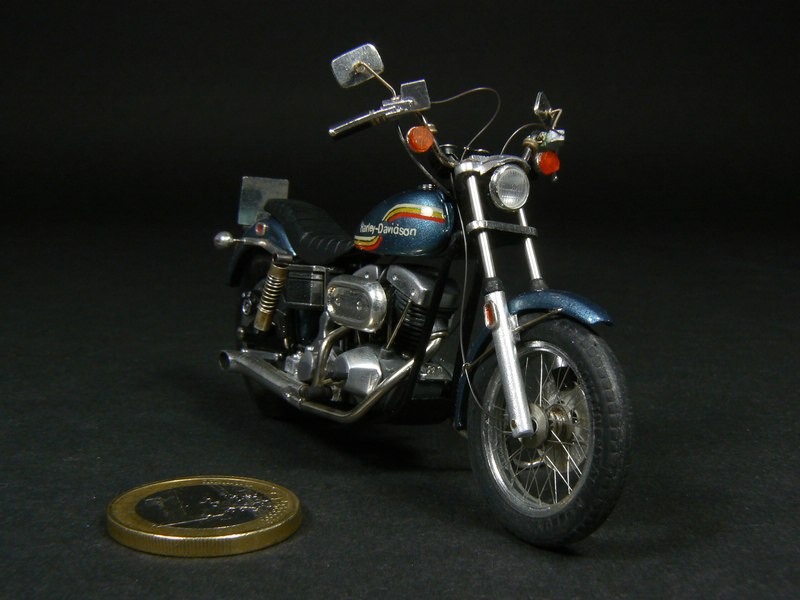
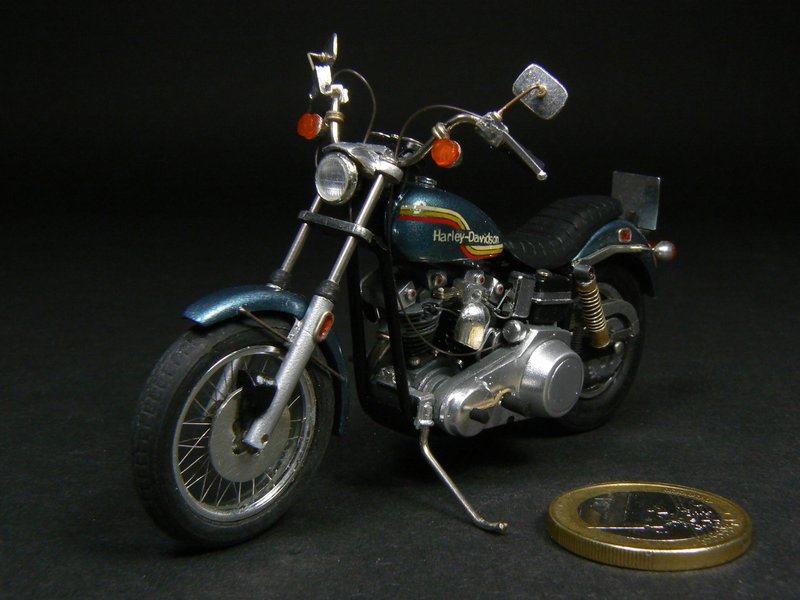
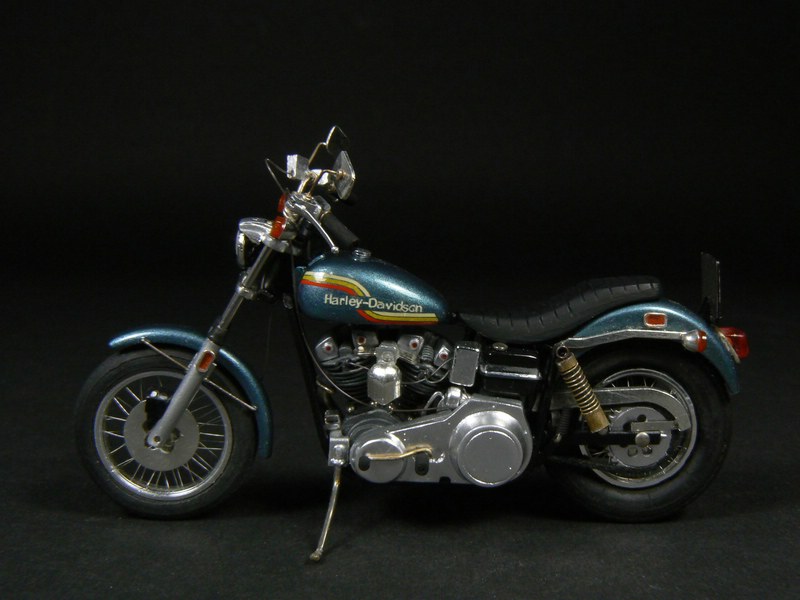
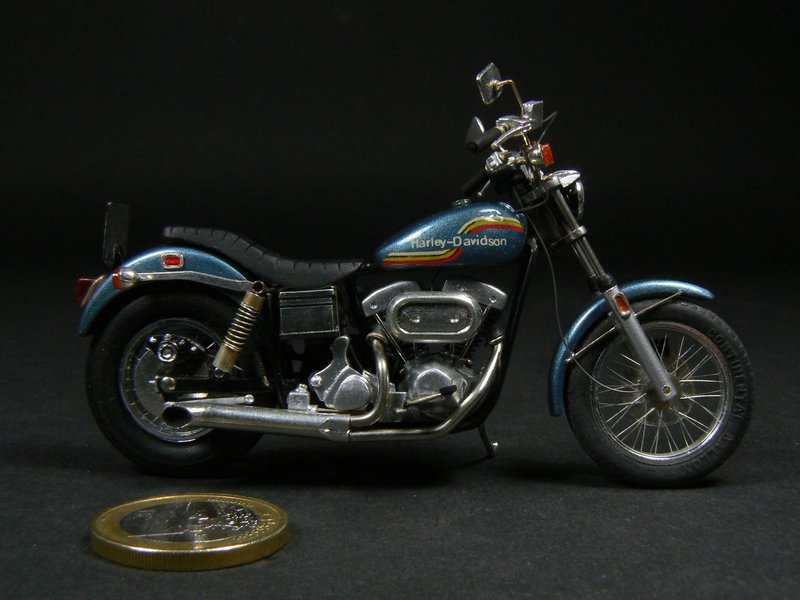
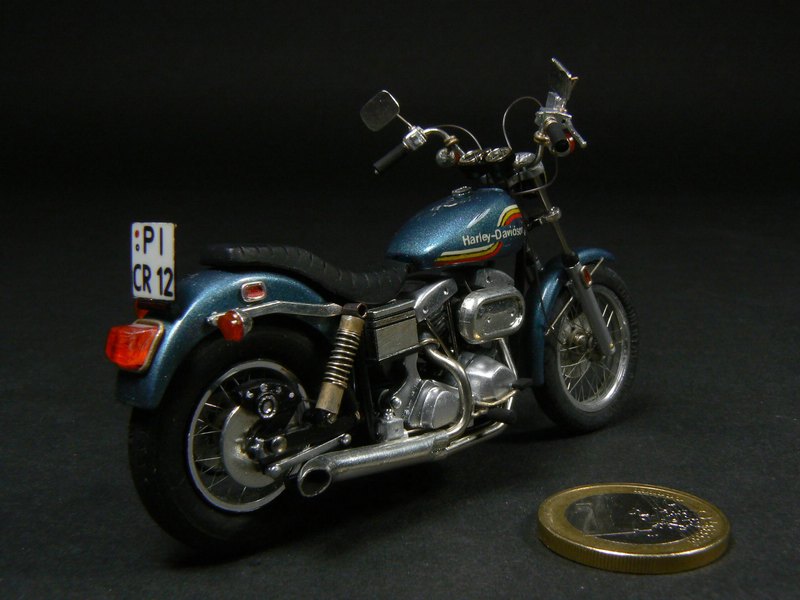
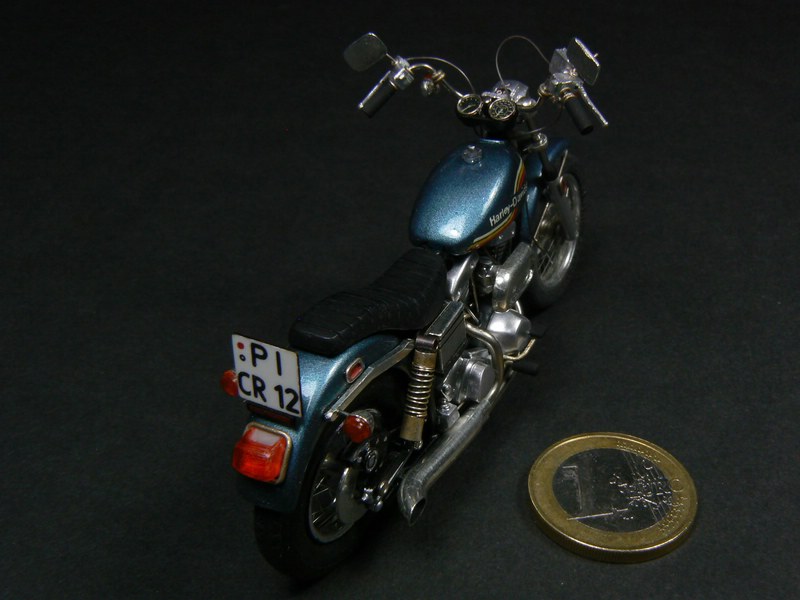
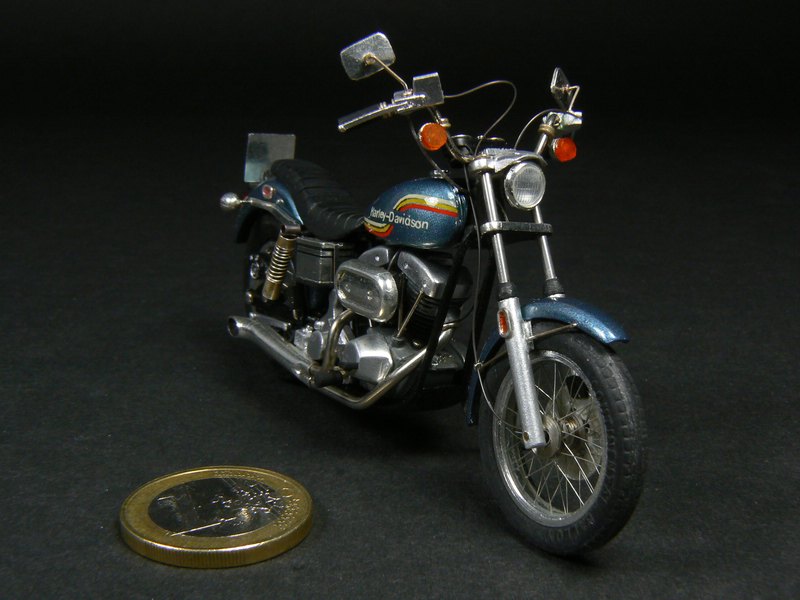
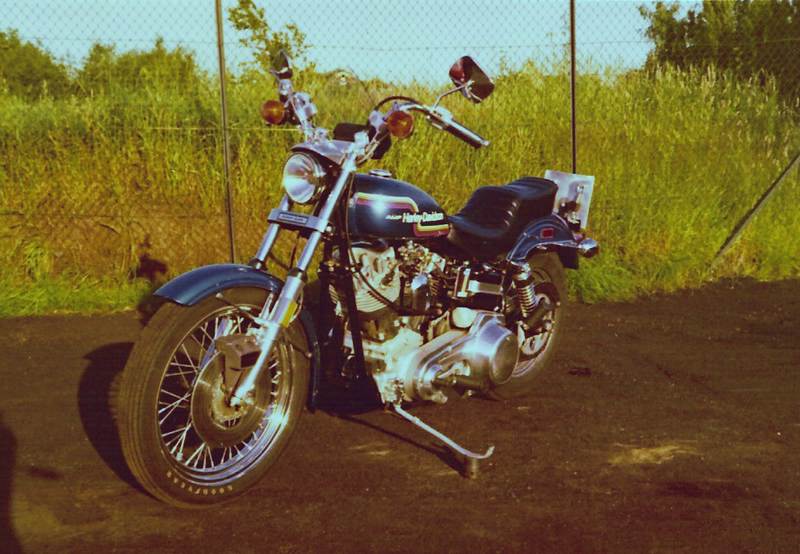
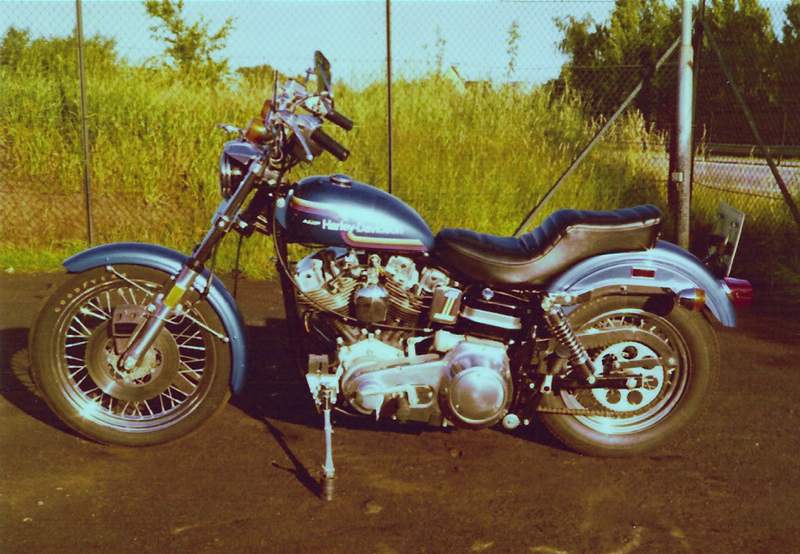
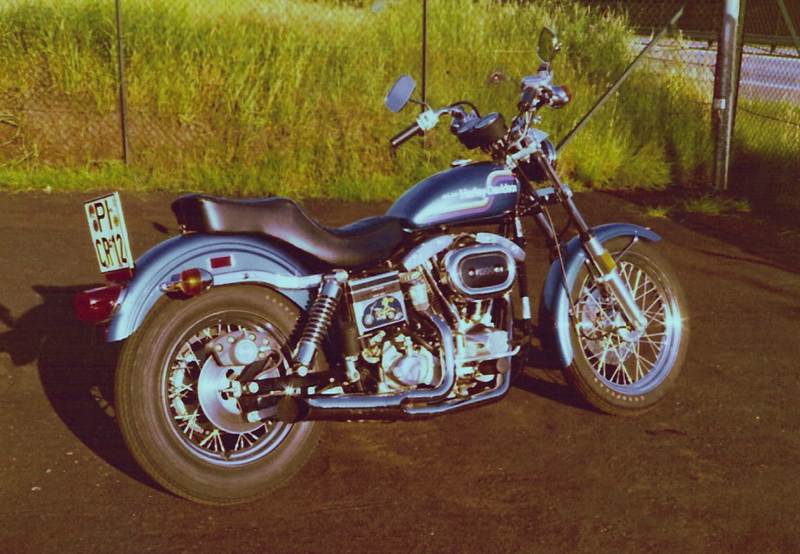
Hi, many modellers build exact replicas of their former vehicles as a token and so do I for nearly 40 years. Up to now minor or major modifications of kits were sufficient for 13 cars. Once, however, I was compelled to build a model completely scratch after waiting in vain for a usable kit of a 1976 HD Super Glide 1200 FXE which I owned as my very last bike. 1976 it looked like this: I hope you don't mind the bad pictures. Many of my Kodak pictures of the seventies have a constantly growing tinge of red very hard to eliminate. This is the model I built more than 20 years ago. Today I would find better solutions for some details. Anyway the Euro coin shows that in 1/24 even big bikes are rather small.