
Uschi van der Rosten
-
Posts
6 -
Joined
-
Last visited
Content Type
Profiles
Forums
Events
Gallery
Everything posted by Uschi van der Rosten
-
 nah, I´m no going to finish this one. It was consiered as a showcase and it gonna end as one. There will be that day when I build one of those. I have two kits to pic from. I also have found some whipers. Thanks for your interest Cheers everyone!
 -
@charlie8575, @all Thanks for your friendly comments. I´ll just start shootn´straight and share a SBS sequence with you guys. The product used is the WGW-1 Woody Woodgrain Decal. This product requires a glazing coat with brown oil color to come to full effect. The result is a pleasing depth in optical appearance. The desired color tone can be controled by the basecoat colors as well as the color of the oils. Uschi is distributed in the US by "Last Cavalry". http://shop.lastcavalry.com/search.php?search_query=uschi&x=0&y=0 Should be on stock. Ok, lets kick some practical s**t. Fig.1) A bright tan basecoat has been applyed by airbrush. Preshading has been set. The picture shows how to copy the shape of the panel onto masking tape, in order to put it on the decal and cout it out. Fig.2) This is how a completed decal job could look like. Its now ready to be covered with the aforementioned glaze of brown oil colors. Fig.3) The frames now have been painted with brown oil color mixed with a bit of light ochre. Any mistakes can be fixed while working. Thats a good thing while working with oil colors. Fig.4) A close up to the framwork shows some fine lines, representing some woodgrain texture. Thats the classic hand-painted way, as most of you already know. Its quite effective on bars and that sort of shapes, but not very effective on squares. The decals help us out. Fig.5) The decals have been covered with the aforementioned dark brown glaze and all that has cured meanwhile. We now bring some another fellahs in the game, the so-called clear acrylics. These colors seal the whole thing (getting it ready for an oil-color-pin-wash) and they also create further effects, acting like a filter. The orange has been used on the panels and the yellow has been used on the frames. A lil´ bit of overspray is not a big deal. Fig.6) A close up shows the completed system. You probably note some dark shadows on the frames. These shadows have been achieved with the clear orange. One could also use "clear black" which is available as Tamiya´s "Smoke" and work very good as a postshading color. Fig.7) Here we have the finished model with all details painted. The door handles have been masked off and were painted with ALCLAD 2. The nails have been accentuated with a silver hobby pencil (Gel pencil). After this a pin wash using black oil color also makes some detail pop. The sequence is explained here one more time as part of the manual. http://www.uschivdr.com/products/wgw-1-woody-special/ I was just testing if the stuff works right and if its easy to use, so this model wont get finished, even if there is some prep for rust is visible. I just did it for training. The car is painted following the concept of "zenithal light" ,so all the dark and bright spots are not really random, they are there for purpose and painted that way. Its a little bit of an artistic approach to the subject but it makes things more interesting, imho. Its the first car I have ever tried in my whole life, working with techniques from aircraft and AFV modeling. All chrome has been painted with ALCLAD2 since the kit-chrome looks a bit odd. It was really fun and I will give it a shot one fine day on a serious project. I´ve also purchased a runabout on a trailer which will make a good scene, probably. Of course my mind is faster than my modeling so it gonna take a while until I start this. I need a solution for the wipers, though. Is there any aftermarket PE available? Anyone knows? Thanks for watching! :-) Best LX
-
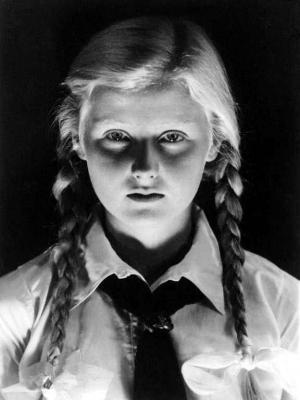
Because I was looking for something that looks like Debbie and has a direct correlation to scale-model-relevant subjects. It should have a German touch since I come from Ger, that was also part of my thinking. So I removed every nazi ###### from the artwork and brought it into a completely new picture. Another point is that I do consider that lil gal as a tragic person. She really exitsted. I found the the original photo the artwork is based upon. She´s a 10 year old gal, had no idea whats going on and all of the sudden she found herself as kind of a role-model, printed on a friggn poster. That tells me that dictatorship is made by dictators, not by the average people. Thats an important differentiation, since propaganda always tries to tell us that "the others" do that and that. That is simply not true since the leaders of "the others" tell them people what to do. These people also have a tendency to "believe the hype", because they´re desinformed and full of propaganda as well. This mixture is what causes the drama in history and thats the set up for the next slaughterhouse scene. Know I´m sayin? Last but not least I do have a special sympathy for that gal since I also weared a uniform in my childhood. Born and raised in Eastern Germany I had the displeasure to be member of the "Young Pioneers" ( http://en.wikipedia.org/wiki/Ernst_Th%C3%A4lmann_Pioneer_Organisation) And I tell you what. I was looking with the same smile right outta my uniform and found it all to be exciting. Guess for what purpose. You are right. For the purposes of a regime that tried tell me how I have to interpret the world. Ok. That was my statement. Actually I said I´m not going to justify myself but well, here we are. Does it make sense?
-
Good idea. Maybe you can edit your post and replace that poster by a link to it. It really hurts my eyes and if I would like to appear on that context, I would have left it as it is. Thank you and sorry for causing troubles here. Meanwhile lets get back to the fun of it. @sjordan2 Thanks for your question. Glad you dig it! Well, that rooftop was actually just a 15mins affair. Its funny because people have often asked this and I was a bit astonished because I´ve put some labour in other areas and that roof was just a rather quick job. All I did was masking it off completely in order to avoid any possible overspray. Then I used a dark gray and added some high-speed-pass-bursts by airbrush. Thats where the streaky pattern comes from. The second step was a classic drybrush with a rather bright grey. I used oil colors for the drybrush for better control (in case I would have applyed too much) @Jantrix Well the large dark panels on the doors are decals while the brigh framework is hand painted. At the time I did this I had no decals matching a bright wood (that has changed meanwhile), so I did it the classic way: Bright yellow basecolor and bright brown oil colors. Lemme organize my photoalbum and I share a SBS sequence, in case you are interested. Thanks gentlemen! :-) Cheers!
-
Ok guys, if you get upset because of a logo, so that is the wrong place to be for me then. Just let me know. Would you call Rick Lawler a communist because he uses contemporary elements of Russian 30´s propaganda in his artworks? Are you able to interpret an artwork also based on the CONTEXT it has been used within, or is it just ok to take a piece of it and get mad about it? Gentlemen, if that really is the spirit in these (actually really nice forums) I´l just take my things and hit the road. I´m not willing to get involved in what ever kinda political discussion here, nor I´m going to justify myself. Taste. Well, Ok. Thats a point I get. But lemme tell you what, when I always would go upset because I see something on facebook (or TV) that I dont like, I really would have a hard time, brothers. So, if we are unluckily unable to talk about arts and scale modeling, I´ll hit the road. Sorry guys.
-
Hi, I´m Alex from Uschi van der Rosten / Germany. I gotta lil company runnin´, called Uschi van der Rosten. www.uschivdr.com I do produce woodgrain decals for aircrafts, cars and...actually everything. Paint masks and special effect decals (graffiti) is also a field I work in. I just thought ist a good idea to stop by and say hello. I´m looking for some inspiration and would like to know more about car and truck modeling in general. A while ago I made a test-piece for one of my products. It was really fun but it´s not a "serious piece", its just a test. I hope you like it nevertheless. I´m looking forward to be in touch with you guys and have a look over your shoulders. Here is that test piece I was talking about. Thanks for your attention. All the best Alex