schwack
-
Posts
23 -
Joined
-
Last visited
Content Type
Profiles
Forums
Events
Gallery
Everything posted by schwack
-
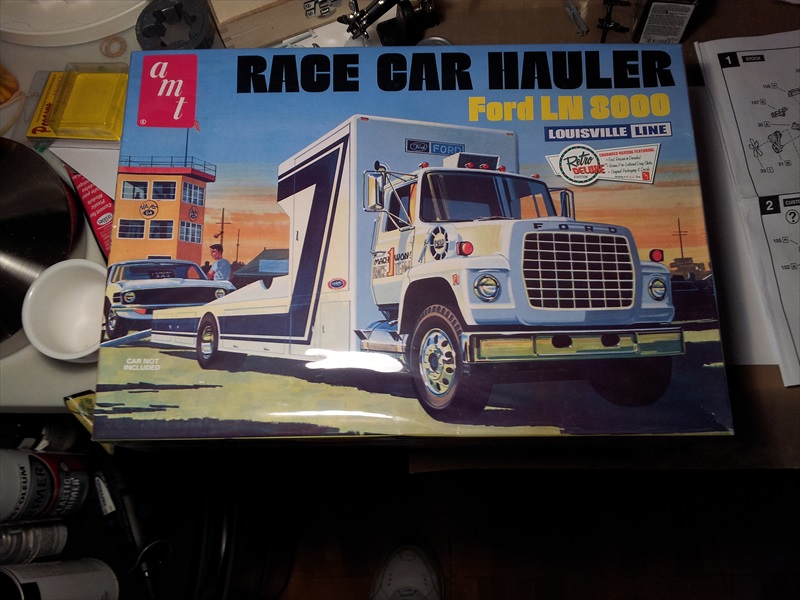
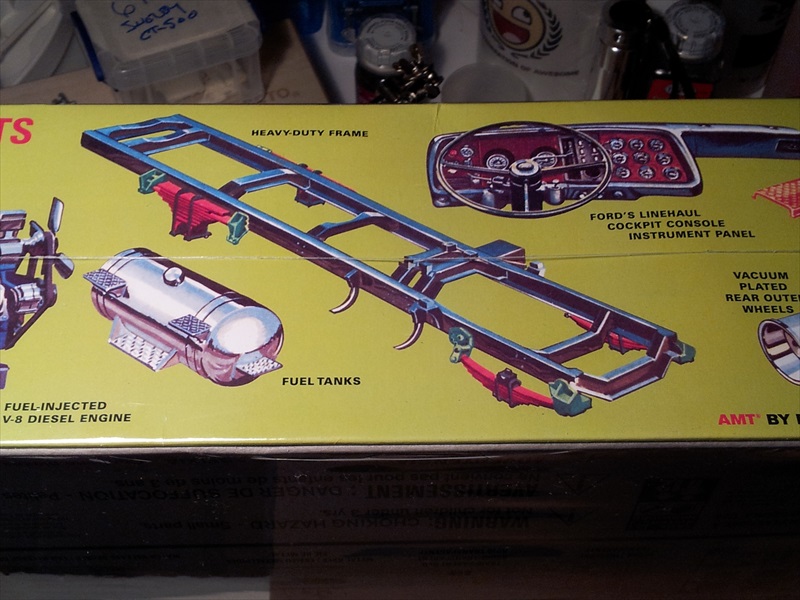
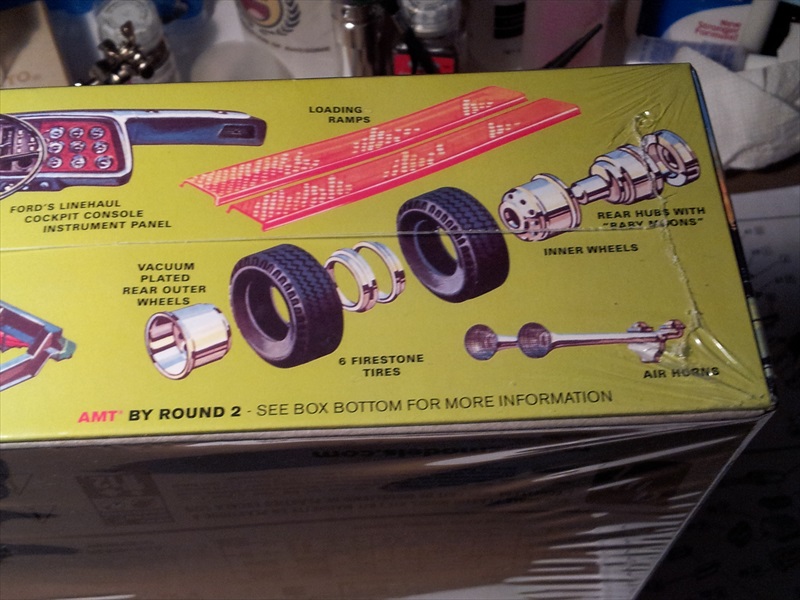
 Got my AMT Ford LN-8000 Race Car Hauler today! A recent re-release. Here are some pics
-
I wasn't sure if this was the right place. I did know this was a highly sought after kit, and the recent re-release of it was pretty big news. Mine came today! I present to you the AMT Ford LN-8000 Race Car Hauler: I am so excited to build this one! Just had to share. Thanks MCM!!
-
malibu! Wow! Those are awesome! Some of those are pricey but I can see why! Thanks for the link!!
-
That is REALLY slick toner! Thank you for sharing that one! Might have to pick up both the AMT and the Revell or Hawk! They look like fun to build!
-
Thanks for this!
-
I don't mind spending more if it helps me understand engines better. Can you point me in the direction of a couple you would suggest? Should I look at the Revell flathead V8? I did see a 1/4 Hemi which looked sharp, its a metal kit. TDR I am unfamiliar with..
-
Hey everyone, After building a few more kits, I got a great idea from one of the friends I've made who also does models. He has a 1/8 scale engine. I think its a great idea. I don't know much about the physical parts connections of engines. Even though I understand how they work, I'm not sure how they come together. My thinking is building a 1/4 or 1/8 scale engine and keeping it handy will help me better assemble model engines in the future. Can any of you recommend such an engine? I saw a Ford flat head engine 1-6 kit and a Revell 1/4 Visible V8 engine w/ working hand crank on Hobbylinc. Are either of those any good or might any of you have another recommendation? I was thinking of 1/4 -1/12 scale just so I could see how all the parts come together very clearly. Thank you in advance for any advice you may have!
-
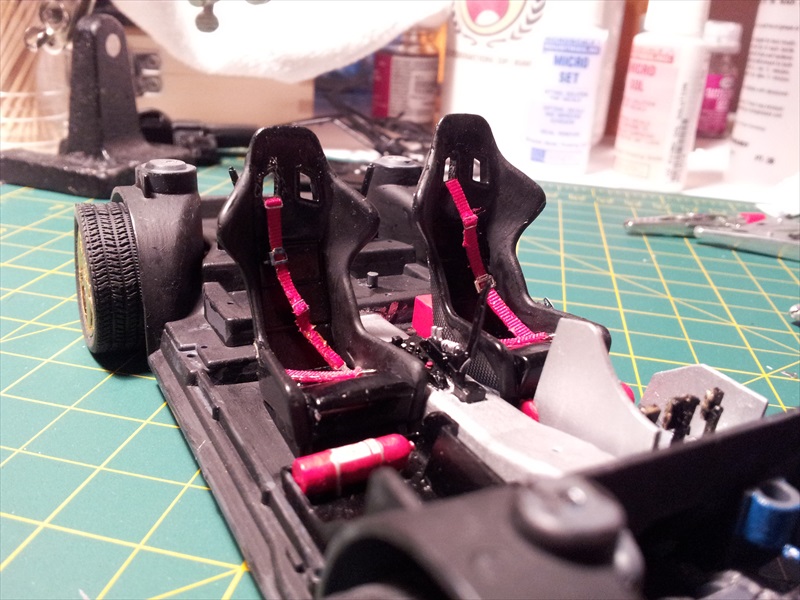
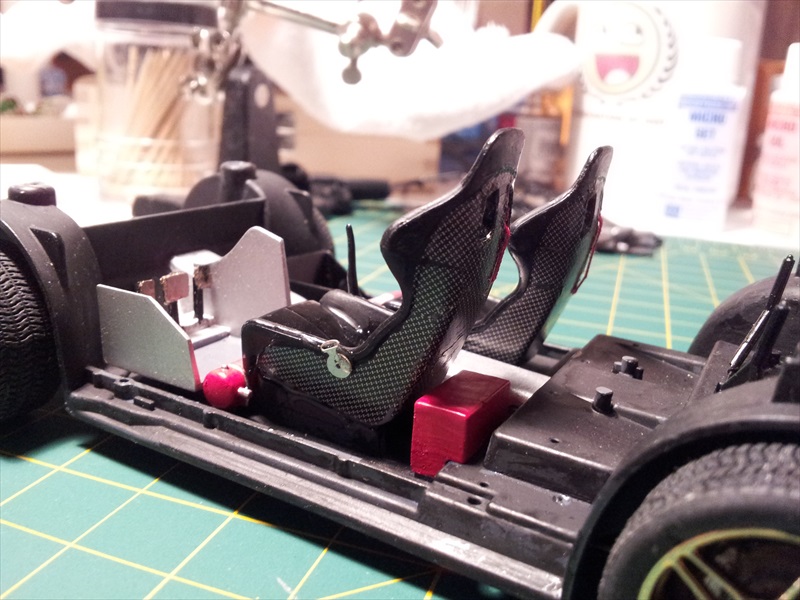
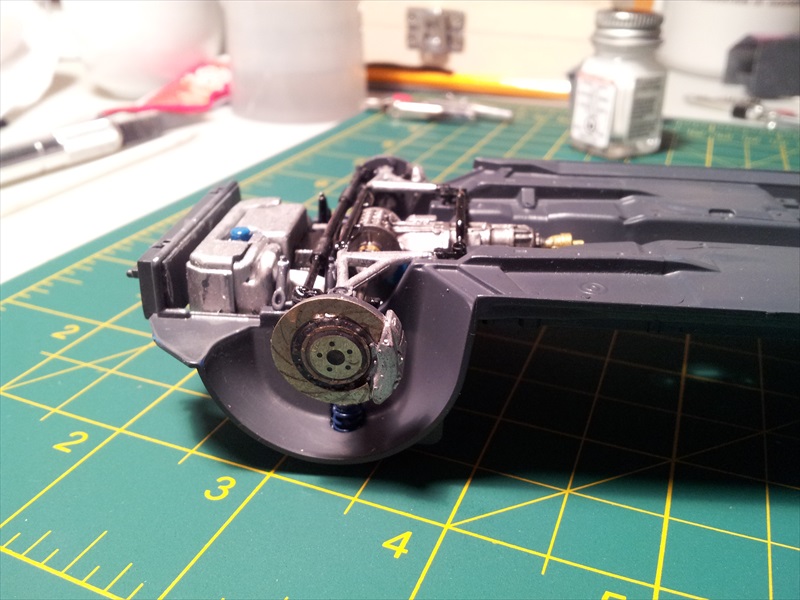
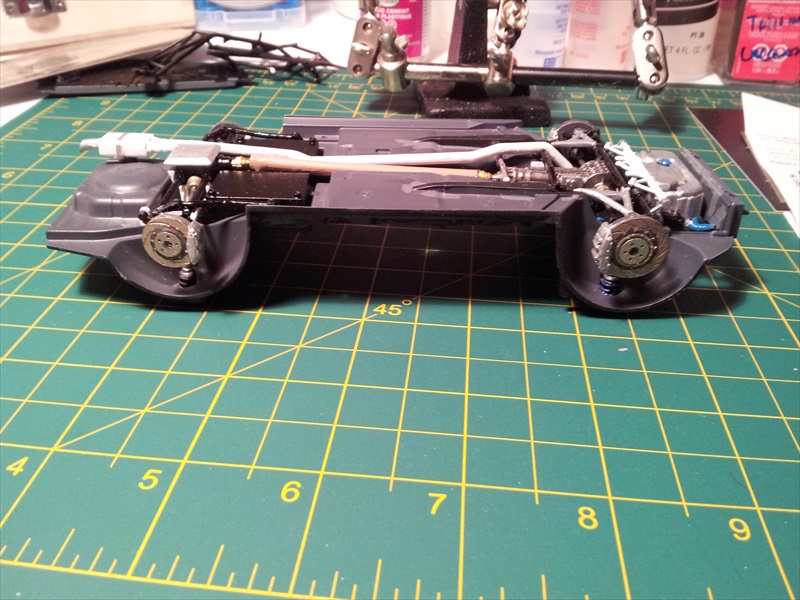
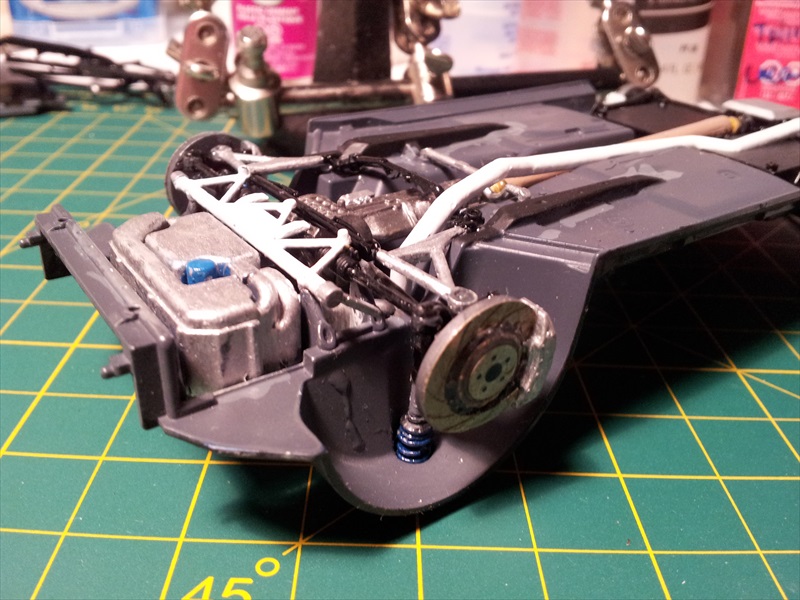
Hi everyone. Just a quick update on my current build. I've finished the chassis, interior seats, P/E seatbelts and roll cage. Now I'm working on the headlights, radiator, and P/E windshield wipers, Those alone should be a real challenge. Here's a few pics of my recent progress. Thanks for looking!
-
Bill, I am new to this forum and just went through all your progress pictures of this Cuda. This is the most incredible model I have ever seen. Your attention to detail is breathless. Makes me want to throw all my modeling equipment away. I can only dream of achievements like this. Thank you so very much for sharing this part of your passion. I am just awestruck.
-
Thank you for this Chillyb1! That's the information I was looking for as well. This gives me a lot more to work with. Thanks again!
-
Thanks for these answers! Its a helpful start! What about pre and post? Do I polish and wax the body before applying the decals? Do I clear coat after? Can I then polish and wax again or will that ruin it?
-
Hi all, First, thanks so much to everyone who takes the time to read my recent questions and offer great advice and tips. It has helped me as a novice model builder a great deal. This time, the subject I am very interested in is decal application. I have done several models so far using Micro Set and Micro Sol for decal application, but many times I've torn decals, had too many wrinkles, or something else will go wrong. I was wondering what you guys consider best practices for decal application? Including pre-prep (apply clear coat to the body before adding decals)? Should I wax and polish the body before applying the decals? Water slide decals, should I be using warm or room temp water to soak the decals in? Is there a tool or suggestion you might have for moving or adjusting decals once they are on the body? The Micro Sol helps with that some. And last, what about post application? Do you wait a couple days to let the micro set and micro sol dry out, then do you apply clear coats? If so, how many? And do you wax / polish again or not? I realize these are a lot of questions, so thank you in advance for helping me understand anything about the fundamentals and good practices of decal application. For me, decals have been one of the toughest things to do on the builds. I find myself questioning if I'm even doing it right. Any advice would be great! Thanks guys!
-
Mike, I had not heard that. I've been primarily using lacquer spray. When you say a bit to air out? 30 minutes or a couple hours? Thanks for the tips!
-
Thanks for all of this guys, and thank you Casey. All of this information is very helpful.
-
Casey, I always thought a polishing kit was used after the clear coat? Like clear coat shot, then wax, and polish. Am I misunderstanding? Also for sanding the clear coat, is there a grit you would suggest? 1200? 2000?
-
So I finally got down the black I wanted for the body of this Subaru I'm building, and I laid down the clear coat earlier today, placing the body in the dehydrator like I always have to accelerate drying. I took the body out and on inspection I noticed some faint milky white lines where it looks like the clear coat pooled and dried. I must have used too much clear coat. Is there some way to re-do the clear coat without having to sand yet again and paint another layer? I really don't want the paint coats any thicker, it already has had 5 wet coats (sanding in between). Any suggestions?
-
Need help with Photo Etch seatbelts
schwack replied to schwack's topic in Model Building Questions and Answers
Thanks for the suggestions Chuck and Joseph! This gives me a good starting point. -
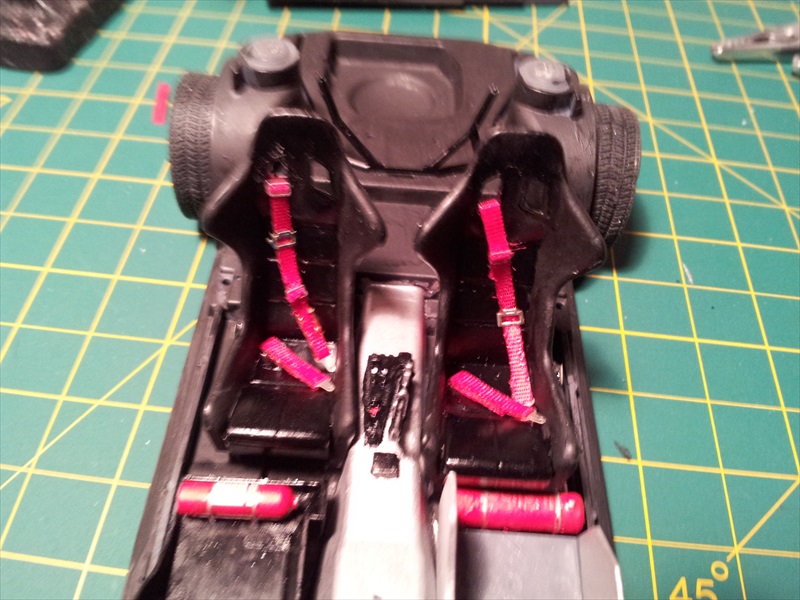
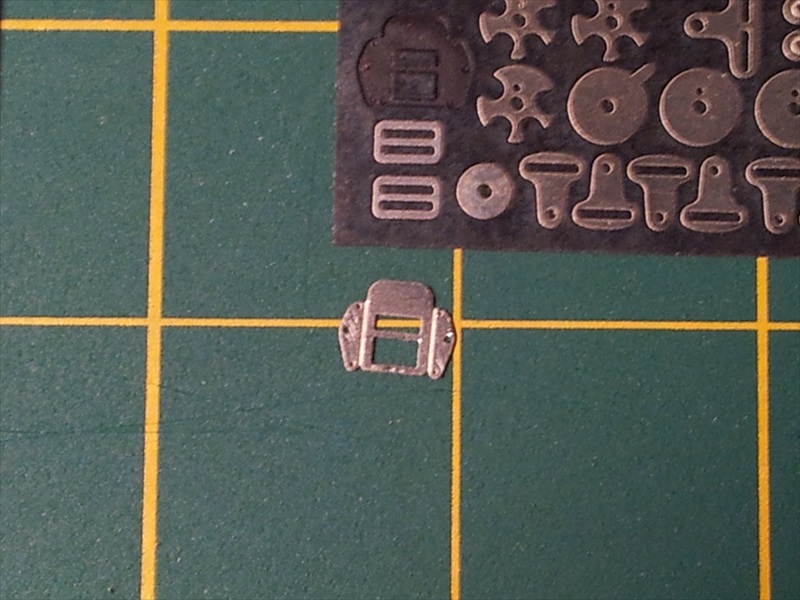
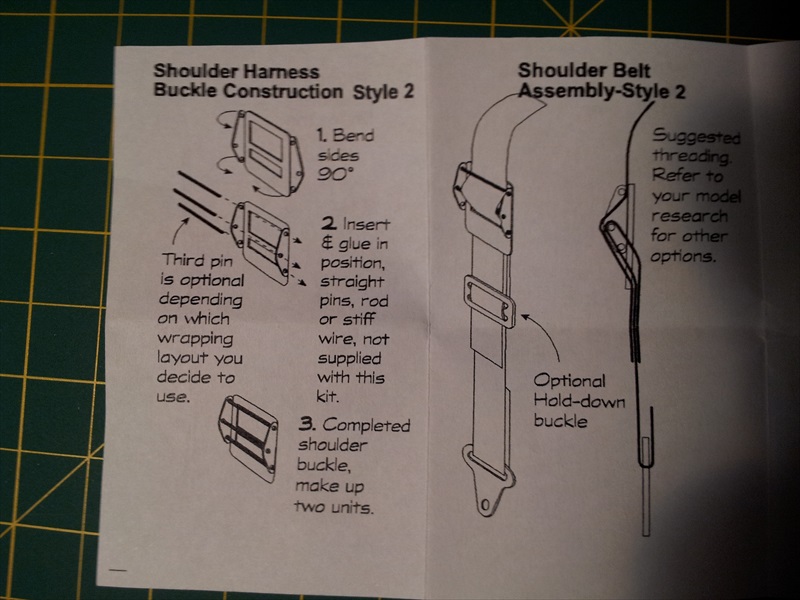
Hi guys, As some of you may know, I've been working on a custom 2001 Subaru Impreza WRC for a family member. Not only did I pick up the P/E kit for this Tamiya model (#24240), but I also purchased the P/E seat harness / seat-belt kit (both kits are from Scale Motorsport). I've opted to go the seat belt route even though I'm making this a stock / rally mash up. My problem is the buckles. I have three options, a shoulder harness, a shoulder belt, or a racing harness assembly. I was going to go the with the shoulder belt assembly but I've hit a wall. The assembly of the buckle calls for 3 pins to be inserted into the holes on the buckle. Of course, the pins aren't included and they don't document the gauge required. I've attached a few pictures for reference. In the first image, you can see the 3 holes on each side of the buckle. That's what I have to have the pins glue to, then the idea is you thread the belt through that. The 2nd two images are the instructions, and I'm wondering if I shouldn't do the shoulder harness assembly style one instead of style two which requires the 3 pins. Let's add to the mix that this is my first full P/E project. So I'm probably going to make mistakes, and style one looks easier to do. My question is, which style should I choose of the two? And if the answer is the easier one, just out of curiosity, how would some of you address the pins? I tried finding the smallest gauge wire I could at my local hobby shop but it was still a tad too big. Thanks for taking the time to read this, and I am thankful for any input! - schwack
-
Thanks everyone for the kind words! o-man, I'm building it as rally. It will have a stock exterior look to a degree, but it will have the hood latches etc. It will look more rally inside, with the roll cage, etc.
-
Hi All, This is my first post in On The Workbench. I have a couple other models I am working on, but I am very pleased with this one so far, for being a newbie. My younger brother used to own this car, but had to sell it after getting married (I guess this ride isn't ideal for infants). So, I'm building it for him. I've ordered a lot of custom parts, including custom wheels from Pegasus, decals from Fireball Modelworks, and Photo Etch trim and seat harness assemblies from Scale Motorsport. Please go easy on me, I really am new at this after a 30 year hiatus from building models as a kid, but I am loving every minute of my work. Here are some photos in progress. You'll notice the photo etch rotors, custom wheels and the work I've done on the chassis so far. The body is still not painted, just sanded and primed. This Tamiya kit came already pre-molded in blue, but my brother's ride was black, hence the preparation for the new paint job. I hope you all like it.
-
Hi all, I am in the middle of building a 01 Subaru WRC and am adding several custom aftermarket parts. One piece in particular is a P/E two set racing harness for the seats. The set comes with a rectangle of material used to cut out the seatbelts. I am looking for advice on how to best paint those straps. First, what kind of paint should I be using? Acrylic, lacquer or? One of my concerns is adding the photo etch pieces (the buckles, etc). I am worried that after cutting the straps and painting them, that sliding on the P/E buckles and fasteners that it will strip the paint. What I'd like to avoid is having to do any touch up after the P/E parts are fitted, as there might be the slightest difference in color / shading. Any advice the folks here at MCM could provide would be greatly appreciated!
-
Hi everyone, My current project is a 2001 Subaru Impreza WRC kit done by Tamiya. The kit comes with the body and trim all premolded in a blue color. I opted to change it to black as a gift for my brother (he used to own one). I've been able to find some P/E part kits (roll cage detail, wipers and harnesses which I can paint gold), but I am having difficulty finding gold decals for it. Is there a good resource for decals online somewhere that may have something for Subaru? Or perhaps gold decals for rally type cars? I really think the gold and black would stand out! Any help would be really appreciated!! schwack
-
Hi everyone, Just joined this forum after getting back into model building about 6 months ago. I built models when I was a kid, got out of it, and now I'm back into it at age 44. I'm really enjoying myself. For me right now, the reward is in the work, not so much the final product. The kits I've done so far include a 71 Mustang Mach 1, a 67 Mustang coupe, A Ferarri 599 GTO, and I'm currently working on a 01 Subaru Impreza WRC. I've been watching some of the Dr. Cranky vids on YouTube, and have a decent bench set up. I am still very much a novice and keep working on my patience. I hope to learn a lot from here and be a regular contributor. This seems like a very tight knit community, and I hope there's room for one more! Thanks to Model Cars mag for having this forum, and to the Admins for all the hard work they do. Thank you for giving me a place to hang out with other modelers! Cheers, schwack (aka Tim)