swede70
-
Posts
729 -
Joined
-
Last visited
4 Followers


Recent Profile Visitors


swede70's Achievements
MCM Ohana (6/6)
-
1968 RKE/JRT SCCA Trans Am Javelin
swede70 replied to swede70's topic in WIP: Other Racing: Road Racing, Land Speed Racers
Renewed Greetings... Seen would be further interior work with 1:18th ERTL '68 AMX-sourced chromed manual window winders and interior door latches transferring over, a GMP Penske Camaro CDI unit taking its place along the passenger's side forward footwell, and a shifter mount appearing on the transmission tunnel finished off with an ERTL AMX shift boot and GMP Hurst-design shifter. The roll cage has been more fully elaborated upon, the rear package shelf received work in the form of carved strengthening ribs and slightly recessed speaker cut out panels notice plugged here, while what holes exist across the shelf noticed in photos were carefully sited and subsequently drilled. Thanks... Mike K./Swede70
-
1968 RKE/JRT SCCA Trans Am Javelin
swede70 replied to swede70's topic in WIP: Other Racing: Road Racing, Land Speed Racers
Greetings... Slowly working up an appropriately contoured and detailed insert to incorporate into the back of the 3D-printed '68 Javelin to suggest the sans bumper appearance revealed below: As witnessed, working up to a reasoned shape in stages. Misjudging with width, width was gained back for introducing new material in the middle which allowed me to recontour each respective end. Misjudging the license plate cutout, further material was added to disguise another misstep. All the same, not a terrible start in relation to something that ought to lend unexpected value if done honestly enough. Thanks for your review of this project update post. Mike K./Swede70
-
1968 RKE/JRT SCCA Trans Am Javelin
swede70 replied to swede70's topic in WIP: Other Racing: Road Racing, Land Speed Racers
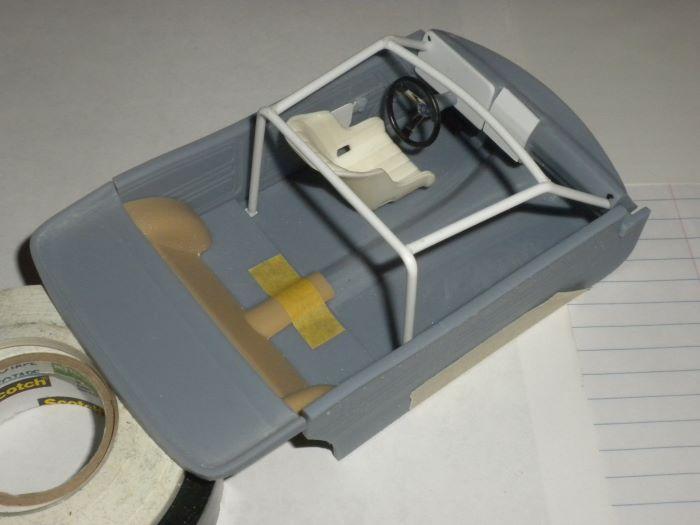
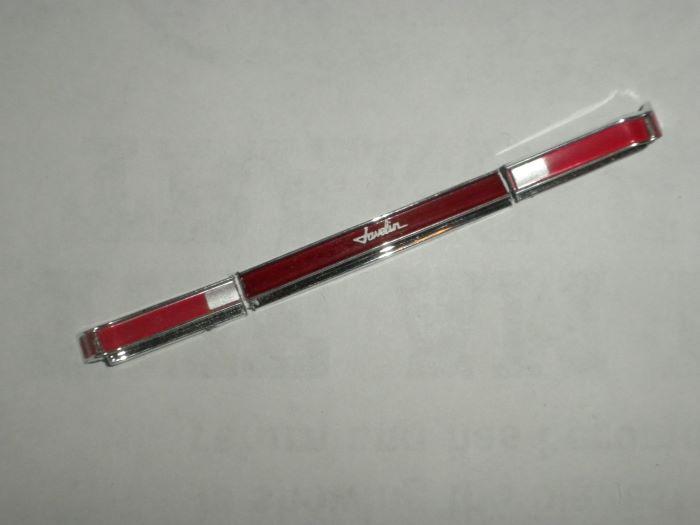
Greetings... Initial work on a roll cage for the 1:18th scale '68 RKE/JRT Javelin project - only a rudimentary four-point design at this stage. The tubes heading towards the front are splayed slightly, affording a specific appearance when viewed from the side... Just taped in place underneath the roof, but mostly sound for a quick mock up. A Raydot Talbot exterior rear view mirror suddenly appears... The splayed look again, although generally reflecting reality... The curvature of the ends into the dash will be worked up and added separately to the A-pillar roll cage bars given it's really hard to do multiple bends precisely where I'd wish with longer members... Some touch up work here, with the small vertical chromed strips situated at the corners not seen on the ERTL '68 AMX turn signal lenses (barely visible mind you) added here with paint. The cut lines were disguised with chrome paint, and in the main things appear orderly. Kind thanks for your review of this post. Mike K./Swede70
-
Still having to dig up old photos to illustrate such, some time ago I attempted to combine some Jo-Han rear spoiler elements to come up with a slightly better '70 Mark Donohue ducktail rear spoiler. On the Mark Donohue Trans-Am release, it seems they mastered the early season race spoiler that doesn't have the expected beveled keyhole to access the trunk lock cylinder, while as seen further up this thread, the base of the spoiler along the back is flat without any additional profile dipping down at the ends. The rear spoiler project rests in a box, I do on occasion resin cast my own stuff, while at some point I'll return to this mini-project given I'm clearly not the only one interested. Thanks...
-
Just a brief program note here! If one does or attempts the RKE wing (also employed on the 100 tri-color '70 Trans-Am special editions predating the Donohue ducktail spoiler and special engine block homologation special), the wing element has a slight vee almost in the style of a boomerang following the lines and design of the trunk lid and taillight cluster that comes to a slight point heading back. Material to do the wing in scale can be a challenge to find, although I found scale model helicopter blades featuring a uniform section and constant chord trimmed just-so work well. The mounts on the ends need to be scratch built to the best of one's ability but are not an impossible task. Thanks...
-
1968 RKE/JRT SCCA Trans Am Javelin
swede70 replied to swede70's topic in WIP: Other Racing: Road Racing, Land Speed Racers
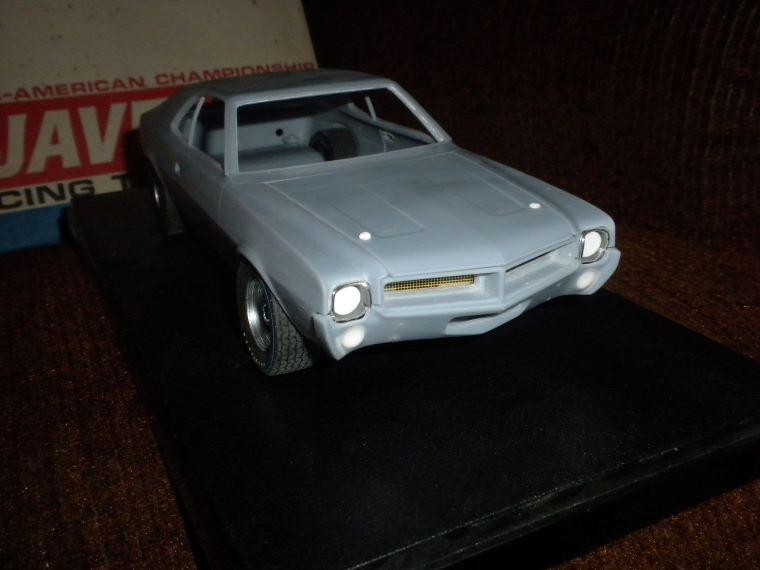
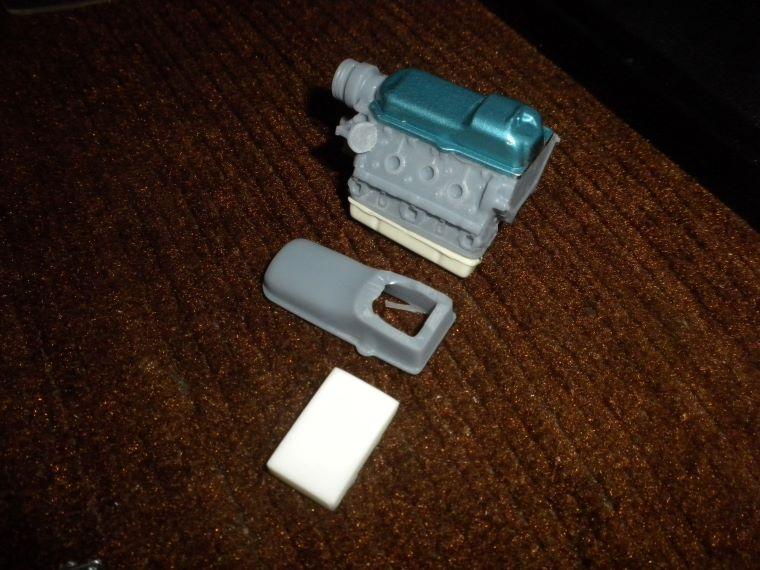
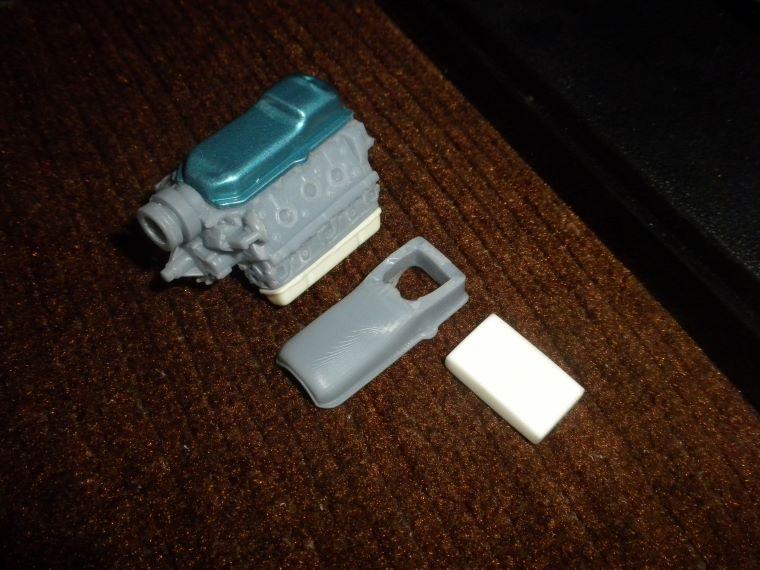
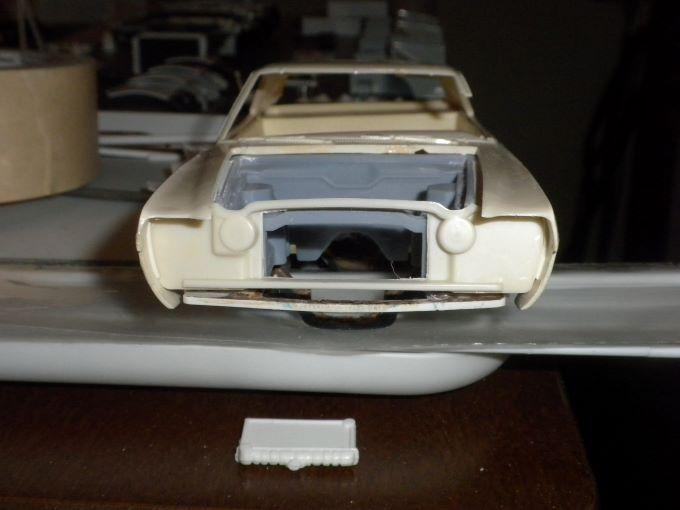
Greetings... Worried that I might ruin the body for aggressive work to slightly enlarge the headlamp/surrounding trim bezel openings to transfer the 1:18th ERTL '68 AMX assemblies (cut away from the bumper) to the 3D '68 Javelin, here I finally developed the nerve to try. Fill panels for the headlamps are resin items recycled from another same-scale project, while the material used to build up the 3D scan really behaves well and grinds away controllably for careful use of a Dremel (in this case a clone of such). ERTL finished the insides of their AMX headlamp bezels in a medium flat gray versus the desired semi gloss black, hence hoping to address matters to correct such soon. Still - not a terrible result for combining tools that may well not have meshed even for being the same ostensible scale. - Here would be a choice to blend ERTL plastic components/parts with the 3D rendering of the engine, with the ERTL oil pan quite a bit better than the as-delivered 3D print. No contest with regards to the block, cylinder heads and accessory drive, although no one would really make an argument that the 3D oil pan should be retained... The rendered in-place oil filter has been ground off even as the mount for such has been retained. The rectangular mass is intended for use as an extended sump formerly glued to the cut down 3D rendered pan as seen... The RKE/JRT '68 season effort witnessed different oil pans tried and employed, hence pondering which to go with before committing to altering the ERTL design adhered only with craft glue to the 3D long block. Kind thanks for your review of this post. Mike K./Swede70
-
1968 RKE/JRT SCCA Trans Am Javelin
swede70 replied to swede70's topic in WIP: Other Racing: Road Racing, Land Speed Racers
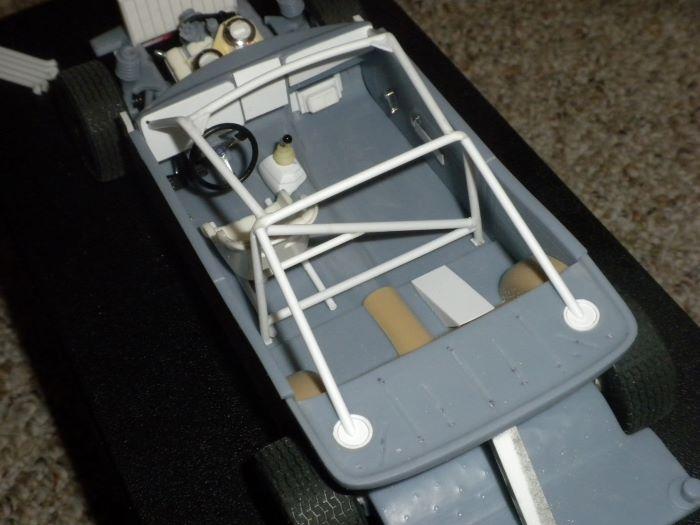
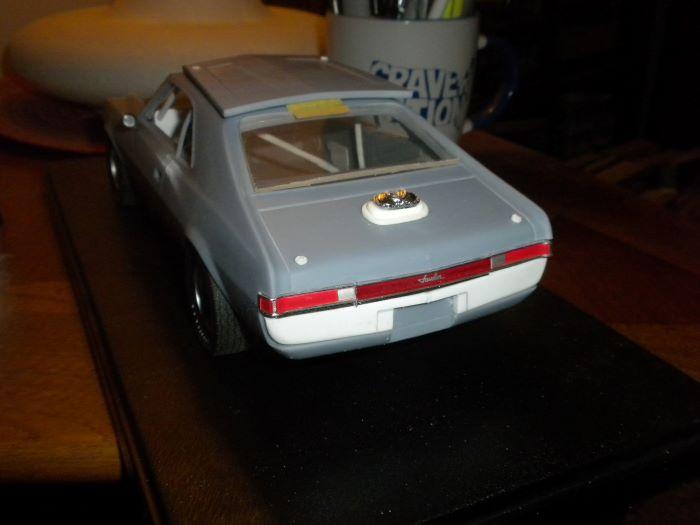
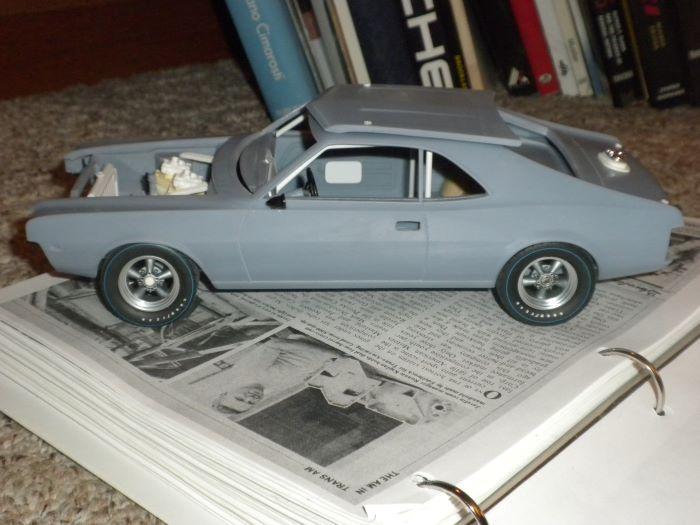
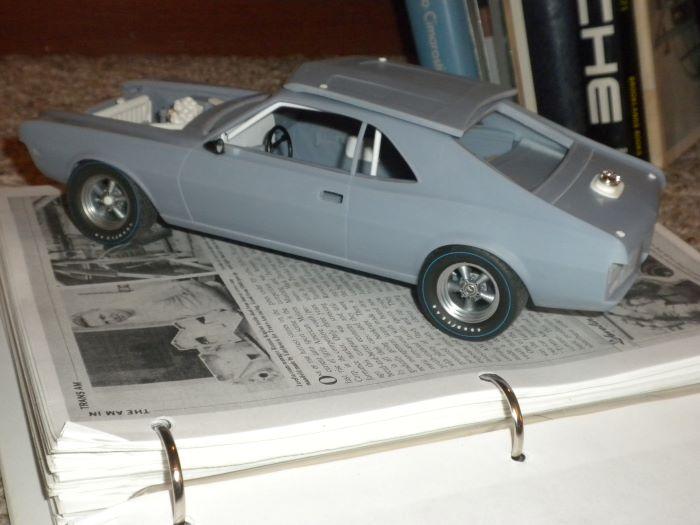
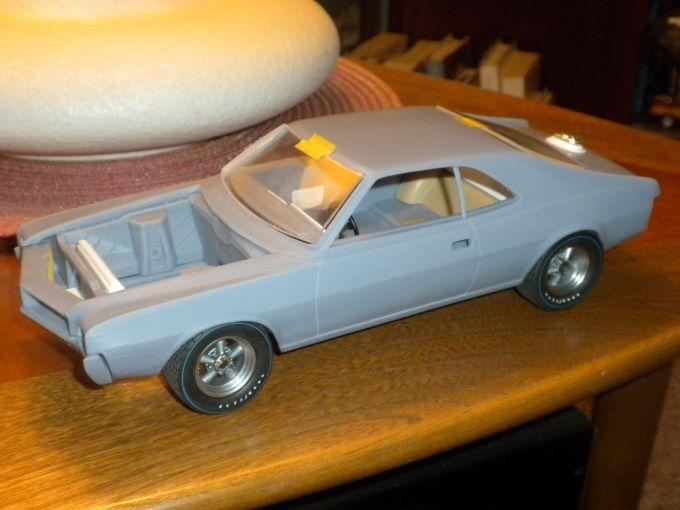
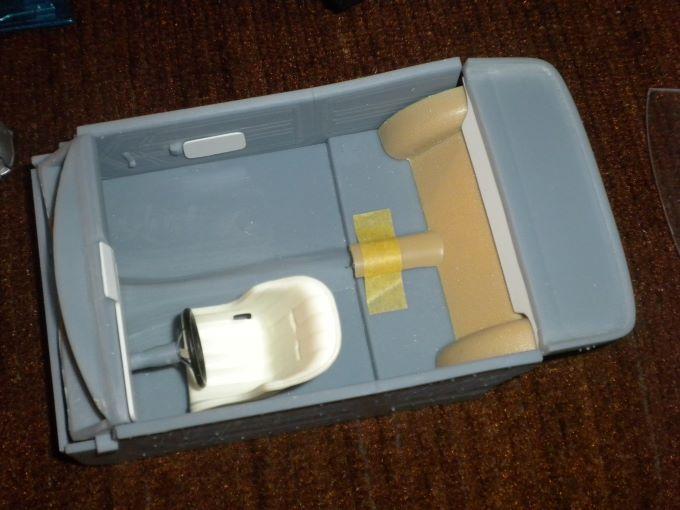
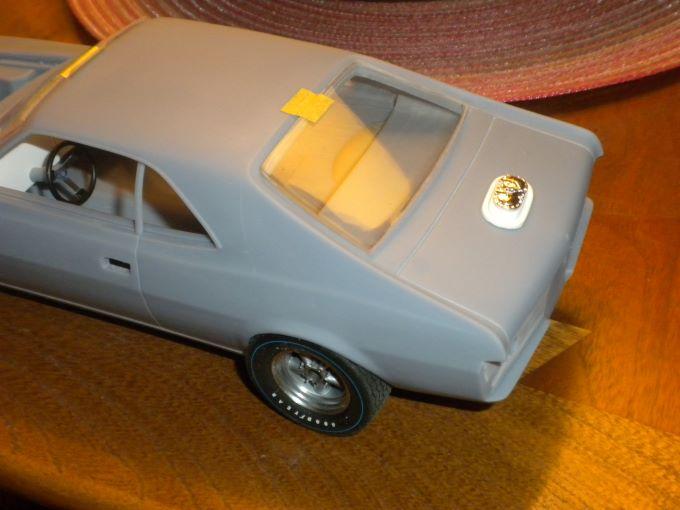
Greetings... Seen would be yet another Ronnie Kaplan Engineering/Javelin Racing Team project, this time in 1:18th scale, 3D rendered and printed. The material employed here as well as strengths and limitations of design offer up various challenges, although looking sounding enough at this stage. I do recommend grinding off all excess material that you may versus taking the route of razor saw cutting for in the main the resin employed is unyielding. This much related, with practice one can become quite adept at using something like a Dremel (or clone) followed up with careful use of jeweler's files to achieve what's necessary... An early concern centered around whether reasoned wheels and tires could be fit to the suspension/wheel backs rendered as unitary bits. Mulling matters, I decided to grind off the rear axle entire, eliminating the wheel backs provided, substituting in straight rod plastic for the axle with the hope of introducing in a 1:18th ERTL '68 AMX Model 20 rear end. The trunnion-style front suspension with wheel backs was afforded limited work consisting of grinding away the wheel backs and hubs entire leaving only a bare upright. Here I used solid plastic rod to match the rear employed as spindles (dropped a touch for this road racing application), whereas the wheels and tires are 1:18th GMP Penske Camaro issue. The wheel arch openings have been filed out slightly, with the bottom of the front fender opening profile expanded a bit in the style of the day to afford full lock/jounce/rebound clearance. The raised ribbed rocker trim has (mostly) been knocked down for deliberate sanding block/sandpaper effort to eliminate such. Odd, but the front windscreen is sourced from a 1:18th UT Models '95 9C1 Caprice police package release, here utilizing carefully cut down rear glass. Thus far things look o.k. The interior taking shape. The rendered in place floor mounted automatic transmission console has been ground and sanded away entire, the rear seat cushion similarly ground and filed away to vanish from sight, while a section of 1:18th ERTL '68 AMX interior profile introduced in and visible here helps to suggest a bare racing spec. The seat and steering wheels are GMP Penske Camaro sourced... Determined grinding removed the rendered in place single 4BBL intake plus carburetor, whereas what's made out would be mostly 1:18th ERTL '69 S/S AMX issue cross ram items with a scratch built lid and ERTL Authentics Ford Fairlane Thunderbolt carburetors. The radiator and oil cooler installations are slowly coming along, while the window profile tracings provided in the full kit are intelligent and very much appreciated... Rear view, with 1:18 ERTL '68 AMX rear 'glass' slowly being filed to shape and suit for overlaying the tracings provided to help me thoughtfully compare to my small inventory of spares. The as rendered extra window channels designed to presumably support vacuformed 'glass' were laboriously filed out, although unsure really just how close I can come and how I might fix the windows in place. The ERTL rear bumper mostly fits, although '68-season SCCA Trans-Am Javelins didn't run such... A modified and narrowed ERTL AMX taillight cluster (it's better than the rendered parts) awaits in the wings, while a Fred Cady Designs waterslide sheet allowed me to alter the 'AMX' identification upon it to read 'Javelin'. Thanks for your review of this post. Mike K./Swede 70
-
The Jo-Han '70 Mark Donohue Trans-Am Javelin release has the namesake rear spoiler, the '70 Jim Paschal NASCAR GT/annual kit release does not. The '71-'73 Jo-Han Javelin AMX releases have something similar but not an exact match to the aforementioned Mark Donohue kit part. Made out below would be a rehabbed BBO promo with the Donohue kit rear spoiler, flat across the base versus the '71 and later design corners which dip down a bit. Swede70/Mike K.
-
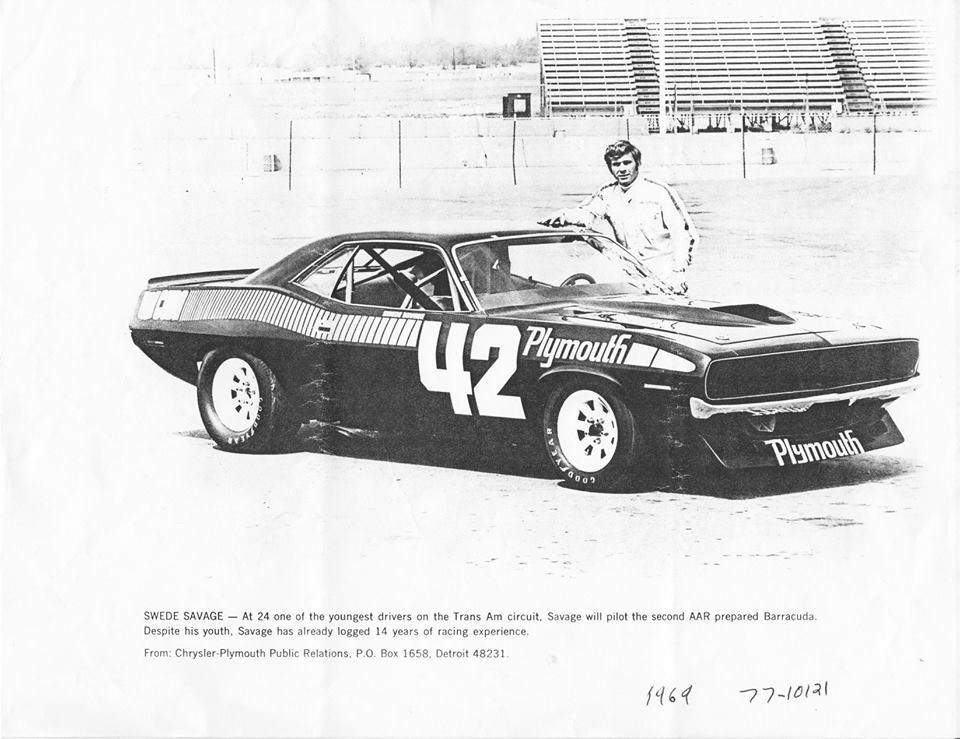
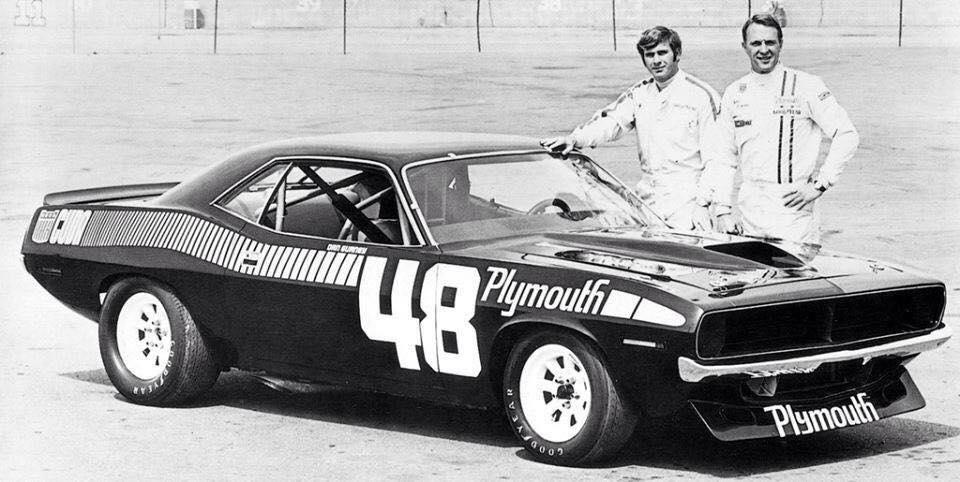
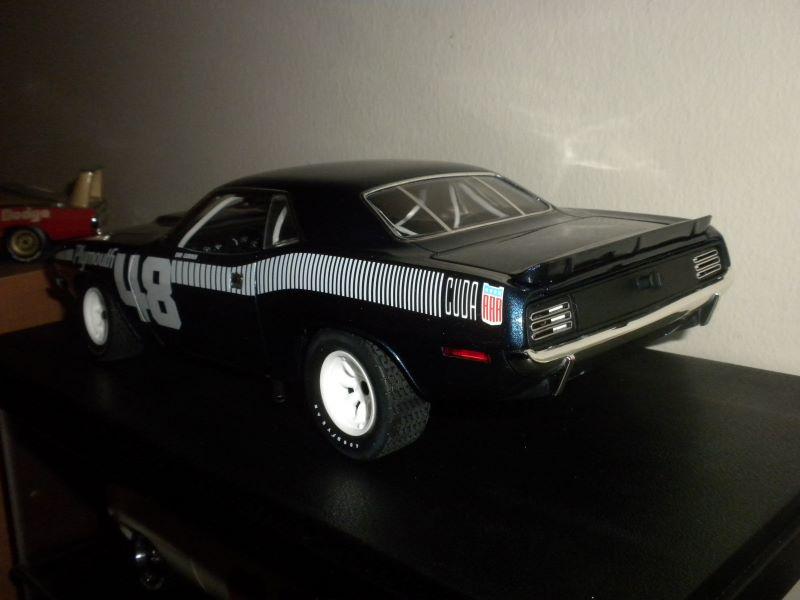
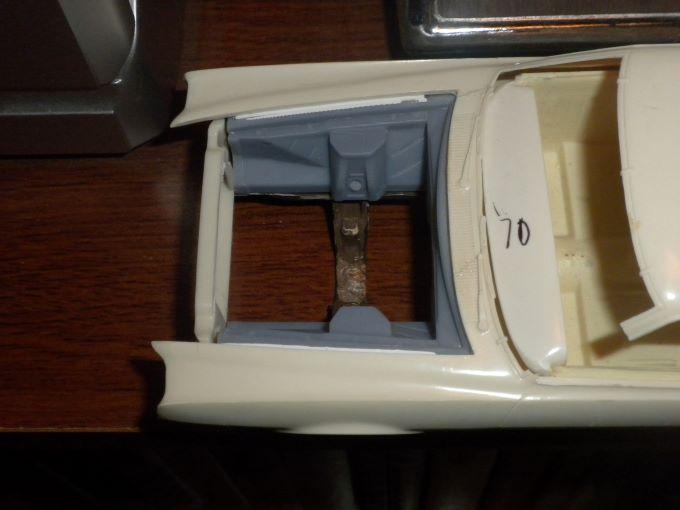
Swede Savage Trans Am AAR 'Cuda Hwy. 61 based project
swede70 replied to swede70's topic in Diecast Corner
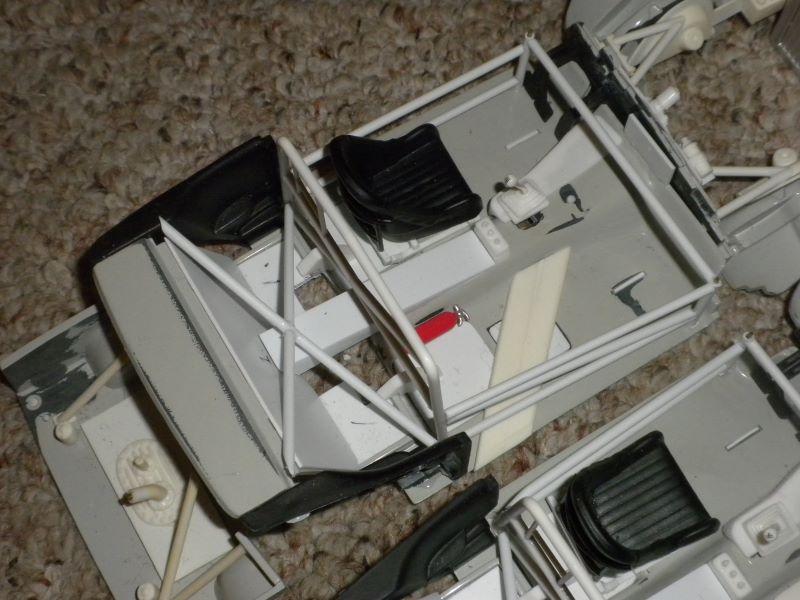
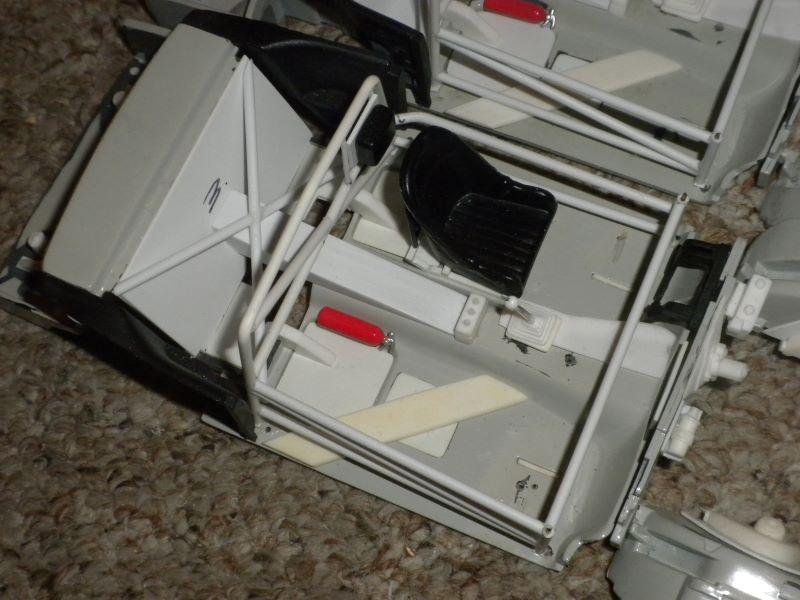
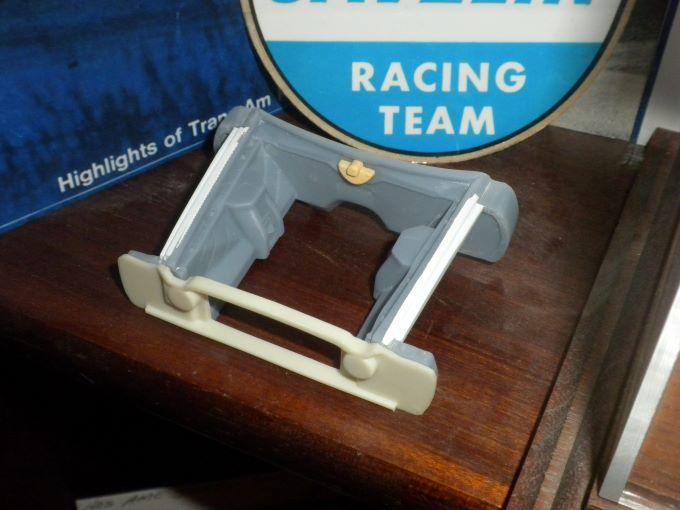
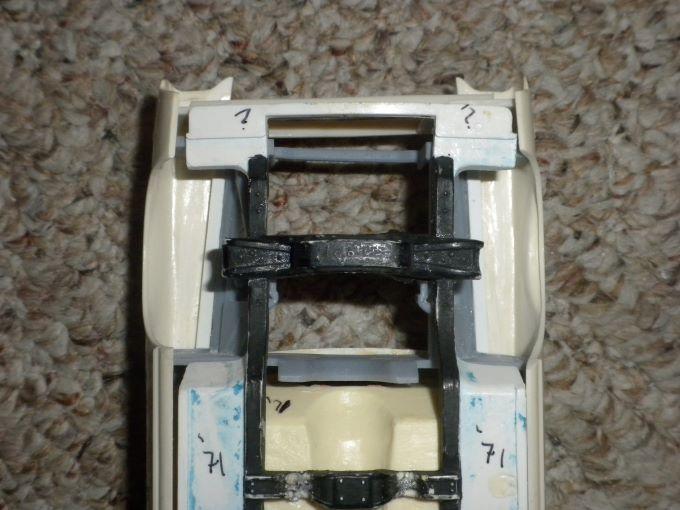
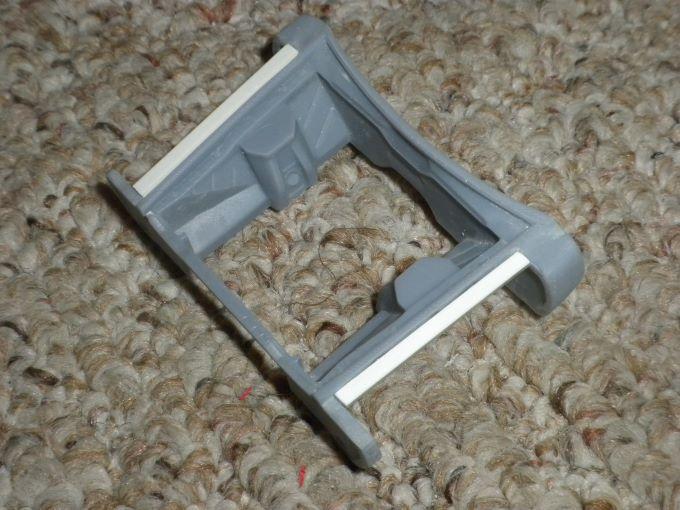
Greetings... Not much perhaps, but for the creation of a urethane mold to reproduce such a scratch built Chrysler E-body manual shifter platform/shifter linkage floor tunnel stamping (at least the shape of such) was completed, working well enough to produce clones. The whole interior constitutes something of a compromise given I'm unwilling to correct every last thing (i.e. in point of fact there should be no parcel shelf out back), although I'm proceeding ahead as though ACME might have dedicated more in the way of resources to better develop their limited SCCA Trans-Am retools largely based upon the existing tool as-witnessed. A lot done then, yet nevertheless worked up in observance of certain limits... Further noticed would be the X-shaped roll cage brace worked up to fit comfortably behind the main hoop of the Autodynamics Challenger interiors and atop the fabricated raised driveline tunnel structure to accommodate the lowered solid axle rear suspension with a differential predictably situated a bit higher up. Thanks... Mike K./Swede70
-
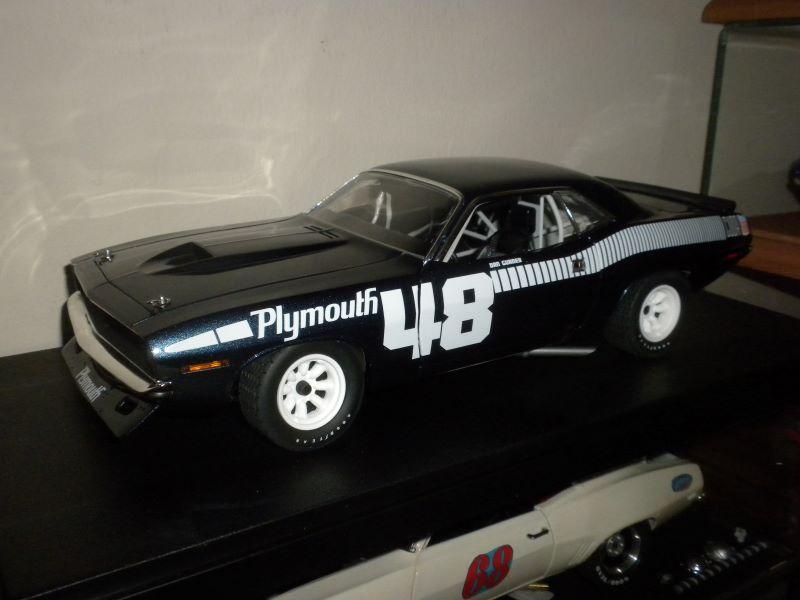
Swede Savage Trans Am AAR 'Cuda Hwy. 61 based project
swede70 replied to swede70's topic in Diecast Corner
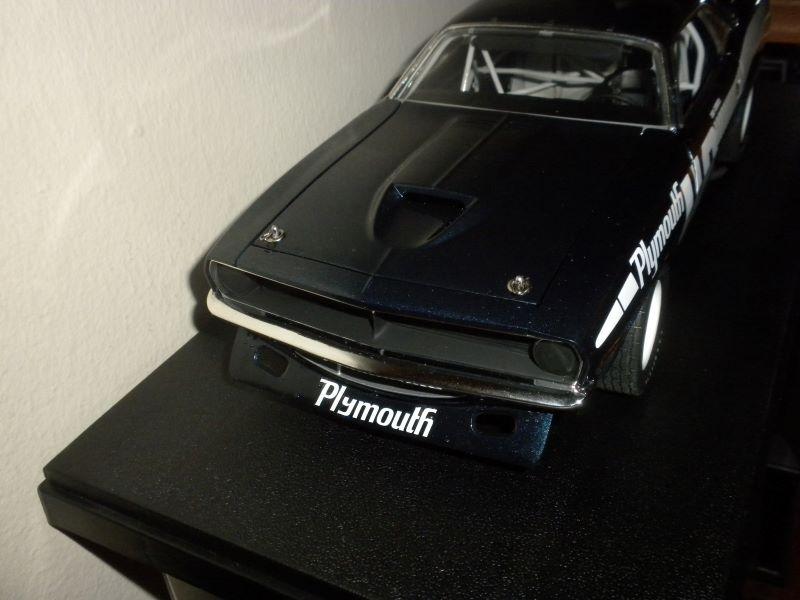
Greetings... For careful review of the press kit photos it was established that the 'Plymouth' font was larger than that seen on the actual racing cars when they competed. Further, to ensure that the lettering would fit inside the restricted space availed and yet look normal enough, note that the letter 'Y' was trimmed across the top, the character subsequently shoved up consistent with aligning everything situated lower down with the bottom edge of the spoiler. Pondering matters, I decided to employ the 1:25th Mike's Decals Gurney race AAR 'Cuda fender mounted 'Plymouth' scripts which are clear, bright and well-registered surely, while for discreet cutting and trimming it was possible to first chop up 'Pl' 'y' 'mouth' apart and reassemble matters more or less invisibly on front of the model. Odd that I'd never noticed the altered 'Y' on the spoiler before, although it seems just to have been a pre-season quirk related to what was then a preliminary livery. Not (yet) sensing anything was amiss with regards to the altered placement of the trimmed letter 'Y', here I tried to test the idea on a spare front valance/spoiler assembly. A bit space-challenged then... What would be a third attempt given spacing between the characters is tedious and may be misjudged. In sum, a nice upgrade and not that difficult, with removal of the tampo printed 'Plymouth' lettering atop a painted plastic spoiler surely not as hazardous an undertaking as I initially feared. Thanks for your review of this post... Mike K./Swede70
-
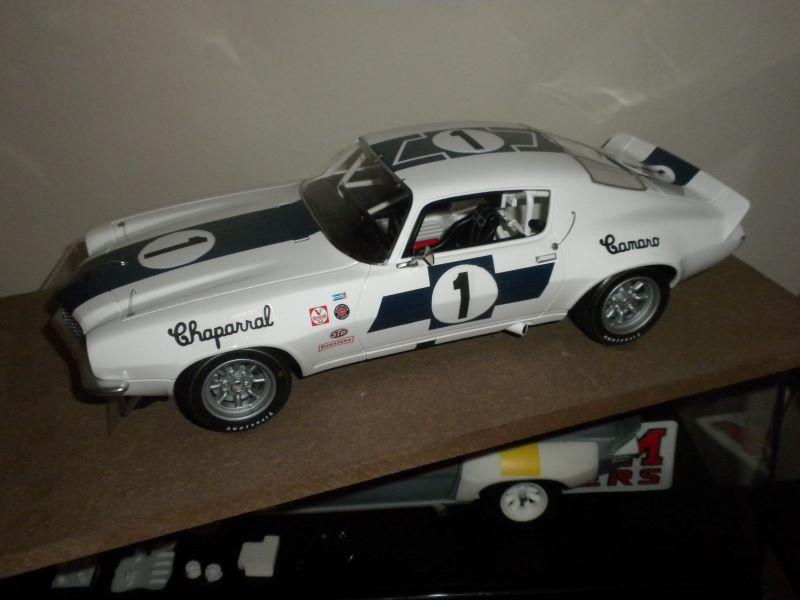
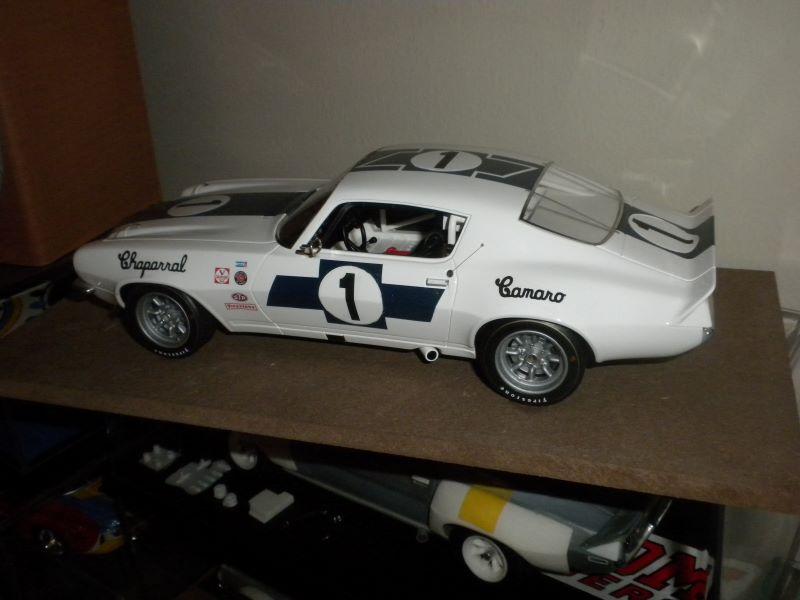
Greetings... Not so different this, but for pondering matters it seemed to me that the accessory decals on the 1:18th sealed resin Replicarz front fenders are a bit too tightly bunched (even without the Firestone bowtie previously added by myself), whereas for being factory tampo prints, some of the colors are shared across markings which usually telegraphs as a bit sterile when reviewed at a glance. Here I've washed out everything between the 'Chaparral' and door-situated roundel within the bowtie, then reapplied markings to suggest '70 Lime Rock, CT., mostly utilizing materials on hand drawn from different sources. Still not confident that I can cleanly remove the interior from the shell consistent with my wish to repaint the same light gray, nervous I'll inflict damage and render this example so much scrap. Very thick beads of urethane and adhesives unseen hold the same firmly to the thick resin body, whereas I'm worried for applying heat I might discolor and ruin the exterior paint finish. A desire exists to refinish the front and rear bumper with Revell's Chrom lacquer aerosol spray, although initial efforts to remove the front bumper achieved little, while it appears the body and rear bumper are cast as a single unit which makes efficient masking key. Likely too much risk for me in total then. Thanks... Swede70/Mike K.
-
Swede Savage Trans Am AAR 'Cuda Hwy. 61 based project
swede70 replied to swede70's topic in Diecast Corner
Greetings... Seen in brief would be a some light work performed to the 1:18th ACME Dan Gurney pilot car/press release '70 AAR 'Cuda, with distinct white strobe side stripe livery and numeral placement never run in competition. Doubtless something of a cash grab as ACME releases go, although I was very happily gifted this example by a friend maybe two years ago. Pre-season rollout of the then-new Barracuda at Riverside International Raceway with all involved projecting smiles to mark the moment. No spring loaded lug alignment/retention discs are seen on the Minilite wheels as of yet, no A-pillar mounted fresh air duct is noticed (also forthcoming), while early on it was naturally expected that both Dan Gurney and Swede Savage would contest every race across the 1970 SCCA Trans-Am series. - Concerning my limited effort, here the as-delivered wheels and tires from ACME have been replaced with a combination of old GMP Penske Trans-Am Camaro Goodyear Blue Streaks with fine blue line sidewall markings removed, the tires mated to hand cast resin Minilites representing a modification of the GMP '69 Penske Camaro tool for featuring what I hope would be perceived as better shaped spokes and better outer rim lip contour. Subject to further refinement to the extent of perhaps being trimmed shorter, the exhaust dumps were redone with brass tubing. The wheels plus tires seen were mated to the Hwy. 61/ACME E-body tool for use of 1:18th ERTL second generation Pontiac Firebird Trans Am wheel backs complete with the mounting system (basically a washer of sorts that spins within the wheel half facing back) that for modest effort (i.e. a round file was employed to open up the inner diameter of the washer) slips over the stock spindles front and rear to secure a reasoned press fit. Some material was shaved off the back of each of the aforementioned ERTL assemblies to adjust for track both front and rear, but in essence everything else was employed without modifications and sans glue. While the model won't soon roll off the shelf unannounced, for use of the more or less readily available ERTL parts, the wheels and tires displayed here still spin. Other light work would include the substitution of a stock interior rear view mirror for a hand cast resin Wink multiple element model fashioned long before, whereas the A-pillar mounted interior fresh air duct has been removed and discarded, the refueling inlet plus cap replaced with larger and better defined examples of each. Finishing up here, the tail panel trim was pulled off, the raised chrome ribs around each tail lamp unit slot masked, whereupon the whole assembly was resprayed matt black including the surrounding edge trim which is usually chrome plated as witnessed on stock Hwy. 61 and ACME-badged AAR 'Cuda releases. Kind thanks for your review of this leisurely multi-project update. Mike K./Swede70
-
1968 RKE/JRT SCCA Trans Am Javelin
swede70 replied to swede70's topic in WIP: Other Racing: Road Racing, Land Speed Racers
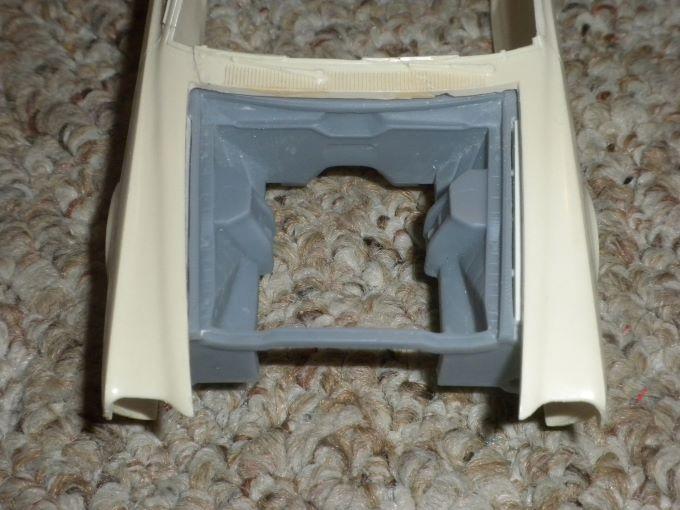
Very quick update... I decided to hack off the 3D-rendered radiator support consistent with just reemploying the standard Jo-Han iteration less radiator (the same of which was filed out/off). Not wishing to shorten the inner fender length given the material along the sides of the support could help 'stretch' the dimensions to fill the gap otherwise left for simply grinding mass from the front, I tried to disguise things for preserving the surface contour underneath even as the results appear a touch long for so-doing. . Notice how I left the radiator support structure outboard the visible under hood area to basically afford something solid to mount and align the standard kit item. Rounding things out and minor stuff, above a Jo-Han Javelin/AMX wiper motor was recovered from an older glue burned build and situated appropriately. Thanks... Swede70/Mike K.
-
1968 RKE/JRT SCCA Trans Am Javelin
swede70 replied to swede70's topic in WIP: Other Racing: Road Racing, Land Speed Racers
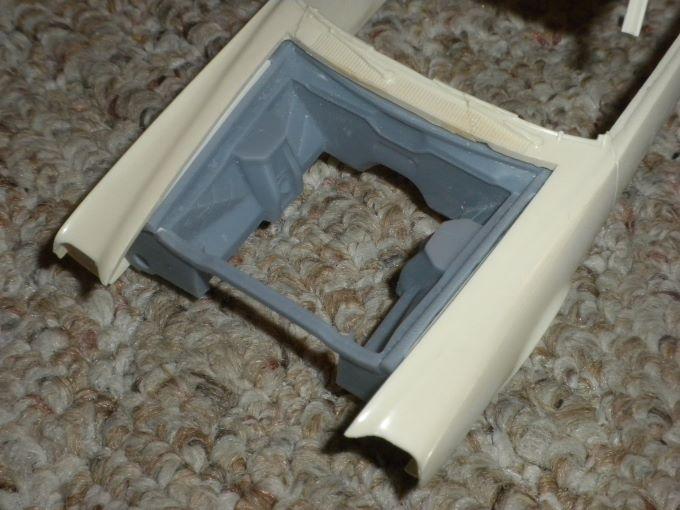
Indeed - I didn't. Thought was given to what might constitute a wish list of things desired if I ever decided to make the 3D design and print plunge independently, although (and as of yet) I've not crossed that decision threshold. Apparently a second/third generation AMC V8 is also available, although I doubt I'd save more than the short block and reach for other tools to flesh such out. We'll see... - Next up is/was to determine if the amalgamation of rendered under hood panels could/might live in peace with the Jo-Han interior/dash as well as the chassis casting plus standard radiator support should I wish to employ it. While I did further work to tighten the fit of the 3D printed material to shove it further up, in essence the inner fenders weren't trimmed to coexist with a junk chassis that simply had the half round wheel housings cut from it to come up with what's made out below. The base of the 3D radiator support required modest trimming, but the firewall was left wholly alone. Ignore the (very) random paint work and scruffy bits on view with regards to the mock up for only the worst subassemblies I have were harmed for experimenting thus. The white plastic inserts in the trough area were glued in, whatever gaps remained topside puttied and smoothed. I filed out a slight recess on either side of where each inner fender stamping would blend into the fender opening looking up and proceeded to deepen the same, while I also tried to replicate the slight curvature/radius of the panel, again with the intention of ensuring a tight fit. A late-issue Jo-Han radiator support has been filed to remove the stock radiator core from it, whereas the same has been temporarily fit into the standard Jo-Han sighting slots cast into the insides of each respective fender to see where I'd be were the decision taken to cut off the 3D rendered radiator support detail which I think I'll do. No interference is/was encountered with regards to the interior and dash fit, while the stock Jo-Han firewall (such as it is) doesn't really factor for the use of such is redundant. Maybe it would be good to steal the wiper motor detail from the Jo-Han original and add such here? Thinking too that additional detail might be added to the 3D printed inner fenders with reference to the 1:1 topic photos seen further up this thread. Pretty close with regards to where one would expect the front suspension to be relative to the suspension turrets. Other than cutting off the wheel housing detail, not much else was done to accommodate things as-seen. No wild surprises here either... Whereas this is about as funky as it gets underneath with nothing done to the 3D rendered firewall to fit in relative harmony to the Jo-Han chassis plate and interior bucket. Life proceeds then. Thanks for your review of this project update. Swede70/Mike K.
-
1968 RKE/JRT SCCA Trans Am Javelin
swede70 replied to swede70's topic in WIP: Other Racing: Road Racing, Land Speed Racers
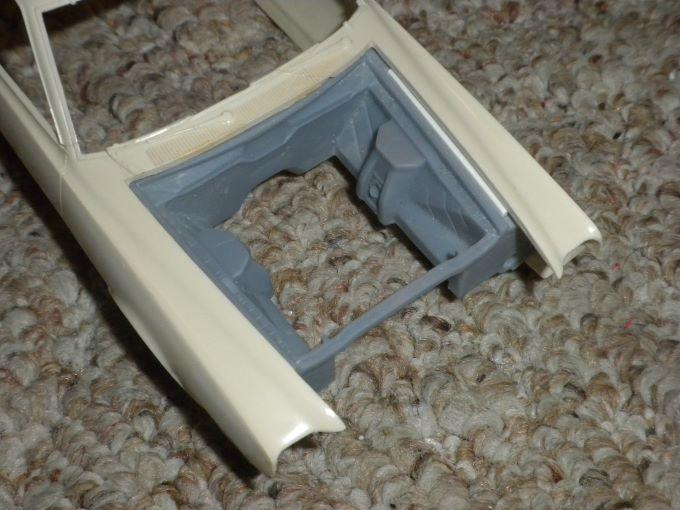
Greetings... Isolating the needed panels all as a piece didn't prove all that difficult for use of a razor saw and much aggressive filing. First effort this with new parts, hence others might perform the work with greater skill. In particular, it seems I filed too much material off of the tops of each inner fender stamping, leaving things too narrow and necessitating the introduction of some plastic to flesh out matters. Thanks... The major effort was cutting the part out, although the best fit was achieved for filing and shaping the radiator support and firewall to mate to the Jo-Han inner body contour... Swede70/Mike K.